Crochet capabilities allow the needlewoman not only to create unique things for the wardrobe, but also to make their home cozy and unique with knitted interior items: napkins, capes, stands, etc. We offer a master class "Air loop with a hook", which will help for beginners to prepare for the creative process and teach it to knit.
Preparing for knitting will take a little time. For the process of needlewoman you need a hook and yarn.
Knit your own hands with a hook for beginners
The main characteristic of the hook is its size (number), which is its diameter. The less the diameter of the hook, the graceful and air looks like the product. Beginner knitters are usually used tool from three to five milieters in diameter.
Hooks make from different materials. Thin - made of steel, more from alluminous and other alloy metals, and large - from bamboo.

In stores for needlework a huge selection of threads for every taste.

For crochet, almost any yarn will suit, but you need to take into account some features:
- The elasticity of the thread. Check the elasticity can be stretched. If the final product is different colors, the yarn should be from the same materials and the same elasticity, otherwise the product will be not attractive enough (except for those products that were originally thought of such);
- Paint resistance. The durability of the paint is simply checked: you need to take the end of the thread, moisten with water, put into white fabric and stroke the iron. For things that will often wear, you need a resistant color.
- Structure. The composition of yarn is taken into account in accordance with the final result. It is advisable to use the recommendations of the Scheme Source. Thread can be both genuine and artificial, both smooth and fluffy - it all depends on the product.
- Thickness. The yarn is selected for the size of the hook. Usually the size is written on the package, but you can check in a simple way: impose a thread on the hook. If part of the thread is or strongly deepened into the tool beard - it needs to be replaced. The thread should coincide with the size of the hook beard.
How to keep a hook newbie?
So, the needlewoman is ready for the creative process. It remains to learn how to keep the hook. In order to immediately take a tool, it is better to acquire it with a "flat" part that is close to the head of the hook.
Knitting hook can be kept two options: like a handle or like a knife during food. In this photo, it is shown how to keep the hook in two ways to:

In order to start knitting, you need to know some conditional notation:
- Working thread - thread coming from the tangle of yarn;
- Chain of air loops - several air loops in a row;
- The working loop is the last loop of a row, in which the hook will be laid.
Any knitting begins with the first loop. The first air loop to make enough easy:
- We take a thread, make it one turn around the index finger. We get a ring that carefully remove;
- In the resulting loop, we produce a hook;
- Capture a crochet working thread;
- Stretch the working thread through the loop;
- Tighten the ends of the loop obtained.
This method of creating the first air loop is the easiest. The loop must be tightened so that it does not "hang out", but also was not very tightened, but moved freely by hook.
The first loop is ready. Hold the hook with the right hand so that the end of the yarn and the working thread hung down.
- We put on the working thread on the index finger, clamp between the index and average. The end of the yarn hold the thumb;
- We produce a hook under the thread on the index finger, capture;
- Take the thread through the loop;
- Air loop ready.
Each knitter knows that the product can be how to come up with itself and take from any scheme. This is how the scheme for knitting a napkin crochet looks like:

The air loop on the diagram is indicated by a circle or oval. The chain of air loops is indicated by the chain of horizontal ovals interconnected.
With the help of a hook, needlewoman can be inventing details of clothes, interior and even knit toys, both souvenir and children.
Knitting the chains of air loops is quite simple, it is necessary to simply repeat the same actions.
Video on the topic
At the end of the article, we suggest you familiarize yourself with the selection of video times on how to knit air hinge hook:
As a rule, air loops are performed from the product fabric, but you can also use a corset or round cord, a hand. In addition, it is possible to manufacture air loops from threads. The main thing, to keep in mind that fasteners with threaded loops can only be used in cases if they are not exposed to a large load. In terms of strength, they are definitely inferior to traditional options, which means that with substantial pressure they can break.
You will need:
- Needles for manual sewing
- Yarn or cotton moulin in tone (wool better not to use)
Step 1
Secure the thread on the wrong one and describe the needle on the front side at the point of start of the loop. Sketch a loop on the finger (the loop should turn out to be quite large in order to go to it), and then enter the needle in the second point of the loop to the wrong point and display the face in the first point.
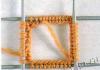
Step 2.

Repeat the last action 3-4 times so that the loop becomes thicker. Holding a product in the left hand, squeeze the thread on the index finger and swipe the needle through the loop, as in the photo.
Step 3.

Spend the needle through the second loop on the index finger, then remove your finger and tighten the thread, pushing the resulting "nodule" to the base of the loop.
Step 4.

Repeat the previous step, continuing to add all the new and new stitches until it is flushing to make each other enough tightly.
Having reached to the end, secure the thread from the inside.
Things made by their own hands possess not only the original type and uniqueness, but also keep warm hands and love. Knitting is known for its original techniques and the ability to make a fantasy with the help of a thread and a simple tool. Interesting air hinge crochet for beginners are performed easily, and with their help, even the standard knitting will turn into a stylish motive.
Basics for beginners
Without prior preparation, it is impossible to do needlework. Each technique requires its tools and materials, thanks to which it will turn out. Crochet for beginners are facing three whales:
- Tool selection.
- Selection of yarn.
- Pattern.
Even a light motive cannot be displayed without using a schematic indication and decryption of the necessary types of loops. From the type of hook depends the mating density, the type of pattern and the final result as a whole. For the fillery easy work and creating openwork elements, thin hooks will suit, allowing you to do neat loops. For plaids, warm winter sweaters and cozy capes will be used tools with a thick head to give the desired pomp with a link, make it the right stretch.
 The element can be used not only for mating, but also in embroidery. A tambourous hook helps to create real masterpieces on the canvas.
Selection of yarn points to the type of product and emphasizes the comfort of use. It will be inappropriate to create a cardigan for late autumn to use a thin cotton yarn. It also happens that for one thing it is necessary to combine several types of threads and make a combined option. In this case, the mating density is taken into account, and before starting work, it is necessary to produce the necessary measurements on the pattern so that all the product stretch the filaments is the same, and the transitions were not too sharp.
Learning to choose yarn is easy, it is better to start with simple combinations and one color palette, and over time you can go to more complex combinations.
For convenient crochet designation in circuits and symbols are served with decoding. Even a beginner master without any difficulty can cope with the instructions, make the desired motive.
Crochet types are directly dependent on the selected pattern. The description always indicates what loops work will be performed. Start the process is better from a simple pattern, especially if the technique is used for the first time. Next, you can connect complex motifs, because the partner work, the more interesting the result.
Types of loops
Ways to knitting the links can be divided into simple and complex. The difference between them is the technique of execution. Needlewomen need to learn to recruit and knit simple items, as it is from them in the future and a more complex part will be.
The main link in the knitting crochet is an air loop: any work begins with it, regardless of the level of complexity. Based on this element, other links are created. It is done simply: it has been hooking, then the thread is thrown on it and stretches. Element is ready. To penetrate the loop without intense stretch of threads so that the pattern does not delay too much.
 A column without a Caida is performed using the introduction of a hook in the air loop chain. Then you should pull out a new loop, press the thread and penetrate two for the reception. Visually element is able to expand the pattern.
The semi-sololbik with an attachment will be knitted by the product in the air loop and tier three parts into one link. Similarly, the column with Nakud is performed. For this, there are three loops in two receptions. Popular item is considered in Pineapple Pattern.
Pico is pronounced with the help of three air elements, then the hook is introduced to the beginning and the column is done without a nakid.
The connecting component is performed for switching to a new element. For this, the air loop is extended through the base of the chain, the thread is pulled out - and the process can be continued.
More complex options and cuddling basics for beginners in pictures are performed easier than with the usual description of the scheme. Also, the videos will also be video tutorials in which you can look at all conditions for creating a beautiful mating.
Knitting in a circle
Some works require seamless fabric, creating which can be used with this technique. It is easy to perform work, weaving occurs according to the scheme, but besides the main motives, there is a mirror image, so that the element can be repeated, and the product was symmetrical. Transitions to mirror rows occur using connecting columns. Their execution is simple: as a column without a nakid, but in one acceptance. At the same time, the thread should not be very stretched so that there is no savory and deformation of the pattern.
To create a beautiful sweater or tunic, even for some napkins and other components of the decor, you may need to dry and expand the canvas. An element is performed with adding or removing unnecessary loops.
 To expand the operation, additional parts and columns with Nakid are pronounced from one base.. It is important to take into account the scheme and not to do unnecessary links so that the elements are not discharged from the total row and did not look ugly. The principle of surcharge in one loop is created by such patterns as "shell" or "fan".
To narrow the motive, weaving technique with a total vertex. It is necessary to start such a mating in advance so that the desired narrowing goes in the next rows. For the procedure on the hook, two loops are left instead of one. The next column is performed in the next base link. At the end of the loops are pronounced together, and one air element is made. Master advise to perform a narrowing strictly according to the scheme so that the pattern does not turn. If this is a combination combination of different elements, the process of narrowing should be divided into two schemes and perform both from one part and on the other.
Reading schemes
An important stage of work on creating a knitted product. This requires not only an understanding of the principle of the work of the main loops, but also the ability to decipher the elements of the creation of the circuit. Most of the descriptions indicate the conditional notation by which the reading is performed. But sometimes only schemes are offered, without additional decoding. Beginner needlewomen are better to select simple patterns with additional decoding, so that there are difficulties in the process of work.
 Rapport in the diagram is indicated as a constantly repeating pattern element. It is distinguished by different color or make the designation in the form of stars or points. The edge loops, which in the future become part of the seam, are also marked by other elements, and there are no information about them in the conventional notation. It also happens that the extreme element indicated only in the initial row of the scheme, and then it is not. Nevertheless, the link is necessarily pronounced in each row: without this, the work will look unfinished.
To perform the work, measurements and computations are required. To determine the density of mating and stretching threads, a group of motifs is presented and measured in centimeters. This will help perverse the number of loops for a specific size. Next, a practical verification is performed:
- Washing products.
- Drying.
- Accounting for molting and yarn features.
- Combinations of threads.
After the sample of mating is performed, you can start to wash. It is important because the yarn may behave in different ways. If woolen threads are taken as the basis, then in most cases the product will sit, even with delicate washing mode. After the trial slice is dry, repeated measurements are made, and the difference in the amount of loops is taken into account when creating a holistic pattern.
 In the process of work, be sure to keep hands properly so that the threads do not twist and the desired tension was created. Some craftsmen tighten the yarn more flutter through two loops, pointing to the convenience of equipment and speed. But even such a manipulation can curb the scheme and make the pattern not so beautiful and perfect. In any case, with any types of elements, the tension should be the same and accurate.
If you need to combine several types of yarn in one product, then it is necessary to calculate the number of loops. The sample is confused by various threads and the hinges are made, which are necessary for the same result. Then the difference is included in the mating process with these threads and, thus, the result will be symmetrical.
Knitted products can be an interesting image supplement and emphasize the originality of the style. It should be understood that manual work should be neat and implemented schematically correctly, only then the thing will be beautiful.
ATTENTION, only today!
We begin a series of crochet lessons, of which you will learn how to knit the main elements: aerial loops And chains, semi-solids, columns without Caida, columns with Nakud, etc.
In this article, we will look at how to keep a hook, working thread, how to tie an initial loop and a chain of air loops. At the end of the article, look at the video tutorial.
How to keep the hook.
The hook can be kept in two ways: as a pencil
or as a table knife.

Use the method that seems more convenient to you. I usually hold as a pencil, but when the fingers get tired, I change the position.
How to tie an initial loop.
Before proceeding to knitting and set of loops, we need to make an initial loop, or rather the node.
We fold the thread of the loop,

we throw this loop on the hook so that the working thread is on the index finger, while the tail of the threads hold the large and middle fingers,

crochet capture thread

and stretch it through this loop, tighten the node.

The hook will be inside the loop. So we tied the initial loop.
How to tie air loops.
We make the initial loop (node) as described above, grab the work thread

and pull it through the initial loop, we have the first air loop. (V.P.)

To obtain subsequent loops, perform the same actions. Capture a crochet working thread

and stretch it through the air loop.

So we have a chain, it is knitting such a length that is required to obtain the width of the product that we need. When counting the number of loops each air loop It is considered one loop, the loop on the hook and the initial loop (node) are not taken into account.

A chain of air loops forms the basis for knitting the first row, but it is not considered a number. This looks like a chain of 10 air loops on the diagram.
A chain of air loops need to knit freely, loops do not delay.
How to keep thread.
If the hook is in the right hand, the receipt of the working thread is controlled by the left hand. It is necessary that the thread is evenly stretched. Put the thread to the index finger of the left hand, at the same time pushing it with a ring finger and mezinets. When knitting a chain from air loops, we hold the larger and middle fingers.

If you want to receive fresh articles, lessons and master classes from the site site on your mailbox, then enter your name and e-mail form below. As soon as a new post is added to the site, you will learn about it first!
Friends, any knitting begins with a loop. Crochet no exception. To start knitting any crochet pattern, you must first score a loop for it, and for this you just need to know how it is done. The main technique of crochet is an air loop and a chain of air loops. Without them, it is impossible to knit any pattern in principle. Therefore, let's know the first thing to know how to knit air hinge and see for what, how and where these hinges and chains are used.
To work, we will need:
- Any yarn. But it is better if the thread is smooth, not very thin and light color. So just more convenient and easier. For example, it's perfectly suitable for learning crumb yarn
- Hook. I am so far I will not give you tips on how to choose a hook ... This is a big and not quite an unequivocal theme for a separate conversation ... Just read the recommendations on the label of your chosen yarn and use them. For the "Kroch" string, the hooks №№ 3 or 4 are well suited
So ... Let's go to practice
Take a hook in your hand. How to take? Yes, as you comfortable! You can, like a ball handle or pencil, and you can, as a spoonful of kids in infancy, are kept or, like a knife. By the way, about this, a lot of disputes in the network, they say, how to keep the hook? ... ...
Attention! Answer!
It is necessary to keep the hook so that you were comfortable and comfortable - and this is the only true way.
For example, I keep this tool in different ways ...
That's the way, then the Syak - it all depends on what and from what threads I knit ... By the way, it often happens that in the process of knitting the same product I change the hook capture, just for the convenience ...
Therefore, try to keep in different ways and be sure to find the option that is suitable for you.
How to knit air hinge hook - guide to action for beginners and interests
- Take the right handle hook, in the left end of the thread from the tangle
Attention! Just remember ... The thread coming from the tangle, in knitting is called the working thread

For your information! The first loop, which we just tied up is just the beginning of knitting, it is not taken into account (do not consider) when counting the number of loops ... i.e. Tied and forgotten ... We begin to count with the next loop.

How to knit air hook air loops, I hope that you understand ... We continue further ...

For example, there were 10 loops, then a chain of ten loops.
Check for training 50 loops, i.e. Repeat the action described above 50 times and you will have a chain of 50 VP (air loops). Optionally, you can also associate ... 
- To "close" or complete the knitting is enough to make another hook air loop, but pull it out more authentic than usual, cut and tighten the tip ... By the way, we will use this closing reception to end the crochet and everywhere.
If you need to see clearly, how to knit air hinge hook, then this video to help you :)
As indicated by air loops in crochet schemes
It is no secret that a significant part of the needlewomen when knitting with crochet uses schemes ...
If you want to thoroughly learn crochet, then learn to read the schemes are simply necessary ...
Each element of knitting corresponds to a certain conditional designation, and it happens that not one ...
For example, air loops and chains of them, which we entered today, in the form of points, arcs, circles (both hollow and painted) or small ovals (as well as hollow and painted)
Let's see examples:
- Points, small mugs, ovals in the diagram - these are simple air loops (chains) or luggage loops - they need to be considered before the start of knitting, if, of course, they are no longer counted by the author


What is used air hinges in crochet
Friends, if you searched for information on the topic, how to knit air loops with crochet, it is quite logical to assume that you need it for some reason.
For example, you want to associate something, and we have already said that any product, be it clothing, toy, napkin, a simple pattern of the pattern, or something else, hooked begins with air loops ...
Epilogue
Friends, I finish this ...
Today, we figured out how to knit air hinges with a hook, tied the chain from air loops, considered how and where these essential loops are used and how they are designated in the schemes.
In the near future, let's start acquaintance with other, equally important, elements - various columns.