If you want to make a small ladybug, which will be convenient to attach to the railing, veranda boards, or "plant" on a decorative fence, you will need:
- two plastic bottles of any color;
- acrylic or spray paints (black, red and white);
- antennae wire;
- reliable glue or construction stapler.
1. Cut three semicircles out of plastic bottles - two smaller and one larger. On the latter, you need to save the cork (i.e. it will be the top of the bottle that grips the neck).
2. Paint them with paints - the larger one is black (with the cork), and the two small ones are red. Draw black spots on the red ones, which will play the role of wings. You can also make a ladybug of the "reverse" color - with black wings and red spots, such insects are also found in nature.
Draw two eyes on the cork with white paint.
3. Unscrew the plug, put two pieces of wire inside and tighten the plug, making sure that the "antennae" remain in one specific place (it is better if it is the lower part of the plug, close to the base - so they will not prick anyone even by accident).
4. Attach the wings to the body with glue or stapler. The wings should start at the very head, i.e. traffic jams. They can be made closed, but a ladybug, as if about to take off, will look more effective, so place them at an angle to each other with a connection point near the cork.
A small ladybug from a plastic bottle is ready! Now attach it with glue or wire (the second part of the antennae, which are now inside the body) wherever you want.
Good afternoon, dear needlewomen!
How to keep your child busy? Engage in creativity with him, make a do-it-yourself ladybug craft with him. This will help the development of fantasy, imagination and hard work. Your child will have a lot of fun doing something with you with his own hands.
What craft to do with a child in kindergarten? You can make a family of hedgehogs from plasticine and seeds, mushrooms from bottles, and in this lesson we will look at how to make a craft - a cheerful family of ladybugs from plastic bottles. You can make a craft in a kindergarten with a group of children. It is very exciting. Allows you to study colors by painting insects, improve arithmetic by drawing dots on the back. The author of the master class "Ladybug from a plastic bottle" Video channel on Youtube Handmade Crafts.
Craft "Ladybug" from a bottle with your own hands
For crafts from plastic bottles with our own hands, we will need the bottoms of bottles of different sizes, how many bottoms you cut off, so many Ladybirds you will get.
We paint the bottoms of the bottles with paints from the inside in different colors.
Red, red, blue - choose any for yourself!
We dry, we wait until the blanks for crafts in the kindergarten dry up.
We take foam balls, form the head of a ladybug out of them, make a notch where the head will be attached to the bottle.
We string the head on a toothpick, paint it black.
We form antennae from a plastic fork.
We glue the heads to the body of our Ladybug.
We glue the beads, or better the artificial eyes, with hot glue. With sharp scissors we make holes on the head for the antennae,
We fill them with hot glue, stick in the antennae.
Draw black dots on ladybirds. Do you know what the number of points on a ladybug means? Age? But no! Do not mislead the children, explain right away that the dots on the back of the ladybirds mean that they belong to a certain species, because there are more than 1000 different species of ladybirds (Latin Coccinellidae) in the world. And, by the way, not only red!;)
Our craft for kindergarten is ready. Create with children, engage children, teach, develop! Who, if not you, can make a fun bottle craft with them?
Also watch the video on how to make jumping frogs from a plastic bottle.
How to make a craft "Frogs" video:
Text prepared by: Veronica
Many items that we consider unnecessary in everyday life can be useful for creativity. The most common plastic containers will be a suitable basis for bright products. With simple manipulations, you can create toys, pictures, garden figures for landscaping, flower pots and crafts in the shape of animals.
Crafts from plastic bottles for the garden and vegetable garden
You can easily decorate your backyards using crafts from plastic bottles for the garden. It will not be difficult to design such figures, you just need to apply your imagination. With them, the site will acquire originality and brightness. You can connect children to work: they will like to create beautiful, interesting figures from simple materials that are stored in every home.
How to make a palm tree
To form a handicraft from plastic bottles with your own hands in the form of a palm tree, you will need:
- brown containers - 10-15 pcs.;
- awl or drill;
- green plastic vessels - 3-4 pcs.;
- sharp scissors;
- a rod of metal or willow.
- Bottles with a capacity of one and a half liters must be washed, stickers and cap rings must be removed from them.
- Form the leaves of a tree from a green container. To make them lush and long, cut the bottom as low as possible.
- Cut the bottle lengthwise into 3 equal parts to the neck. Fring the sides of each sheet you get. Form the cuts closer to each other, then the crown of the palm tree will be more beautiful.
- Leave 1–2 cm in the center of the leaf.To make the vegetation look realistic, place their central part under the candle, but not too close so that the green part does not smoke.
- Move on to creating the trunk. It must be formed from a brown container. Cut the bottom at a height of 10-15 cm.
- Cut each part along the edge with cloves, bend them to the outside.
- Create holes in the center of the barrel blanks with a drill or hot awl.
- Start assembling the palm tree. To do this, stick a rod of metal or wood into the ground. On it, assemble the structure of the barrel from brown parts, inserting them inside each other.
- The crown of the tree is fixed as follows:
- leave the lid in the last green blank;
- make a hole in it;
- put the resulting part on top, it will press the lower sheet plates.
Flowers

You can make products from plastic bottles in the shape of flowers using the following materials:
- plastic containers;
- marker;
- scissors;
- lighters.
How to make crafts from plastic bottles with your own hands:
- Using a marker, draw outlines of flowers on the surface of the bottles. To make them look voluminous, do it from the bottom. Cut the flower blanks along the lines.
- Bend each petal to one side. Shape using a lighter.
- Connect the blanks by placing them in each other. For bonding, you can use wire, glue or heat plastic.
- Decorate the core with beads or a finished plastic flower.
- Using this idea, you can create different flowers: lilies of the valley, chamomile, times. Create an entire flower bed in your summer cottage by enclosing artificial plants with a car tire.
Swan for a summer residence

Crafts from plastic bottles for the playground are suitable for installation in your garden. Make a beautiful swan using materials:
- plastic bottle (five-liter);
- wire-based hose;
- white half-liter bottles;
- wire;
- paint;
- scissors;
- a candle;
- marker.
Instructions on how to form a craft:
- Take a five-liter container and mark the shape of the bird's body on it with a marker. The contours should look like a boat, and the neck of the base should not be cut off. Cut the plastic along the line.
- A swan's neck is formed when a hose is placed in the neck.
- Form bird feathers from milk containers. Remove the necks and bottoms, and cut the remaining material into pieces to get feathering, give each part a fringe, melt with a candle. Take 2 feathers each, tying them together with wire. Attach to the torso using glue.
- Leave the rest of the small bottles to shape the neck. Cut off their bottom, start stringing on the hose. Create the bird's head using the top of the white vessel. Create holes in the container and hose on both sides. Connect the 2 parts with wire, screw the cover.
- For the beak, use caps from bath products. Cut in half and glue to the lid. Color in the beak and draw the eyes.

You can prepare Christmas tree decorations from the following set:
- glue "Moment Crystal";
- liter plastic bottle;
- tapes;
- scissors;
- plastic beads on a thread.
Instructions:
- Divide the bottle into 4 rings 5 \u200b\u200bmm wide. Coat each one with glue, let it dry a little.
- Place the pieces of beads on the adhesive surface so that there are gaps for assembly at the top and bottom of the ring.
- After drying, connect the rings by inserting one into the other.
- Tie a thin ribbon to the top of the resulting ball to create a loop. Hide the ugly knot by decorating with a bow from a thicker ribbon.
Crafts from plastic bottles for kindergarten
Kids in kindergarten are given a lot of creativity. The products are unusual and bright, and the process of joint work will captivate children and adults. However, sometimes parents have to puzzle over what kind of craft to do with the child in kindergarten. Plastic bottles are a simple solution. This material is easy to find and use because it freely takes any shape.
Butterflies

To make a butterfly, a child will need:
- marker;
- plastic bottle;
- paints;
- scissors.
Step-by-step instructions for creating crafts from plastic bottles:
- Find a flat part of the container, cut out a cylinder. Cut the resulting shape in half.
- Draw a butterfly on the resulting part, cut it along the contour.
- Curl the wings for a natural look.
- You can color and decorate the butterfly as you wish.
- They can be used to decorate an apartment or street decor elements, for example, a weather vane, railings, flower beds.
Ladybug

Required materials:
- small plastic containers;
- chestnuts or beads;
- glue;
- scissors;
- marker;
- acrylic paints;
- wire.
How to make a craft from plastic bottles with your own hands:
- First, make the torso of the ladybug. It will turn out if you cut off the bottom of the bottle and take it as a base.
- To make it look similar, paint the part with paint and draw black circles with a marker.
- Glue a chestnut or a large bead to the body to create a head. Draw eyes on it.
- Make the antennae out of wire, gluing or sticking them into the head blank.
- Other insects can be made using this scheme, for example, a bee.
DIY plastic vase

Materials to help you decorate the original vase:
- a vessel of the required volume;
- scissors;
- stationery knife;
- glue;
- magazine.
A method of making crafts from plastic bottles with your own hands:
- Cut the container to the height you need. Roll the bright pages of the magazine into tubes with a diameter of 0.1 cm. Attach them to the base of the future vase, cut off just above the neck.
- Wrap the cut bottle with paper and glue.
- Glue the tubes around the perimeter of the future vase so that each is tightly glued to the adjacent one.
Crafts from bottle caps

Alphabet fridge magnets can be obtained using caps and other materials. Take:
- traffic jams;
- small magnets;
- double-sided tape (glue);
- medical alcohol;
- colored paper;
- felt-tip pens.
How to do:
- Degrease the surface of the plugs with alcohol.
- Glue the magnet with glue or tape on its surface.
- Cut out paper circles that match the size of the bottle cap.
- On each circle, write a letter with a felt-tip pen. Glue the resulting blank inside the lid.
Video
If you have accumulated a lot of unnecessary containers, think about what you can do from plastic bottles with your own hands. All kinds of crafts will help to decorate the house, garden, and Christmas tree. It is convenient and fun for adults and children to create products using the material. The formation process develops imagination, fine motor skills. In addition, you can make good use of the plastic you don't need.
Peacock from bottles
Garden frog
DIY pots
In order to decorate your garden, to make it original, unlike others, it is not at all necessary to spend huge sums. A lot of crafts for the garden can be done very easily with your own hands from a variety of materials at hand. And one of the simplest and at the same time the cutest crafts is a ladybug. Today we will look at a master class on how you can make a ladybug out of stones, paper, concrete, plastic bottles and spoons, from plasticine and beads, as well as sew, knit or mold.

Stone crafts
How to make a ladybug out of stones and pebbles
In order to settle bright and cheerful ladybugs in your garden, you can use ordinary round stones - sea pebbles or whatever you can find are fine. Such a craft is made elementary - the stone is painted red, with black paint - you draw wings, dots, eyes and antennae. Then you can settle the resulting insects in the grass, plant on stumps, glue on tree branches or decorate a flower bed. Another option is to draw ladybirds on a large rock.


Ladybug made of concrete: DIY mosaic
A similar way to make a ladybug, but this time we will use artificial stone and colorful tiles. Making a ladybug out of concrete is very simple. We need cement, which can be bought at any hardware store, an old basin or bowl - a craft mold, plastic and red and black tiles, or something from which we can make a mosaic. Here's what we get:
Related article: Folding interior doors: accordion or book?

We put a plastic bag in a basin so that the cement does not stick to the sides, pour the cement, wait until it hardens and dries. We take out and grind with sandpaper. Next, glue the mosaic on top of the pieces of red and black tiles. The cement ladybug is ready, it remains to place it in a prominent place in your garden.


Making ladybirds out of clay
If you have not found suitable stones and it is difficult for you to make a mosaic, you can simply mold a ladybug out of clay with your own hands and paint it with paint.

Plastic crafts
Craft for the garden: ladybug from a construction helmet
If you have an old construction helmet lying around somewhere, preferably red or orange, then there is another elementary way to make a ladybug out of a helmet. The only thing you need here is black paint. As a last resort, a regular black marker. Just draw the spots, eyes and wings - this is the figurine for the garden and is ready.


How to make a ladybug from plastic bottles
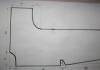
You will find more ideas for crafts from plastic bottles in our last article. And today we'll see how to make a ladybug from plastic bottles with our own hands. The most popular idea is this insect-shaped flower bed. For such a flower bed, the bottles will first need to be painted black and red (not entirely, but only the bottoms + 5-10 cm). Here is a diagram for such a flower bed:

Another way is to string cut bottles on a line to create a voluminous ladybug that can be used to decorate a garden. This figure can then be trimmed with scissors. And here's what we can get:


DIY ladybug from plastic spoons
You can also use plastic spoons for garden crafts. It is very easy to make a funny ladybug out of plastic spoons with unfolded wings. You will need three spoons for each craft. We paint two in red and draw points - these will be the wings, one - in black (this will be the body). We glue all three spoons. Add a head - made of buttons, clay, or something suitable. The craft is ready:
Related article: Bed as an everyday element of our life


How to make a ladybug out of cork
For garden crafts, you can use any materials at hand, and even a ladybug can be made from any round or oval object. For example, you can use beer or plastic bottle caps. They just need to be painted with red paint and black - draw dots, eyes and antennae.

Needlework: we sew, weave and knit
Beaded ladybug
The needlewoman can also use the ladybug symbol for her crafts. For example, you can weave it with beads. Of course, you won't get a big figurine, but even such miniature beaded ladybugs can be used to decorate the garden, for example, you can hang or glue them on trees.


This article describes various ways that a ladybug can be made from plastic bottles. There is also a list of all the necessary materials and tools that may be needed in the process. So feel free to take it and do it.
Materials and tools
In the process of work we need the following tools and materials:
- A set of paints with a brush (black, white and red are required).
- Scissors or knife.
- Marker for marking.
- Plastic bottles.
It is better to prepare all this in advance and collect it in one place. Exactly where you plan to make a ladybug in any of the following ways.

The ways
A plastic bottle ladybug can be made like this:
- From three scraps of a plastic bottle.
- From a set of plastic bottles, bottom up.
- From the lids of this container.
- Actually from one plastic bottle.
Patterns from a bottle
In this case, a ladybug from plastic bottles is made as follows:
- Apply a tablespoon to the narrowing part near the neck of the plastic bottle and circle it with a marker. We make three similar blanks and cut them out.
- We paint two obtained blanks in red, and one in black. Then we wait for the paint to dry.
- After that, on red blanks, we make black dots in random order, and on black - two white dots strictly on one side (this will be the face of a ladybug). We pause again to dry the paint.
- Then, symmetrically glue two wings onto the black blank so that a black face with white eyes protrudes from one side. The wings themselves do not have to be glued close to the body. They can be made protruding, and this will create the appearance of a ladybug flight.
- At the end, cover the finished ladybug with varnish. After it dries, the craft is ready.

Flower bed
This is the simplest way to make a ladybug from plastic bottles with your own hands. In this case, you need an impressive set of plastic bottles. It is recommended that they all be the same shape. To begin with, we make a circle, inside which our ladybug will be located. Then fill it completely with bottles. At the same time, we strive to ensure that the distance between them is minimal. In the future, through the entire ladybug, paint the lines from black bottles. On one side, paint a small piece black - this will be the head. On it, we also paint 2 bottles symmetrically relative to the central black line white (these will be the eyes). We make the remaining bottles in two sectors red, but selectively some of them we paint black, since these will be points on the wings.

Making a ladybug from the lid
This is the simplest way a ladybug can be made from plastic bottles. Photos confirm this once again. We take the red lid from the plastic container. Then we divide it in half with a black line. Draw the muzzle on one side of the line in the same color. Let it all dry. Then we make white eyes on the muzzle, and black dots on the red wings.
Directly from a plastic bottle
Finally, let's figure out how to make a ladybug from a plastic bottle. For these purposes, it is recommended to choose a container that will be more like a circle in size. For example, a 5-liter container is perfect for this purpose. Cut the bottle in half along with the cap. With the help of glue we fix half of the lid on the neck of the container. Then, after the glue dries, paint the resulting workpiece completely black. Then we wait until the paint dries. After that, we apply two white dots in the area of \u200b\u200bthe tapering part, and on the side of the bottom we draw the wings in red. Then on the red wings in a chaotic manner we apply black dots. At the final stage, after the paint has dried, the resulting craft must be varnished. After it dries, the ladybug is ready.

Outcome
This article describes various ways that a ladybug can be made from plastic bottles. There is nothing super complicated in the above methods, and everyone can make this kind of craft.