Those. You, without knowing how to knit on stocking or circular spokes, you can associate yourself and not only yourself a wonderful thing! A distinctive feature of this knitting method is that you can raise anything on the back of the palm. From jacquard, to beaded knitting. Those due to the fact that knitting all the time goes in a straight line, you can impact as you like. Materials and tools. Yarn 100% wool 100g \u003d 300 meters.
Spokes No. 2.0 10 English pins.
Start
On the knitting needles, we gain half the loops from the amount that you would need for a cuff mittens or gloves on stocking (circular) knitting needles.
ATTENTION! An odd amount, if the pattern or ornament is assumed from the central loop and the odd, if this is not supposed.
I have 29 loops. Glove on the right hand.
after typing range, the first is tied with hinges. In order for a beautiful rutter to form a person, which will then be heated by a needle.


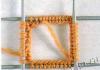
Further knit facial stroke as much as we want for a beautiful pent of gloves. I have 1.5 cm. And the last front line is tied (on 29 loops) of the Kyrgyz Republic, * 2 together face, Nakid * until it remains on the left knitting 2 loops. 1 persons. 1 edge.
Turned over and the outstanding row to lie with all the irons ..
it turns out a series with "holes", which will be a beautiful edge of the cuff


Knit cuffs. I pay attention when knitting is only two threads, then non-working tangle add the pin so that the threads are not confused.

Correcting the cuffs, proceed to knitting thumb.
Not reaching one loop to the end of the facial row begins to make an increase for thumb.

The penultimate loop to the facial, and then, from the base loop, we encourage the add-on the facial.


In the same place to get a clear line of additives.


Thus, adding one loop in each facial row, in the same place, you will receive a beautiful thumbprint line

So add a loop until it turns out: the thumb 10 loops + 1 loop + 29 on the back side of the palm:

An invalid rod knit only 10 loops (this is a thumb) and remove these loops onto the pin. Then they tie the middle loop and remove it to the pin (you can marker). And knit on 29 loops with involutions. I turn over and farther to the beginning of the mother's knit web straight facial stroke. Kli you want to embroider something, or somehow decorate the glove on another, now is the time. I have Vasileuk on my gloves connected by Jacquard


Tied to the beginning of the mother's, you need to distribute the loops on your fingers. I have 29 loops. I distributed so. Mysinetse-7 loops, unnamed and index -8 loops. Middle-9 loops. And between them on the same loop. 32 loops. The correspondence is explained simply.
There are intervals between your fingers. If they do not fill them, turn holes. I will tell you how to avoid them.
In the photo above 6 loops on the finger of the little finger. And three of the next loop is encouraged. :

Of these three loops, the first will go to the little finger, as the seventh, medium, as the jumper between the fingers, the third, like the eighth on the unnamed. The average loop is removed on the pin. On the front side of work. It was this loop that will fall on top of the prefabricated three loops of the rear and inside of the palm and closes the hole between the fingers. We will have such "shelter loops" 4. In the intervals: big-index, index-medium, medium-unnamed, unnamed-little finger. But for now we have only the beginning of the maiden. We remove all the loops, besides the little finger on an extra needle or a large pin. Starting from here we knit only a little finger.

Knit up as much as the size of the little finger, spin the finger and knit in the opposite direction. Showing on the thumb:

Making a Ubapet


Then make an increase

We begin to knit in the opposite direction, tissing the edge loop along with the base edge loop.

For sure, so in the MK on mittens.
As a result, dismissed all 4palts except we have:


We proceed to closing the holes between your fingers. From the side of the Mizinza, they will collect all the loops on the needle, leaving the loops between the fingers on the pins at work. Insert 7 loops of the index finger with an invalible and eighth loop of the index finger, the loop from the pin between the index and middle and the first loop of the middle finger is mixed together with the inside so that the loop from the pin (the average of three) is on top of the other two. Thus, the hole and closes.


Gloves are the necessary accessory in winter, as well as early spring and late autumn. Almost six months we spend in gloves, without even thinking about it. Unfortunately, now this element is paid not so much attention, as before, when the glove was not only part of the toilet, but also actively participated in the lives of people: fatal duels began to be from her, and happy love stories.
Today, etiquette does not attribute special functions to gloves, so the main task of this accessory is to preserve the heat of our handles. With which, by the way, they cope with perfectly, especially if they are manually connected.

We learn how to tie the gloves with the knitting needles: a simple model for beginners, men's, and openwork.
Gloves can be warm winter, easier for cool weather and even very easy openwork. For the first option, the yarn containing natural wool is suitable. It is very warm, does not miss the wind, but does not fit the owners of sensitive skin, as it can cause irritation and itching. If your skin is this, then it is better to choose a mixture yarn containing in equal proportions and wool and acrylic, or give preference to a high-quality thread made of expensive types of wool, for example, Alpaca or Kid-Mohler.
 For spring or autumn, you can choose both fine wool yarn and cotton. The latter is lighter, in such mittens will not be hot, but they can protect them from the spring wind.
Thin openwork gloves are rapidly decorative function. They will become an excellent complement to the evening dress or will decorate your image for the thematic photo shoot. For knitting such an elegant accessory, a thin yarn with silk in the composition is suitable. Gloves will get an easy "dear" shine and chic.
For knitting gloves, a set of five stocking spokes will be required. In size, they must approach the selected yarn. If the size is greater, then the mittens will be more loose and not sufficiently warm, if less - too dense and rigid.
Men's gloves better knit from yarn of gray, blue or brown shade. Also, men prefer black and khaki. Women are more bold in the choice of color, so women's accessories can be both delicate pastel colors and bright, juicy.
Knit a simple model gloves
Knitting gloves for beginners should be started from measuring the circumference of the palm. Calculate the number of loops by the pre-associated pattern.

Dial the required amount of loops into two knitting needles to bind the gum. Distribute them between three or four knitting needles and knit in a circle of a rubber band 1x1 or 2x2 you need lengths. The glove cuff can be of any length: short 3-4 cm, long with a latch 10-12 cm, or a completely long to the elbow 20-25 cm.

When the cuff is ready, go to the usual facial surface and knit front loop before the start of the thumb. Loops intended for knitting thumb, re-cheer on a pin or auxiliary needle. If, for example, you "changed" ten kettops, then the same amount must be scored on the workpice and continue knitting in a circle to the base of the maiden.

The loops intended for knitting the little finger, remove on the pin, lie another or two rows in a circle and proceed to knitting the index finger. Finger knot in a circle on two or three spokes.
When the height reaches the beginning of the nail, close the loops, tieting two together. In the same way, knit medium, Unnamed, little finger and thumbs.
Gloves with braids for men
Knitting gloves for men begins with the fact that you need to dial 64 loops and distribute them between four knitting needles.

After the cuffs, proceed to knitting the central part. The pattern from Kos consists of 27 loops, it is located on the third and fourth knitting needles. Here is a central pattern scheme with a description.
After you check 22 rows, you will need to leave the hole for the thumb. To do this, remove 8 coverings on the pin or auxiliary needle, and in the next circular row type 8 air loops.


Continue to knit in a circle, not forgetting about the pattern with braids, to the base of the maiden. After that, make the calculation for four fingers, dividing the number of loops to four. Release each finger separately in a circle. Men's gloves with knitting needles!
More specifically how to tie gloves for a man, you can find out, looking at the Master class of the amines of Yuryevna.
Video: Knitting Lesson Men's Gloves
Delicate openwork gloves
Such openwork gloves can be an addition to the wedding dress, and if you perform them in another color scheme, they are suitable for accessing the theater or solemn reception.

How to knit gloves with knitting needles, master class for beginners
For those of you who want to learn to knit dense simple male or openwork female gloves with knitting needles, this lesson is offered with a detailed description of the work. In addition to the description, the lesson is necessary for the needlework of the scheme. It will be about how to tie this product classically, that is, using five spokes. The lesson is complemented by appropriate photos and video materials that describe in detail and show how different gloves fit. 


Men's classic gloves
Classical technique of knitting gloves involves the beginning of the needlework to perform from the gum on the wrist. The pattern for gloves is selected depending on who they are intended. It may be a relief or jacquard pattern, which will be suitable for almost everyone, or openwork exclusively for women. This master class is better to start with simple patching gloves, which is more suitable for beginners. Men's specimens of gloves are performed more often than this viscous. For example, we carry out knitting the left glove. 
Before work, it is necessary to carefully remove the measurements from the palm of the palms that begin with the wrist. In the example of the length of the brush in a circle is nineteen centimeters. Next follows the length before the start of the thumb equal to six centimeters. The third measurement is the distance to the Mizinza, equal to nine centimeters. The last size to the index finger. Let's start knitting gloves from a set of sixty loops (P) for two knitting needles, removing one of them after dialing. The first row will be executed with a rubber band 1 * 1, and place all loops equally on four knitting. Fifth will prepare for work. Be sure to note the first with the help of the orientation pins. It should be noted that the rooms 1 and 2 are located on the product, and on the third and fourth lower part of the glove. We continue the needlework, closing it in a circle. We also note that in circular knitting there are no edge loops. 
Knitting gloves with a classic way begins with a gum 1 * 1, the length of which each needlewoman determines at wisdom, from two to nine centimeters. After the gum should be a thumb, and for this loop is added. For gloves on the left hand, the wedge is placed on No. 4, and on the right on number 3. You can proceed to it directly, or after performing several rows of a bullish. We add two loops with nakidami, one of which is done before the last n fourth number, and the second after it. Further three circles we carry out without added loops, tieting the nakid for the back thread, otherwise holes will appear in the canvase. Knitting the right glove is different, and the Caides are made on the third room, but at the very beginning. So gradually carry out the addition of the ranks at the end and beginning of the ranks under No. 4 and 3, but through three or four circles. Prescription P must be done through one, 3-and, 5 or 7 p, that is, there must be an odd number. After the length of the height of the wedge, that is, six centimeters by measurement, finish with the addition of loops, and put them into two additional pins. 

Aerial loops are recruited above these n, half less. One circle will be performed with those units that already exist in work without changing their number. Then we will reduce P on the fourth needles, making two loops together. We reduce until it remains on it, as at the beginning. In our case, this is 15 pieces (pieces).
Then you need to continue knitting to the point of the mother's point, and place P to continue work again. To properly place everything, distribute on the 8th share, on the 8th pieces plus 4. For each share there are fifteen pieces. Two are added to the indicative, and from the nameless, the same two pieces are dropped out. As a result, for the Misma, we have fifteen n, Unnamed will take thirteen pcs, the average fifteen and index seventeen. 
Between them, it is necessary to make air loops so that they become jumpers. The entire alignment P is performed in the form of a graphic scheme that it is later fully observed. Now perform a hole for the mother's. When it is ends on the second knitting needle, it is necessary to remove 9 pcs on an extra pin, and put 7 P from the third room onto the second pin. Further, four air P ones are formed on the second issue, and all the last P to No. 3. As a result, it remains on three spokes, and the fourth we will knit. In such a state, the work continues to three or four circles until they reach the beginning of the thumb.
At this stage, it is necessary to embroil the index finger. He fit in the first room (at the beginning), and at the end of the fourth. In this case, the number of n is seventeen units. After holding the loops of the jumpers, we will get them in the amount of twenty one, that is, 4 pcs will be added. Knitting the index finger is made on three spokes, and p is divided therefore into three parts. Knit nine P on the first room, others put on additional devices (excluding eight extreme, which are gaining on two knitting needles). All units with №1 divide into two parts, of which 7 go to the new one, and two remain in place, where you need to add four air P. further knit one n with the next, with the result that each is 7 pcs. Next, knit circular rows to the end, and we make the outflow until there are two units everywhere. 
In the end of a pretty tightening of the loop, stitching them. After the index, the average finger of fifteen n plus eight, in sum 23 (8 + 8 + 7). His knitting is made in the same technique. Everything from the pin will remove and put on the needles, that is, 8 pieces from the top of the glove on the first, and 7 from the bottom to # 2. Now you have four units from the jumper, and knit the same yet. After that, enter the fourth number to perform 4 pieces that remain, and add four more air. After that, there are twenty-three units in the work, that is, 8 + 8 and 7 more. Finish the middle finger of the technique, as the index, after which it knits Unnamed. Remove n with pins and place, in the amount of 7 + 7 + 3. We score where three units are located, then P. It will just be on the jumper of the middle finger. Knit n in circular as usual. For the Misina P, it is removed from additional spokes and leave on two knitting spices, then four p from the jumpers are gaining. 
As a result, we have nineteen n in work that distribute 7 + 6 + 6. We continue to knit in ordinary technique. Now it remains knitting thumb. It is performed on two spokes, loops with pins and scored from the hole. Knitting is performed on a circular line. In the area of \u200b\u200bthe nail, the blade is performed, then the loops are sewn and fixed. At this stage, we figured out how to associate the technique of men's gloves with knitting technicians. 
This video master class is designed specifically for beginners. To secure knowledge of knitting classic male gloves, you need to carefully look at it to the end. From the video lesson you will learn many features and details, thanks to which you can connect gloves easily and simply.
Video: Gloves on 5 knitting
Knitting female openwork gloves
In conclusion, the lesson is offered a scheme, following which you will connect one more gloves, but this time there are already beautiful openwork, for women who know the lot in fashion. 

Following the indications of the scheme, you will definitely connect beautiful openwork gloves.
Stock Foto MK knitting high gloves

Video: Learning to knit gloves with an openwork
Comments.
Related Posts:
 Embroidery ribbons for beginners Master class Rose (video)
 Embroidery ribbons for novice video lessons and master class
Gloves are a beautiful and useful thing. They may not just warm, but also decorate, make an image more sophisticated, calm, or vice versa - bright, catchy. Especially a wide variety of models for all seasons and occasions are offered to crochet gloves, which create decent competition models created by the knitting needles.
It is at the expense of this method of performing gloves that can work out both dense and textural and finest, openwork. Of course, the decisive factor will be the yarn chosen by you - it is she who is responsible for the heat, the thickness and the degree of openness of the product. Such a variety of knitting capabilities allows you to get equally beautiful gloves for women and girls, comfortable and practical gloves for children, and warm gloves for men.
Crochet Gloves - Scheme and Description
Let us consider in more detail the most common options for knitting gloves with crochet, including a way to knit products for beginner needlewomen. We also learn how to crochet Mittenka - gloves without fingers, and detail the ways of knitting male, female and children's gloves.
Knitting for beginner needlewomen

Crochet's knitting gloves provides the ability to create sufficiently thin, but dense and warm products. Let's try to create one of these, while performing a simple single type pattern.
Popular articles:
Knitting crochet gloves for beginners begins with definitions hand measurements . This can be done as follows: Cut the palm with a pencil or handle on a sheet of paper. Now, in accordance with the scheme, we measure the following indicators:

A. - the width of the palm at the base of the fingers (approximate width of our glove); B. - the distance from the base of the palm to the bend of the thumb; C. - distance from the bottom of the palm to the tip of the middle finger (length of the glove without a cuff); D. - Transfer from the base of the palm to the foundation of the mother's.
Materials for work:
- jersey;
- hook number 23.
Progress
We recruit the chain of air loops equal to the length of the circumference of the wrist + 1 cm for free dressing gloves. We connect the chain into the ring by the connecting column and for the beginning of the knitting of the first row we do 3 airlock lifting loops.
First row knitting art. C / H and end a row of connective loop in the last lifting loop. Next for knitting Second row Make 2 lifting air loops and knit the gum pattern, alternating convex and concave embossed columns. Finish a number of also connective loop. The following rows Gum knit as well as the second. Cuff gloves knitted with a pattern of rubber band At your discretion can be any width of 4 to 6 cm.
Then go to knitting The main part of the glove. We knit the glove with semi-brass circular rows of spirals, that is, do not make a lifting loop, then there will be no seam of the initial loop of the row.
For yourself, make the side sides of the gloves, where the thumb will be located, and where the little finger.
Tied 2-3 circular rows of the side of the side of the large finger are beginning to make additions to expand the thumb wedge. For this, in the following 5-7 rows, add one semi-solitary row, having twisted two from one loop.
When the height of the knitting will reach the base of the thumb in the last row, not tied to the edge of 6-7 loops, with a chain of 8-9 air loops and secure it into an army through 12-14 loops of the previous row. Thus, a hole for the thumb, which rises last time.

Before starting the touch of the fingers, calculate the loops for each finger. You can define them by simoling the glove and noticing the loop on the inner and outer side. To confuse the Mizinz, attach the thread from the palm side, take 3-4 air loops and attach the arches to the back of the glove. Next, knit in the circle of the semi-brass to the height of the mother.

Closer to the tip of the tip on the two sides of the finger for the narrowing. When the finger is tightened to the entire height, closing the loop, having encouraging the column circle without a nakid - one of two loops. When the hole is narrowed, cut the thread, secure it, extending the tip through the loop. In the remaining tip of the thread to inhale the needle and sleep the remaining hole, filament the thread on the wrong one.
If you look at your hand, you will see that the fingers are located at different heights the first little finger, slightly above the index, and the middle and unless at the same level. Therefore, after knitting a mother's, go back to knitting the main part of the glove. Having taken to work left the thread, tie one round row by half-brackets along the inside, arched at the base of the maiden and the outside of the glove. Now you can knit a ring finger. Attach a new thread to the inside, tie a chain of 4 removals. Peltlek and secure the arch on the outside (photo 1).
Knit semi-solids to the height of the finger, in the upper part, narrow it, making the sidelines. Finish knitting as well as on Mizinza - do the disabling, taking together two columns without an inlet, while the hole is narrowed to a small hole.
Reolate to work left the thread of the main part and check one round row through the army of the nameless finger. Next attach the thread to knit the middle finger. If the base is obtained a large hole for your finger, then releasing the corners, taking two semi-solids together (photo 2).

An index finger knit the thread from the main part of the glove. Connect the thread for knitting thumb and knit twisting with semi-rolls, making the recess at the corners at the corners, tie to two semi-solids together until the hole is equal to the diameter of the finger. Next, knit it to the height and narrow the columns without Nakid.
The glove for the other hand also knits, but in mirror reflection. The back can be decorated with a knitted flower or embroidery.

Model without fingers

Very popular in our time the gloves without fingers, called also mitenks, allow led and use the phone quickly and without discomfort. In addition, the process of knitting this model is much easier than knitting simple gloves - after all, there is no need to work with each finger separately. Since they knit them and for the summer season, and to the winter. Consider in more detail how to tie the crochet gloves without fingers, which look very spectacular in the autumn and winter time.
Materials for work:
- yarn "ADELIA JESSICA" (67% wool, 33% polyester, 260 m / 100 g);
- hook number 3.
Progress
First you need to dial the chain of air loops of such a length so that it is easily folded into it, four fingers easily. Knit Mitten will be top to bottom - from the fingers to the wrist. We will be closed chain into the ring using a connecting column, check two air loops of the rise and then - three rows of columns without Nakid (photo 1).
Next, go to the mating lush columns. The magnificent column is three or more "non-touching" columns with Nakida, accurate at the end of one loop. In this case, the magnificent columns consist of exactly three "incomplete" columns with Nakud. To perform a magnificent column, we will make a nakid, we introduce a hook in the loop of the previous row and extend the thread. Check the thread into the resulting loop and Nakid (photo 2).

On the hook - two loops. We will make a nakid again and again "distrust" a simple column with Nakid (photo 1). On the hook - three loops (photo 2). We repeat everything again - the hook turned out four loops (photo 3). Finally, we have all four loops at the same time (photo 4). Lush column ready!

Knit three rows of lush columns, then three rows of columns without Nakid, then two more rows of lush columns. In principle, the alternation of different mating can be any - it all depends on the taste and desire of the knitter.
We approached the base of the thumb. We will connect a chain of fifteen air loops and attach it using a connecting column to the main knitting after four loops from the beginning of the chain. Learn Mittenka - the thumb should freely go to the hole intended for him. If a hole is less or more than you need - change the length of the chain (photo 1).
We continue knitting around the columns without Nakid - only a number became longer than fifteen (in this case) loops. It is more convenient to knit on the helix, without lift loops (photo 2).

By sticking two rows of the columns without an attachment, we begin to make a shift. It is best to do them like this: evenly reduce four loops in a row - the next row of knitting without outstanding is to donate four loops again - to regain a series without outstanding. Total rows with refusals turned out four. Having finished relating, there are still four or five rows without outbreaks. Finished knitting five rows of relief columns.

Details remained: the upper part, like a thumb hole, can be arranged next to "Pico", while sticking the pre-two-three rows of columns without Nakid. We will connect the second mitten in the same way as the first. A pair of gloves without fingers is ready!
Master class - how to tie men's gloves

As a good gift, a dear person can connect men's crochet gloves. It does not take a lot of time and effort, especially if you work according to the master class for knitting gloves with crochet. In this case, we will talk about beautiful gloves that will great look in a monophonic moderate color scheme, preferably black, gray, dark blue.
To begin, it should also cover the outline of a male hand on paper, or measure its old gloves.
Materials for work:
- thin acrylic or half-walled yarn;
- hook number 2-2.5.
Gloves knit in the transverse direction from the maizin to the thumb. One glove consists of two parts: rear - with four knitted fingers and the inner with the tied fifth thumb. Finished halves of gloves are sewn, in conclusion, on the bottom, bind the cuff with a rubber band from relief columns.
Progress
The initial chain of air loops, dial from the beginning of the cuff to the tip of the maiden path. Next, knit rows of columns without Nakid to the width of the maffer. Each new row of columns start with one lift air loop.
When knitting b / n columns in the fingers direction, please contact the base of the nameless finger and dial the chain of air loops to the tip of the ring finger.

Inner half of the glove fit just as the rear to the middle finger. At the beginning of knitting the index finger, in a row of columns in the direction of the cuff to the fingers, tightening the columns to the base of the thumb, type the chain of air loops equal to the double length of the thumb. Close a chain into a long loop, continuing to knit columns around the row to the base of the index finger, then pick up the chain of air loops to the lower finger length.

Tie a few rows of columns without Nakid, first on the chain of the index finger, along a row of the brush to the thumb loop, then along the thumb chain and then to the cuff. Turning the work, knit columns in the opposite direction until you connect strips on the width of the index and thumb.
Fold two halves of gloves, back and inner together. You can connect them with a row from the connecting columns or just sew a needle, also sew the side sides of the thumb. A stitched glove turn out to the other side so that the seam is inside.

At the bottom of the gloves first, insert a number of columns with an attachment, then two rows of embossed columns, alternating convex and concave. Knit the second glove just, only when stitching, details place so that the thumb is located on the other side.

How to tie fishnet gloves for a woman

To replenish the wardrobe gloves - it is always a great idea, because it is they warming their hands and give the female ending in the cold season. Make it with your own hands, even with needlewomen without tremendous experience, you only need to choose a detailed knitting scheme with a description. Consider how to create openwork crochet crochet gloves with step-by-step photos.
We measure measure
Taking advantage of the method of measuring the hand specified at the beginning of the article, we are determined with the size of future gloves. Now you need to calculate the required number of loops. Usually, in the descriptions of knitting gloves mention, how many loops are contained in sample 10 * 10 cm. However, it is possible to make it easier: to tie a small sample (10-15 loops, 4-5 rows) and find out how many elements in entire centimeters.
In this case, 1 cm is 3 columns with Nakad, that is, initially 3 air loops. The width of the glove 8 cm, which means 8 * 3 \u003d 24 (another 1 loop for symmetry pattern \u003d 25) is added.
Scheme knitting gloves
 Fig. 1: Knitting the upper part of the right glove; Fig. 2: Knitting the bottom of the right glove.
  Fig. 1: Knitting a thumb in gloves; Fig. 2: Glove cuffs knitting scheme.
 Progress
We start knitting the upper part of the right hand glove. We recruit a chain of 25 air loops + 3 air loops for switching to the next row. Knit 2 rows of columns with one nakid to each loop (photo 1).
In the third row, knit 6 columns with Nakid, then we start knitting the pattern: we skip one loop, to the following fan of 6 columns with Nakud, we skip, two columns with an attachment. We repeat the pattern element 2 more times and end a number of columns with Nakud (photo 2).

Knit another 8 rows with a pattern, or as much as you need for your size hand - try on to know for sure. In the next row over the extreme "versions", we only have 3 columns with Caid, through one loop (photo 1).
Knit another row with the element of the middle pattern. Then 2 rows of columns with one nakid. At this stage, the detail length should be equal to the distance from the base of the palm to the basis of the mother's ( d.).
Now you need to distribute the number of hinges for each finger: 25/4 \u003d 6 and one loop in the reserve (6 to the index finger; 7 - on the average; 6 - on Unnamed; 6 - on the little finger).

Knit 19 columns with Nakud, since the little finger is located slightly below the other fingers - we leave 6 loops for it.
Go to the next row and begin to knit the ring finger. In this case, only 10 rows of 6 columns with Nakud. Complete the "fan" of 6 columns with an attachment in a loop along the middle of a row, the thread is fixed and cut off. At this stage, it is important to try on the detail to the hand to find out the desired length of the fingers.
Similarly, knit the middle finger. In this case, only 12 rows of 7 columns with Nakud. Complete the "fan" of 6 columns with an attachment in a loop along the middle of a row, the thread is fixed and cut off.
The index finger knit the same as unnamed.

Knit a little finger. In this case, there are 7 rows of 6 columns with Nakud. Complete the "fan" of 6 columns with an attachment in a loop along the middle of a row, the thread is fixed and cut off. The upper part of the right glove is almost ready.
We link the item in a circle of the columns without a Nakid (2 columns without Caida for each extreme column, the tops of the fingers are 1 column in each loop and 1 column in the intervals between the fingers for a beautiful turn).

Now it's time to move to knitting the lower part of the right glove, in accordance with the schemes specified above.
We recruit a chain of 25 air loops + 3 air loops for switching to the next row. Low part of the glove knit columns with Nakud. Slip as many rows so that the detail length is equal to the distance from the bottom of the palm to the bend of the thumb ( in). In this case, 10 rows (photo 1).
In the next row, leave a place for thumb. Knit 2 columns with Nakud, we skip 8 loops (or how much you need, trying on them) above them, we have a chain of the same number of air loops and continue to knit with the bastards with Nakud. In the next row, in each loop, the chain is in line with 1 column with Nakud.
Knit to the base of the mother's. In this case - another 3 rows. Knit a little finger. Then knit a row of 19 columns with Nakid (photo 2). Then knit the remaining fingers in the sequence: index, medium, unnamed.

How to knit children's gloves

Another interesting model of knitted gloves is thin openwork. They are suitable for girls. So for girls. Beautiful, lungs, gentle - they are perfect for a beautiful outfit for a matinee, graduation or any other celebration. Learning to knit children's gloves with a crochet will help a detailed master class.
Materials for work:
- cotton threads №30-40;
- hook number 1.
Progress
We start knitting gloves from your fingers. To do this, in the initial ring, I will check the 8th century. Cylinder Cylinder Circle Circle Reinforcing Index and Middle Finger, Sample the encrypted cylinders and add the arches to the bottom of the finger.
Finished cylinders on the index and middle finger are connected, and tied up around 1-2 rows of the main pattern.
The next cylinder is on the ring finger, just attach to the side of the middle finger and tie around now the 3 cylinder.

Then the queue for the little finger, attaching the cylinder of the Mizinz, tie around the palm the main pattern, do not forget to try on the glove during the strapping and if you need to decline the arches between your fingers from the inner side of the palm.
By contacting the glove to the thumb, attach the connected cylinder and continue the strapping, making the recess on one army in each row from the inner side of the palm from the place of attachment.

Tied to the end of the palm of the palm of the palmistry, stop making the recess and knit in a circle to the required length of the glove, then tie the edge of a beautiful border according to this scheme:

Video lesson
Faster to get used with the technique of knitting gloves with crochet novice needlewomen will help the video master class. It will save time and will save from possible new mistakes. The video presents a version of knitting a mitten-vechersek - another interesting way to combine gloves, mittles and verges.
Video lesson - how to knit crochet gloves
Our article will introduce you to the nuances of knitting female, male and children's gloves. You will also learn what patterns are most suitable for these products.
Snow, frost and cold force us as much as possible and do everything so that our body minimally felt all the charms of winter. That is why in the cold season we try not to get out of the house without warm jackets, hats and gloves. It is about the latter in our article we will talk. As a rule, knitted gloves that are sold in shopping centers and in the markets are not distinguished by originality and beauty.
Most often they are made on some one template, changing only the color of the finished product. In view of this, if you want to have in our winter wardrobe it is not easy warm, and beautiful gloves, then try to tie them yourself. In this case, you will have the opportunity to choose and color, and the pattern of the future upgrade.
How to tie women's gloves knitting: scheme


Scheme number 2.
- Start knitting female gloves should also be as well as any other thing, with accurate size determination. If you try to adjust the parameters of the product in the manufacturing process, then in the end you can get not exactly what you have planned. Consequently, if you do not want to spend your time, then take a sewing meter and spend all measurements as much as possible.
- The first thing is measured by the circumference of the brush, and then completely straighten your palm and measure the distance before the start of the thumb. At the next stage, we carry out measurements of the height to the mother's and middle finger, and also learn the incidence of palm circumference at the base of the fingers. After that, you will need to tie a small sample from the yarn that you will manufacture your gloves. It is necessary to do this, because only so you can find out the mating density.
- Calculating which approximate number of loopeks is in 1 centimeter, you can multiply this data on the end of the palm at the base of the fingers and find out how many loops you need to gain the needles at the very beginning of your work. If the resulting number was not integer, then simply round it. And it is not necessary to be afraid that extra 2-3 millimeters contribute to the fact that the finished gloves will be viciously. Some needlewomen, in general, argue that the data obtained from the very beginning it is necessary to add 4-6 loops and only then begin to test the product gum.
- Therefore, when necessary, boldly round the resulting number and proceed to work. Yes, and finally, I would like to say that inexperienced needlewomenes are best to start knitting gloves from the bottom up. So it will be easier for them to figure out how the fingers are prior.
How to tie men's gloves with knitting needles: video
- In principle, men's gloves fit in the same schemes as women's, except pattern for such products is selected simpler. This may be, for example, a barn. Such a pattern can also get quite cute. But for this, in the process of knitting, you will need to carefully monitor so that all hinges are the same size. Try to show them in such a way that they are not too free or tightened, because all this will immediately affect the visual perception of the canvas.

- Knitting Male Gloves Scheme
- In the place where you allow an error it will be slightly deformed. In the event that such an oversight you do in the process of fingertips, they can get less or more than it is necessary. As mentioned above, start knitting men's gloves best with gum. In order for it to be moderately dense, put it alternating two facial and two wrong loops. Yes, and do not make the gum very small. Ideally, its length should be at least 5 centimeters.
- If you do it less, it is not enough that the finished product will be kept well on your hand, so it will still pass the cold air and under the product itself, and under warm jacket. In the manufacture of male gloves is also extremely important to understand with which your second half will wear them. If they are needed by him under strict clothes made in a classic style, then the threads for such a product must be bought thin.
- The finished product made from such a material will look quite organically even with a strict business coat. If the gloves are rushed with a down jacket or park, they can be made of thicker yarn and even have any geometric pattern.
How to tie baby gloves with knitting needles?


- Children's gloves in contrast to adult products can be brighter and interesting. In this case, it is appropriate to use the most juicy shades. Therefore, you can safely buy for knitting yarn of red, blue, green, yellow, blue, orange and purple. If you wish, you can even make a rainbow child wardrobe from this detail. Try to tie the gum and the bottom of the gloves more calm and dark, and your fingers encourage multi-colored.
- Also, do not forget to choose the right yarn for these products. Many parents, going to buy threads, most often prefer natural wool. And although this material is considered fairly warm, it does not fit for the manufacture of children's things. Woolen thread has one unpleasant feature, their villi is strongly irritated by the skin. And since the child is almost all the time in motion, then his body sweats and it further enhances the discomfort.
- Therefore, it will be better if you choose for the manufacture of children's gloves, no more modern material. You can stop your choice on acrylic with a small addition of wool. This yarn will ensure very well to save heat, but it will not be irritating the skin of your son or daughter. And, of course, do not forget that children's gloves must have a bright decor.
- Therefore, you can try to stick the rubber band with a small pile or just to make the original embroidery on the top of the product. All this in combination with bright color will turn gloves into the most beloved thing of your child.
How to tie gloves for a boy with knitting needles?


- Even if you are a novice needlewoman, then surely heard or read that you can tie children's gloves exclusively on five knits. In fact, it is not so, it is possible to make them on two knitting. Moreover, this version of the manufacture of a warm element of the children's wardrobe is more suitable for beginners. In this case, you will need to recruit not all loops, but only half.
- That is, you will first need to decide on the size (how we told it at the very beginning of the article), find out how many loops will need to be typing and simply divide this number in half. The only thing you must take into account that the looping should be an odd amount, so if you received, for example, the number 20, then you need to dial 21 loops. After the loops are scored, they will need to be tied with an invalid.
- This is necessary in order to form a rutter, which in the future you approach an ordinary needle. After that, you can safely go to the front surface or on any other pattern that you like. When you realize that the canvas has the desired length, start adding a loop for thumb. Having done this, remove all these looping onto the pin, lie a number of hollows and start to distribute the remaining loops on the remaining fingers. After distributing them, form the remaining four fingers.
- Having finished with them, return to the big, remove the loops from the pin and lie them to the same viscous that everyone else. Touching all your fingers, begin to remove the loops in the face rows. Continue to do it while you will not get a straight line again. Next, we continue to knit as well as started and do not forget that at the end you need to make a number of invalid.
Gloves - mittens with knitting needles

Gloves-mittens

Scheme for knitting
- Gloves-mittens will like the people who lead an active lifestyle and spend almost all day on the street. This element of the winter wardrobe will help you replace both mittens and mitts. Who worn and those and others know that both of these products have their own minuses. In the mittens, the hand with time begins to freeze the way it is practically not moving in them. In Mitenks, the most suffer your fingers.
- Since they are not protected by anything, then literally after half an hour of staying on the street, they begin to shine and swaw. Therefore, if you want to avoid all these troubles, then try to associate yourself mittens gloves. Such a product transformer ties almost as standard models, just in this case you do not have to prick the fingers to the end. In addition, you will need to make the so-called hood, which will cover your fingers.
- To knit such a product, too, you need to start with gum, so the transformer glove is better than hand. And after it is ready, check the widest part of the product with a handle or bustling. If there is a desire, then you can try to make any intricate pattern from English brass or any other relief ornament. And do not forget to take care that the hood is a small petakers for which it can be carefully removed.
- It can be made from the same yarn as all the product or from any other material that you like, and just sew it. This element is unnecessary at first glance, will help you avoid product deformation and prevents loafening of looping at the base of the hood.
Openwork gloves with knitting: diagram with pattern

Knitting scheme with description


- Openwork gloves most often knit under the evening coat. This product is usually made from fine soft yarn of white, blue, wine, watermelon or melange color. In this case, you can do without standard tissue of gum. Since it will not be harmonized with a light and air pattern, it can be replaced with a puff or handwriting.
- So, type the required number of loops on the circular knitting needles and close them into the circle. With the help of the pin, we mark where the first loop of the row will be. So it will be easier for you to count the loops for tiering an openwork pattern. After that, tie 2-4 rows of a cycle knitting, and then proceed to the creation of an openwork ornament. Choosing a drawing, do not forget that you make a winter product, so you need to give preference to those patterns that will have a minimum number of holes.
- This may be, for example, the Bulgarian cross, openwork rhombus, floral paths or a wavy ornament. Yes, and if you want the finished product to be as warm as possible, then an openwork pattern, let's only knocked the grove side. Internal you can easily continue to encourage all the same cycle knitting. In the manufacture of this product, do not forget that the openwork pattern is quite well stretched, so if you want the gloves to sit like this, then you can immediately get a little less singing at the very beginning.
- In the process of knitting, be sure to periodically put on the glove on the hand and see the pattern correctly. If you have noticed that he is thrown into some place, then be sure to dissolve several rows of the canvas and all alter.
How to tie long and short gloves without finger knitting needles?


- As you already, probably, understood the tie up beautiful gloves under the power of every woman. If you buy yarn and needles in advance, then just a couple of days you can boast the original new thing. In the case of gloves without fingers, much attention should be paid to the choice of threads. For such a model, the most preferably thin yarn without any inclusions and pile. If you like Angora, then find the threads without nosha.
- Of course, if you wish, you can use the fluff material, but be prepared for the fact that the villi will begin to curl very quickly and make your gloves are not very beautiful. To such a yarn it is necessary to choose the corresponding needles. Thin threads are best knitting # 2. So the pattern will get more even and openwork. It is necessary to start doing such a product with wrist. In order for it as beautiful as possible, type the desired number of loops and approximately 16 rows of English elastic.
- The next part of the glove can be confused by conventional facial loops. Thus, the canvas can be knit until the thumb level. As soon as you come to him, immediately begin to make a pattern. Since you create a winter product option, it will be better if it is a dense ornament, for example, braids. When you get to the bottom of the fingers, start distributing the loops. After that, you will only need to finish the upper part and you can wear gloves.
Patterns for gloves with knitting: schemes


- In principle, absolutely any pattern is suitable for knitting gloves, but still there are such species that are more suitable for things such a plan. It will be nice to look at the product English elastic, a busty or handmade. The main advantage of such pattern is their simplicity.
- Due to the fact that they stick with the alternation of the involve and face loops, even a beginner needlewoman can make such a pattern. Another win-win pattern is the harnesses and braids. The harmonious of all they look at female and children's gloves. For the manufacture of men's models, it is best to choose embossed patterns that are pronounced by a simple crossing of the loops.
- But remember if you are going to knit your first gloves, choose uncomplicated drawings for this, such as simple, complex or equal gum, pearl or patent pattern. Since they knit very simple, then you are unlikely to push, which means that from the first time you will have a fairly stylish and beautiful winter accessory.