Even a modest souvenir, accompanied by a beautiful handmade postcard, will be a great gift. Such a postcard will not only convey warm wishes, but also become an excellent decor for your home. Here's how to make adorable Christmas cards easy and simple.
1. Almost knitted postcard

The leftover yarn for knitting can be put into action by making a DIY New Year card out of them. Cut a triangle out of cardboard that will become a Christmas tree, grease it liberally with glue and wrap it with colored threads. The more yarn colors you use, the better. Then glue the Christmas tree onto a regular postcard and decorate it if you want.
2. Contrast textile applique

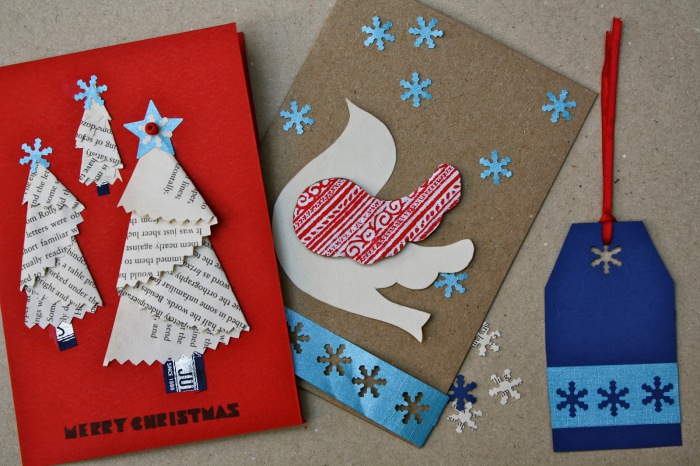
Pieces of bright fabric will come in handy to create a postcard. Choose textiles that won't crumble. Cut out simple figures from fabric - trees, Christmas balls, animals - and glue them on a white card. A contrasting combination of colors looks most impressive.
3. Balls and ribbons

The use of ribbons in decor is a win-win solution for those who want to create a festive mood. Draw the outlines of a New Year's ball on paper or lay it out using glued beads, and at the top place a bow tied from a narrow ribbon. The presence of volumetric elements makes this decorative postcard very original.
4. Herringbone with voluminous branches

Roll thin tubes out of multi-colored paper. Grease one of the edges with glue so that it does not unfold. Then glue the straws of different lengths onto the card. The card with a voluminous herringbone is ready.
5. Laconic stripes

Fans of minimalism will appreciate the restrained but effective postcard, where Christmas tree branches are made of strips of paper. The only decoration of such a postcard is a decorative seam on the paper branches and a frame around the edges of its front part.
6. Fragrant message

A card that not only looks great but smells good is a really nice surprise. Use cinnamon or vanilla sticks as a basis for a decorative composition, surrounding them with New Year's tinsel, beads, pictures.
7. Winter lace

White lace becomes snow-covered Christmas-tree branches, and sequins glued to it become New Year's balls. For the background, use paper of any pastel shade or textured fabric, such as burlap.
8. Simple drawing

Even a simple drawing on a New Year's card can look impressive. To make the postcard look noble, pay special attention to the accuracy of its application. We also recommend using rough craft paper or snow-white glossy paper.
9. Sewing on paper

An easy way to make a postcard three-dimensional is to sew on any paper shape with one central seam and fold back its edges. You can also use several figures of the same shape, stitching them with a common seam, and sticking one of them as a background. Then the image will be even more voluminous.

10.With quilling elements

Quilling is the art of creating decorative compositions from strips of paper. It will not be possible to fully master it a couple of days before the New Year, but it is quite possible to apply certain techniques in the decor of the postcard. The circles of twisted narrow strips of paper become Christmas balls, and the Christmas tree is the green curved line drawn on the card.
11. Combination of several different textures

Another easy way to diversify a familiar applique is to use materials with a different texture for it. For example, knitted fabric, cardboard, plain tissue paper. Then, despite the simple shape of the elements, the postcard will look non-trivial.
12. Eye-catching contrasts
It is not at all necessary to use white paper as the base of the postcard, and make the applique bright. Do the opposite, and the decorative composition will sparkle with new colors.
13. Whether an inscription, or a drawing

For lettering and drawing, choose a paint that contrasts with the paper base. The more intricate and decorative the inscription is, the better. Don't forget to surround it with small, simple drawings.
14. Cute landscape

A simple landscape applique will be a real decoration for a New Year's card. Complement it with voluminous elements - cotton wool imitating snow, beads, sequins, and even chains. This DIY New Year card looks very cozy.
15. Elegant brutality

On thick, saturated paper, make holes along the outline of the triangle. Pull the threads between them in a chaotic order. Do not make too many stitches - our New Year's card is valuable for its laconicism.
16. Maximum gloss

Draw a Christmas tree on paper and grease it liberally with silicone glue. Then add sparkles and beads. After drying, a thick thread can be glued along the contour. This DIY New Year card will sparkle with all the colors of the rainbow.
17. Paper snowmen

The basis for the snowman card is white paper rolled several times. Lightly grease it with glue to keep the snowman in shape. From the remnants of the fabric, make a hat and a scarf for the snowman, draw his face.
18. Second life of old buttons

In every house there are many buttons that are no longer needed, but it is a pity to throw them away. Buttons will come in handy on the eve of the New Year holidays. Glued onto a postcard, they become Christmas balls. Complete the composition with a simple caption. Do-it-yourself New Year card is ready.
When gifts for loved ones are ready, it is time to think about decorating your own home. Do not forget
The best gift for the New Year is, of course, a handmade gift. And if socks or a sweater is an unbearable option for you at the moment, then even a child can handle the postcard. A DIY New Year card is suitable as a gift for absolutely everyone: friends, relatives, the most dear and close people.
New Year's cards can be difficult to make, or they can be very simple, but at the same time not devoid of taste. The most important thing in creating a New Year's card is a flight of imagination. In this article, we have collected for you more than 30 original ideas for New Year's cards that you can do yourself.
Quite simple to make, but very original New Year card. For manufacturing you will need: thick base paper, corrugated paper, scissors, jewelry.
# 2 DIY New Year's card using scrapbooking technique
Scrapbooking has become very popular lately, so why not use this technique to create a postcard for the new year. You will need: thick paper for the base, scrap paper (you can limit yourself to ordinary wrapping paper), PVA glue, a pen or felt-tip pen, jewelry.

# 3 Postcard for the new year from threads
A postcard made with threads looks original. Drawings can be completely different: a Christmas tree, a deer, Santa Claus, just the inscription "Happy New Year". To make such a postcard, you will need: thick paper for the base, thread, needle, pencil, ruler, sequins for decoration.


# 4 Handmade origami Christmas card
An excellent option for a New Year's card would be a volumetric card made using the origami technique. For manufacturing you will need: thick paper for the base, colored paper, glue, buttons, sequins, ribbons, etc. for decoration.

# 5 Postcard for the new year using quilling technique
You can surprise your loved ones with a postcard made using the quilling technique. You will have to spend a lot of time, but it's worth it. You will need: thick paper for the base, paper strips for quilling, scissors, glue, corrugated paper or napkin, toothpicks.

New Year is the most fabulous holiday of the year, on this day everything becomes magical, so it will be very symbolic to present a voluminous postcard that seemed to come to life. To make 3D New Year's cards with your own hands, you will need: thick paper for the base, scissors, a pencil and a ruler, decorations.

For those who love order and control, a handmade New Year card with a geometric herringbone will be an excellent gift option. To make such a masterpiece, you will need: thick paper for the base, a stationery knife, a pencil and a ruler, PVA glue or double-sided tape.

For romantic natures, strict geometric shapes will not work. Rather, we need smooth lines, curves, additional decoration. In this case, you can present a handmade postcard made with a ribbon and buttons. You will need: thick base paper, tape, buttons, scissors, glue.

# 9 Postcard for the new year from a napkin
To make such a postcard, you will need: thick paper for the base, napkin or double-sided paper, glue or double-sided tape, scissors, decorative elements (beads, rhinestones, buttons, etc.).

# 10 Christmas card Christmas tree made of colored tape. Preparing postcards for the new year with children
If there are small residents in the house, they must definitely be involved in creating New Year's cards with their own hands. It is not at all necessary to do something difficult, the kids will also be delighted with simple crafts, for example, a New Year's card with a Christmas tree made of colored tape. You will need: thick paper for the base, scissors, glue, multi-colored tape (decorative tapes, strips from old magazines and postcards are also suitable), stickers or other decorative elements.

Another option for a New Year's card that you can make with your own hands with your children is a card with a Christmas tree fan. You will need: thick paper for the base, glitter or rhinestones, wrapping paper, scissors, glue, stapler.

Another simple but very original idea for creating a postcard for the new year. You will need: thick base paper, buttons, glue, tape, pencil or compasses.

A great idea would be a postcard with a handwritten drawing. For example, you can draw New Year's lanterns: you don't need to be an artist.

You can draw a New Year card with kids. You will need: thick base paper, a marker, a ruler, paints.

To create such a postcard, you will need: thick base paper, colored paper, scissors, glue, sequins, rhinestones and sequins.

What you need: thick paper for the base, colored paper for the Christmas tree, pencil, scissors, glue, decorative elements (beads, sequins, stickers, etc.).

For such a postcard, you will need: sequins of various shapes and sizes, a needle, thread, glue, tape for decoration.

New Year's cards decorated with felt look very original. We will make cards with Christmas trees from pieces of fabric, but you can turn on your imagination and make something more complex. You will need: thick base paper, felt, scissors, glue.

# 19 Very simple DIY New Year card
You will need: thick paper for the base, cardboard for round blanks, colored decorative tapes, glue, glitter, felt-tip pen.

You will need: 3 sheets of colored paper of different sizes, glue, thick paper for the base.

If you don't have much time for postcards, you can try this option. You will need: thick paper for the base, a Christmas tree template, a pencil, glitter, glue, a stationery knife, sequins or beads for decorating.

# 22 Postcard for the New Year with a volumetric Christmas tree made of scrapbooking paper
A very cute and simple New Year card. To create it you will need: thick paper for the base, thick paper for scrapbooking or cardboard, glue, ribbon for decoration.

# 23 Postcard for the New Year with a volumetric Christmas ball
And here is a New Year card with a voluminous Christmas ball. The principle of production is the same as in the previous postcard, the only difference is that instead of triangles made of colored cardboard you need circles. By the way, you can use old postcards as consumables, but only those that are not valuable to you as memories!

# 24 New Year's card to the garden
Such a New Year's open, made literally with your own hands, is perfect as a gift to grandparents, as well as to a kindergarten. Kids will create with great pleasure! You will need: thick paper for the base, paints, felt-tip pens.

# 25 Beautiful vintage new year card
A vintage New Year card can be made from the most common materials: old notes, thick paper, a beautiful old postcard (you can cut out any picture from a magazine), glue and some glitter. Step by step instructions in the picture below.

# 26 New Year card with volumetric garland
New Year is, of course, a tree and tree decorations. In fact, Christmas tree decorations come in many different shapes, but the most common are balls. That is why Christmas tree decorations and New Year are associated with balls. So we will make a postcard with a voluminous garland of Christmas balls.

If postcards with Christmas trees are unacceptable for you, then you should pay attention to other attributes of the New Year's holiday, for example, garlands. We will make a garland from pieces of felt and literally "hang" on a postcard.

# 28 Postcard made of felt
For making postcards with your own hands, you can and should use various materials, in particular, pay special attention to felt. No, no, not the whole postcard will be made of felt, but only some decorative elements. In this case, a herringbone. How to make a felt postcard - see step-by-step MK with a photo.

# 29 Original Christmas tree postcard
A New Year's card does not have to be square or rectangular. Get creative and make a postcard, for example, in the shape of a herringbone. The idea is not new, but agree, very, very original! By the way, with such a postcard, you can safely go to the competition in the kindergarten.

# 30 Herringbone accordion: making a postcard with children
A card with a herringbone accordion will be a great gift for grandma and grandpa. The child can make all the elements of the craft on his own. Mom's help may be needed, except in gluing. Take note of the idea and have fun with your child.

# 31 New Year card from different materials
And here is an idea for those who want to make a beautiful, simple and unusual craft - a postcard from different materials. You will need colored paper, fabric, you can also use fringe, braid and other unnecessary trifles that are lying around and do not get your hands out. Step by step instructions in the photo below.

# 32 Sequins and nothing more
You can make a stylish New Year's card using sparkles. For a greater effect for the base, take dark paper, although you can do it on light one, only in this case, take dark sparkles, gold on a white background will be lost. For making you need glue, brushes and glitter. For a step-by-step master class, see below.

# 33 Postcard for the New Year from scrap materials
And here is a great idea for those who do needlework once a year. Is there only paper from the materials for postcards in the house? No problem! You can make a great postcard from coffee packaging. How to do it - look at the photo.

# 34 Simple greeting card for kids
Making crafts with children is a real pleasure. Here you are, Mommy, when was the last time you made something with your own hands? In kindergarten, in elementary school, in the final exam at art school? Just about, and this is so much fun! Children are not only our joy, but also our teachers, who give us the opportunity to remember what we sometimes forget about!

# 35 For the little ones
And here is another version of the postcard for the little ones, for those who still can't really hold a brush in their hands. Well, let the child begin to learn art from the art house!) A simple card with a Christmas tree made from a handprint.

# 36 Unusual DIY snowman card
And here is another idea for an original card in the shape of a snowman. Simple ideas are good because they are simple to execute, but they are not devoid of grace.

# 37 Unusual New Year card with children
And another option for a simple postcard for making with children. Such a craft will smooth out a very, very original and quite suitable for the competition work. Prepare a thick sheet of paper and lots of colored scraps (colored paper, foil, pieces of fabric, etc.). Glue all this stuff to the base, and then cut out the elements for postcard decor from the resulting panel: Christmas trees, gifts, balls, and more.

A photo. Another 40+ DIY Christmas card ideas for inspiration


Long before the winter holidays, many begin to prepare gifts. Hand-made souvenirs are especially popular now. It is very interesting to involve the whole family in making them. For example, you can make beautiful New Year cards with your children with your own hands. Such gifts will definitely please grandmothers, grandfathers and other relatives. In addition, creative family activities are beneficial for children's development. The manufacturing process stimulates imagination, perseverance, forms accuracy.
DIY Christmas card ideas with children
The options for such souvenirs are very diverse both in form and design and execution techniques. Square and rectangular folding or single products are traditional. More original postcards in the form of Christmas trees, snowmen, Santa Claus, Snow Maiden. A child can draw a postcard, make it using the applique technique. Older children, especially under the guidance of adults, will also make more complex products with window slits, unusual surface textures, volumetric details made of paper and other materials, as well as all kinds of decor. The more parents work on the selection of beautiful materials and the choice of interesting technologies, the more interesting and original both the process and the result of children's creativity will turn out.
Volumetric New Year's for children
Modern materials for arts and crafts and children's crafts make it possible to create very beautiful and spectacular postcards even in the form of flat items, but souvenirs with volumetric details look especially unusual. You can do such a thing with the following methods:
- applique with embossed decor;
- in the quilling technique;
- with origami elements;
- in technology and kirigami.
Such voluminous postcards are beautiful even when they are made of an ordinary sheet of white paper, and if you use decorative sheets, then homemade souvenirs will not only be no worse than purchased ones, they will turn out to be just fabulous gifts, especially when they are made by children on their own.
Tools and materials
If you are going to make Christmas cards with the hands of children in kindergarten or at home, prepare the following:
- cardboard, paper (white, colored, textured, metallized with a pattern, embossing and other effects);
- pencil;
- eraser;
- ruler and others (compasses, stencils);
- templates and samples;
- scissors, office knife;
- with snowflakes, stars (if any) or a regular one that makes round holes;
- pVA glue or a thermal gun (both options are possible);
- felt-tip pens, gels, sparkles;
- decorative elements (stickers, sequins, satin ribbons, beads, beads).
In fact, nothing complicated and expensive is required. The main thing is imagination, patience and a desire to do something especially beautiful.
Christmas trees-accordions
Such blanks can easily be completed by a child on his own, especially if a diagram is printed or drawn on paper, that is, the lines along which folds should be made. Do-it-yourself New Year's cards like these can be made quickly. To complete the herringbone in the first way, work according to the following scheme.
- Take a sheet of green paper and mark it with equal-spaced guides.
- Fold the workpiece into an accordion.
- Glue one side of the resulting part so that you get a triangle shape.
There is also a second way.
- Cut a triangular blank out of green paper.
- Make markings at equal or different distances.
- Perform folds.
- The resulting harmonica herringbone can be strung on a wire, decorated with a string, a rod or a beautiful stick.

Now move on to assembling the postcard.
- Take a sheet of colored cardboard and fold it in half.
- Glue a Christmas tree created in your favorite way on the front side of the resulting postcard blank.
- Decorate the green beauty with beads, beads, sequins, thin tinsel.
- Decorate the background with artificial snow, cotton wool, white balls and glue snowflakes or circles made with a hole punch that simulate a falling snowball.
The postcard is ready.
Three-dimensional herringbone accordion
Simple but beautiful DIY New Year cards with your children can be made using the same accordions, only in this case, take not one blank, but several.

The herringbone will form inside the folded card. The product is made as follows.
- Prepare strips of green paper (according to the number of tiers of the tree).
- Make stripes.
- Make folds on all blanks.
- Glue the accordions, folded in half, in tiers inside the card. Thus, when opening, the Christmas tree will unfold, becoming voluminous. By the same principle, you can make a base for it (preferably from white paper). It will be a great imitation of snow.
Volumetric applique
In this way, it is easy to make a variety of Christmas cards with children with your own hands. As the main element, you can again take a Christmas tree (the simplest one), a snowman, or a whole plot picture of a winter theme. Consider a tree example.
Follow the steps below to create the base.
- Take a rectangular sheet of colored double-sided paper and fold it in half.
- Cut a hole in the front to a suitable shape, such as rectangular. You will get a frame. Choose the proportions yourself.
- The tree will stick to the right side of the postcard spread, that is, it will look out of the window.
- You can twist the elements of the Christmas tree using the quilling technique or make from strips of corrugated paper.
To work in the first way, you need to perform a few simple manipulations.
- Cut the green paper into strips about 5mm wide and twist the pieces out of them using a toothpick, knitting needle, or a special tool.
- Removing the element from the axis, form the desired configuration and glue the edge of the strip with the base and the layers together.
- Compose the image of a Christmas tree from the created parts.
To use the second method, work according to the following scheme.
- Cut the corrugated paper into wide strips (1.5 - 2cm).
- Fold the strips accordion-like and make cuts on one side.
- Unfold the blanks and roll up dense rolls from the resulting tapes. Glue the outermost layer to the previous one.
- Fluff up the incisions.
- Glue the made elements in the form of a Christmas tree silhouette.
5. Now decorate the Christmas tree itself, the background and the frame on the front side.
6. Sign the postcard, and on the front side glue the inscription "Happy New Year!"
Origami
This technology allows you to make a DIY New Year card with your child with little or no glue, just cutting and folding the paper. It's better to use a template here.
The work is carried out in a strictly defined sequence.

Kirigami
The brightest and most joyful holidays, of course, are New Years. A do-it-yourself card (we do it with children or completely trust the process to the kids) will be a nice gift for the New Year, and for Christmas, and for the Baptism of the Lord.
The kirigami technique is very interesting. In fact, in this case, the technique of silhouette cutting from the plane of the postcard is used, and then, by bending the sheet, the picture will become three-dimensional.

In addition to simple drawings in the form of trees, Christmas balls and snowmen, which are easy to make yourself, you can download very complex but amazing templates for New Year cards on the Internet. With your own hands for children, you can easily prepare a diagram. You can cut out complex elements, and entrust the child with folding or cutting out large parts.
Postcard with a volumetric Christmas tree
The design of such a postcard is similar to the version with a herringbone accordion that appears when opening a souvenir, only the manufacturing process will take less time. The volumetric Christmas tree that will appear inside the card when opened is formed not from horizontal tier elements, but from vertical Christmas trees.
A similar thing is done according to the following scheme.
- Prepare the base sheet by folding it in half.
- Draw a pattern for half a tree or print a finished one. On a sheet folded in half, circle the outline of the tree halves and cut out.
- Expand the workpiece. This is a neat, symmetrical shape.
- The resulting parts need to be made several of the same. Minimum - 3, but more is better, then the drop-down structure will be more voluminous and effective. It is enough to circle the scheme on one sheet, and the rest can be simply folded in a pile and fastened together or executed in the form of half-trees on sheets already folded in half.
- Cut out the required number of blanks for the silhouettes of the Christmas trees.
- If Christmas trees were made without fold lines, then now they need to be glued along the central axis. Glue the blanks sequentially so that the right side of the first tree is aligned with the left side of the second, etc.
- When all the details are connected in a three-dimensional herringbone, it will be enough to glue the left side of the free edge to the left of the postcard, and the right to the right inner side of the postcard;
- The process of decorating both the Christmas tree itself and the space around it can be carried out in any way with all available materials.
As you can see, you can make voluminous New Year cards with children with your own hands in different ways. Choose the idea you like. Create original gifts and stimulate your little ones to develop creativity and other useful qualities.
A beautiful volumetric New Year card with a Christmas tree is easy to make at home with your own hands. This card will appeal to both children and adults. And most importantly, making a New Year's card is a creative and interesting activity. You will need for Christmas crafts:
- colored paper,
- the pattern according to which the herringbone needs to be cut
- decorations (glitters, decorative glue, sequins, etc.)
How to make a voluminous postcard with a Christmas tree
This Christmas card with a Christmas tree is made using the kirigami technique.
Download the template first. You will need to cut a herringbone along it. Transfer the template to colored paper. You can take green, gold, velvet or whatever else you have.

Cut carefully with a clerical knife (children can do this with nail scissors) along the solid lines. The dotted line is the fold lines, you do not need to cut them.
Now make the folds along the dotted line. You need to push the Christmas tree with a slide, and fold the main part with a postcard. You should get a voluminous Christmas tree.
The second part of the template is the background. It can be cut from other paper - contrasting. The cut finished tree will be glued to it.
The folded volumetric tree must be glued to the substrate. You can also decorate the tree with sparkles, sequins, or paint with glitter paints. Once the blank is glued, you need to put the postcard under the press (or place several thick books on it). But make sure that the glue does not flow out from under the tree, so that the card opens normally.
It is better to write congratulations on such an interesting New Year card on the front side.
Here are a few more herringbone card templates:


.jpg)

Successful creativity and a merry New Year!
No matter how good a gift is, it is not considered complete without a postcard. The assortment of greeting cards is very large today. However, if you want a unique unique postcard, then it is better to make it yourself with your own hands. This is what we are going to do now: we will consider the ideas of New Year's greeting cards with our own hands.
You will need: thick colored A4 paperboard, scissors, corrugated paper, PVA glue or double-sided tape, a simple pencil, decoration elements (glitter, beads, ribbons ...).
Master Class

New year card in scrapbooking style
Scrapbooking Is a whole art that teaches you how to create and decorate photo albums (in our case, a postcard) with your own hands. Scrapbooking has a whole story of how a notebook became an album. At the end of the 17th century, notebooks appeared with additional blank pages. Their owners pasted the images, creating entire collections. So scrapbooking began to develop.
You will need: thick colored cardboard A4, PVA glue or double-sided tape, scissors, scrap paper, pencil, decoration elements (glitter, beads, rain, buttons, sequins ...).
Master Class
- Make 12 rectangles from scrap paper. The size of each rectangle should be different, from smallest to largest. (Width from 1 to 12 cm, length 5 cm for all rectangles).

- Roll each rectangle into a cylinder in the width direction, using a simple pencil to secure each cylinder with glue.
- Glue all the tubes together, starting with the largest and ending with the smallest, creating a Christmas tree shape.

- Let the tree dry well, then glue it on the right half of the card.

- Decorate the card to your taste with sequins, sequins, buttons, rhinestones ...
You will need: A4 colored cardboard, wrapping paper or candy wrapper, thin black marker, scissors, PVA glue or hot melt glue, stapler, decoration elements (sequins, beads, rain, buttons, sequins, bows ...).
Master Class

Minimalist Christmas card
Minimalism (from Latin - the smallest) is a style that is distinguished by simplicity and conciseness of composition.
You will need: A4 colored cardboard, shaped hole punch or stationery knife, thread, needle, sequins, simple pencil, ruler and scissors.
Master Class
- Make the base of the card by folding a piece of cardboard in half.
- On the right half of the postcard, sketch out the tree and star tops. Use a ruler and pencil.
- Cut the sprocket with a shaped hole punch or a clerical knife.
- Make a Christmas tree-shaped hole with a needle - a triangle.
- Take a needle thread and sew stitches. Thread the sequins after each stitch.
- Gently secure the thread from the back.
Origammi Christmas card
Origami Is a kind of decorative and applied art, literally translated from Japanese as "folded paper" in various figures.
You will need: multi-colored A4 cardboard, PVA glue, scrapbooking paper or thick paper, decoration elements (glitter, beads, rain, buttons, sequins, bows ...).
Master Class
- Make the base of the card by folding a piece of cardboard in half.
- Take 3 squares of thick paper, each side of which is 20cm.
- Fold the square diagonally, unfold it and fold it diagonally crosswise (conventionally marking 4 triangles).

- Tuck 2 opposite triangles inward.
- Press the resulting triangle to the surface and mark the center conditionally.
- Fold the bottom corner parallel to the middle. Repeat this procedure with the second corner. The module is ready!

- Make 2 more such modules, you can have different colors.
- Assemble the tree in this way: glue the origami module on the right side of the postcard, form the tree from top to bottom, insert the next module into the previous one.

- Decorate the tree to your taste with sparkles, sequins, buttons, rhinestones ...
You will need: A4 colored cardboard, scissors, a pencil, ribbons, PVA glue, decoration elements (sequins, beads, rain, buttons, sequins, bows ...).
Master Class
- Make the base of the card by folding a piece of cardboard in half.
- Glue the tree trunk to the center of the right side of the card. The barrel should be of a brown ribbon in the shape of a trapezoid length.
- Cut 6 strips of 2 cm wide, 2, 4,6,8,10,12 cm long.
- Cut off the corners of the bands on both sides.
- Glue the tapes from bottom to top, in a triangle shape.
- Decorate the tree to your taste with sparkles, sequins, buttons, rhinestones, stars, bows ...
You will need: A4 colored cardboard, scissors, a double-sided round napkin, a ruler, a simple pencil, double-sided tape, decoration elements (sequins, beads, an asterisk, rain, buttons, sequins, bows ...).
Master Class

You will need: A4 colored cardboard, A4 colored paper, scissors, a ruler, a pencil, a stationery knife, flat paper decorations (snowflakes, stars ...), decoration elements (sequins, beads, asterisks, rain, buttons, sequins, bows ...).
Master Class

You will need: colored cardboard and A4 paper, double-sided tape with a backing, scissors, tape, hole punch.
Master Class
- Use a hole punch to make circles out of colored paper. (If you do not have a hole punch, do not despair, the circles can be drawn and cut by hand).
- Make the base of the card by folding a piece of cardboard in half.
- Place tape in a circle on the right side of the card.
- Remove the protective layer from the tape pads.
- Glue the circles in several layers to make a voluminous wreath.
- Tie the ribbon with a bow and glue it up.
You will need: A4 colored cardboard, scissors, a simple pencil, multi-colored pieces of fabric, thread, needle, decoration elements (sequins, beads, stars, rain, buttons, sequins, bows ...).
Master Class
- Draw a star pattern, a tree trunk, a tree with a triangle on the pieces of fabric and cut them out.
- Make the base of the card by folding a piece of cardboard in half.
- Create an appliqué as shown in the picture, stitching a square of fabric with stitches to the right side of the postcard (use a sewing machine or sew by hand).
- Sew on the trunk of the tree, then the tree and the asterisk.
- Decorate with decorative elements to your taste.
Make cards yourself using your favorite colors, decorate according to your personal design taste, experiment and create whole collections of masterpieces with your own hands. Happy New Years for you and your loved ones!