Good day, friends and readers of my blog! No, it is impossible to survive! I thought that I had dealt with the Magi, but forgot about the shepherds at the Christmas show. Soon the head will fall off from overstrain. It would seem that so complicated in the outfit of this character, but I want to do everything as quickly and simply as possible. So I remembered how I used to take my husband's shirt for a role-playing game and gird it with a belt from an old robe. I don't remember, really, what kind of game it was then, but it doesn't matter. But this is an option, how to sew a shepherd costume for Christmas without a needle. I will share my findings with you, my friends.
As always, the first thing I turn to for help is books and the Internet. What did I find there? Well, about the wonderful book "Meet New Year and Christmas ”I have already told you. This is a real encyclopedia of tips, information, recipes, patterns and in general everything related to the winter holidays.
As for the question of how to make a shepherd's costume for Christmas with your own hands, the Internet will help out. There are shops where you can buy, if not the entire outfit of a shepherd, then at least find suitable items. For example, I found a folk Russian outfit, if you refine it, you get a shepherd boy. Instead of a cap with a flower, you can wear a coarse-knit hat, or make a primitive headdress from a piece of fabric and twine. The fabric is simply placed on the head, fastened across the forehead with a string. So as not to close your eyes, cut in a semicircle around the face.
Or, you can take the necessary details for the image of a shepherdess from ready-made masquerade outfits: a shirt, pants, some kind of hats, staffs, whips, etc. Today many shops offer affordable price good suits... Get something versatile that will come in handy for other projects. There is nowhere to buy a real shepherd costume for Christmas, but our fantasy will help get out of the situation, right?
Let's stir up the past ...
The most correct option for solving our problem is to rummage through the bins and find old things that would fit the outfit of a shepherdess. As I said, men's shirts of any color will do, but better than a solid dark one. They can be belted with anything: twine, a belt from a robe ...
Explore the photos of the costumes of the shepherds that came for Christmas of the Savior on the Internet and you will know what to do. There are pictures that depict biblical scenes on the theme of Christmas. For creative people, which we are educators, this is enough to figure out what to make costumes from.
What did the shepherds look like in those days? Who knows. I think they wore long coarse robes, their heads covered with linen or a hood. This is a poor part of society, so clothes should be simple and soft. You can even take an old sweater knitted with thick threads, let it be gray or brown. On the child, he will be like a hoodie, which is what is needed for the image. Tie a cloth over your head, like a Bedouin, give a toy sheep in your hands, a staff and a shepherd's costume for Christmas with your own hands are ready!

Since in those days, men wore beards, one shepherd can make "vegetation". The easiest way is to apply this mascara to the child's face with a mascara brush. Have you seen how artists make up? This is not difficult. And you can make a good goatee out of fabric, paper, cotton wool, thread. I have seen many beard making tutorials on the Internet. If you have time, make a beard, it will come in handy for other projects.
What else to think of for the costume of the historical shepherd for the holiday on Christmas Day? A bag over the shoulder, a pipe, sheepskin skins are also suitable or whatever you find. In general, the main thing is to make it clear that this is a shepherd and nothing else is needed. Of course, if you are a perfectionist, then sew a long shirt without buttons from burlap, make a fringe on the sections. Use the same fabric to make a Bedouin headdress and a roomy bag.
Christmas carols are a long-standing tradition of the Slavic peoples. See how to make costumes for him, prepare special treats.
The content of the article:
Spend the New Year holidays in a fun and interesting way. Remember how Christmas was celebrated in antiquity, maybe it is worth adopting some traditions? Make outfits for children and adults, learn songs, ditties and go caroling in a noisy company to friends, relatives or neighbors. If you are hosting such guests, then prepare treats in advance, some of which will be ritualistic.
A little about Christmas carols

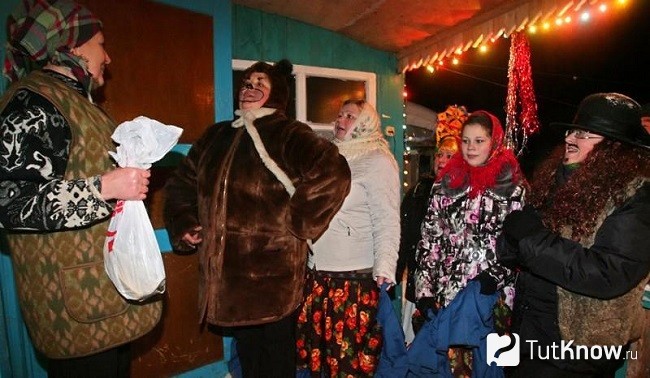
Caroling is a Slavic rite, which was carried out mainly on Christmas days. A group of people came to the house, they performed songs and sentences addressed to the owners of the house. The wishes were positive. The hosts treated their guests with special dishes.
Two groups of people walked around the courtyards - mummers and non-mummers carols. The latter mainly pronounced only the text, the mummers, in addition, played a whole performance in front of the owners, the participants of which were the characters they represented.
But there are other carols, whose main goal was magical actions, songs and texts only accompanied this. For example, someone was throwing grain, such people were called sowers. Others swept garbage from the corners of the house or poured water over the owners, handed out ritual branches, which, according to legend, were supposed to bring happiness to the household. Some carved sparks from their burning logs, such were called polazdniki and were considered "divine guests" who bind both worlds.
There were also carols who came to the house with special ritual items. So, someone carried a branch or a tree with them, decorated in a certain way; others a figurine of a little Christ in a cradle; still others are a Christmas star; the fourth is the image of a snake.
The ceremony takes place after sunset or at night before dawn, both adults and children participate in this. But the latter went mainly in the morning and in the afternoon, did not particularly dress up, but put on animal masks, sang, and asked for food.
The structure of the rite includes:
- preparation;
- caroling round;
- the end of caroling, a joint meal of the carol squad.
Goat costume for a party of Christmas carols
Masks can be purchased at the store or made by yourself. Clothes do not have to be sewn, you can quickly do it yourself.
Usually, during caroling, people are involved, disguised as such animals as: goat, bear, deer, mare.
If you want to quickly make a goat costume, then use a light fur coat or sheepskin coat, which needs to be turned inside out, with the fur out. If you have such clothes, all that remains is to make the horns.

If you liked these, then take:
- head hoop;
- soft pink and white fabric;
- artificial flowers;
- pieces of white fur;
- glue.
Cut out two horns from thick white fabric, attach them to a semicircular base. You will drape the junction with flowers, at the same time decorating the horns of the goat with them. Using the hoop, you can make other head decorations for this animal, for example, this one.

Take:
- soft dark fabric;
- synthetic winterizer;
- wide elastic band to match;
- scissors;
- threads;
- needle.
- Cut in two fabric triangles, grind the sides of each to make cones. Fill them with padding polyester, giving the horns a slightly curved shape.
- Cut out circles from the same canvas to cover the bottom of these cones. But do not do this yet, but cut out the elastic bands along the diameter of the circle with allowances for the seams, tuck their ends between the bottom of the cones and the circles.
- Now you can sew up the bottom of the horns. They fit easily with hair hoops.

Using cloth, paper, glue and braid, you can make a goat's garment, which consists of:
- headdress with horns and ears;
- tail;
- hooves.

If desired, horns and ears for a goat for Christmas carols can even be made from disposable tableware.

If you have neither a sheepskin coat, nor a sheepskin coat, nor a fur coat, but you have a fluffy light fabric or fur, then make such a skirt and vest out of it.
- For a skirt, it is enough to cut a rectangle, one side of which is the length of the future product - minus 5-7 cm (depending on the width of the belt), the other is the volume of the hips plus a seam allowance.
- Stitch the sides of this rectangle. For a belt, take a wide knitted strip, fold it in half. Insert 1 cm of the skirt inside, stitch the belt with it.
- You can sew a vest without a pattern by attaching a sleeveless jacket, jacket or other non-tight outerwear to the fur. Using this pattern, cut out the back and two shelf parts. They need to be sewn on the sides and shoulders.

If you want the horned goat to have a mask that covers the face, then sew it using the following pattern.

Here's what you get.

But you need to cut out and sew on the ears. For each, one piece is cut out from fabric and fur, sewn in pairs. Place the lining in the goat's head, grind these two pieces around the edges. Open the goat's nose using the following pattern.

Fill it with padding polyester, sew on the face, attach the eyes.

How to make a Christmas deer with your own hands?
This is another character who participates in carols. You can make a costume of this animal or just bring its figurine with you to the holiday. This requires very little:
- cardboard box;
- pencil;
- template;
- scissors.

Scale up the provided template to the desired size.As you can see, it consists of 4 parts:
- body and head;
- horns;
- hind and front legs.
The deer can be left like this or pasted over with paper of the desired color. The snow-white animal looks good and festive. You can decorate it with A4 white sheets.
After the glue dries, use scissors to make cuts in the parts to connect them. Insert the horns into the notches of the head so that the parts are perpendicular to each other. In the same way, connect the hind and front legs of the animal to the body.
Taking this idea into account, in the future you will be able to create other animals, including a bear, using this technique. If there is no desire or nothing to make his costume from, make such a figurine, carry it with you on carols.

If you want the deer to be the most durable, plan to place its figurine in the country after the holidays, then cut out the details from plywood. Connect them with bolts so that you can unscrew at any time, fold compactly and take them to the address.
For a street animal, it is better if you paint or cover it with an antiseptic, then the figure will not be afraid of precipitation.

Here's how to make a deer for the New Year, so that then for a long time it will also decorate the dacha. If you don't want to carry a large figurine with you, then make a pocket one.

This will require:
- corks from wine bottles;
- twigs;
- glue gun;
- drill or thin screwdriver;
- Cut the twigs to the desired length so that some of them will soon turn into horns, others into hind and front legs, and the smallest into tails.
- Drill holes in the two plugs to insert the corresponding branches there. If this tool is not available, then gently twist with a thin Phillips screwdriver where you want to drill a hole.
- Using a glue gun, fix the parts, connect the two plugs together with a piece of a thick branch.
- You can decorate the face of the animal by gluing a small ball instead of a nose. Take this figurine with you and go caroling.
- brown sweatshirt with a hood;
- a piece of beige fabric;
- cardboard;
- brown paints;
- red cloth;
- gum;
- synthetic winterizer;
- red ribbon.
- If the jacket is at the bottom with a drawstring, it will come in handy, if not, then sew a strip of fabric there to insert an elastic band.
- Cut out the tummy lining from the beige linen. Better to use fleece so you don't have to work the edges. Sew a strip of tape over the top to tie this tummy overlay in the shape of a neck apron.
- Trim the hood strip with the same fabric, sew double ears from it.
- Cut out the antlers of the deer from cardboard, paint them brown, when the coating dries, glue them to the hood.
- If you do not have your own tummy, then you can put fabric under the bottom of the sweater to achieve such a figure for a while.
- Cut a circle out of red felt, gather its edges with a thread. Fill with padding polyester, sew this deer's nose into place.

This model for men:
- Women can use a dress of this color, attach a beige linen jewelry to their chest.
- Wrap the wire with brown braid, form deer antlers out of it, attach to the hair band.
- To make a nose, drill a hole in the center of the red plastic bottle cap and two holes along the edges. Pass it through the side elastic of the same color, tie its ends.

Here's how to make a New Year's reindeer out of a person for carols or for a costume ball. See how you can quickly create another ritual character.
Bear costume for kids and adults
To do this, it is not necessary to sew it from scratch, you can remake an old jacket with a hood, and create an image for a child from a large fur toy. , taking these ideas as a basis, has already been told. Now look at how to quickly make it for adults.

If a brown fur coat with a hood is available, this is what you need. Ears are sewn to the hood, makeup is done to the person so that he looks like a bear.
If the fur coat is without a hood, an old hat with earflaps is suitable for the head of this animal. If there is no such attribute, then you need to make a bear mask or buy one. They are very interesting, which are created from waste material.
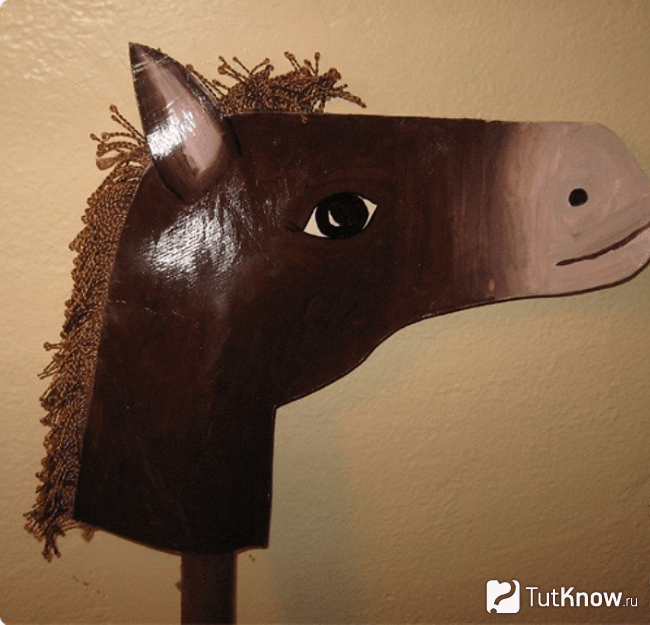
How to make a horse with your own hands for Christmas carols?

You will also need these skills, because mummers often dress up to look like this character. Usually two people create it. To do this, the first one needs to put on the head of an animal and pants of the same color, the second one dresses up in similar pants, bends over, holds the first by his belt.
On top of these people are covered with a blanket, to which you need to sew a tail. You can use a tablecloth or a cape for a sofa as it. But the horse's head will need to be made.

From plush or other brown soft fabric, cut out two parts according to the presented pattern, sew them together, and just tuck and hem the bottom. It should be such that the person's head passes well. But it is best not to overlap the center seam at the front for better air exchange.
If the horse depicts one person, then you need to make a head on a stick, keep it next to your own, covering yourself with a piece of fabric sewn on the side.
To make one, take:
- cardboard;
- paints;
- scissors;
- glue;
- brown fringed braid;
- stick.
- Cut out two parts of the head from cardboard, color each on the front side, highlight the eyes, nose, mouth. Color the ears separately.
- When the parts are dry, glue the ears in place, attach a mane (fringed braid) between the two blanks on the back of the head, glue them.
- When this solution dries, you just have to thread a stick through the hole and wear the horse's head with it.
When a lot of people were packed, they did not fit under the blanket, the task was to stay there. Those who were able to do this were considered the winners. Those who could not resist became losers.
After such merry contests, Christmas songs, it was high time to eat. For this, the hostesses had to prepare a treat for Christmas carols in advance. Check out some of them now.
Christmas carols - recipes
Housewives should take care of the treat in advance if they suspect that they will come to carol for the New Year holidays. They used to do just that. Before Christmas, the housewives kneaded dough, baked cookies from it, which were called "carols".
The largest was kept in a stable until Epiphany, on that day they were crushed for food by animals. There was a belief that then the livestock would not get sick all year round. Of course, you can make such delicious cookies for the mummers. But if they were not made sweet for the animals, they should be decorated with jam and glaze for the guests who came.

This will be a modern innovation, and the dough for Christmas carols has always been made according to one recipe - from rye flour. Here's what's included:
- rye flour - 2 cups;
- warm water - 1 glass;
- a pinch of salt.
- All ingredients are combined, the dough must be kneaded well, covered with a napkin, and left for half an hour.
- After that, a tourniquet is rolled out of it, cut across into pieces of the same size.
- Each is rolled into a cake, the filling is put inside, but the pies are open, so only sides are formed from the dough, the filling remains in a prominent place.
- mushroom;
- potato;
- sweet jam;
- carrot;
- from porridge.

- To make a mushroom, rinse the dried mushrooms, soak them in water for 2 hours, then boil until tender. After that, fry them together with onions in vegetable oil, salt, add seasonings.
- To prepare the second filling, potatoes are washed, peeled, boiled until tender. Now you need to drain the water, heat the potatoes, fill with a small amount of hot milk, add a piece of butter, salt, mix. Use when the filling has cooled.
- For the third, take thick jam, fresh or frozen berries.
- For the fourth filling, take 2 cups of water and put it in a saucepan over the fire. When it boils, add a glass of millet, add salt, a little vegetable oil. Previously, housewives cooked such porridge in an oven, modern ones can use a gas or electric stove for this. So that the filling does not taste bitter, it is better to first pour boiling water into the millet, drain the liquid. Then add 2 cups of hot water, cook according to the recipe. Instead of millet, you can use pearl barley or buckwheat.
- To make the filling of carrots, take 300 grams of this vegetable, rinse the root vegetables, peel, grate. Simmer in hot water until tender. Finally, add salt, sugar, some vegetable oil and lemon juice.
As you can see, you can treat the mummers with pies, bagels, sweets. If you didn't manage to make an animal costume, then guys can go caroling in hats, and girls in headscarves. You can take animal figurines with you, you already know how they are made. But how to create the Star of Bethlehem, which they also take with them, look right now.
![]()
Soon Christmas - traditional christian holiday, as usual celebrated in the family circle and full of gospel symbolism. Many Christmas elements have become familiar to New Years: candles, green herringbone as a symbol of eternal life, decoration in the form of a star and angels, etc. Therefore, decorating your home (apartment or house) for Christmas, we will simply supplement the existing one christmas decor separate elements. As you might have guessed, today we are discussing DIY Christmas crafts.
Nowadays, almost all decorative elements can be purchased in the appropriate stores, however, many people prefer to make them with their own hands, selling creative skills and love for needlework. We offer several ideas, implementing which, you can better prepare for the long-awaited holiday. 

As usual, when creating handicrafts, we will do without expensive materials and complicated processes. The tools are also familiar and hopefully you know how to handle them. In any case, our ideas will help you creatively organize your leisure time, spend your time interesting and usefully.
Christmas wreathusually decorating front door, came to us from the West, but perfectly fit into the Orthodox and secular tradition and can be used both as a hanging decoration and as a decoration for candles or a separate decorative element. 

To make a Christmas wreath, you need a round base ring of a suitable size, usually from thick cardboard, less often from other materials, for example, flexible branches twisted and tied together: metal and plastic rings are not considered a suitable base, but no one bothers you to use and them. The next stage is to design this very ring: it is best to first wrap it with a fabric or lace ribbon of a color suitable for the main decorative element, then using hot glue, threads or thin copper wire (you can combine it) to attach the decor - needles, beads, bows, ribbons , pine or spruce cones, etc. The more imagination, the better and more original, the presented photos can serve for you both as a source of inspiration and as a model. 


The episode of the Nativity of Christ was the adoration of the Magi, which is described in the Gospel of Matthew:
"When Jesus was born in Bethlehem of Judea in the days of King Herod, the wise men from the east came to Jerusalem and said: where is the one who has been born King of the Jews? for we have seen his star in the east and have come to worship him. Hearing this, Herod the king was alarmed, and all Jerusalem with him. And, having gathered all the chief priests and scribes of the people, he asked them: where should Christ be born? They said to him: In Bethlehem of Judea, for this is written through the prophet: you, Bethlehem, the land of Judah, are no less than the voivodships of Judah, for out of you will come a Leader who will guard my people, Israel. Then Herod, secretly summoning the Magi, found out from them the time of the appearance of the star and, sending them to Bethlehem, said: Go, scout carefully about the Baby, and when you find it, notify me so that I can go and worship Him. After listening to the king, they went. [And] lo, the star that they saw in the east walked in front of them, when at last it came and stopped over the place where the Child was. Seeing the star, they rejoiced with very great joy, and, entering the house, they saw the Child with Mary, His Mother, and, falling down, worshiped Him; and opening their treasures, they brought him gifts: gold, frankincense, and myrrh. And, having received in a dream the revelation not to return to Herod, they departed to their country by another way.".
In the Russian tradition, it is customary to call the pilgrims who came to worship the baby Jesus, the pilgrims, emphasizing that they were pagan priests, like the Slavic wise men. In the Gospel, the Greek word μάγοι (magicians) is used, meaning at that time the Persian ministers of the Zoroastrian cult of Mithra or the Babylonian priests-astrologers. Magi, starting from antiquity, were depicted in Persian costumes. The 7th century Persian king Khosrov II Parviz, who destroyed all Christian churches in Palestine, spared the Bethlehem Church of the Nativity because of the Persian appearance of the Magi depicted on it.
However, there is another point, also coming from antiquity, according to which the Magi came from Arabia. This point of view is based on Old Testament prophecies, which coincide with the worship of the Magi described in the Gospel: " the kings of Arabia and Saba will bring gifts. and will give him from the gold of Arabia"(Psalm 71/72, 10 & 15);" and nations will come to your light, and kings - to the radiance that rises over you, they will all come from Saba, bring gold and incense, and proclaim the glory of the Lord"(Isa. 60, 3 and 6). Certain features of Arabian myths and cults, which included the idea of \u200b\u200bthe birth of God from the stone-maiden, prompted Christians to suppose that the priests and" wise men "of Arabia had a special premonition of the mystery of Christmas. In the Arabian point of view, the Magi are not just priests, but also kings.

The Gospel does not mention the exact number of the Magi, but the 3rd century Greek Christian theologian Origen suggested that the number of the Magi is hurt by the number of gifts, i.e. Three Magi. This point of view is dominant to this day. However, there are twelve Magi in the Syrian and Armenian traditions.
Origen also gave the Magi names: Abimelech, Ohozat, Ficol. However, other names of the Magi took root in the medieval Western European tradition: Caspar, Balthazar, Melchior. With the advent of the era of great geographical discoveries and the intensification of missionary activity in "exotic" countries, the Magi become the personification of the human races - white, yellow and black, or three parts of the world - Europe, Asia, Africa: Balthazar - Moor, Africa; Cupronickel - white man, Europe; Kaspar - with oriental features or in oriental clothes, Asia. In addition, the Magi began to attribute the division into three human ages: Balthazar - a young man, Melchior - a mature man and Caspar - an old man.
Bernardino Luini. Adoration of the Magi

Albrecht Durer. Adoration of the Magi

Konrad von Soest. Adoration of the Magi

Hieronymus Bosch. Adoration of the Magi

School of Hieronymus Bosch. Adoration of the Magi

Edward Burne-Jones. Adoration of the Magi
Rubens. Adoration of the Magi

Correggio. Adoration of the Magi

Cosimo Tura. Adoration of the Magi

Gerard David. Adoration of the Magi

Guido da Siena. Adoration of the Magi

Hans Memling. Adoration of the Magi


As for the gifts of the Magi, the following point of view prevails here: they worship God with incense, pay tribute to the king with gold, myrrh (with which they anointed the dead) they honor the upcoming suffering death of Jesus Christ. It is believed that the tradition of giving gifts at Christmas dates back to the gifts of the Magi.
Dirk Bouts. Adoration of the Magi

Luca di Tomme. Adoration of the Magi

Richard King. Adoration of the Magi


There are legends about the later life of the Magi: they were baptized by the Apostle Thomas, then they were martyred in Eastern countries. The relics of the Magi were found by the Byzantine Empress Helena and placed first in Constantinople, and in the 5th century were transferred from there to Mediolan (Milan). In 1164, at the request of the Emperor Frederick Barbarossa, the relics of the three wise men were transferred to Cologne, where they are still kept in the Cologne Cathedral. In Catholicism, the adoration of the Magi is celebrated on the day of the Epiphany - January 6 (in Spain and many Spanish-speaking countries, gifts are given on the Epiphany), and the memory of the Magi is honored on July 23.


An important moment in the story of the Magi - Star of bethlehem, which led the Magi to the baby Jesus. Believers consider this star to be the fulfillment of the Old Testament prophecy: " I see Him, but now not yet; I see Him, but not close. A star rises from Jacob and a rod rises from Israel, and smites the princes of Moab and crushes all the sons of Seth"(Num.24: 17).
There are different points of view on what exactly the Star of Bethlehem was. Origen and John of Damascus believed that it was a comet. Astronomers say that Halley's comet was indeed visible in the sky for 63 days in 12 BC. The 14th-century Italian artist Giotto used Halley's comet, again passing over the Earth in 1301, as a model for the star of Bethlehem.
Giotto. Adoration of the Magi

Giotto. Adoration of the Magi

Since, according to the Gospel, the inhabitants of Judea themselves did not notice any miraculous phenomenon, there is an opinion that the Star of Bethlehem is actually a parade of planets (an astronomical phenomenon during which a certain number of planets of the solar system line up) - an event for the uninitiated not particularly remarkable, but of great importance to those who are able to interpret it. Astronomers point out that the parades of the planets at that time were also: the conjunction of Jupiter and Saturn in the sign of Pisces (November 15, 7 BC), the conjunction of Jupiter, Saturn and Mars (early March 6 BC), conjunction of Jupiter with Regulus (August 12, 3 BC) and Venus with Jupiter (August 12, 2 BC).
It is believed that the star of Bethlehem, due to the strange features of its behavior, cannot be an astronomical object at all, but has a supernatural origin. Theologian Theophylact the Bulgarian wrote: " When you hear about a star, do not think that it was one of those visible to us: no, it was a divine and angelic power that appeared in the form of a star. Since the Magi were engaged in the science of the stars, the Lord brought them to this, for them a familiar sign, like Peter the fisherman, amazed by the multitude of fish, attracted them to Christ. And that the star was an angelic power, it is evident from the fact that it shone brightly during the day, walked when the Magi walked, shone when they did not walk: especially from the fact that it walked from the north, where Persia, to the south, where Jerusalem: but the stars never go from north to south".
There is also such a point of view that the Star of Bethlehem is not a creation of God, but of the Devil, who thus wanted to kill the baby Jesus with the hands of King Herod. And this would have been possible if Joseph and the Virgin Mary with the baby Jesus had not fled to Egypt during the mass extermination of babies by the order of Herod.
Designing and creating a children's festive costume is a fun and creative process.There are needlewomen among us who, like Vasilisa the Beautiful, are capable of creating a real exclusive masterpiece for their baby in one night.
But these mothers are more the exception than the rule. Striving for the ideal, we often forget that the perfect pattern, high-quality fabric, straight lines, the price of a suit - all this is interesting and important only to you and me. Well, sometimes people around you also pay attention to it. For a kid, it means absolutely nothing! YOUR attention and care, YOUR creativity, YOUR joint time with him, spent on creating an outfit is much more important to a child. So, dear mothers, let's not give up on the eve of the holiday, but try together with the baby to build a costume with our own hands that does not require the skills of a super dressmaker. And we will spend a minimum of time and money on this.
Angel costume
sewn from light white fabric. Wings: we stretch a chiffon fabric of an appropriate shape on a wire, onto which we attach small pieces of feathers.
Shepherd costume
"By eye" we cut out a long shirt with a one-piece sleeve.
We supplement with belts. The headpiece is a rectangle, which we tie with a wide piece of tacky. Staves in hand - the suit is ready.
Magi costume
Can be made from bright fabric, like a shepherd costume. And on your head, twist a large piece of dense fabric. Make with chopsticks, at the end of which attach foil stars.
There are miracles ...
If we use Pushkin's tales in the script, for example, Lukomorye or "The Tale of Tsar Saltan", then the following costumes can be used:
Scientist Cat.
It is hard to imagine that such a very intelligent cat would be white or red. Of course, it must be pitch black. Let's pick the right clothes for our little son: black trousers and a black turtleneck sweater. We put on our hands old black gloves with cut off fingertips. Cat ears are easy to make. Cut and glue 2 triangles each from black velvet paper or cardboard. Before gluing, put a dark elastic band on the baby's head, measure the desired length, fasten the ends and mark on the elastic band the places where the cat ears should stick out on the crown of the head. Then attach the cardboard ears at the indicated points so that the elastic passes between the two triangles at the base, and glue them together. Our cat is almost ready. The main accessory is missing - the chain. Weave a chain from foil rings. The cat itself will cope with this. Cut the food foil into strips, roll them along several times to make the foil denser. Now fold each strip into a ring, thread one into the other. Glue the ends. Make more of these links so that the chain is long. Now we put on a shiny chain around the cat's neck, complement the image with a black mustache.
For greater learning, the cat can carry a large book under its arm.
Small the little Mermaidwill look good in my mother's any very long dress. We embroider the dress with shaggy green tinsel so that it hangs with ribbons from the waist to the ground. You can add plastic algae (these are available at any pet store). The main decoration of the little mermaid will be a crown of water lilies. We will make water lilies out of paper. To do this, first make three cardboard flower templates. Draw on cardboard three circles of different diameters (7, 8 and 9 cm), draw a lily flower with petals inside the circle, cut out. Now outline the templates on white paper. Our wreath will have three water lilies, which means that we need nine blank flowers of three diameters. Using scissors, bend the paper petals inward (place the blade of the scissors to the base of the petal from the inside of the flower and swiftly move it to the edge, rolling the paper). We collect "twisted" flowers in three, gluing the smaller ones inside the larger ones. Add yellow colored paper stamens. To the size of the baby's head, we cut out a cardboard hoop (instead of a cardboard rim, you can use a wide hair band (such as for aerobics). In order for it to hold better, we make the hoop a little smaller than necessary, and insert a piece of elastic at the back (in those places where the elastic is attached, glue squares of fabric from the inside so that the mask does not break immediately.) We decorate the hoop with paper water lilies (one in the middle, above the forehead, two others - on the sides). We dissolve the little mermaid's hair over the shoulders, put on the head decoration from water lilies - and the image is ready!
If your daughter has a braid or at least a pigtail, she will be able to transform into The Swan Princess.
Remember: “The month under the scythe shines, and in the forehead the star is burning.
This should become the highlight of the outfit, a small detail, thanks to which everyone will immediately understand what kind of character is in front of him. For the base of the suit, you will need a long white dress, preferably toe length and with wide sleeves. You can on hastily sew a long hoodie from an old white sheet. We embroider the outfit with crescents and stars cut from foil. We glue the cardboard hoop, attach a large cardboard star, pasted over with silver foil, to it in front. The same month will be placed behind. It remains only for the little princess to put on the headdress correctly so that the month is under the scythe, and learn to move beautifully and smoothly, waving her arms like wings.
Butterfly.Put on an elegant blouse, black skirt and black tights and shoes, make a hoop of black fabric on a cardboard frame on your head, on which you fasten wire "antennae" with balls at the ends. The main job is making the wings. Take a light-colored silk (white, yellow, pink or blue), cut it out with a half-sun, stretch it and paint with watercolors or aniline dyes as your fantasy tells you. The only condition is that the drawing must be symmetrical. After completely dry, gather the fabric in the center, fasten it around the neck, and the tips of the wings on the wrists.
Snowflake.
Such a suit is every girl's dream. Sew the dress from a light translucent fabric and decorate with embroidery with silver lurex. The headdress can be made both in the form of a hat, and in the form of a diadem or crown. To do this, take a silver tinsel twisted in a spiral, that is, hollow inside, then pick up a piece of wire about 1.5 m long, pass it through the tinsel and "sculpt" a fantastic decoration for your girl. First, mark the center of the segment, which will be the center of the headdress, and from it symmetrically place folds and loops on both sides. The circle will close at the back of the head: free the ends of the wire from the tinsel, fasten them together, and then put tinsel on the joint again. The wire should be easy enough to bend and maintain the given shape, should not be too thin, because in this case the product will have to be corrected every now and then, but too thick is also not suitable. Do not use aluminum wire - it will stain your skin. The hat is easier to make: close the wire wrapped with tinsel in a circle, and inside the circle, fasten the pieces of tinsel (without wire), located crosswise.
Princess.
Sew a magical, airy princess dress from light silk or satin in pink and blue, sleeves and an upper skirt from mesh or nylon, chiffon. Gather the skirt every 15-20 cm on a thread, decorate the bottom with small bows, attach the same bows to the sleeves. Sew a fluffy petticoat. Decorate the dress with a heavily starched collar and a large pink satin bow. The hairstyle is crowned with a small diadem and an exquisite necklace around the neck. Both the diadem and the necklace can be made from tinsel.
Funny animals
All kinds of fauna can also be wonderful prototypes for a costume.
Bunny.
To make a bunny costume, you need white fur. Sew a hat with ears, a collar, mittens out of it, wrap the boots over them. Sew a black nose and antennae to the cap. You can use a ready-made hare mask, in which case sew a hat without ears.
Put on white shirt and white pants, and shorts with breasts let them be bright yellow color with carrot applique. It will be very impressive if you sew them from colored fur: the bunny is all so soft, fluffy, well, just lovely! And in conclusion, do not forget to attach a small white lump of fur to your pants - a ponytail. This is the most touching piece of the costume.
Chanterelle.
Sew a dress for a chanterelle from light silk in a bright orange color. Lush petticoat, white swan down collar, graceful gloves - beauty! On the head is a hat made of faux fur with ears, and the most important thing is, of course, a natural fox tail. Generally speaking, only if you have a decent tail is it worth taking on the manufacture of this costume. Decorate the hat, gloves and shoes with small bows, and the girl's neck with beads to match the dress.
Kitty.
Sew a hat with ears, mittens and a ponytail from gray fur, pick or sew a blouse and pants of a suitable color (in a gray strip). A white shirt-front and a large bow on the neck will very decorate the suit. And for a kitty, you can sew a tiny bag "for mice".
Bear.
To turn into a bear cub, you can sew a jumpsuit out of brown fur, sew on the ears to the hood - and you're done. But try to get by with the things that are in the wardrobe. Take a warm sweater of a suitable color with a hood, sew on the ears; wash (albeit temporarily) appropriate appliques on the panties with bosom. Sew mittens with slits for the thumbs and with appliqué in the form of teddy bear paws. You can use a ready-made bear mask.
Fly Tsokotukha.
For a tsokotukha fly suit, use black velvet and white mesh, pick up a yellow blouse. Sew pants or a skirt and a small hat (beret) out of velvet. Strengthen small black antennae on the cap. Cut out the wings from the net, pass the wire along the edge and give them a shape, decorate them with black dots (small balls of velvet). Make a collar from white lace, small wings along the armholes of the blouse and decorate the bottom of the panties or skirt. In addition, sew a tiny black handbag with a long strap and put a large "coin" cut out of cardboard and pasted over with foil in it with the inscription "5 kopecks".
Little bunnies, fluffy squirrels, soft kittens, prickly hedgehogs, red chanterelles, gray wolves - all these cute costumes suit our kids. To create such an image is not at all difficult: clothes of a suitable color, cardboard or cloth ears, tails.
You can buy a ready-made mask or hat with ears of the corresponding animal, and build everything else from improvised means.
For the bunny it would be nice to find a real rabbit tail. The kid will be delighted.
Tail chanterelleseasy to sew from two oval pieces of orange fabric or fur, stuffing it with padding polyester.
On the back dressed in shorts and a vest hedgehog you can attach a piece of gray fur, and on top - plastic apples, multi-colored paper leaves.
Wings butterflies or bees easy to do by covering a wire frame curved in the form of wings with any thin fabric (for example, nylon or tulle). Decorate the wings with paper flowers, sew two straps to them, like a backpack, or attach them to clothes. Dress up the baby in a bright sarafan or dress (it can also be embroidered with flowers), put a hoop with cardboard mustache on your head - here's a beautiful butterfly.
And by all means learn poems or songs with the baby that are suitable for his image. For example, if you have two kids, dress them up as a fox and a wolf.
Then they will be able to tell by roles a wonderful poem by S. Marshak "A gray wolf in a deep forest met a red fox ..." For a hare, A. Barto's poem "It was in January" about how hares deceived a wolf will do.
And the tiniest rabbits will be able to dance to the song of their mother "Zainka, dance ...".
Fairy-tale heroes
Peppy Long Stocking from the tale of A. Lindgren. We put on a short sarafan (you can even one from which the baby has already grown). Sew a few patches of a different color to the sundress with light stitches. Remember, as in the book: “it was assumed that it (the dress) would be blue, but there was not enough blue fabric, and Pippi had to sew here and there a few scraps of red”. An obligatory touch is long multi-colored knee-highs. We will borrow the shoes for a while from the daughter of a friend, who is three or four years older than your baby. And don't forget about tight braids sticking out in different directions. For more "sticking out" we insert a piece of flexible wire into them. We draw bright freckles on the nose and cheeks. Done! You can add to the image a chest with "gold" coins, a toy monkey and demonstrate the crown number - raising a horse (of course, also a toy one).
Carlson.
It is very easy to turn a boy into him. We put on a plaid shirt, shorts with suspenders. We attach a cardboard propeller to the back. And if you manage to persuade dad to spend a little time and participate in the creation christmas costume, he will probably be able to assemble a simple device on batteries (or rechargeable batteries) in such a way that when the button is pressed on the baby's belly, the propeller starts spinning from behind (we hide all the wires under the clothes). A computer fan is suitable as a propeller. It is powered by 12V and can be bought at any computer store. To complete the image, ruffle the boy's hair.
And, of course, any costume should be created with the baby. Let him make his own contribution to the work: he will cut out, paint, glue something. Such a suit will be of even greater value for its young owner.