Marina Ilyina
Good evening, dear guests of my page!
The summer is over and our teachers have begun working days.
I faced such a problem, for a competition in kindergarten I had to make an owl from natural material... I didn't want to do a flat craft, and I thought of a volume one. I reviewed the entire Internet and found owlets that I liked. But I could not find step by step photos how to take them.
Today in my publication I want to present master-class for making an owl from sunflower seeds, beans and pumpkin seeds. I thought for a long time what to make a frame for an owl. I went through a lot of newspaper and foil with wire. But she stopped at a glass of sour cream. I was afraid that the glue gun might burn through the jar, but nothing happened. On top of plasticine, she blinded the ears and rounded her head a little.


My daughter Nastya is a creative child and therefore always helps me. Then I cut out the eyes from the ears of corn, yellow. And the pupils are burgundy corn.

The nose was made from pistachios. Pumpkin seed breast. Admire what kind of owls we got.


I hope someone will find my idea useful.
Thanks for attention!
Related publications:
Master class "Owl - owl". (Natural material) Description: I present a work that may be of interest to educators, teachers.
This year's Defender of the Fatherland holiday was surprisingly long. Another free three whole days is a good time to pay attention.
Persimmon is the fruit of a tree belonging to the ebony family. Persimmon fruit is large in size, juicy, has a sweet taste, and its skin is bright.
Autumn has a beautiful smile, In her, a woman's kind face, And in her, embroidered with gold, Glittering happiness - joyfully, easily. The leaves are covered with silk.
Master class mosaic from natural material "Castle" Master class on the topic: Collective mosaic from wooden beads "Castle" Prepared by :.
The golden time will begin soon - autumn! And who does not like to walk in the park with children and grandchildren in early autumn, when multicolored rustling underfoot.
Nature is the mother of man. She created him, and she influences his whole life in the most direct way. From birth, children are surrounded.
Making toys out of paper is an activity that will never lose its popularity. Paper crafts can be very beautiful and original, and besides, making them is a great way to keep children busy and teach them to be methodical, assiduous and neat. This article will be about how to make an owl out of paper in different ways.
From a cardboard sleeve
The main for such an owl is a round cardboard cylinder on which all other elements are glued. There is a huge scope for imagination, you can think of as many finishing options as you like. Let's consider one of them.
We will need:
- a cardboard cylinder or sleeve that the toilet paper has been wound around;
- colored paper;
- scissors;
- glue;
- gouache or watercolor;
- pencil.
Let's analyze the workflow.
First of all, we process our blank cardboard sleeve. Bend both upper edges inward as shown in the photo to make the "ears". This part of the workpiece must be pushed through and ironed with your fingers so that the base is as neat as possible.


After that, choose the color of the future owl and paint it with gouache or watercolor. The base should dry well.

While the paint dries, we will have time to cut out the eyes, beak and feathers from paper. We select the paper of the desired color, put several sheets together, draw small circles on the back of the last sheet with a pencil and cut them out - these will be the feathers on the owl's chest.


Cut out a small triangular beak from brown or burgundy paper.

We make feathers in the form of "tongues" of paper of the same color as for the breast pens-circles. These feathers are suitable for an owl's tail.

Now you can start gluing the base with all decorative elements. We do this in the order shown in the photo:


The paper owl is ready, but you can continue to show your imagination, for example, decorating the owl's head with a bow, a bug, etc.


Origami paper owl
Consider two methods - classic origami (from one sheet) and modular origami (from many small paper blanks).
Classic origami
We take a square, cut out of colored paper, and bend it along both diagonals with the colored side inward, and then straighten it. Turn the heading over and fold it crosswise, but now there should be a white part inside. Then, having worked with the pre-planned folds, we bring the model to this form. The top three corners need to be placed on the bottom one (more on how to do this in the video below). The "wings" of the triangles must be folded and unfolded. We bend the top of the workpiece and unfold it again.
Further - the task is more difficult. You need to open the top of the workpiece, squeezing from the sides, and do the same on the back side to get a rhombus (this process is shown in more detail in the video). The front and back are folded with the valves facing down. And we reduce the upper corners to the axis. Pulling out the part from the middle and pressing it down, we make a wing, then the same way - another. And fold the top. The owl using the classic origami technique is ready.
Modular origami
This method of making an owl out of paper is more complicated, but the result is very beautiful and unusual.

As already mentioned above, when working in the modular origami technique, a craft is formed from many pre-made small parts - modules. This is another way to make a paper owl three-dimensional, and not flat, as it happens when working in the classic origami technique.
First, let's prepare the modules. For their manufacture, the following scheme is used:
- A small piece of colored paper is taken and folded in half lengthwise and then across;
- The workpiece is straightened, the right and left parts are folded to the resulting fold line;
- The figure turns over. The bottom edges are folded so that an even triangle is obtained;
- The triangle folds in half. The module is ready.
See also video
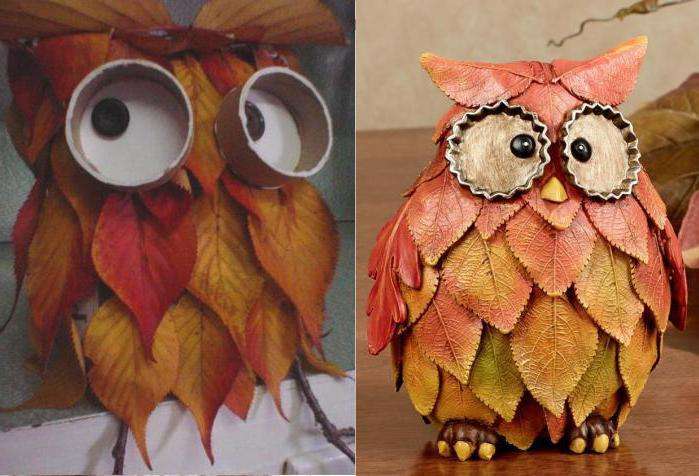
For lovers of making crafts, you can offer the actual idea of \u200b\u200bmaking an owl from scrap materials. Such a thing can decorate any interior, and for elementary school children it will be a good craft for a labor lesson.
Materials and manufacturing techniques
Every child should know what an owl can be made of. We list some materials, but with enough imagination, this list can be expanded:
- Natural materials;
- Two-dimensional owl made of leaves;
- Fabric and felt;
- Paper and cardboard applications;
- Tiles and buttons.


Owl made of wooden parts
A beautiful craft of an owl can be obtained by using cuts of thin and large branches. With the help of a saw and the required amount of wood, many cuts can be made. For the base, a thin cut of a large log is taken, and small cuts of branches are used as feathers.

For the eyes and wings, larger wood cuts are made. Bumps or bark can also become elements of the wings. The workpieces are brought to the required size using scissors.

Do not be discouraged in the absence of large sections. You can use smaller slices, and then, you can get a small owl. You can make a little more such products.

On a tree saw cut, you can draw plumage using felt-tip pens, or iodine. And glue the buttons as eyes. A burning apparatus is also useful, and the plasticine from which the legs are made.

A tall tree trunk is suitable for the torso, and a wooden cut for the head. Large eyes from the cuts, and a small bump for the nose will do. Ears are made from thin twigs (twigs). Small feathers are also glued to them.

Bark craft
Let's look at how to make a simple owl for kids. In this case, a large piece of bark will do. It is processed so that the workpiece takes on an oval shape. If possible, make two ear contours on the crown of the head.

The acorn caps will look original as eyes. Large cuts of twigs, buttons, large apple cuts are also suitable. The wings are cut out in the form of a sheet of fabric or cardboard. Autumn leaves are best.

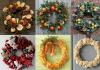
Owl in the form of a wreath
The owl, made in the form of a large wreath, represents a good autumn composition. In the process of creativity, not only natural materials will be used, but also parts of cardboard.

Making an owl with your own hands at home will begin by cutting an oval ring of thick cardboard. For crafts, it will be the base on which you need to apply glue. Next, having collected the material at hand, you should glue it to the cut oval.


Chips, small twigs, pieces of bark can go into business. The eyes can be made from circles of colored cardboard, preferably using bright colors. Legs, wings and beak are also made from it.

For eyes, circles cut from fabric in the form of flowers are suitable. And make the wings from leaves of autumn oak. If there are no suitable leaves at hand, then they are cut out of cardboard or fabric.

Can be used - dry grass, leaves, and even flowers. An oval cardboard circle can be made without a slot inside. Then the center is glued with any available material. Such a craft for the school will be a good decoration at the exhibition.

Pine cone owl
The variety of buds inspires craft projects. Consider a master class on how to make an owl craft from a cone. The larger it is, the better. Ideally, take cedar, but it is extremely rare. Therefore, take a large spruce and pine cone.

Glue or plasticine is suitable as a bonding material. Since the spruce cone is longer, it will become the body, and the pine cone will be glued for the head.


Two elements are fastened together at an angle. Dry bean pods will become paws, they are fixed with glue or plasticine. To make the wings, you need to make side cuts with a knife in the spruce body. Remove a few scales, and place a small bunch of thin twigs in this place. This element is attached with glue.

We will make our eyes from a small bunch of hay. It is tied up in the middle and fluffed on one side. The result should be an even fluffy circle. You can also take small straw, dry corn silk, barley hairs for the eyes. The finished elements are glued together, and buttons are fixed in their center.

For the eyes, slits are made in the bump. They are inserted together with several thin branches so that they serve as cilia, and glued. The same is done for the legs, but they are made only from dry branches. The composition is ready, in the photo of the owl crafts, a very attractive product turned out.

Craft for children
Homemade from a cone has a different design complexity, but the process is fascinating, so even children will be interested. For them, there are crafts a little easier to make. For example, only one bump is used as the body and head.


Cardboard eyes are made, and the beak is made of dried orange peel. It can be glued for the wings. Ears of an owlet from leaves, and put a piece of moss on its head. The product is almost ready, it remains to plant it in a clearing of moss. The little owlet is ready!


It will not work to find detailed instructions on how to make an owl. The creative process is always unique, and there are many varieties of crafts. You need to have good imagination and creative qualities, and then it will turn out to make a variety of products.

Photo of owls


Paper is a great material for making crafts with kids. This material is affordable, moreover, it lends itself to various processing. Interesting and unusual crafts can be made from paper. For example, today we offer you a master class with a photo about how to create an owl out of paper with your own hands volumetric or 3D. Such voluminous animals even more resemble the original and fit perfectly into the interior. Everyone can make such a craft. The technique for creating this craft is quite simple and very exciting!
To work on a do-it-yourself paper owl, prepare:

- medium-weight colored paper;
- paper towel or toilet paper roll;
- scissors;
- glue stick;
- gouache or watercolor paints;
- brush;
- pencil.
How to make an owl out of paper with your own hands?
So, we create the basis of our owl. To do this, bend the upper part of the sleeve inward as shown in the photo.

We will do the same on the back of the cardboard box.

We push through all lines well, making them clearer and more even. The result is such a blank owl with ears.

Now we paint the cardboard blank with gouache or watercolors.

You can choose the color in which you will paint the part at your discretion. Leave the workpiece for a few minutes so that all paint is completely dry.
Until the paint dries, we will create the feathers, eyes and beak of the bird. Cut owl feathers from yellow colored paper. Place several pieces of yellow paper together.

On the reverse side of the blanks, we will draw a couple of such circles with a diameter of 1.5-2 cm. Then carefully cut them along the contour.

We also cut out the eyes of the owl. For the base, we need two large white circles with a diameter of 4 cm.
We create the pupils from colored black paper.

Cut the beak out of brown or burgundy paper.

To create a ponytail, we need oblong-shaped yellow blanks.

So, we begin to glue the decor to the base of the craft. First, we glue three oblong feathers. The result is such a tail.


Then we glue the beak.

Its tip should be in the center of the lower circle. We cut off the excess paper.

To create glare on the eyes, you can use gouache paints or cut out small circles from white paper, and then glue them to the pupils.

You can also decorate the craft with interesting decor. For example, small ladybirds. We glue the little ladybug to the owl's ear.

That's it, a voluminous paper owl is ready!

Now you can decorate a nursery with such an original owl or add a new craft to your paper collection. All good luck and positive impressions!
An owl is a symbol of knowledge and wisdom. And so it has been accepted for a long time. In addition, these birds attract with their mystery. But most importantly, the owl allows you to achieve academic success. It follows from this that an owl can be presented to a teacher on such a wonderful holiday as Teacher's Day. Therefore, in this article we will give you owl crafts that will be appropriate for Teacher's Day.
Craft ideas
Owl postcard.
In our country, paper crafts are often made. An owl, which is also made of this material, looks very attractive. However, in this case, we will try to make a beautiful postcard. So, you need the following materials:
- Thick tracing paper, cardboard and colored paper.
- Pencil, glue and scissors.

Working process:

Another nice postcard.
Every teacher is looking forward to the day - October 5th. And this is all because it is customary to give gifts on this day. If you decide to also please your teacher, then take a closer look at the following idea. To create crafts you will need:
- White cardboard and paper,
- Colored paper is double-sided.
- Green corrugated paper.
- Double-sided tape, glue and wire.

Working process:

- To make eyebrows for an owl, you need to take a strip of light brown color. Glue the eyes and glue the strip on top. Now it is worth twisting them with a toothpick.
- It's time to form an owl from all the elements. Attach the eyes to the body, then the beak. Put on your hat. A twisted black circle is glued to the owl's head.
- Glue the wings and substitute papyrus under one of them.
- Strips are cut from beige paper, which are 2-3 mm thick. Twist and press them to create ovals. Make 6 of these ovals. Then they are glued together in 3 pieces in the form of legs. Then the legs are glued to the owl.
- That's all the owl is ready. Now it's time to make other elements of the postcard. We take crimson paper, also cut into strips and twist circles from them. As a result, you need to make 15 circles. Moreover, 5 should be large, and 10 several times smaller. First of all, each circle should be turned into an oval. After that, the oval should be squeezed so that corners form below and above.
- Each petal is formed from one large part and two small ones. The parts are glued together and pasted over with a strip of crimson paper. Thus, it is necessary to make 5 such petals.
- Thus, 3 small circles are harvested in order to form buds from them.

- A small rectangle is cut out of beige paper. Make the middle of the flower out of it. A little further than the middle of the rectangle, a fringe is cut and twisted with a toothpick. The end of the rectangle is glued.
- Form a flower. For this purpose, 3 petals are glued together. The middle is glued inside. Then the remaining couple of petals are also glued. The fringe is scrolled with a toothpick.
- The maple leaf is drawn on beige paper. Then it should be cut.
- At the next stage, we will start forming the book.

- A voluminous owl craft will not be considered complete without a book. It's easy to make. Cut out a strip of light brown paper. This is the cover of the book. Fold it in half, and then fold the edges towards the center. Pages of a book are made of white paper. They are glued or stitched together.

- We take light brown paper and cut strips 6-7 mm wide. Roll an owl stump out of them.
- Assemble and fix the postcard details. A stump is glued to the maple leaf. We put the owl on the stump. Then we attach the book, and the gladiolus is attached to the book.

- Prepare the inscription "Happy Teacher's Day" and glue it to the book. On the strip with the inscription, you need to twist the edges with a toothpick.
- We take a beautiful glossy cardboard and cut out a rectangle from it, which will be the basis of the postcard.
- Make 6 leaves from strips 3 mm wide of green color. They should be made using the principle by which the buds were made.

- 2 green leaves are attached to each bud.
- Now take the wire and wrap it with green paper. Then glue the buds to it in turn. Then the bottom of each bud is wrapped with corrugated paper.
- Now glue the maple leaf to the base and attach the branch with buds to the base. As a result, your postcard will be ready.
Owl made from natural materials.
It is worth saying that you can also make an owl craft from natural materials, of which there are a lot in our world. A mini owl is easy enough to make from cones. And every teacher will be pleased to receive such a present. In order to do it, it is worth preparing:

- A couple of acorn caps.
- A couple of yellow and dried leaves.
- Glue gun.
- Beads or buttons for the eyes.
- For the legs, a piece of felt or cardboard.
- A pine cone and a circle of cardboard of good density.
Working process:
- First, a couple of petals are removed from the cone. This is done so that the eyes can stick well.
- Place the cone on cardboard using thick glue.
- The acorn separates from the cap. The hat is glued into the place that was freed after removing the petals.
- Now the parts for the legs and beak are cut out.
- At the next stage, leaves are glued to the owl, which will imitate wings.
And some more options for crafts-owls for the teacher.


Finally
Undoubtedly, any craft created as a gift for a teacher is a real joy. And this is all because warm emotions were invested in such a product when creating, capable of giving pleasant impressions and warm memories.