How to make crafts from eggshells and plastic eggs with your own hands: nesting dolls.
DIY crafts from Easter and plastic eggs: nesting dolls
It is not difficult to make matryoshka dolls together with a child from a container from "Kinder-surprise". Such a craft is suitable as a home decoration or decoration for Easter. You can make it out of it. If you cover the finished craft with varnish, and insert a key ring on a chain on top, you get a keychain.
How to make a craft "Matryoshka" from a container from a kinder surprise
Materials and tools
- container from "Kinder-surprise" or its analogues
- self-adhesive paper (or glue and colored paper)
- scissors
- felt-tip pens (colored pencils) or black marker
Stages of work
Option 1 (easiest)
With a marker, draw a nesting doll on the container from the kinder surprise: a face, hands, a flower. But it will turn out prettier if you glue her face drawn on paper.

Option 2 (brighter)
It will turn out even prettier if you make not only a face out of paper, but also hands and an apron. Draw a flower or stick a sticker on the apron.


You can make several multi-colored nesting dolls if there are containers from cheaper counterparts (in this "Kinder Surprise" containers are almost the same yellow).
Option 3 (made of plastic eggs)
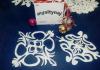
If you have plastic eggs of different sizes, you can make nesting dolls from them in the same way. Plastic eggs are usually sold in grocery stores and are called "Surprise Egg", inside there is a small souvenir and what is called sweets - but my daughter and I always throw them away. in their composition, among the little understood chemical names of what can be called the word "food", there is almost no.

The specks on the largest matryoshka are sparkles, the egg is so shiny :)

If you carefully cut the paper along the line of joining the halves of the plastic eggs with a clerical knife, or first cut the paper parts, and then glue them onto the upper and lower halves, then the nesting dolls will turn out like real ones. They will understand and it will be possible to invest them in each other.
I suggest looking at how to make nesting dolls from other materials:
- from candy in the shape of a matryoshka,
and others: a goldfish, a pig, a penguin, Santa Claus, an astronaut, a rocket, etc.
Enjoy your creativity!
Especially for blog readers "MORE creative ideas for children", with sincere respect, Yulia Sherstyuk
All the best! If the article was useful to you, please help the development of the site, share the link to it in social networks.
Posting materials from the site (images and text) on other resources without the written permission of the author is prohibited and punishable by law.
How to make crafts for Easter in kindergarten? Easter is a very colorful holiday filled with childishly fun traditions. The process of preparing for it brings a pleasant revival in the life of the baby, the anticipation of joyful moments and surprises.
And minutes of creativity will help the child pass the wait and better reveal the atmosphere of the upcoming celebration. For example, you can make adorable crafts for Easter in kindergarten and congratulate teachers and classmates with them.
Crafts for easter from kinder surprise eggs
To create crafts for Easter with your own hands is an interesting and exciting task for children. Children's crafts for Easter can be made in a variety of techniques: applique, drawing, molding from plastic material, scrapbooking, embroidery and many others. We propose to create custom souvenirs on the Easter theme.

From threads of floss, shells and kinder surprise eggs, a charming chicken in the nest is obtained.

From plastic testicles, you can build a whole nest with chicks.

You can make a real Easter bouquet from plastic eggs.

Watch the video on how to make an Easter wreath from kinder surprise eggs:
DIY Easter bunnies
Another Easter favorite is the bunny. The easiest way to make an Easter bunny is to glue it together from paper disposable plates.

You can make a wonderful Easter bunny out of a plastic egg.

This adorable Easter bunny is made from a cardboard roll and colored paper.

Easter bunnies from socks
A very interesting rabbit is obtained from a white sock. The rabbit's face can be embroidered with threads. Inside such a rabbit is stuffed with padding polyester.

Watch how to make an Easter bunny out of a sock in the video:
You don't have to drag the rabbit's head with a thread, but make a funny pom-pom tail for the rabbit.

DIY Easter baskets
A lovely Easter basket is made from foarmine or colored cardboard.

Foamiran can be cut in the shape of a circle, cuts on it and glue it around the edges. We get a small basket for one testicle. If we weave three strips into a pigtail, then we get a handle for a basket.

Adorable Easter baskets - chickens are made from disposable paper cups.

Easter baskets - chicken
This adorable Easter basket is made from a cardboard egg cell.

The base and handle for the Easter basket can be made from cardboard tape. The decor can be very different, for example, the egg basket in the form of a green lawn looks very nice.

Green Lawn Egg Basket
An interesting Easter basket is made from disposable paper plates.

A very good idea - an Easter basket made of a plastic container and ribbons:
Easter paper basket as part of the Easter composition. The lower part is made of a cardboard box pasted over with green paper.

Easter basket made of felt decorated in the form of a green lawn.

Easter basket from foamiran "green lawn"
Applications for Easter in kindergarten
In honor of Easter, you can make a large number of bright and colorful crafts made using the applique technique. The first option is the "Easter basket" applique. With the help of potatoes, we make colored prints on a sheet of paper. We wait until they dry and cut them out. We paint half of the paper plate brown and glue beige strips on it. Glue one strip up, making the handle of the basket. We fill our basket with testicles.

Colored Easter eggs can be used to decorate a room.

Take note of the Easter cake applique. Willow twigs are made from rolled paper tape. We make the willows and the light from rolled paper (using the quilling technique).

Application "Easter cake"
A charming Easter decoration is made from colored cardboard, ribbon and pieces of plasticine.

Beans, peas or corn can be used to make a wonderful Easter chicken applique.

Easter application "chicken"
Another wonderful Easter craft made using the applique technique is a chicken on a stick.

You can plant your Easter chicken in a paper pocket. Cut out the shell and all the details of the chicken from colored paper. We glue all the elements and decorate with flowers.

One side of the testicle can be connected with a movable hinge. Then the chicken can be “opened and closed” in the testicle. We make the chicken itself out of felt and decorate with a feather. The chicken does not need to be glued to the base, then it can be taken out and planted in an egg. Kids will be delighted with this Easter craft!

The “chicken” applique can be made of colored cotton balls.

Application "chicken" from cotton balls
Another version of the Easter applique is “Easter cake”. Cut out the napkin like a snowflake. We glue it and brown paper cake.

We glue the testicles and the base of the candle. We make the flame and the upper part of the cake from rolled paper. We decorate the cake with pieces of plasticine and glue the flowers.

"Powder" for Easter cake and flowers
Another original Easter craft is an applique made of buttons.

DIY Easter cards
You can make a very delicate Easter card with duct tape. Strips of duct tape are glued to the back of the card. We glue on it the front layer of white paper with a hole in the form of a testicle. Decorate with a delicate flower - the Easter card is ready!

A voluminous paper Easter card can be a very unusual craft for Easter. The foldable base of the postcard is thick paper according to the sample.

We fold the base of the postcard
We decorate the "steps" of the postcard with Easter and spring attributes.

A very beautiful Easter card can be made using the scrapbooking technique. To do this, you can use colored paper, ribbons, flowers or napkins, as well as use special kits for scrapbooking.

Easter card with ribbons
Take a look at the video on how to make a beautiful DIY Easter card:
Crafts for Easter using quilling technique
A charming Easter card is obtained using the quilling technique. The basis of the craft will be a cardboard folded in half in the shape of an egg.

For a postcard, we need special paper strips for quilling. Two of them (yellow) are cut with special scissors, making a fringe on one of the edges. Now we twist our strips into rolls - we get the body and head of a chicken.

Twisting other stripes we form flowers, a sun and a cloud and a wing. We glue all the details of the Easter card to the base.

Another wonderful Easter craft using the quilling technique is a voluminous egg with chicken. We wrap the tennis ball with foil and glue the white rolls one by one. We glue the rolls to one another.

We will get a blank that looks like a half of an egg shell. We fix the impromptu shell on a stand (glue the stand from round purple and compressed green rolls).

Craft for Easter from paper balls "Temple"
In order to make such a craft, we need thin paper. A regular napkin will work very well. We cut the paper into large enough strips, apply liquid glue to it and roll it into dense balls.

We roll balls in white, blue and orange. Dip each ball in glue and glue it onto thick cardboard.

When all the balls take their places, we should have a temple. Now we need a paper quilling tape. Roll up small spirals from white paper strips. We fix the edge of the paper tape with glue. We squeeze paper spirals from one side - we should get small white droplets.

We glue the strips of brown paper. We place paper droplets around the edges - we should get very delicate willow branches around the temple. We decorate the top of the temple with a cross made of golden paper. Our beautiful white-walled temple is ready!

Craft for Easter "Temple"
Easter crafts from eggshell
Dyed and ordinary eggshells can be used to make adorable Easter chicks.

You can make a small Easter applique from the eggshell.

And here is a stunning Easter composition from eggshell "cock and hen". For this craft, you can use a whole boiled egg or a whole eggshell. We glue the eyes, comb and beak on the testicle - we got a cockerel.

We decorate the chicken with a bow and rope hair.

Cut out the bottom of the plastic bottle and wrap it with colored paper - we get the basis for the Easter basket. We tie the basket with a ribbon and put a straw of corrugated paper in it. We put a cock and a hen in this cozy nest. Craft for Easter in kindergarten is ready!

Easter souvenir in an egg shell
A very touching Easter souvenir can be made right in an eggshell. First, we need to make a hole in the raw egg. Content should drain gently out of it. We wash the testicle and let it dry. We should have a clean, dry shell.

We make a hole in the upper part of the shell with an awl and thread a rope through it. We tie the rope with a knot so that you can hang the testicle.

We fill the shell with sisal or thin paper chips.

We put fluffy Easter chicks and small Easter eggs inside. Done! It remains to hang the souvenir by the string.

The kids will love the chicken Easter egg tray. Cut a chicken out of cardboard.

We put the chicken on a cardboard tray from under the testicles. Put a straw of corrugated paper at the bottom.

We paint the testicles, draw the eyes, attach the scallops and beaks - we will get yellow chickens. Easter egg tray - ready!

Watch the video on how to make a very effective Easter chicken in an egg craft:
For toddlers of the younger and middle groups of kindergarten, the "Hatched Chick" salt dough craft is suitable. Slightly colored dough is very popular with children and is completely safe, even for the smallest creators.
An adorable Easter Chicken can be made from paper rings or cut-up cardboard rolls.

Easter crafts from threads
The kids will be delighted with this Easter thread craft. The easiest way to make a thread craft is to make it out of pompons. You can see how to make a pompom in our article "". Having mastered the technique of making pom-poms, you can make an Easter-themed craft, for example, a small yellow chicken.

Another option for making pom-pom Easter crafts is to make it with a small balloon. Wrap it tightly enough with thick threads and cover the threads with glue. After the glue dries up and the threads acquire density, carefully pierce the ball and remove it. We must have a skeleton of their threads - this is the future body of the Easter chicken.

We glue the eyes, nose and legs to the frame. Easter thread craft is ready!

If you take as a basis the threads of a floss and small balloons, then you can make a very effective Easter composition from openwork eggs.

The eggs can be hung by a string, then we get unusual Easter pendants.


DIY drawings for Easter
Crafts for Easter in kindergarten can be done in a combination of drawing and applique techniques. We create a volumetric Easter basket in a very interesting way: on the main sheet we make cuts into which we insert strips of corrugated cardboard.

Teachers who decorate the Easter corner in kindergarten may find it useful to have a chicken in the meadow for Easter.

For school, we offer a drawing with Easter cakes in a basket. First, sketch with a pencil.

Coloring the basket, Easter cakes, testicles and a bow. Highlight the contours on the basket with a marker.

We paint the chicken with yellow paint. We draw brown legs for him.

Highlight the bow, testicles, basket and Easter cakes with color. We are waiting for the paint to dry. Select the basket and bow along the contour with a marker. Spread the upper white part of the cakes with glue and cover with sprinkles. Drawing for Easter is ready!

Another version of the Easter pattern is a chicken with a chicken. First, make a pencil sketch.

Pencil sketch "chicken and chicken"
We paint the chicken and the chicken with paints.

Finish the chicken and chicken with a tender green meadow with flowers and herbs. We put the picture in a frame - we will get a lovely Easter decor.

Painting as a gift for Easter "Hen and Chicken"
Drawing "Easter egg"
For Easter, you can draw a beautiful Easter egg. The main plot of the drawing. may become symbols of spring - birds and flowers. And patterns located on horizontal lines are convenient for coloring. First, sketch with a pencil.

Pencil drawing "testicle"
Then we paint the testicle with paints.

Drawing "Easter egg"
Watch the video "how to draw an Easter egg":
All the symbols of Easter are reflected in this Easter drawing - a church, a basket, an Easter cake, eggs, spring twigs and flowers.

An adorable Easter basket for Easter can be made from ordinary plasticine. First, we make a concave Easter basket. We sculpt a thin flagellum from plasticine.

Fold the flagellum in half and twist it.

Gently glue the flagellum along the edge of the basket. We will have a very interesting wicker basket effect.

We roll a thick yellow sausage from plasticine.

We cut the sausage into two parts - this is the future basis for cakes. On each base we put a white round cake - "glaze".

Easter cakes with "icing"
For the craft, we need small real twigs.

We glue gray elongated lumps of plasticine on the twigs - we get a very believable willow. We put Easter cakes and willow twigs in a basket, complement the composition with colored eggs.

Sprinkle the cakes with food powder. Plasticine craft for Easter is ready!


Very delicate Easter egg pendants can be made from salt dough.
Easter chicken made of ribbons and felt
A very cute Easter chicken can be made with ribbons and felt. We cut the ribbon into squares and fold it according to the pattern, fixing the workpiece with glue. The technique of making crafts from small pieces of ribbons is called kanzashi.

We glue the lower green part of the flower from the blanks. We glue purple blanks for the flower itself in the same technique. We glue them together. Place a bead in the center. Putting the composition together.

Glue yellow felt onto the cardboard base. We make blanks for chicken from yellow ribbons.

We glue the tuft and wings from yellow ribbons to the base. We glue the bead eyes and the beak. It remains to decorate the chicken with a flower and a bow. We've got a very spectacular Easter souvenir!

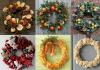
The most famous and favorite Easter craft is the wreath. It can be made as a decoration for a hall or room. The base of the wreath is made of twigs that are connected together with tape.

We wrap the wreath with a garland with artificial flowers and greenery. We fix the garland with double-sided tape.

We decorate the wreath with ribbons. We paint plastic eggs with bright Easter patterns and fix them with double-sided tape on a wreath. The finishing touch to the Easter wreath is fluffy chickens.

Wreaths for Easter from branches can be decorated with feathers, flowers and willows.

Do-it-yourself willow branches from cotton wool
A handicraft that will be very useful for you for Easter is willow twigs. With these twigs we can decorate an Easter wreath or make a luxurious Easter bouquet. We dilute the starch with hot water.

We form future willows from cotton wool with starch. Coloring the willows gray. Do not get carried away with coloring, light and uneven application will give the willows a natural look.

We glue the painted cotton balls to a real twig with a glue gun. On the underside under each willow we glue a felt “pocket”.

Our pussy willows are ready! It remains to form a spring Easter bouquet!

DIY Easter tree
Since the bright holiday of Easter symbolizes the flowering of a new life, in some countries there is a tradition to decorate the Easter tree. After all, it is the tree that personifies nature and the ability to rebirth after a long winter. We take the sawn testicles and gently pierce them from two opposite sides. Their contents can be blown out with a straw.

We paint the testicles. Using a stick, we insert a ribbon into them.

Tie a ribbon on one side with a bow. Leave a loop on the other side. Easter eggs are ready. It remains to make the basis of the craft - the tree itself. We make it from interconnected colored twigs. Pour gypsum into a small container and insert twigs there. It remains to hang the testicles on the tree. Our Easter tree is ready!

DIY Easter tree (video):
Easter basket chicken made of felt
A very beautiful Easter basket "Hen" is made of felt. We cut out the details of the chicken according to the pattern in the photo.

Sew the parts together. Leave the edges free at the bottom and top. The bottom will be sewn into the bottom. In the upper part we will fold the testicles.

Sew on the bottom detail.

Put the eggs in the Easter basket.

You can decorate the Easter composition with a yellow chicken. Sewing it out of felt is very simple. We cut out 2 oval body parts from felt and sew them together, not forgetting to fill with padding polyester (you can immediately sew a crest between the body parts). Sew on the wings. We glue the factory eyes and beak. Easter chicken with felt chicken - ready!

An interesting Easter idea - DIY soap in the form of chickens for Easter!

A very beautiful Easter basket made from pasta. To make it, we need to inflate a small balloon and glue it with pasta in the shape of "horns".

Leave the hole in the front unpapered. We color the pasta and decorate the hole with the pasta in the form of "bows".

The Easter stand will be the best decoration of the Easter exhibition.

Happy Easter to you and your children!
Crafts for Easter in kindergarten reviews:
Beautiful crafts! Happy Easter) (Hope I)
I really like the testicles made of threads, the original technique and very popular now (Dashulya)
Girls, I share photo ideas for crafts for Easter. And then they already asked to bring it to the kindergarten.
We have not yet decided what we will do ... I will look at the material (fixed price awaits me))))
All ideas under the cut ...
1. From toilet rolls ... our favorites ... so many of them have already been remade ....


2. A chicken out of a glove .... a good idea and it seems simple ... if it doesn't blow away)


3. Easter bunnies ....
It seems, too, everything is simple .... the question is where to get these eyes ....? Previously, they had torn out all the old books, no more ((( 


4. Chicken from napkins on cardboard ... I think it's as easy as shelling pears .... and not expensive .... for material. 
5. Easter bunnies and a chicken with a rooster made of plastic spoons .... - funny))), but I just can't figure out where to stick them ...


6. Easter chicken in the nest - even with instructions)
If your kids love kinder surprises, then you probably have a lot of eggs left in your home. And they, most likely, lie somewhere abandoned, taking up free space. But using eggs from kinder surprises, you can make many different interesting crafts. Crafts made from plastic eggs, thanks to their brightness, are very elegant and festive. Making toys with your own hands develops children's imagination, imagination, creativity and ingenuity. This work is very simple and does not require large material costs and physical efforts.
So let's get started ...
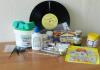
For work we need:
1. Big plastic egg from kinder - surprise;
2. Plastic disposable plate;
3. Dry twigs, feathers, sawdust, artificial flowers, etc .;
4. Napkins of yellow color;
5. Corrugated paper or red napkins;
6. Scissors, simple pencil;
7. A pair of plastic eyes;
8. PVA glue.
1. First, make a nest for the chicken. To do this, grease a disposable plastic plate on the inside with plenty of PVA glue. And we glue on it everything that was found in the house, suitable for imitating a chick's nest: dry tree branches, feathers, sawdust, flowers, and so on.
2. While the nest dries up, make a chicken. Tear off small pieces from the yellow napkins and roll them into small balls with our fingers. Egg from kinder - we completely glue the surprise with the resulting paper balls. We try to glue the balls tightly to each other so that there are no empty spaces. We put the future chicken in the nest and continue working.
3. On top of the egg, on the head of the chicken, we make a crest: roll a few balls out of a napkin or red corrugated paper. Then we glue them one after another on the chick's head.
For a chicken eye, you can take ready-made plastic eyes and stick them on the head, but if there are no plastic eyes, then you can replace them with black buttons or make them out of colored paper.
4. To make a beak, you need to cut a small rhombus out of colored red paper, fold it in half. With the middle part we glue it to the head of the chicken.
5. We also make the wings of the chick from yellow napkins: fold part of the standard napkin like in the photo and glue it to the body.
So our fluffy chicken is ready! A little desire, imagination, free time and we have such an interesting toy. 


I will add if I dig something interesting ...
Schemes, instructions for creating crafts for Easter from pasta, cardboard, ribbons, salt dough.
Children, in turn, can improve the mood of loved ones or decorate the festive table by making a variety of crafts. A fun cardboard bunny or Easter basket is a great option for Easter. Visit the hardware and office supply store in advance and get everything you need.
Materials:
- 2 packs of wooden clothespins
- 1 plate of cardboard or a sheet of cardboard
- Scotch
- Colored paper
- Tape
VIDEO: Paper egg coasters
Instructions for making an Easter basket made of cardboard:
- Take a plate or circle of cardboard with a diameter of 22 cm and cut along the entire circumference of 3-4 cm.
- Now fold over the slices to make something that looks like a tray. Glue tape or a piece of paper along the rim with regular office glue. It is necessary to fix this nut.
- Glue the handle from a piece of cardboard. To do this, cut a strip 30 cm long and 4 cm wide.
- Now attach clothespins around the entire circumference of the rim. It is necessary that they fit snugly against one another. You should get a frame.
- Glue a wide tape along the length of the handle. Along the circumference of the frame from clothespins, also make a rim from a ribbon, tying a bow.
- Place straw or thin strips of green colored paper at the bottom of the container. It will be an imitation of grass. Place the eggs on top of the pillow.

 DIY Easter crafts from corrugated paper and cardboard: schemes
 DIY Easter crafts from corrugated paper and cardboard: schemes
  DIY Easter crafts from corrugated paper and cardboard: schemes
 DIY Easter crafts from corrugated paper and cardboard: schemes
 DIY Easter crafts from corrugated paper and cardboard: schemes
 DIY Easter crafts from corrugated paper and cardboard: schemes
Every woman has cotton pads in her cosmetic bag. They can be used to remove and adjust makeup and even make Easter crafts. You can decorate the Easter basket with chickens from cotton pads.
Materials:
- Several cotton pads
- Yellow egg paint
- Red colored paper
- Wire
Instructions:
- Pour some dye into a bowl and add water. Dip cotton wool into the solution and place on a plate. Let the cotton dry completely.
- Attach thin wires to the bottom of the disc, shaping them into a foot. Glue the paws over with pieces of cotton wool and paint them red.
- Cut the scallop and beak out of red paper. Glue the eyes. You can cut the wings separately from a cotton pad and glue them to the body of the chicken.
 DIY Easter crafts from cotton pads
 DIY Easter crafts from cotton pads
You can make a lot of interesting crafts from napkins. One of the most attractive is the Easter tree.
Materials:
- Packaging of blue or pink napkins
- Cute dry branch
- Wire
- Cigarette paper
- Paints
- Plastic pot
- Styrofoam
- Colored paper
Instructions:
- Take a snag and sand it with sandpaper. If there is no driftwood, weave some wires together to simulate a tree. Cover the wire with tissue paper.
- Take a napkin, unfold it and crumple it up. After slightly moistening your hands with water, shape it into a ball. Let dry completely.
- Glue the balls to the driftwood. Take a pot and put some styrofoam in it. Stick in a drift of balls and place a colored paper pillow on the styrofoam.

 DIY Easter crafts from napkins
 DIY Easter crafts from napkins
 DIY Easter crafts from napkins
Foamiran is a fairly new material on the domestic market. It is also called plastic suede or velor. It perfectly changes shape right in the hands of the craftswoman, because in order for the material to become malleable, it is enough to heat it in the hands. We offer to make an Easter basket from foamiran.
Materials:
- Foamiran of different colors
- Glue gun
- Beads
- Filler for baskets
Instructions:
- Cut a circle and a strip from the foamiran, which is equal in length to the circumference. Glue the bezel to the circle to make a container.
- Glue the handle. Connect the parts using a heat gun.
- Cut the foamiran into petals. Hold them a little in your hands and stretch. Place the parts on a soft cloth and place crepe paper on top. Iron the parts with an iron. This technique will add texture to the petals.
- Using a glue gun, glue the petals, and attach a bead in the center. Glue the flower to the basket handle. After that, you need to decorate the handle with a thin satin ribbon. Fill the basket with crumpled strips of green paper and place the eggs.

 Crafts from foamiran for Easter: templates
 Crafts from foamiran for Easter: templates
  Crafts from foamiran for Easter: templates
There are many crafts that require a minimum of time and materials to make. One of these crafts are shell Easter bunnies.
Materials:
- 2 eggs
- Faux fur
- Paper
- Paints
- Thin wires
Instructions:
- Take a raw egg and carefully remove the liquid through a small hole. Wash and dry the base. Color the egg white or beige.
- Attach the wire legs, after pasting it with paper or corrugation
- Glue on the faux fur forelock. Draw the eyes and mouth.
- Cut long ears out of paper and glue them to the hare's head.

 How to make DIY Easter crafts quickly?
 How to make DIY Easter crafts quickly? How to make DIY Easter crafts quickly?
A lot of interesting crafts can be made from plastic capsules from Kinder Surprises. These can be chickens, rabbits or bees.
Materials:
- Surprise capsule
- Foamiran yellow leaf
- Colored paper
Instructions:
- Cut the tail and wings out of the foamiran. Give them texture with your hands, stretching and twisting the details.
- Glue the parts to the yellow capsule. Cut the legs out of thick paper or cardboard and attach them using glue.
- Glue the beak and eyes.

 Easter crafts from kinder eggs
 Easter crafts from kinder eggs
Pasta is a rather strange and unusual material that is used in the manufacture of Easter crafts. You can make an Easter basket from them.
Materials:
- Pasta "Wheels"
- PVA glue or glue gun
- Balloon
- Spray paint
Instructions:
- Inflate the balloon and glue the pasta to it. From below and up to half, the ball must be completely pasted over.
- Starting in the middle of the ball, lay out the handle of the pasta. Try to keep the pasta snugly against each other and there are no gaps. They must connect into one whole.
- When the pasta is completely dry, pierce the ball with a needle and gently remove the rest.
- Use gold spray paint to paint the basket. Now you can safely fill it with eggs.

 DIY pasta crafts for Easter
 DIY pasta crafts for Easter
  DIY pasta crafts for Easter
A lot of interesting crafts can be made from fabric. These are garlands, Easter bunnies, chickens and garlands. Use diagrams and pictures.

 Crafts from fabric for Easter: schemes
  Crafts from fabric for Easter: schemes
  Crafts from fabric for Easter: schemes
A lot of interesting and unusual things can be made from salted dough. Try to make a stand for a chicken egg.
Materials:
- 320 g wheat flour
- A glass of fine salt
- Incomplete glass of water
- Paints
- Toothpick
Instructions:
- Knead the dough from the specified products. Roll a circle out of it. Make a rim from the dough and glue it to the mug, make a ponytail and a head.
- Glue the details to the groove. Use a toothpick to emboss the product. Place the product in the refrigerator.
- After the dough has hardened, paint it with yellow paint.
 Crafts from salt dough for Easter
 Crafts from salt dough for Easter
 Crafts from salt dough for Easter
 Crafts from salt dough for Easter
Ribbons are an inexpensive material found at any fabric store. This material can be used to make a basket, eggs, and even Easter wreaths. The photo shows a lot of ideas for creating such crafts.
 DIY crafts for Easter from ribbons
  DIY crafts for Easter from ribbons
  DIY crafts for Easter from ribbons
This option is suitable for the smallest. These are children of preschool age, for whom modeling will improve fine motor skills of hands. The easiest option is an Easter egg.
Materials:
- Several pieces of multi-colored plasticine
- Kinder Surprise capsule
- Toothpick
Instructions:
- Roll the sausages out of plasticine. They should be of different colors.
- Spiral the surprise capsule with thin sausages. Use a toothpick to apply a relief pattern.
- Decorate the eggs with bows or plasticine flowers.

 Crafts from plasticine for Easter
 Crafts from plasticine for Easter
  Crafts from plasticine for Easter
 Crafts from plasticine for Easter
The easiest option is to make a garland of Easter eggs.
Materials:
- Felt of different colors
- Tape
- Hole puncher
Instructions:
- Cut egg-shaped figures out of felt. Make holes on both sides with a hole punch.
- Glue strips and felt circles of a different color to the eggs.
- String the pieces onto linen and attach the garland to the dresser or window.
 DIY felt crafts for Easter
 DIY felt crafts for Easter
 DIY felt crafts for Easter
  DIY felt crafts for Easter
In order to make a craft for the competition, you can use your favorite technique. It can be a quilling postcard or a beaded Easter egg. The main thing is to do what you love and show your maximum imagination.
 DIY Easter crafts for the competition
 DIY Easter crafts for the competition
 As you can see, Easter is a wonderful holiday that will help you get closer to your children. Don't miss the opportunity to make holiday crafts together.
VIDEO: Easter baskets
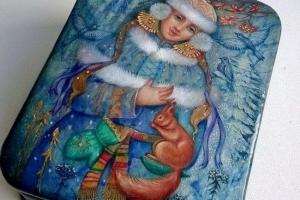
Hello dear readers of the site! Soon we will celebrate the bright holiday of Holy Easter. Often in kindergartens and schools they ask you to make thematic crafts for the holiday, I suggest making a festive Easter egg with your children from a large plastic kinder egg with a surprise using the decoupage technique. We have such plastic eggs left after buying toys with Welly models. We will do decoupage with napkins with a bright print, in the form of bullfinches. You can choose napkins to your taste, either with a specific theme or with an abstract ornament. The process of making such an Easter egg is not at all complicated, so the involvement of children in such creative work is only welcome. Even my four-year-old took part in this exciting process with pleasure. We also recommend watching master classes on crocheting and sewing cute
We will need:
- Large plastic eggs (I have from a children's toy with a surprise) - 2 pcs.
- 1 x napkin with bright print
- PVA glue
- Squirrel brush (soft)
- Glitter nail polish
How to make an Easter egg:
For decoupage, you need to take a soft fluffy brush (we have a squirrel). Only one napkin was required for two eggs. You will also need PVA glue or, if it is not available, you can weld the paste yourself. To do this, you need to stir until smooth 1 - 1.5 tbsp. starch or flour with 100 ml of water, with constant stirring, heat on the stove until the first bubbles. 
I used PVA glue. I poured some of the glue into a small container and diluted it with water 1: 1.
A napkin, as a rule, consists of 3 layers - a colored layer with a pattern and 2 solid white layers. They need to be carefully separated from each other. 
I cut out pictures of bullfinches and mountain ash from the color layer. 
Since our plastic kinder eggs are saturated colors, they must first be pasted over with white napkins (the same layers that were separated from the napkin). To do this, tear the napkins with your hands (or cut) into pieces. First, glue the kinder egg with glue, glue a piece of white napkin, spread it on top with a brush with glue. And so you need to make several layers. At this stage, my baby helped me with pleasure. 
Leave the eggs covered with white napkins to dry. 
We continued our creative work the next day. The blanks have dried out, now the color of the kinder eggs is not visible, which means you can proceed to the next stage, namely, applying a bright print. 
We glue the cut drawings onto the prepared blanks in the same way as we did before. First, put a little glue on the egg, then apply the picture, smooth it with a brush with glue. 
We dry our workpieces again.
Now you can decorate your Easter eggs with glitter nail polish. My kid liked this stage the most. We covered the breasts of bullfinches and bunches of mountain ash with a more saturated varnish with red glitters. And with transparent varnish with blue glitters - the entire surface of the Easter egg.  It turned out very nice!
Easter eggs are ready for the holiday! 
Kindness and love to your home! 
For viewing, I propose a master class on decorating Easter eggs in the decoup style from Ksenia