The summer cottage is a great place to organize the playground, which will be used both adults and children. A complex of sports devices requires careful development, as a result of which the platform will provide active recreation and mass of entertainment in the country.
Children's and adult sports field
The sports field at the cottage is a complex of devices that allow sports, actively move and comfortably relax. It can be designed for adults and children or divided into two zones, respectively. The type of structures used depends on the size of the future platform, individual preferences and capabilities.
Types of tourists
To arrange a platform designed for older children and adults, the following structures are often used:
- crossbar with rings. The element can be made of wood or metal pipes, and the rings are attached at an optimal height with a rope. Adjusting length makes the operation of the projectile more comfortable;
- vertical, inclined or horizontal lades from metal. They are optimal for performing various exercises. The height of the horizontal element is calculated based on the growth of an adult. For younger children, separate designs are constructed, which are suitable for growth;
- the crossbill for pulling is a classic element of any playground. The design is easy to build with your own hands, and the height is calculated depending on the growth of users. Horizontal ladies are often used as this simulator. Children's crossbar is often located separately.
- rope staircase or rope. The element does not require a special zone, it is easy to attach to horizontal lades, and you can also use a removable rope or rope staircase, which are attached to a solid crossbar;
- swing, bars and other designs. These details are not mandatory, but provide a comfortable active leisure to adults and children of any age.
If necessary, on the playground place a boxer pear and additional ladies and shells. For young children, sports platform is often combined with a gaming zone in which there is a small house, a slide, sandbox. With a limited area, only the main elements are installed on the playground.
Preparation for building
Creating a playground in the country area requires careful preparation. The free space is pre-highlighted, sufficient for the number and size of structures. The optimal option is the site that is in the shade throughout the day. This will make it possible to play sports and adults with comfort.
Features of training
In the site of the site it is impossible to have unprotected electrical wires, sharp objects and other dangerous details. The territory should be well viewed from the windows of the house, which will ensure the safety of adults and children. Tourists need to be located at a distance from a reservoir or pool.
After determining the location of the playground, its territory is equipped. Old stumps, dry bushes and trees, other extraneous elements are removed. To reduce the risk of injury, the plot is covered with a thick layer of sand, and in some cases the lawn is appropriate. With the help of a small fence, it can be prevented in the future the distribution of sand throughout the summer area. If there is a lawn, it is necessary to ensure optimal care for it.
Size and drawings
The playground in the country often includes ladders of various types, crossbars and rings. During the planning process, the locations of all the horizons are determined. For example, the horizontal ladder can connect the crossbar for pulling and crossbar with rings placed at different ends.
Independent manufacture of a set of shells requires determining the size of all elements. For children of school age, individual complexes are often equipped. If the area does not allow to create separate zones, it is important to take into account the growth and possibilities of kids.
Create a detailed professional drawing with your own hands is sometimes impossible. Therefore, it is best to portray the layout of the necessary elements on the sheet, as well as choose the size of the horizons.
The complex of horizontal workers for giving may include only a double crossbar, which is universal for different exercises. Removable swings allow for the need to relax and children and adults. The addition in the form of a rope or ordinary ladder will make a compact horizontal bar with multifunctional, so there is no need to set many designs for sports. It is enough to fix a few crossbars that are easily combined with a basketball basket, a rope or staircase, swing and often perform a football gate function. In this case, all the details must have high quality. It is necessary to envisage the opportunity to remove and put into the room of the removable components of the horizons for a long lack of users or bad weather conditions.
Selection of material
The horizontal spots for the playground in the country are made of metal pipes of various shapes and diameters. Wooden elements are often used to create children's structures. The level of the rope staircase can be wooden or rope, and bars, support parts, crossbars are made of metal profile and round pipes. The elements are pre-treated with anti-corrosion composition, and then coated with a layer of paint. Staining in several stages allows you to prevent damage.
Additional elements
Rope elements, swings, rings and some other devices are presented in a wide range. Acquisition of finished parts greatly facilitates the construction of the sports field and time costs.
For independent manufacture of wooden elements, equipment is needed. The parts are thoroughly grinding, as because of bad processing it is easy to get a zoom. Further, all the elements are covered with a layer of soil, and then varnish for wood or paint. The coating compositions are selected taking into account the strength of the layer, as well as the effects of weather conditions.
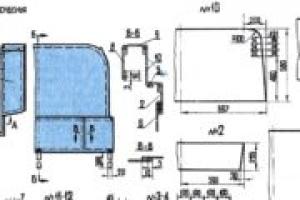
Calculation of material
Create a sports field with your own hands in the country is easy, but for this it is important to correctly calculate the number of materials. Pre-prepared the drawing of the desired horizontal bar, such as the classic crossbar. For an adult, the height of such a horizon should be at least 2.5 m from the ground, and the recess - at least 1.5 m. Bruxes are located in parallel to each other, the upper crossbars are on the same level, at an altitude of about 1.3 m, and deepened The design is 1 m. The distance between the bars is from 55 cm, the classic pull-up crossbill is often between 90 cm wide. Calculation of the amount of materials is carried out taking into account the parameters of the horizons.
The horizontal scientists are often manufactured from a combination of materials. For example, racks for conventional crossbar can be wooden, and the upper bar is made of a round tube with a diameter of 27 mm. Swing also often have wooden support racks in the shape of the letter "L", the seat is also of the wood. Fastening the swing is carried out with a solid rope or chain. The combination of wood, metal and ropes is practical, convenient and does not require large financial costs.
Tools and materials
Basic materials and tools for the manufacture of tourists:
- metal profile and round tubes. The cross section of the profile should be at least 120 mm, and the diameter of round - from 32 to 42 mm;
- wooden bars whose dimensions are slightly more than metal profile elements. Due to the fact that wood has less durability than metal;
- fasteners - powerful bolts that allow reliably to fix all elements of the planners of the sports field;
- welding machine for connecting pipes and personal protective equipment;
- paint, anti-corrosion compounds.
Step-by-step instructions for the construction of sports grounds for children
Children's playground in the country does not include many complex designs. For children, the optimal combination of stairs and several crossbars, which, if necessary, are attached to certain types of shells: removable swings, a boxer pear, a rope staircase or rope.
The sequence of work is as follows:
- Before installing on the plot, metal pipes weld. When creating a crossbar with your own hands, the top bar is better to put on top, and then with the help of welding to secure. Previously, all items should be cut into parts, the dimensions of which correspond to the parameters of the future horizon, taking into account the deepening. Details are declined on Earth in the form of a planned projectile.
The diameter of the top plank of the crossbar must be comfortable for girth of a children's hand
- For a complex with a boxing pear, it is necessary to install a ry-bolt, which is designed for greater load. On the reverse side, a small plate is fastened and everything is fixed with a nut.
Durable bolt will provide reliable mount
- From a metal sheet with a thickness of about 4 mm, the plugs of the square shape are manufactured. Next, round holes are done in profile pipes, the diameter of which corresponds to the diameter of round pipes-crossbar.
The crown is selected according to the external diameter of round pipes
- From the metal angle of 50x50 mm in size, it is necessary to make a roof for concreting, and on the supporting pipes, mark the depth of their landing into the ground.
For effective concreting, 40 cm longs are required
- The angular elements are welded to the supporting columns below the concreting level. They perform the function of reinforcement, which allows reliably to fix the details and make the horizontal bar safe.
Corners allow reliably to fix the poles
- Magnetic soliccans facilitate the work process and allow you to determine the exact angle for fastening parts.
The measuring device is easily fixed
- Bracket for boxing pear is welded to the main pillar. The end of the round crossbar for amplification is carried out through the bracket and welded to the plug.
Round crossbar welding is carried out inside and outside profile pipes
- All seams of this part of the horizon are boiled. On the other hand, welding of the circular and profile element inside and outside.
Owliness allows you to fix the details
- Below the surface of the Earth, the crossbar placed in the middle of the concrete jumper. This element is necessary to ensure the parallel location of the columns and loyalty of the corners.
Welding is carried out in the fastening area of \u200b\u200ball parts
- Next, the assembly of the stairs is carried out. In this case, all elements should be parallel to each other and accurately perpendicular to vertical supports.
All steps are carefully attached to the supports
- After all welding works, metal parts are carefully processed by an anti-corrosion agent. Underground parts should be covered with bitumen mastic outside and inside. In this case, a long thin stick is used, to which the fabric is wound. Pipes are carefully processed, which allows preventing the destruction of the horizontal bar. All ends are attached plugs.
All the corners and parts of the pipes are covered by special means
- At the site should be made of deepening, in which pillars of the horizontal bar will be concreted. The design is installed, a concrete mixture is poured into the holes. It is necessary to wait a few days until complete hardening.
After painting, the "pear" hangs and places the site
This design is universal and suitable for older children and adults. On the playground, located in the country area, simpler horizons are often installed. In this case, there is a crossbar combined with a ladder. Sophisticated types of shells require careful preparation, accurate calculation and attentiveness when installing. It should be noted that the structures that are fully made of metal have a higher cost than combined horizons. Therefore, the combination of metal and wooden elements is used more often.
Video: Playground do it yourself
Features of adults and children
Any sports field requires high-quality and reliable structures. The construction designed for adults and children is designed taking into account the age and growth of small athletes. It is important to carefully fix and deepen the support elements.
The optimal sports field at the cottage for children and adults has the following features:
- the diameter of the round bars should provide comfort and reliability of the girth, so when choosing pipes or round wooden elements, you need to consider the size of children's hands or construct two separate designs;
- the complex of the tourists is necessary in a safe place, away from water bodies, reinforcement structures and other unsafe zones;
- all elements of the tourists need to carefully process and paint, which will ensure the comfort of operation;
- not far from the site you can position the sandbox, shops or arbors. The complex of structures will allow children to play, and adults will be able to relax after training.
Video: horizontal bar and bars do it yourself
The playground on the country area allows you to actively relax and adults and children. Create with your own hands the horizons simply, but the preliminary study of the installation technology and the correct selection of materials are of particular importance, because the projectiles should be reliable.
Place with carousers, sandbox and toys are not just a decoration for the plot, but a whole world - children; do-it-yourself playground, photo With which you will see below or in the courtyard of a multi-storey house, or in our own summer cottage will become a gift not only for all the children, but for their parents, because it will be safe, comfortable and cozy. All the best - children!
Ideas of the playground do it yourself
In the list ideas of the playground do it yourself You can see the usual and us from childhood things. The main task is to make each item so that skillfully combine a safe stay on them so that this safety is interesting to children. We will take the platform as a meeting of the most necessary, favorite children's entertainment.
The first, where to start the construction is the allocation of the area itself for construction. Yes, you can just put the attractions, but remember that in order for them to stand for a long time and pleased the kids, they should be stable and durable, and therefore, without aligning the landscape will not work. You can approach the construction of this place as construction - to level the soil, fall asleep with rubble and concrete. But then it will be necessary or cover the entire surface with some safe material, non-slip and not solid, for example, rubber coating. But it is much better to use the existing lawn or to build it using a roll technology. On the cottage playground do it yourself And in design, and on a set of entertainment, only your fantasy is limited. Choosing a better place from a leeward side so that in no case there is no so-called air corridor, draft. It will also be important if there is a dunes in the daily heat on the territory, if there is no shadow from home or garden, then you need to organize awnings, canopies.

The main element, the component of the sandbox will be part. It will be interesting to play and very little kids, and older. Of course, it will be superfluous about the quality of sand, and so it is clear that it should be absolutely clean and sifted, but this purity needs to be supported. Therefore, when you get a piece of wood with a tree, press the lid that you can cover all this sandy wealth. You can use a mesh, a flexible lid from an inflatable pool, and so on. It is important to use for dIY kindergarten design. It is also very important to have existence of wide sides that will be used as benches, as well as for the plowing of the amusco. For convenience, take high above the sandbox of the roof, which will allow you to play even with bad weather or bright sun.

Swing and carousels can be ordered ready, today there is a huge number of firms that specialize in installation and manufacture plates of kindergartens do it yourself. However, you can independently make some of the species. It will be easy to build balancing - swings on which two children ride, in turn, then sweeping up, then dropping down. It is necessary to calculate the maximum load and, based on it, select the variants of materials and fasteners. At the ends of the board you need to make holders and backs so that the kids feel safe. Suspended swings It is important to do from such materials about which children will not be able to be injured, the ropes, rubber will be optimal (household version - rubber tire, not very large size).

Among other traditional elements that are often used for - mini-simulators of various species. It is very important, since it is they who help at least spend a little wasteless children's energy. If you can't do the horizons, you can wear up to the ground to half the automotive tires so that there is a distance between them enough to jump. You can also organize an unusual Swedish wall from rope ropes, passing them as a grid. Be sure to consider the soft matte system under it, which will not be afraid of moisture. If you have more adult children, and there is a sufficient number of trees on a plot or in the courtyard, it is possible to organize a miniature rope park with a set of dashs, ropes, stairs.
Make a playground with your own hands
In order to make a playground with your own hands Not only a place for games, but also for high-quality child development, you can use the same furniture as in development.

The table is necessary for creative work: drawing, modeling, appliqués, creating craft. Children's playground do it yourself Will not do without such a facility, do you make it for one or two children or for the guys from all over the yard. But the usual table is not always suitable for standard drawings. If you want to achieve maximum safety and comfort, you can make a countertop in the form of a four-meter clover, and in each of the four recesses to make a small bench. The tree is a good material for such furniture, but it will need to be covered with a large number of furniture varnish to avoid damage from snow and rain. Plastics will suit better, but it will make something independently to do something problematic. You can arrange master classes at such a round table, for example, teach kids ,.

On the children's playground with their own hands, photo Which you see, it is the house that takes a central place. Inside it does not have to be empty, you can put a shop for games for children in the hospital, benches to place a counter or cashier to play a store.
Children's playground do it yourself: photo


If there are small children in the family, it is simply necessary to equip the playground in the country. Here they will play outdoors, giving parents to relax or do their own business. And when you get free - you can always join them. The game corner in the garden will be much more positive, brighter and more interesting if you use crafts for the playground. There are a lot of ways to make them yourself, what we will tell about in this article.
To decorate the playground, it is not necessary to buy an expensive garden decor. Made independently crafts will allow the site to look very original. It will be a unique children's corner that only you and your children.
Made crafts on their own pleasantly in all respects - materials for such creativity are abundant, and completely free, it is enough to use a fantasy, creative imagination, and soon you can please our kids. Work should be started from choosing a place where the site will be placed. A spacious place is suitable not far from the house where the sun is present, and the shadow.
Good coating for the site where crafts will be placed - sandy mound or lawn. It is necessary to follow the purity of the lawn so that there are no glasses, sharp pebbles among the grass, so that the children can play barefoot, as well as inedible berries. As you know, in childhood we want to taste everything, especially what looks bright and attractive.
What can be used as raw materials?
First of all, these are old tires. Currently, the tires used literally acquire a new life - they make flowerbeds, swing and a wide variety of crafts for the playground.

Tires are good because of them you can create sports shells. For example, such a tunnel, make a swing, boil into the ground at a distance so that you can jump and walk
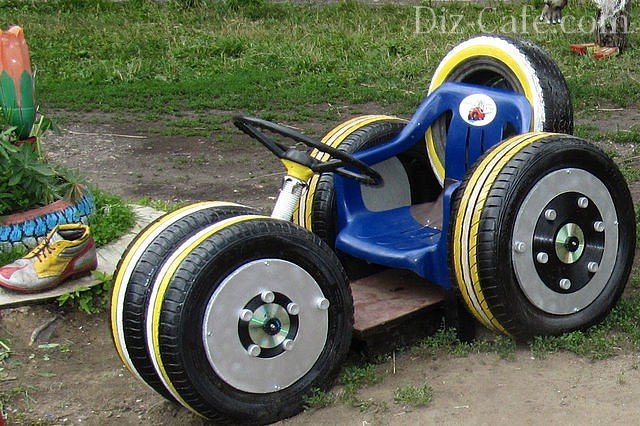
Today, not only boys, but also girls are delighted with cars. Such a gorgeous car can be made of tires and plastic stool. Option easier - to wear 4 tires to the ground and make a wooden seat

From tires you can create amazing crafts - funny bears (tires of different sizes, cardboard, old pelvis), bright tropical parrots are used. When painting, they seem to come to life and turn the playground in the corner of joy and positive
Tire before starting a creative process you need to wash and dry. By the inside, the tires can be walking and jumping, on top you can attach a plank, paint them, and make such "lazalks" even more interesting. From a large tire you can make a sandbox, well, and the options for creating various figures simply not to count.
More ideas for the arrangement of the playground in the country:
Palm trees from bottles and plastic zoo
Plastic bottles are also very common material for crafts. The variety of their shapes and sizes allows you to create very interesting things - palm trees, flowers, figures of insects and animals.

Exotic palm trees will revive any landscape, and not difficult to make them. Such material like bottles, everywhere enough. Do not necessarily follow the strict instruction, experiment by creating a tropical corner

Make such a pig is very simple - use a five-liter bottle for the body, two-liter - for the legs. Tail ears are also cut out of plastic
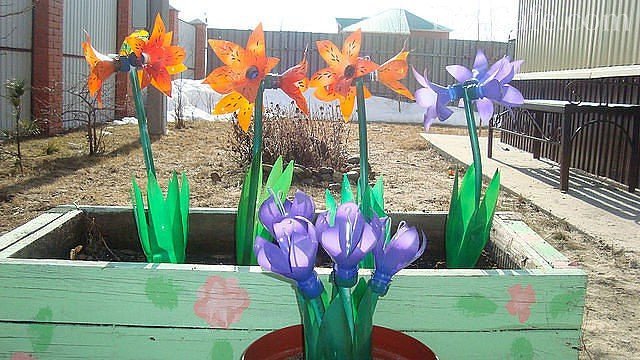
Such a flower garden will not start throughout the summer. Flowers - bottle neck, cut in the form of lilies and bells, leaves - bottles without base, cut on 4-6 parts. Paint their paint from the console and install in the right place
Such crafts are distinguished by practicality - they are not afraid of rain nor the scorching sun. To make a palm tree, cut the bottom at the bottles and strip them on each other, insert the metal rod inside - this is the base of palm trees. To create a "crown", use one or more bottles and cut them from the base to the neck into several bands - it will be the leaves. Then cut pieces cut into oblitege so that they resemble the shaped palm leaves. Insert this bottle into the "trunk" neck. To create classic palm trees, brown bottles (barrel) and green (crown) are used, but not necessarily adhere to the classical norms.
Useful: how to make garden figures for giving with your own hands:
Parade of plywood figures
Plywood is an excellent material for the manufacture of flat, brightly colored figures that will raise the mood to anyone. On the plywood, you can depict anything - your favorite cartoon characters, the heroes of films and books, and then cut the figures and put them in the garden. The composition may be, it can be used as a demarcupant fence for garden zones.

Figures in the form of characters of favorite cartoons are always happy. To create Winnie the Pooh, a five-liter bottle is also used

Plywood cats-mouse surrounded by flowers with flowers located on a soft lawn - a great place to relax and moving games for kids
Mounting foam figures
Mounting foam is not too familiar, but interesting material for creating crafts. Figures from it look like toys, look great and very much like children.

Figures from the mounting foam look like ready. The site has a master class in their manufacture, if you are interested, the technique of their manufacture can be mastered
Hedgehogs and ladybugs from pebbles and boulders
Large pebble is also suitable material. If you paint the rounded stones with bright colors, it turns out fun bugs, hedgehogs or other animals, depending on the imagination you will tell you. Collect them better by acrylic paints, and then cover with colorless varnish. Pictures with a clear contour look good. First, it is painted with a pencil, then black or white paint. Color paints are applied between the contour lines.

Such a family of ladybugs will add positive to the children's corner. Paint bug stones are the easiest way to be applied simple contour drawing, and then bright contrasting paints and varnish are used.
Materials combinations - space for creativity
You can create interesting crafts from logs, combining parts of the tree of different sizes and different lengths. Combinations of various materials - tires and logs, tires and plastic bottles will not be allowed to miss, you can make such a playground that will be envied by those who purchased for their garden ready.
You can create interesting lawns or flowerbeds in the form of animals and insects using the bottle as a fence. Work with children, they usually arise completely non-standard interesting ideas.

Fun flower bed-crocodile - suitable decor for the playground, made of plastic bottles (contour), eyes - plywood and plastic

If the site was an old tree that you cut, do not rush to get rid of the stump. From it you can make such an excellent house with the door, roof and windows. He will not only delight children, but will be a beautiful decor for the site.

Zebras are made of their logs and tires, mane - from plastic. These are sports shells, and homemade garden decor at the same time.

To create the sun used plastic bottles and an old tire. The composition is very bright, positive, and make it easy. Corks from bottles are nailed to the tire, then screwed to the bottle - rays are ready
If you have been unused after the construction of the garden or arrangement of the garden, the materials are not hurry to throw them away. For example, with pieces of bright ceramic tile, you can lay out tracks, space around the figures, or use pieces of a bit tile for lays down a mosaic, images of various characters. Draw on the track the outline of the figure, and then lay it out with tiles. If you lay out on the ground or on the sand, such a mosaic will be short-lived, but a lad out on the cement mixture will create an image for years. Start the seams after drying, and the result will delight you yourself.
Send the material to you on E-mail
D. for the normal development of children, they need to actively spend their free time - run, play, entertain. When creating playgrounds, their safety and functionality is focused on focusing. To build children's playgrounds on the countryside or dacha with their own hands, the photos of which you will find in this article, you will need some tools, carpentry, construction and plumbing skills.
Homemade playground
Registration of playgrounds with their own hands photos of which posted on the Internet implies the presence of a certain equipment. If you don't have something, do not be discouraged, here are some ideas that will help you equip the playground.


Making slide house
Children's playground in the country with their own hands photo of which you can find on the Internet always includes a hill or a hill house. The base of the slide is the frame of 4 vertical racks. You can only use 2 racks, but then the possibility of creativity and the hill will be reduced by one slope and one lift. On the frame of 4 racks, you can make a slide with one slope and several lifts. One lift to make in the form of a ladder, other normal steps, and the third rope.

This design will seriously diversify children's leisure. For a slide with a direct slide, it is undesirable to make the corner of the skate more than 30 degrees relative to the ground to avoid excess overclocking and injuries.

Helpful advice!If possible, use a plastic skate that is sold in stores. With it, children will receive more fun than from a direct wooden row.

What to make a hill house
To do this, you will need:
Preparation of the foundation
Find a hill place and prepare a hole for the foundation of the frame. We recommend to make a square frame with a distance between the racks of 1 meter. The sides side of the pit should be 1.5 meters, the depth is at least 20 cm. Seal the bottom of the pits and pour a layer of rubble (fraction 15-25 mm) with a thickness of 10 cm. Seal it. You can also do with small pits under each bar. In this case, the depth of the pit must be at least 50 cm. The lower edge of the bar is soyar and molten bitumen, the treated part should rise above the ground by 1.5-2 cm. At the bottom of the pits, pour a crushed stone pillow - a fraction 15-25 mm, thickness 5 -10 mm. Insert the poles in the hole, set up the level and ensure their correct orientation - their faces should be parallel to each other (with logs or round bars it is not required). Then pour concrete.

Helpful advice!The smaller in the concrete of water, the stronger it will be. So that thick concrete is moving, add plasticizers to it that can be bought in a construction store.
Lower strand and skate
Reincut the bars using a 50 mm thick boards at the floor level of the house, and also set one longitudinal jumper. Bold the boards to the bars using self-samples with a length of at least 100 mm. From the board with a thickness of 25 mm Make a tray for the skate. To do this, cut 2 boards whose length is slightly higher than the skate length. Mark the corners of contact with the cutting of the frame and the earth, then doincate the board using a disk saw or jigsaw. Adapt boards to the strapping to make sure that you are all done correctly. Then make the jumpers from the same board. The length of the jumper is equal to the width of the skate. Put long boards on the ground and with the help of screws, attach to them from the side of the jumper.


The distance between the jumpers is not more than 30 cm, and the first and last jumpers place 5 cm from the edge. Make such a cut in the upper edge of the board so that the skate rests on the strapping like on the shelf, and the jumpers were closed with strapping. Attach the slide to the strapping with the help of bolts with nuts and screws. Corners install so that the children do not scratch. Corners are secure to the skate with bolts and nuts so that there is nothing protruding or sharp from the side of the skate. Slice plywood slot with screws. They must be pulled by 0.5-1 mm, then put off and grind. Secure the lower edge of the slope using pins or anchor bolts scored to the ground.

Stairs
Cut two pieces of 50 mm thick boards, the length of which will be slightly exceeded. Follow and cut the corners of contact with strapping and land. Cut in these boards the groove of 24.5 mm width to install the steps, then cut the steps of the desired width and collect the staircase. Stages are focused to sideboards with screws. Attach the staircase to the strapping and ground from the side opposite to the Skate. With both sides of the staircase, attach the supports and railing. They can be made from a 25 mm thick board. Supports and railings need to be processed using a manual or electrical ruble to eliminate sharp edges, after which it is thoroughly sprawling. The top edge of the railing must be attached to the racks.

Additional entrances, upper strapping and roof
Make a staircase from one of the sides of the same bar as the racks. Sliced \u200b\u200bbars to treat with an electrolablanka to a slightly rounding face. Attach these bars to the racks at a distance of 20-30 cm from each other. The first bar is screwed at a distance of 20-30 cm from the ground. Prepare an extreme rise in the house. To do this, make the same tray as for a skate, but installed at an angle no more than 20 degrees relative to the racks. Reinforcing racks at the ceiling level house with a 50 mm thick board. From the side of the extreme entry, strengthen the strapping using steel corners. Cut and select Phaneur to the floor, then swing the plywood ceiling. Cut the house plywood outside by making round or oval inputs. Input / output size Determine yourself, so that the child is comfortable. To make a roof, cut out 4 rafters from a 25 mm thick board. Corners of the rafter determine based on the height of the roof. Strops are attached to the corners of the frame and close on top with a metal corner. Cut the phaneer into pieces of the required size and roof the roof.

Cutting plywood electrolovka
Final works
Having finished work, be sure to sand all the places where the child can drive the off-beland. Then treat the skate, steps and extreme lifting parquet varnish. Attach the rope with a thickness of 10-15 mm to the upper strapping from the extreme lifting and impose nodes on it every 20 cm. Coloring the house so that it looks beautiful.

Step-by-step photo instructions: how to make a playground with your own hands. Tips, drawings, video.
Make a full-fledged playground with a slide, staircase, a balcony, a rope, a laser and swings with your own hands. This will help you the following manual. It has many detailed photos, so no problems with the manufacture of structural elements and their installation will arise.
Getting ready for work


To begin with, we buy the material you need - boards 15x2 cm and 5x2 cm and a timber sections of 10x5 cm, 10x10 cm and 5x5 cm.
Prepare the following tools:
- electric drill;
- electric jigsaw;
- bulgarian;
- a hammer;
- roulette;
- level.
In the process of work, you may need any additional little things like a screwdriver, knife, etc.
We make supports
Pre-prepare the project of the future complex. In the drawing, specify the desired dimensions of each system element. Consider the size of the existing construction site.

- cut the bar on the part for the arrangement of support racks and transverse crossbars;
- gluing wooden elements;
- we mean polished wood.
The average length of supports is 900-1150 mm. About 80-100 cm of each support will be discharged into the ground, about 10-15 cm will remain above the ground.


We lay out the support elements on the site in accordance with the project and form a framework - two side parts of our future complex. For compound, we use screws with a diameter of 8-10 mm. We bleed them into the wood. Holes close the plugs.
Prices for sandbox
sandbox
I exhibit the sidewols on the supports, fixing in pre-prepared deepening. At this stage, we have a sharing of 1-3 people. The sidewalls exhibit in terms of level. Pre-under the bottom of each support is recommended to lay bricks for better platform resistance. The installed supports fall asleep with a rubbent by 10-15 cm and pour a concrete mixture.
The exhibited supports connect transverse beams. We leave the fill to gain strength.


We do the stairs

While concrete is frozen, engage in the arrangement of the stairs. Cut the timing of the desired length. The design of the staircase is extremely simple: 2 cowra and steps. Steps do not too high - the playground is still children's.
Kosomers are tightened with spills. Stairs fastened in deepening and additionally fix the self-drawing.

Drop the reference pillars for the future staircase. Withstand the desired slope. We do it not too cool. The procedure for arranging supports remains as in the previous section.

We try on the staircase. I exhibit it in terms of the level, attach to the base and fill the supports with concrete. Mobile staircase.

Next, we make railing. To do this, exhibit vertical racks from the bar, they are attaching them to the stairs, and then fix the handrails. The upper handrail is made from the board and fasteners at an altitude of about 90 cm, the second handrail is fixed in about the insertion between the upper railings and the staircase. For its manufacture, we can use the timber 5x5 cm, 5x2 cm or another similar section.

Make a hill
What kind of playground without a slide? Let both! We will not spend money on the finished plastic descent. With metal, too, we will not mess around. Make a slide of wood!
First we will collect a slide, and then attach it to the base. Floor laying recommendations will be given further.
For the manufacture of the design, we will need the following material:
- bar with dimensions 70x10x5 cm - 2 pieces;
- boards 220x15x2 cm - 5 pieces;
- bar 45x10x5 cm - 5 pieces.
Of the three boards, we will make the base for the descent. Construct the boards to the same thickness and carefully polish. After that, directly on the surface fasten the board with bars. Breeping from above - so we can attract the boards to Brusa as much as possible. Fasteners flow into wood. Delections are smeared for wood processing. Let her dry, and after again, carefully grind the whole slide - it should be as smooth as possible.
The foundation was made. We proceed to the manufacture of lateral parts. Determine the extension angle. The top floor of our gaming complex will be at an altitude of 130 cm. Therefore, the extension angle will be about 55 degrees.
Prices for children's slides
children's slide


Sorry sidewalls, getting rid of sharp corners. Additionally, we spin the boards along the length so that the kids are more convenient to hold onto the sidewalls during the slope on the hill.
It remains only to paint the product. You can cover it with a verse, and then - varnish.


Now we need to install the finished slide. To do this, concrete in pre-dug pits supports from a bar. Suitable material with dimensions of 70x10x5 cm. Wood is pre-impregnate with an antiseptic.

The base of the slides connect with reference racks and the playing complex with the help of screws.

We make the floor and railing
The floor of our game complex is laying out 15x2.5 cm boards. The total length of the floor is approximately 2.5 m. Before laying the floor, secure to the frame of the ringer edge complex. For their manufacture, the bar 5x10 cm will fit.
At the same stage, the vertical ladder is constructed from the end. For its assembly, we use 2x5 cm strips. At the end of work near this ladder hang rope. Recommendations for arrangement of the railings have already been brought earlier. And follow them. From the side of the steps instead of the railing from the boards by mounting the timber 5x10 for the arrangement of Laza.

At this stage, we will collect and install a supporting structure for swings and develop a LAZ. Support of the upper beam makes the nearest - so stable. Pre-make a sample for a comfortable docking of the bars and additionally tighten them with bolts. On top of the supports, we apply and press the transverse beam clamp. We screw it to the support.

ROOM POMS for racks. We establish supports in them, carefully extinguishing each level. In the same stage, we screw to the struts of the struts - they will not allow the supports to shift in the process of frozen concrete. I fall asleep pits with racks with a small layer of rubbank and concrete.
 Pits for racks
 While the concrete fill dials the strength, we make LAZ. The bias make practically vertical. Steps and cutouts draw up at their discretion. Holes cut with a jigsaw. LAZ himself make from OSB and freamed it to a frame of a bar 5x5 cm and cross-5x2 cm.


On the top floor we draw a balcony. To do this, we put and fix the crossbars, laying the floor and build the roof to the staircase. From the side of the slide, fasten the wall of the OSB sheet. To make it beautiful, cut a small window in it. On the balcony make railing.


Sorser all the wooden elements installed at this stage. Sharp corners and ends are spinning. Cover all varnish.