Preschool and school age - is by no means a reason to deprive a child of a stylish neck jewelry. Due to his age, he still may not cope with complex nodes on his own, but this is not necessary, because a special kids tie no need to tie on an elastic band. The child will be able to quickly and easily put it on to school, which is especially important if the rules of the educational institution provide for a special uniform.
How to choose a tie with an elastic band?
Outwardly, a tie with an elastic band practically does not differ from an ordinary self-tying tie, so the same basic rules are relevant here as when choosing a classic accessory.
- In the cold season, dark-colored ties made of dense fabric are worn. For warm seasons, light, light decorations are suitable.
- According to etiquette, the accessory must reach the belt buckle. If the child is not yet attending school or is in elementary school, this rule can be ignored. However, as they grow older, the baby must master all the subtleties of the business style of clothing.
- Also, in accordance with the etiquette, the width of the accessory must match the width of the lapels of the jacket. At first, this requirement is not necessary, but only until the boy moves to middle classes.
- The color and texture of the tie fabric should match the appearance of its little owner and the elements of his clothing.
- Children are very mobile and not always neat. Since a boy can accidentally get his tie dirty, it is best to purchase an accessory made of a fabric that is easy to clean (such as cotton).
- It is better to buy some ties for the child. They are inexpensive, and their purchase will not cause much damage to the family budget, but the boy will be able to combine various accessories, shirts and pants.
- Ties with stripes, polka dots or patterns are suitable only for plain shirts. For a plaid or striped shirt, it is better to choose an ornament with a simpler color.
You don't need to puzzle over how to tie a children's tie with an elastic band - its knot is already securely fastened or even stitched. The accessory can be attached to the neck using:
- A looped elastic band is the simplest fastening option, usually found in the cheapest jewelry. However, when the child grows up or the elastic wears out, it is more difficult to put on the tie (or it sags and dangles freely around the neck).
- Ribbons with special fasteners - a more complex fastening design increases the cost of the accessory. On the other hand, the length of the elastic can be adjusted exactly to the diameter of the boy's neck.
Children grow up very quickly, so the jewelry may be small soon after purchase. Some ties with an elastic band can be untied, adjusted to length, and then tied back. You should pay attention to how the knot is fixed - sometimes it is stitched or fastened with a special fastener.
IN last years online stores are very popular, where you can buy ties with an elastic band. Photos that accompany electronic product catalogs make the purchase process as easy as possible.
If the accessory is bought for a student, you should pay attention to the rules of the educational institution that relate to a special uniform. Perhaps the relevant requirements only provide for a certain style and color of the tie.
How to tie an elastic tie?
In some cases, you need to know how to tie a tie with an elastic band, for example, if the factory knot is untied during washing. It is impossible to wear such an accessory, but throwing it away and buying a new one is irrational. However, it is very easy to return the jewelry to its previous appearance.
Before you start knitting a knot, you should see what condition the elastic is in. If it is stretched, worn out, or has stopped coming to the boy's neck, it is better to replace it completely. You can make new ties as follows:
- The elastic consists of three parts: front and two side parts. The front is cut from a dense suit fabric, which is most suitable in texture and color to the material of the tie itself. For the side parts, an elastic band or elastic tape is suitable.
- To make the accessory last longer, you should provide for the adjustment of the elastic band in length.
- The front part is folded in half along the long side and stitched.
- The corresponding parts of the fastener are attached to the side parts of the elastic.
- At the end of the work, all parts of the elastic are sewn together.
Now that the elastic is in perfect condition and ready for a long service, you need to tie a tie to it.
It is worth preparing a needle and thread of a suitable color before tying a children's tie with an elastic band. The scheme of the selected node should be before your eyes - the process will be much easier if you focus on the image of the finished decoration.
- The tie is placed with the wrong side out.
- An elastic band is placed approximately in the middle of the tape.
- The narrow part of the tie is covered with an elastic band on one side.
- Pass the narrow end through the face of the jewelry.
- On this side, using the narrow end, make another loop around the elastic.
- Tighten the knot.
- Straighten the narrow end.
- From the seamy side, fasten the knot with several neat stitches.
This is the easiest way to tie an elastic tie. The scheme of actions for creating more sophisticated nodes in general does not differ much from the one described.
In order to sew a tie with your own hands, scraps of suit fabric will do, and the product can be finished in 1-2 pm. In the course of work, all the details are sewn and smoothed with an iron, after which you can already think about how to tie a tie with an elastic band. Photos of finished models will help you come up with a stylish and, most importantly, unique accessory.
The tie itself is very beautiful, but it can be supplemented with embroidery, a badge (for example, with the image of your favorite cartoon or comic book character), a special clip or pin. However, it is important not to overdo it - without a sense of proportion, the accessory will become too defiant and will cease to be an ornament.
My first grader likes to wear to school uniform ties. The elder, too, began to be fashionable (or to flaunt) and periodically asks Temka for his wealth. However, for some unknown reason, he brings them untied. I decided to tie (I know how to tie classic men) - but it was not there! No matter how I turned it, nothing worked. I had to buy another one and see how it's done. I share with everyone who might find it useful:
1. Secret number 1. Ties with an elastic band are not tied, but folded in a certain way and sewn up.
2. Secret # 2 The fabric of the tie is wrapped around the elastic.
This is done like this:
1. Lay the tie with the wrong side up. Put the elastic on top 
2. Bend the tie over the elastic towards you (down) 
3. Bring the thin end of the tie back to the left 
4. Slip down under the elastic (as shown in the photo) 
5. While pulling on the ends of the tie, make a neat knot. 
6. Assemble the lower parts of the knot so that on the front side you get a triangle with the top down. Sew it up. 
7. It should look like this
In this article I would like to consecrate such an exciting question for many women about how to choose men's Tie and how to tie it. There are certain rules, but they are easy to learn.
Experts from the University of Cambridge have conducted observations that when tying a tie, 9 movements are usually used, and with the help of these movements, 85 different variations of tying a tie can be combined.
You are unlikely to need about a hundred combinations, but it is desirable to learn several ways - believe me, it can come in handy in life.
How to tie a man's tie: scheme
Eldridge node“, Which was born only in 2007, is rather unusual, but it attracts attention. Knits using 15 steps that are easy to reproduce thanks to pattern orientation.
How to tie a tie: The Eldridge knot is quite unusual - it resembles a spike of wheatIMPORTANT: Please note that, unlike most knots, the Eldridge knot is tied not with a wide, but with a narrow end. However, even if done correctly, this whimsical knot can quickly come loose due to careless wearing, so don't be afraid to tighten it properly.
- First of all, position the tie with the seams inward so that the narrow end is to the right of the wider end. Wide flush with belt buckle
- Put the narrow part on the wide one, crossing them
- The wide edge should be moved from the left side to the right
- Lift the narrow edge and thread it into the gap between the accessory and the leather
- Pull out the narrow edge on the left
- Take care of the design of the visible side of the "Eldridge" - for this, the side of the tie, on which we are working, move to the right and pass it through the collar of the accessory
- Pull the narrow edge to the left and pull to the right under the wide edge
- You should have had a front loop earlier. Thread the narrow end from right to left into it. Point up at the same time
- Tighten the resulting knot, but not fully
- Leaving the narrow part still to the left, throw it over the collar of the tie, pulling it down
- Transfer the end from the left side to the right, tucking it over the collar
- As a result of the previous action, another loop appeared on the visible side. Pass through it from the right side to the left narrow end, lifting
- Tighten the knot slightly
- As a result, the remaining small tip of the tie will stick out. To disguise it, tuck it in discreetly
- It remains only to place the Eldridge knot in the middle.
 Eldridge Tie Knot Pattern
 Ideal Eldridge Knot for shirts with medium to long collars, and for collars with small buttons or soft ends.
 How to Tie a Tie: Eldridge Knot for Mid Collar
 Trinity Knot similar to "Eldridge" in that it revealed itself to the world quite recently, but has already become quite popular. This is due to the external uniqueness and similarity with the Varangian symbol, which is called a tricvert. The formation process resembles the Eldridge knot - all basic actions are performed with a narrow end.
IMPORTANT: Remember that the knot will turn out to be asymmetrical and large.

 How to Tie a Tie: The Trinity Knot
 - Throw a tie with the inner side closer to the body. Make sure that the wider part is on the left and the narrow part needed for tying is on the right. Place the wide one so that it is just below the buckle or flush with it
- Cross the ends so that the largest one is under the one that is smaller
- Pull the smaller one up, threading it into the collar of the tie
- Pull out the smaller one on the left
- Wrap the largest part of the tie around the narrow one from the left side to the right
- Pull the narrow part up, pushing it into the collar of the accessory
- Pull the end to the left by lowering it
- The horizontal component of the knot is formed by pulling the narrow part of the tie on right side under the collar. The strip of fabric should lie horizontally
- In the course of the previous paragraph, a loop was formed. The narrow part of the tie should be passed through it.
- Stretch the tie horizontally again, with the smaller part going under the larger
- Pull the desired end into the loop you made from step 9. Pull the end up slightly
- Tuck the remaining loose narrow part of the tie behind the collar - nothing should stick out
- The final touch is to fix the tie

 Trinity Tie Knot Pattern
 As you can see, this scheme is very similar to the Eldridge variant, however it requires less manipulation. Trinity Knot suitable for clothing with medium or wide collar, for collar with buttons and “shark” version.

 How to Tie a Tie: Trinity Knot for Shark Collar
 If a man likes long knots, we recommend a variety Van Wijk. Actress Lisa Van Wijk came up with it, adding another twist to the Prince Albert look.

 How to tie a tie: the Van Wijk knot
 - So, position the tie around your neck so that the seams are facing inward. Place the largest component of the accessory on the right, and the smallest on the left.
IMPORTANT: The smallest component of the tie should be at waist level, but amendments are also possible - it all depends on the person's height. The size of the accessory also plays an important role.
- This time you have to work with the wide part of the tie. Position it so that it intersects with the other
- Place the wide part under the narrow one - as a result, the first one wraps the second
- Move the wide component to the left above the narrow one. Remember to keep the line horizontal
- Return the largest part to the right again, threading it now under a narrow
- And again, make a turn from right to left - this is how the front component of the node is formed
- Wrap the tie again, but now a little lower than before
- Now let's talk about the third layer of the front of the node. Remember to keep the line horizontal
- Lift up the tie with the end under the collar
- The loops on the outside will still come in handy - through them you need to thread the largest component of the accessory down
- Pull the accessory better and fix it

 Van Wijk tie knot diagram
 The next node is Baltyus - less intricate than the previous ones. It appeared in the last century thanks to Balthazar, who was an artist.
 How to tie a tie: the Baltyus knot
 - Position the tie so that the narrow edge is on the left and the wide edge on the right
IMPORTANT: In this technique, the seams are located outside, that is, the thing must be placed with the front side to the body.
- Cross the ends, with the narrow one over the wide
- Broad point up
- Place it under the collar, pulling it out to the right
- Pull the same piece up
- Tuck the edge of the tie behind the collar and pull out to the left
- Lift the widest part
- Place it again under the collar of the tie and pull it out to the right
- It's time to once again wrap the wide edge, stretching it to the left - as a result, the front of the knot will form.
- Bring the wide hem up and under the collar
- Thread the hem through the loops from the front
- Correct the result of the work, not forgetting to pull the largest side down to the maximum to secure the knot tighter

 Baltyus tie knot scheme
 "Murrell" suitable for those who want to try something that does not belong to the classics. In fact, this knot that saw the world in 1995 is an inverted Windsor knot.
IMPORTANT: Correctly knotted "Murrell" is symmetrical, its shape is an even middle triangle.
 How to Tie a Tie: The Murrell Knot
 - Throw on the tie so that the inner side is closer to the body. Place the wide component on the left, and the narrow one on the right. The wide one should be approximately at the level of the buckle
- Cross the ends
- Pass the smallest one behind the collar of the tie, pulling it up
- Place the narrow section over the collar, pointing to the left
- Place this part under the wide one, stretching out to the right.
- It's time to pull the part we're working on again to the top
- Wrap it around the collar, pulling it out from the bottom on the right side
- Drag the end to the right, positioning it above the knot to form the front side
- Pull this part up by passing it under the collar
- In paragraph 8, we got a front loop - it is through it that now you need to drag the narrow part of the accessory down
- Correct what happened. Please note: the narrow part should be on the wide
 Murrell tie knot diagram
 Suitable for for a medium, wide shirt collar and for a collar with soft ends.
How to tie a tie? Step-by-step instructions in pictures and photos
Is a great choice for anything.
- Place the tie around your neck with one end over the other
- Go around the thinnest end from left to right. A loop should form. In this case, please note that the wide part will have to be under the narrow
- Turn the wide part to the left over the narrow one. If done correctly, you get a loop
- The widest end of the tie should be threaded into the loop
IMPORTANT: It is better not to straighten the edges of the tie after it has been tied with a "Four" - this is useless, but worse can be done.

 Tie a four tie
 It is not at all more complicated than the "Four", but it looks more interesting.
- Throw on the accessory so that the wide end drops 30 centimeters lower than the narrow
- With this long side, it is worth going around the short one from behind so that you can bring the first one up. Do not forget that you need to display the tie upside down. Thread the end into the throat loop
- Wrap the wide part around the narrow again, pulling down
- Pass a wide loop through the loop you formed earlier
- Tighten your tie

 How to Tie a Tie: The Half Windsor Knot
 Reminds the technique of the previous version and is suitable for those men who like wide knots.
- The wide end, after the tie is thrown over the neck, should be located on top of the narrow one. In this case, the first must be made longer than the second by about 30 centimeters
- Wrap around the narrow end on the inside with a wide one, pulling the latter up through the neck loop
- Now lower the wide part down and, around the narrow one, direct the end to the right
- Fold the wide part over the narrow one to the left on the front side. Slip the end through the collar
- Thread the end into the resulting knit
 How to Tie a Tie: The Windsor Knot
 Tie a knot on a tie
When tying the knots, remember about the following nuances:
- Pay attention to the color of the accessory: for example, complex combinations will look more advantageous in combination with calm pastel colors, but simple nodes are more suitable for brightness. This can be explained by the fact that tying simple combinations on colorful models avoids refraction of patterns, shades

 Simple tie knot combined with bold color

- Now take a closer look at the collar of the shirt, at the face of its owner - the cut will go well with a wide accessory, a voluminous knot. Use a complex knot when the collar is wide, as well as if the face is wide. But if the face is elongated and the collar is narrow, master the classic knots, which are thin

 How to tie a tie in a cage: an elongated face does not require an intricately tied accessory
 - Do not listen to those advisers who convince you that you can tie a tie in your hands and then put it around your neck. In fact, the correct knot will turn out only on the neck.
- Please note that simple classic knots exclude wrinkles. But as for wide knots, then it all depends on the preferences of the owner of the accessory - some people like slight negligence
- Pay attention not only to the palette of the tie fabric, but also to its material - for example, a complex knot is best obtained on thin plain fabrics... Avoid synthetics, preferring natural fabrics - knots are best tied on them
IMPORTANT: Remember to keep the widest part of the knot perfectly straight
- Whichever knot you choose, you cannot barely tie it - it is better to tighten it to a moderately tight state. But you should not tighten the knot too much - this can be explained by the fact that all overly tightened knots look the same, so all ingenuity can go to pieces
- Thick lining of the tie makes it difficult to tie - consider this fact when buying an accessory
How to tie a thin tie?
The retro style shows itself on the streets again, and with it the fashion for narrow ties, called "herrings", reminds of itself. They are stylish, original, and go well even with a business look. Remember the following the nuances of wearing such a tie:
- It is recommended to wear them for men of slender physique.
- Large chains or rings do not go well with this type of accessory. Remember that a thin tie is minimalist. However, casual jeans with sneakers are also not suitable.
- The best choice of a node in this case is medium-sized and asymmetric.
- With regard to colors, prints are excluded. Plain or checkered models look best.
- Pay attention to the jacket and shirt: the jacket should be narrow, and it is advisable to select the shirt collar in such a way that it is not too large. A buttoned blazer is also great
 Thin tie - minimalism and taste
 The knot is great for thin ties Granchester - dexterous but great looking option:
- Throw the tie so that the seams are towards the neck, with the narrow part on the left
- Place the narrow section on the wide
- Wrap the narrower end twice with the wider end
- Now bring the end with which you made turns up and thread it into the collar
- Rotate around the loop, bringing the wide end to the right under the loop
- Direct the end with which all manipulations are performed to the left. The fabric should lie horizontally
- Pull the end up, passing it through the loop between the tie and the neck.
- Loop the end down and straighten

 How to Tie a Tie: The Fine Granchester
 How to tie an elastic tie?
An elastic tie is a favorite accessory for schoolchildren and young office workers who cannot or do not want to tinker with the daily knotting. It turns out that a tie with an elastic band does not need to be tied at all, instead should be folded in a certain way and sewn up.
IMPORTANT: Always remember to wrap the fabric around the elastic.
- In order to fold the item in the right way, place it on any surface with the elegant side down, and place the elastic band across from above
- Flip the tie over the elastic with the thin end
- Wrap the specified end back and to the left
- Slip it under the elastic, pointing down
- Pull all ends gently to form a knot
- Connect the lower parts of the knot together. The result is an inverted triangle. Sew up what came out. If you have done all the manipulations correctly, a small knot will flaunt on the front side of the accessory

 tie with elastic
 How to tie a bow tie?
Previously, such a tie was worn exclusively with tuxedos, but now it can even be worn not only at business events, but also at festive occasions. Suitable for bow collar, short and medium collars.
- First of all, wrap the fabric around your neck. In this case, the left end should be 4 or 5 centimeters longer than the right
- Cross the left with the right, forming a loop
- Meanwhile, fold the right end in the shape of an accordion - it is she who will turn into the face of the butterfly
- Pull the left side down so that it is perpendicular to the accordion
- Fold the left end twice as in the diagram.
- Thread this end through the loop you formed earlier
- Holding the ends, pull them in different directions - this will tighten the knot.
- Bring the butterfly to full dress by straightening it

 How to tie a tie: the butterfly knot
 How to tie a kid's tie?
For children, adults most often acquire exactly elastic accessory... It is good for several reasons: firstly, there will be no need to struggle with tying every time, and secondly, there will be no need to buy a new thing due to the rapid growth of the child. An ordinary tie will turn out to be small in just a couple of months, so an elastic band will come in handy.
How to quickly and correctly tie a tie?
A simple and quick knot is relevant in the case when it is necessary to quickly tie an accessory, but there is absolutely not enough time for such procedures. good because it looks great and can be easily tied on any type of fabric.
- First of all, position the accessory around your neck so that the largest part is on the left side and is lowered below the smaller
IMPORTANT: The specified method of forming a knot is considered one of the few in which the seam is outside.
- Cross part of the tie, with the smaller one over the larger
- Now place the wide part over the narrow one, directing it to the left.
- Pass the wide side through the loop. Movements should be directed from bottom to top. Perform these manipulations from the wrong side
- Now pass it through the loop from top to bottom, but from the front side
- Pull your tie down, straighten it

 How to tie a tie: small knot
 Ways to tie a tie
Which is considered one of the most difficult and unusual, is done according to the following scheme:
- Cross the largest part with the smallest after the tie is thrown over the neck
- Now place the larger part under the smaller one, bringing it to the right.
- Repeat the action, again twisting one end around the other, drawing out to the right
- Now tuck the large component into the loop
- Bring the largest part to the left
- Tuck the bulk into the loop you made earlier. Node ready

 How to tie a tie: the diagonal knot
 is created according to the following scheme:
- Place the accessory around your neck. Cross its parts so that the wide one is located over the narrow one. Aim wide to the right
- Now it is worth directing the largest component down through the loop
- Tighten a little
- Pull the large end horizontally to the right
- Thread it through the loop

 How to Tie a Tie: The American Knot
 An easy way to tie a tie
It is considered one of the easiest methods of tying a tie. Recommended to be worn by tall men using medium-length ties.
- So, first, throw the accessory with the largest part outward. In this case, let the largest side be on the right, and the small one on the left. You will have to work with the larger part, and lower the smaller one to a length slightly above the navel
- Cross the wider part with the narrow one so that the first goes under the second. As a result, the wide component is displayed on the left. Turn it to the right - now it will lie on a narrow
- Now, lift the part with which you are actively working and thread it into the loop formed between the thing and the throat
- The final step is to thread the largest end into the loop down from the front. Pull the tie down a little and straighten it

 How to tie a tie: the kent knot
 "Prince Albert" goes well with shirts with a medium, wide collar or a collar with buttons.
IMPORTANT: This knot is considered one of the few that needs to be tightened tighter - its appearance from this becomes more strict.
- Place the tie so that the seams are closer to your neck. The wide end will be on the right, the narrow end on the left
- Place the wide end on the narrow side so that a crosshair forms
- Bottom under the narrow part, drag the wide one to the right
- Now swipe to the left along the upper side of the narrow part - this will form the face of the knot
- Repeat the previous step
- Pull the wide end towards your neck, passing between the tie and throat
- Now pull the tie down through the front loop and straighten the resulting knot.
 How to tie a tie: the prince albert knot
 - a fairly versatile unit that anyone can easily handle. It is perfect for everyday wear as well as for the holidays.
- Place the tie so that the seams are facing outward. The wide side will be on the right and the narrow side on the left
- Cross the wide part with the narrow one - the narrow one will be over the wide
- Pull wide from bottom to top, passing under the collar of the tie
- Make one turn and pull out the end to the left
- It's time to move the end to the right horizontally - this will form the outer side of the knot
- Pull the end up again, passing it through the collar.
- Now it is worth passing from top to bottom through the front loop
- Pull the end down and straighten the knot
 How to Tie a Tie: The Pratt Knot
 How to tie a tie - video
Node "Manhattan" - stylish and lightweight. Versatile for all suits and shirts.
Node "East" - for those who want something unusual. The result is stylish and eye-catching.
Kristensen node - it is also called "cross". Ideal for those things that are made of loose materials. The width should not be large.
Onassis knot is a godsend for those men who prefer to hide a knot under a shirt collar. Accessories made of lightweight material are suitable.
Knot "New classic" - is a small triangle. Ideal for ties of medium weight and short lengths.
As you can see, there are a lot of options for designing a tie. However, you can master a few of them in order to facilitate the collection of a man for work or holiday. Believe me, he will appreciate this skill.
In addition, it is quite possible to please yourself with such knots, because a tie can increasingly be seen on women's necks - such an accessory looks very stylish and appropriate quite often.
Video: Knot New Classic
- a versatile, practical and convenient model for every day.
The knot is tied through an elastic band only once and subsequently sewn up, the length of the tie is adjusted based on the height of the child.
In contact with
Material selection
For children's ties with an elastic band, as a rule, use one of the following materials, namely:
- atlas;
- silk;
- wool;
- jacquard.
Wherein it is better to abandon models made of synthetic materials... They are inexpensive, but they also look cheap, so any, even the highest-quality suit looks less solid against their background.
You also need a tie select by season... For example, silk and satin models will ideally complement a summer, spring outfit, while woolen ones - warmer, winter suits.
pay attention to quality of lining... How the tie will keep its shape directly depends on it.
Easy steps or how to tie a kid's tie with an elastic band?
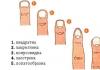
Most of the models that are presented today in a wide assortment on store shelves, put on simply - with the help of special hooks and elastic bands, which subsequently hide under the shirt collar. Further, the photo shows step by step how to tie a children's (school) tie with an elastic band.


There are another technique, according to which we tie a children's tie, is no less popular. Let's consider it in more detail:
- lay the tie face down on a flat surface. In the center, across it - a stretched elastic band. You need to fix it only with a narrow end;
- for this purpose, we carry it out from the bottom side, then to the side;
- we draw the edge of the tie and again draw it down under the elastic;
- we fix it with a small knot;
- now you need to try on a tie for a child, adjust the length;
- carefully remove the tie, sew on the knot from the wrong side.
Video instruction
You can more visually familiarize yourself with how to properly tie a children's tie with an elastic band in the video below:
In this article, I would like to consecrate such an exciting question for many women about how to choose a men's tie and how to tie it. There are certain rules, but they are easy to learn.
Experts from the University of Cambridge have conducted observations that when tying a tie, 9 movements are usually used, and with the help of these movements, 85 different variations of tying a tie can be combined.
You are unlikely to need about a hundred combinations, but it is desirable to learn several ways - believe me, it can come in handy in life.
How to tie a man's tie: scheme
Eldridge node“, Which was born only in 2007, is rather unusual, but it attracts attention. Knits using 15 steps that are easy to reproduce thanks to pattern orientation.
How to tie a tie: The Eldridge knot is quite unusual - it resembles a spike of wheatIMPORTANT: Please note that, unlike most knots, the Eldridge knot is tied not with a wide, but with a narrow end. However, even if done correctly, this whimsical knot can quickly come loose due to careless wearing, so don't be afraid to tighten it properly.
- First of all, position the tie with the seams inward so that the narrow end is to the right of the wider end. Wide flush with belt buckle
- Put the narrow part on the wide one, crossing them
- The wide edge should be moved from the left side to the right
- Lift the narrow edge and thread it into the gap between the accessory and the leather
- Pull out the narrow edge on the left
- Take care of the design of the visible side of the "Eldridge" - for this, the side of the tie, on which we are working, move to the right and pass it through the collar of the accessory
- Pull the narrow edge to the left and pull to the right under the wide edge
- You should have had a front loop earlier. Thread the narrow end from right to left into it. Point up at the same time
- Tighten the resulting knot, but not fully
- Leaving the narrow part still to the left, throw it over the collar of the tie, pulling it down
- Transfer the end from the left side to the right, tucking it over the collar
- As a result of the previous action, another loop appeared on the visible side. Pass through it from the right side to the left narrow end, lifting
- Tighten the knot slightly
- As a result, the remaining small tip of the tie will stick out. To disguise it, tuck it in discreetly
- It remains only to place the Eldridge knot in the middle.
 Eldridge Tie Knot Pattern
 Ideal Eldridge Knot for shirts with medium to long collars, and for collars with small buttons or soft ends.
 How to Tie a Tie: Eldridge Knot for Mid Collar
Trinity Knot similar to "Eldridge" in that it revealed itself to the world quite recently, but has already become quite popular. This is due to the external uniqueness and similarity with the Varangian symbol, which is called a tricvert. The formation process resembles the Eldridge knot - all basic actions are performed with a narrow end.
IMPORTANT: Remember that the knot will turn out to be asymmetrical and large.
 How to Tie a Tie: The Trinity Knot
- Throw a tie with the inner side closer to the body. Make sure that the wider part is on the left and the narrow part needed for tying is on the right. Place the wide one so that it is just below the buckle or flush with it
- Cross the ends so that the largest one is under the one that is smaller
- Pull the smaller one up, threading it into the collar of the tie
- Pull out the smaller one on the left
- Wrap the very tie around the narrow one from the left side to the right
- Pull the narrow part up, pushing it into the collar of the accessory
- Pull the end to the left by lowering it
- The horizontal component of the knot is formed by pulling the narrow part of the tie to the right side under the collar. The strip of fabric should lie horizontally
- In the course of the previous paragraph, a loop was formed. The narrow part of the tie should be passed through it.
- Stretch the tie horizontally again, with the smaller part going under the larger
- Pull the desired end into the loop you made from step 9. Pull the end up slightly
- Tuck the remaining loose narrow part of the tie behind the collar - nothing should stick out
- The final touch is to fix the tie
 Trinity Tie Knot Pattern
As you can see, this scheme is very similar to the Eldridge variant, however it requires less manipulation. Trinity Knot suitable for clothing with medium or wide collar, for collar with buttons and “shark” version.
![]() How to Tie a Tie: Trinity Knot for Shark Collar
How to Tie a Tie: Trinity Knot for Shark Collar
If a man likes long knots, we recommend a variety Van Wijk. Actress Lisa Van Wijk came up with it, adding another twist to the Prince Albert look.
 How to tie a tie: the Van Wijk knot
- So, position the tie around your neck so that the seams are facing inward. Place the largest component of the accessory on the right, and the smallest on the left.
IMPORTANT: The smallest component of the tie should be at waist level, but amendments are also possible - it all depends on the person's height. The size of the accessory also plays an important role.
- This time you have to work with the wide part of the tie. Position it so that it intersects with the other
- Place the wide part under the narrow one - as a result, the first one wraps the second
- Move the wide component to the left above the narrow one. Remember to keep the line horizontal
- Return the largest part to the right again, threading it now under a narrow
- And again, make a turn from right to left - this is how the front component of the node is formed
- Wrap the tie again, but now a little lower than before
- Now let's talk about the third layer of the front of the node. Remember to keep the line horizontal
- Lift up the tie with the end under the collar
- The loops on the outside will still come in handy - through them you need to thread the largest component of the accessory down
- Pull the accessory better and fix it
 Van Wijk tie knot diagram
The next node is Baltyus - less intricate than the previous ones. It appeared in the last century thanks to Balthazar, who was an artist.
 How to tie a tie: the Baltyus knot
- Position the tie so that the narrow edge is on the left and the wide edge on the right
IMPORTANT: In this technique, the seams are located outside, that is, the thing must be placed with the front side to the body.
- Cross the ends, with the narrow one over the wide
- Broad point up
- Place it under the collar, pulling it out to the right
- Pull the same piece up
- Tuck the edge of the tie behind the collar and pull out to the left
- Lift the widest part
- Place it again under the collar of the tie and pull it out to the right
- It's time to once again wrap the wide edge, stretching it to the left - as a result, the front of the knot will form.
- Bring the wide hem up and under the collar
- Thread the hem through the loops from the front
- Correct the result of the work, not forgetting to pull the largest side down to the maximum to secure the knot tighter
 Baltyus tie knot scheme
"Murrell" suitable for those who want to try something that does not belong to the classics. In fact, this knot that saw the world in 1995 is an inverted Windsor knot.
IMPORTANT: Correctly knotted "Murrell" is symmetrical, its shape is an even middle triangle.
 How to Tie a Tie: The Murrell Knot
- Throw on the tie so that the inner side is closer to the body. Place the wide component on the left, and the narrow one on the right. The wide one should be approximately at the level of the buckle
- Cross the ends
- Pass the smallest one behind the collar of the tie, pulling it up
- Place the narrow section over the collar, pointing to the left
- Place this part under the wide one, stretching out to the right.
- It's time to pull the part we're working on again to the top
- Wrap it around the collar, pulling it out from the bottom on the right side
- Drag the end to the right, positioning it on top above the knot - this is how the front side is formed
- Pull this part up by passing it under the collar
- In paragraph 8, we got a front loop - it is through it that now you need to drag the narrow part of the accessory down
- Correct what happened. Please note: the narrow part should be on the wide
 Murrell tie knot diagram
Suitable for for a medium, wide shirt collar and for a collar with soft ends.
How to tie a tie? Step-by-step instructions in pictures and photos
A great choice for anything.
- Place the tie around your neck with one end over the other
- Go around the thinnest end from left to right. A loop should form. In this case, please note that the wide part will have to be under the narrow
- Turn the wide part to the left over the narrow one. If done correctly, you get a loop
- The widest end of the tie should be threaded into the loop
IMPORTANT: It is better not to straighten the edges of the tie after it has been tied with a "Four" - this is useless, but worse can be done.
 Tie a four tie
It is not at all more complicated than the "Four", but it looks more interesting.
- Throw on the accessory so that the wide end drops 30 centimeters lower than the narrow
- With this long side, it is worth going around the short one from behind so that you can bring the first one up. Do not forget that you need to display the tie upside down. Thread the end into the throat loop
- Wrap the wide part around the narrow again, pulling down
- Pass a wide loop through the loop you formed earlier
- Tighten your tie
 How to Tie a Tie: The Half Windsor Knot
Reminds the technique of the previous version and is suitable for those men who like wide knots.
- The wide end, after the tie is thrown over the neck, should be located on top of the narrow one. In this case, the first must be made longer than the second by about 30 centimeters
- Wrap around the narrow end on the inside with a wide one, pulling the latter up through the neck loop
- Now lower the wide part down and, around the narrow one, direct the end to the right
- Fold the wide part over the narrow one to the left on the front side. Slip the end through the collar
- Thread the end into the resulting knit
 How to Tie a Tie: The Windsor Knot
Tie a knot on a tie
When tying the knots, remember about the following nuances:
- Pay attention to the color of the accessory: for example, complex combinations will look more advantageous in combination with calm pastel colors, but simple nodes are more suitable for brightness. This can be explained by the fact that tying simple combinations on colorful models avoids refraction of patterns, shades
 Simple tie knot combined with bold color

- Now take a closer look at the collar of the shirt, at the face of its owner - the cut will go well with a wide accessory, a voluminous knot. Use a complex knot when the collar is wide, as well as if the face is wide. But if the face is elongated and the collar is narrow, master the classic knots, which are thin
 How to tie a tie in a cage: an elongated face does not require an intricately tied accessory
 - Do not listen to those advisers who convince you that you can tie a tie in your hands and then put it around your neck. In fact, the correct knot will turn out only on the neck.
- Please note that simple classic knots exclude wrinkles. But as for wide knots, then it all depends on the preferences of the owner of the accessory - some people like slight negligence
- Pay attention not only to the fabric palette of the tie, but also to its material - for example, a complex knot is best obtained on thin simple fabrics. Avoid synthetics, preferring natural fabrics - knots are best tied on them
IMPORTANT: Remember to keep the widest part of the knot perfectly straight
- Whichever knot you choose, you cannot barely tie it - it is better to tighten it to a moderately tight state. But you should not tighten the knot too much - this can be explained by the fact that all overly tightened knots look the same, so all ingenuity can go to dust
- Thick lining of the tie makes it difficult to tie - consider this fact when buying an accessory
How to tie a thin tie?
The retro style shows itself on the streets again, and with it the fashion for narrow ties, called "herrings", reminds of itself. They are stylish, original, and go well even with a business look. Remember the following the nuances of wearing such a tie:
- It is recommended to wear them for men of slender physique.
- Large chains or rings do not go well with this type of accessory. Remember that a thin tie is minimalist. However, casual jeans with sneakers are also not suitable.
- The best choice of a node in this case is medium-sized and asymmetric.
- With regard to colors, prints are excluded. Plain or checkered models look best.
- Pay attention to the jacket and shirt: the jacket should be narrow, and it is advisable to select the shirt collar in such a way that it is not too large. A buttoned blazer is also great
 Thin tie - minimalism and taste
 The knot is great for thin ties Granchester - dexterous but great looking option:
- Throw the tie so that the seams are towards the neck, with the narrow part on the left
- Place the narrow section on the wide
- Wrap the narrower end twice with the wider end
- Now bring the end with which you made turns up and thread it into the collar
- Rotate around the loop, bringing the wide end to the right under the loop
- Direct the end with which all manipulations are performed to the left. The fabric should lie horizontally
- Pull the end up, passing it through the loop between the tie and the neck.
- Loop the end down and straighten
 How to Tie a Tie: The Fine Granchester
How to tie an elastic tie?
An elastic tie is a favorite accessory for schoolchildren and young office workers who cannot or do not want to tinker with the daily knotting. It turns out that a tie with an elastic band does not need to be tied at all, instead should be folded in a certain way and sewn up.
IMPORTANT: Always remember to wrap the fabric around the elastic.
- In order to fold the item in the right way, place it on any surface with the elegant side down, and place the elastic band across from above
- Flip the tie over the elastic with the thin end
- Wrap the specified end back and to the left
- Slip it under the elastic, pointing down
- Pull all ends gently to form a knot
- Connect the lower parts of the knot together. The result is an inverted triangle. Sew up what came out. If you have done all the manipulations correctly, a small knot will flaunt on the front side of the accessory
 tie with elastic
How to tie a bow tie?
Previously, such a tie was worn exclusively with tuxedos, but now it can even be worn not only at business events, but also at festive occasions. Suitable for bow collar, short and medium collars.
- First of all, wrap the fabric around your neck. In this case, the left end should be 4 or 5 centimeters longer than the right
- Cross the left with the right, forming a loop
- Meanwhile, fold the right end in the shape of an accordion - it is she who will turn into the face of the butterfly
- Pull the left side down so that it is perpendicular to the accordion
- Fold the left end twice as in the diagram.
- Thread this end through the loop you formed earlier
- Holding the ends, pull them in different directions - this will tighten the knot.
- Bring the butterfly to full dress by straightening it
 How to tie a tie: the butterfly knot
How to tie a kid's tie?
For children, adults most often acquire exactly elastic accessory... It is good for several reasons: firstly, there will be no need to struggle with tying every time, and secondly, there will be no need to buy a new thing due to the rapid growth of the child. An ordinary tie will turn out to be small in just a couple of months, so an elastic band will come in handy.
How to quickly and correctly tie a tie?
A simple and quick knot is relevant in the case when it is necessary to quickly tie an accessory, but there is absolutely not enough time for such procedures. good because it looks great and can be easily tied on any type of fabric.
- First of all, position the accessory around your neck so that the largest part is on the left side and is lowered below the smaller
IMPORTANT: The specified method of forming a knot is considered one of the few in which the seam is outside.
- Cross part of the tie, with the smaller one over the larger
- Now place the wide part over the narrow one, directing it to the left.
- Pass the wide side through the loop. Movements should be directed from bottom to top. Perform these manipulations from the wrong side
- Now pass it through the loop from top to bottom, but from the front side
- Pull your tie down, straighten it
 How to tie a tie: small knot
 Ways to tie a tie
Which is considered one of the most difficult and unusual, is done according to the following scheme:
- Cross the largest part with the smallest after the tie is thrown over the neck
- Now place the larger part under the smaller one, bringing it to the right.
- Repeat the action, again twisting one end around the other, drawing out to the right
- Now tuck the large component into the loop
- Bring the largest part to the left
- Tuck the bulk into the loop you made earlier. Node ready
 How to tie a tie: the diagonal knot
is created according to the following scheme:
- Place the accessory around your neck. Cross its parts so that the wide one is located over the narrow one. Aim wide to the right
- Now it is worth directing the largest component down through the loop
- Tighten a little
- Pull the large end horizontally to the right
- Thread it through the loop
 How to Tie a Tie: The American Knot
An easy way to tie a tie
It is considered one of the easiest methods of tying a tie. Recommended to be worn by tall men using medium-length ties.
- So, first, throw the accessory with the largest part outward. In this case, let the largest side be on the right, the small one on the left. You will have to work with, and lower the smaller one to a length slightly above the navel
- Cross the wider part with the narrow one so that the first goes under the second. As a result, the wide component is displayed on the left. Turn it to the right - now it will lie on a narrow
- Now, lift the part with which you are actively working and thread it into the loop formed between the thing and the throat
- The final step is to thread the largest end into the loop down from the front. Pull the tie down a little and straighten it
 How to tie a tie: the kent knot
 "Prince Albert" goes well with shirts with a medium, wide collar or a collar with buttons.
IMPORTANT: This knot is considered one of the few that needs to be tightened tighter - its appearance from this becomes more strict.
- Place the tie so that the seams are closer to your neck. The wide end will be on the right, the narrow end on the left
- Place the wide end on the narrow side so that a crosshair forms
- Bottom under the narrow part, drag the wide one to the right
- Now swipe to the left along the top of the narrow part - this will form the face of the knot
- Repeat the previous step
- Pull the wide end towards your neck, passing between the tie and throat
- Now pull the tie down through the front loop and straighten the resulting knot.
 How to tie a tie: the prince albert knot
A fairly versatile knot that anyone can easily handle. It is perfect for everyday wear as well as for the holidays.
- Place the tie so that the seams are facing outward. The wide side will be on the right and the narrow side on the left
- Cross the wide part with the narrow one - the narrow one will be over the wide
- Pull wide from bottom to top, passing under the collar of the tie
- Make one turn and pull out the end to the left
- It's time to move the end to the right horizontally - this will form the outer side of the knot
- Pull the end up again, passing it through the collar.
- Now it is worth passing from top to bottom through the front loop
- Pull the end down and straighten the knot
 How to Tie a Tie: The Pratt Knot
How to tie a tie - video
Node "Manhattan" - stylish and lightweight. Versatile for all suits and shirts.
Node "East" - for those who want something unusual. The result is stylish and eye-catching.
Kristensen node - it is also called "cross". Ideal for those things that are made of loose materials. The width should not be large.
Onassis knot is a godsend for those men who prefer to hide a knot under a shirt collar. Accessories made of lightweight material are suitable.
Knot "New classic" - is a small triangle. Ideal for ties of medium weight and short lengths.
As you can see, there are a lot of options for designing a tie. However, you can master a few of them in order to facilitate the collection of a man for work or holiday. Believe me, he will appreciate this skill.
In addition, it is quite possible to please yourself with such knots, because a tie can increasingly be seen on women's necks - such an accessory looks very stylish and appropriate quite often.
Video: Knot New Classic
A tie is one of the most important details of the image of a successful man, but it is important not only to purchase a high-quality accessory, but also to be able to tie it correctly. In fact, there is nothing complicated in this and all kinds of schemes have been invented a long time ago - you just have to follow the instructions step by step, and everything will work out!
Main rules
There are two things to know when tying a tie:
- It shouldn't cause physical discomfort, so don't overdo it when tightening it;
- An overtightened tie knot looks ugly, and the quality of the fabric does not matter. Both silk and wool ties should not be too knotted or wrinkled.
Tie length
A tie is, by and large, a tape that can be adjusted in length. Pay attention to the end of the tie in the photo.
The second picture shows the optimal length - this is how to tie the tie correctly.
Classic style tie knot

The classic tie knot is versatile and blends perfectly with any shirt collar.
Light knot

This diagram shows the simplest and quick waythat you can tie a tie with. If you are in a hurry and you have little experience in this matter, it is better to stop at this particular node.
Instructions: How to tie a simple knot step by step
Video source: Megaimage
Pratt Knot

In terms of complexity, the method does not differ much from the previous one and there are almost no external differences either. In choosing a knot for a tie, most people are guided mainly by habits.
Tutorial: How to tie the Pratt knot yourself
Video source: TheCravatta
Double Windsor

The diagram shows the most popular tie knot. It looks most impressive with a plain shirt in a strict business style.
Step by step instructions: How to tie a tie with a double knot
Video source: Ray Anor
The bow tie

Of course, it is much easier to get a bow tie with an elastic band than to tie it every time, but for many men this option seems frivolous.
Step by step diagram

Tying a bow tie is not as difficult as it might seem. Experience is important in any business, so follow the step-by-step scheme and get your hands on!
Instructions: How to Tie a Bow Tie
Video Source: Ideas for Life
Tricky tie knots
I use the above schemes, it was possible to tie a tie for a special occasion or an official event. Now look at other node options that you can use for parties and informal gatherings.
Eldridge Knot

Since the knot in this case is the central part of the tie, the emphasis should be on it. It is desirable that the tie is solid.
Step by step diagram

Agree, difficult, but very effective! We advise you not to postpone this matter until the last moment, because the first time it may not turn out perfect. Watch the video tutorial, everything is shown there step by step.
Instructions: How to Tie a Tie in a Knot
Video source: Ekaterina Vozhova
Trinity Knot

The knot, as pictured, is much easier to tie on smooth fabric ties.
Step by step diagram
 Trinity knot looks very unusual, but at the same time it is restrained. This option is suitable not only for stylish guys, but also for those who are tired of the classics. With a strict shirt, a tie tied in this way also looks very beautiful.
Instructions: How to Tie a Tie with the Trinity Knot
Video Source: How to Tie a Tie
How to tie a tie: diagrams and photos
| 12.06.2015 |
My first grader likes to wear ties to school uniforms. The elder, too, began to be fashionable (or to flaunt) and periodically asks Temka for his wealth. However, for some unknown reason, he brings them untied. I decided to tie (I know how to tie classic men) - but it was not there! No matter how I turned it, nothing worked. I had to buy another one and see how it's done. I share with everyone who might find it useful:
1. Secret number 1. Ties with an elastic band are not tied, but folded in a certain way and sewn up.
2. Secret # 2 The fabric of the tie is wrapped around the elastic.
This is done like this:
1. Lay the tie with the wrong side up. Put the elastic on top
2. Bend the tie over the elastic towards you (down)
3. Bring the thin end of the tie back to the left
4. Slip down under the elastic (as shown in the photo)
5. While pulling on the ends of the tie, make a neat knot.
6. Assemble the lower parts of the knot so that on the front side you get a triangle with the top down. Sew it up.
7. It should look like this 
A small neat knot is obtained on the front side.