In the modern world, any man can pick up business suit and feel confident in any situation. But to make the image look complete, you should know how to tie a tie in a simple way. To understand this will help step by step photos.
A simple knot for beginners
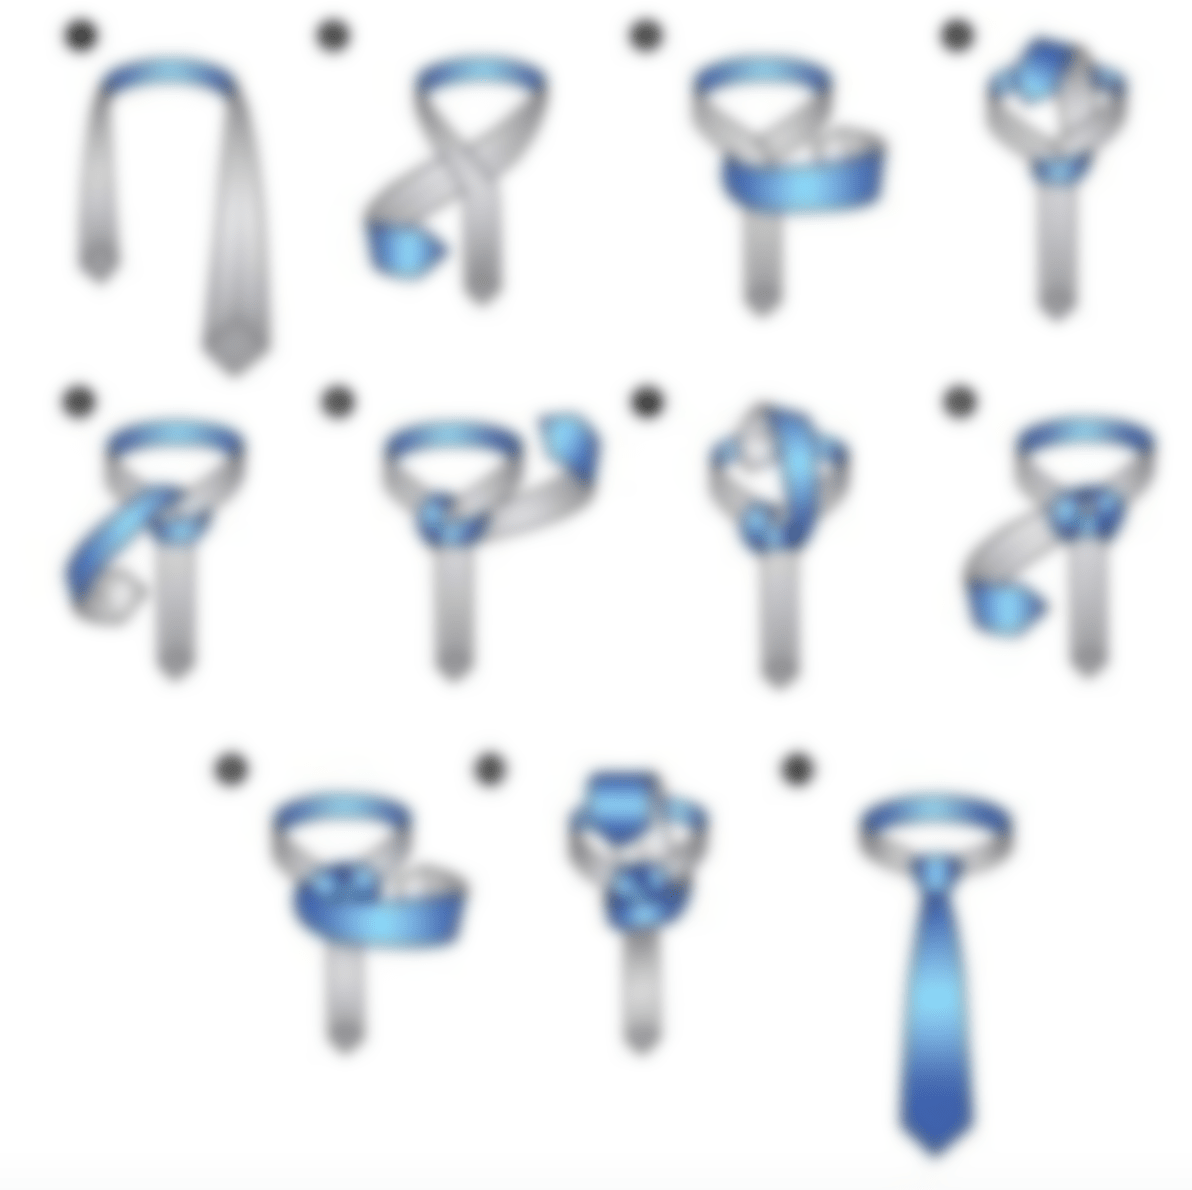
Double knot
Another easy way of how to tie a tie, focusing on step by step photos:
- Throw in a tie with a seam inward. We cross the two sides so that the wider part looks to the right. After that, we wrap the narrow end with it, keeping the loop intact. If done correctly, the large tip will be near the left hand.
- We slowly tighten the tie, but make sure that the narrow part is on top, and the wide one "goes" towards the right hand, forming a loop.
- We put a wide knot on top of it, and turn to the left, passing through the gap in the neck area.
- We stretch the large side of the accessory into the eyelet and carefully tie it. Be sure to straighten the tie with your hands - this will help emphasize the double knot.

Quarter knot
An interesting idea for those who are tired of the "everyday" version of the site. It is not so difficult to repeat it if you follow all the recommendations:
- We put the tie around the neck so that the seam looks inward. The thin part should be on top and the wide tip extends from the right side.
- After that, we take the wide part to the left hand and pass it through the loop formed on the neck. At the same time, we pull the tie to the top. All this time we hold the knot so as not to tighten it too much.
- All that remains is to tie the business accessory so that the wide side is closer to the shirt collar, and the narrow part can be pulled down a little.

Diagonal knot
The next easy way to tie a tie can be seen in step by step photos. It is also recommended to read additional instructions:
- We put a tie around the neck so that its seam looks inward. After that we put a wide part on top and form a crosshair.
- Now we stretch the wide tip from below, take it closer to the right hand and wrap it around the narrow part once. As a result, the thin part should be on the right.
- We stretch the larger side through the front side of the knot, throwing it through the loop on the neck. You need to bring it closer to the left hand.
- It remains only to thread the tip into the formed eyelet and carefully tighten the tie.

Do you often wear ties?
Vote
Cross knot
This option looks very elegant and emphasizes the good taste of a man. It takes a bit of practice to tie the knot, but the effort is worth the effort.
Just a few steps need to be repeated:
- We put the tie with a seam inside. We cover the wide side of the accessory with a thin part, after which we take it closer to the right hand.
- We put the narrow side under the wide one to form a loop.
- We bring the larger end to the top, wrap it through the other side and tighten it gently.

Hanover
A symmetrical knot will help create an interesting look and diversify a business one. Step-by-step instructions will help you do everything in the best possible way:
- Throw in the tie with the seam outward. After that, it must be crossed so that the seam of the wide part is also on the outside.
- We cover it with a thin side and make sure that it stretches closer to the right hand.
- We start most of it at the smaller end and direct it to the right. We start the loop from the bottom up and stretch the wide part down, and then to the left.
- We make one circle near the knot, and then carefully draw the large tip through the upper loop near the neck.
- If done correctly, the wide side will bend around the base of the tie from left to right. Now we start it from the back on a loop near the neck so that it falls into the knot.
Kelvin Knot
Tying a tie in this way is very easy. In just a few minutes, you can add a twist to your casual look, or change your holiday outfit a bit.

This requires:
- We put on a tie so that the seam is on the outside.
- We direct the thin part to the right hand so that it is on top. In this case, the seam should not change its location.
- Now place the wide part on top, completing a full circle. At the end, this side should be closer to the left hand.
- On top of the knot we put a large part of the tie one more time, but we "lead" the fabric from left to right. Then we pass the end through the loop and through the formed eyelet.

Oriental
The easiest way to tie a tie that's great for beginners. How to achieve a positive result will be prompted by step-by-step photos and additional instructions:
- We throw a tie around the neck and cross its sides so that the thin side is on top and looks to the right side.
- We wrap the smaller part with the wide side once and see that it is closer to the left hand.
- We stretch the large tip into a loop, pull it gently down and get a neat knot.

Onassis knot
In order to tie a tie in this way, you must repeat the following steps:
- We put on the men's accessory around the neck so that its seam looks down. We put the wide part on the narrower side. It should be closer to the left hand.
- We put the larger tip under the thin side, and then direct it upwards and stretch it through the formed loop on the neck.
- As soon as the ear appears, pull the same side down, tie a knot and give it a clearer outline.
- At the end, we take the wide part closer to the right hand, transferring it to the resulting knot for this. Straightening the tie again.

As you can see, there are several simple ways Tie a Tie. For convenience, you can use step-by-step photos or instructions with detailed videos.
It is not at all surprising that the different types of tie knots are known to the proponents of the business attire. In the case of a recent acquaintance with this accessory, you may at first even be confused. Why would this happen? The fact is that knots for a tie are nothing more than an independent science. That is why it requires good preparation in terms of theory and, of course, very interesting training in relation to practice. The ability to properly tie a tie is one of the most important skills in the arsenal of a real man and a caring wife.
There are dozens of ways to create nodes today, and each depends on personal preference. All of them have one thing in common - they make men irresistible.
Suitable scheme
Interestingly, the choice of a tie knot depends on a number of factors. By the way, in this case, putting fashion first is impractical and even stupid. The material of the product is much more important here. For example, a tie with a lining of dense material is not suitable for wide knots, because then the tie knot will look not very well-groomed and cumbersome. In addition, you need to pay close attention to the shirt collar. It is necessary to determine if there is enough space for a wide knot under the collar. If not, then most likely a thin cut tie, tied in a classic way, will do.
Often, a person selects the ideal option for himself through trial and error. Of course, this is much easier than trying to form an ensemble for two hours that will look spectacular. Nevertheless, it is much more pleasant to have good theoretical training so that the chosen tie knot looks advantageous in any case.
What else?
To begin the practice of tying knots for a tie, the theory presented in this article is simply necessary. Here are detailed instructions and diagrams. A striking example of this is a double knot on a tie or a classic knot, otherwise called Windsor. In the process of considering them, it must be remembered that in any case, the knot must be formed directly on the shirt. And after the tie is tied, one should follow the harmony of the length of its ends. So, the wide end cannot be short or long, according to the standards. Therefore, two centimeters below the waist is considered the optimal length.
Classic design of the tie knot
As it turned out above, the classic tie knot is called "windsor". Accordingly, he received the greatest distribution in society. So, it is such a knot that often flaunts on men's accessories. Almost all representatives of the stronger sex and, of course, their caring wives know how to form it. Windsor is quite simple to perform, but lately people consider it insufficiently original, therefore they turn to other techniques. Nevertheless, tradition in this world has always been appreciated, so it would be advisable to consider the scheme of forming a classic knot for a tie.
Basically, it is a wide-format triangular knot. As a rule, it is used for formal meetings and goes well with a wide collar. By the way, in another way it is called a large tie knot. What is the scheme of its formation?
Algorithm

In order to form a classic tie knot, you need to perform a number of simple steps:
- Wear a tie and carefully adjust the length of both ends. The wide end should be 30 centimeters longer than the narrow end. Then you need to cross these ends so that the one that is wider lies on the narrow one.
- It is necessary to thread the wide end of the product into the formed loop, then drag it and lower it down.
- Place the wide end of the tie under the knot.
- It is necessary for the second time to pass the end, which is wider, through the loop and lower it down.
- The leading end of the tie should be held over the narrow one.
- Again, you must pass the wider end through the loop
- You need to lower it down (through the knot).
- Tighten the knot by pulling on the wider end.
- The final step is center adjustment of the assembly.
How to tie a tie with a double knot?
It is important to note that the double knot is endowed with a compact shape due to the double knot type. By the way, it is very similar to the "victoria" knot, which is also very popular today. The double knot on the tie is simple enough in terms of execution, and therefore does not require any super skills. It should be noted that in the process of forming such a knot, it is advisable to use a small, but such an interesting trick that makes the knot more intricate than it might seem.
The double knot is suitable for unfilled ties where the material is lightweight. In addition, products should not be too short. Before forming a double knot, turn the wider end of the tie 180 degrees. It is this turn that will endow the tie with stability during the next turn in order and, of course, will allow you to create a knot in a competent way.
Double node creation scheme

How to tie a tie with a double knot? The algorithm of actions is as follows:
- First, you need to tie the product around the neck with the right side, after which the wide end of the tie should be placed slightly below the narrow one on the left.
- You need to cross the ends of the product (the wide end should be directed to the right and rotated 180 degrees to the wrong side, it should be held under the narrow one).
- Stretch the wider end of the product to the left, it needs to be applied to the narrow end.
- Pull the wide end of the product to the right under the narrower end.
- The wider end of the product should be pulled to the left. In this case, it must be applied to the narrow end.
- It is necessary to pass the wide end of the product through the neck loop from the inside (up).
- The wider end of the tie must be pulled into the formed eyelet.
- Straighten and tighten the knot.
Simple tie knot
As you know, today there are a great many options for forming knots for a tie. And this is not surprising, because the style of clothing is developing rapidly, which means that its elements do not stand still. The above discussed the question of how to tie a tie with a double knot, but this option is actually not everyday, because it is much easier to come up with a more banal algorithm. So, one of the simplest ways to form a knot is the method presented below. By the way, the birthplace of such a knot is England (where it was very popular among coachmen). This knot prevents the tie from fluttering in the wind, making it ideal for thick fabrics. The algorithm for forming a simple node is as follows:
- First, you need to throw the product over the neck and align the ends like the first of the algorithms presented in the article.
- The wide end of the product should be held under the narrow one.
- Then you should draw the wide end over the narrow one.
- You need to slide the wide end of the product between the knot and the collar.
- It is necessary to hold the knot so that it does not tighten, and then stretch the wide end of the product into the loop (from top to bottom)
- The final stage in forming a simple knot is to tighten and align it.
Wismar
The knot called "bismara" looks a bit like a classic tie knot. It should be noted that most men and women will find this knot the easiest to perform. In general, it goes well with women's shirts, because it exudes elegance and spontaneity. The material of the tie makes the knot even more unusual. For example, if the product is made of silk or satin, then the end result will be more advantageous.

By the way, the name of the feminine knot was invented thanks to the magazine, on the pages of which people noticed a photo of the pratt knot, which was turned out to the wrong side. It is important to note that this knot is ideally combined with snow-white blouses, not burdened with all kinds of decorations. Therefore, the idea of \u200b\u200bits formation is a great opportunity to give the office style a little freshness and originality.
Christensen

As it turned out, knots for a tie have in their totality a considerable number of options for "filing". There are knots that are easy to perform, and there are those that you need to learn to perform long and hard. A midway between these extremes is an example reflecting the formation of a christensen knot. It is designed for people who like to wear high collared blouses and shirts. A positive feature of this knot is its compatibility with both wide and narrow ties. This is probably why men love it so much when their wives tie their tie like this. It should be noted that "christensen" looks even more impressive if the corresponding product is made of a material such as cashmere or wool (you can use other fabrics, as long as they are "winter"). This knot is small in its volume, it snuggles well and is quite easy to adjust, which is very convenient.
English knot

Above, we have considered the standard types of tie knots that appeared in society a long time ago relative to modern options, including the English knot. It is suitable exclusively for thin garments and looks appropriate on blouses and shirts, where the collar is set aside, with long ends. It is important to note that the process of tying an English knot is relatively straightforward. As a result of the formation, the knot comes out tight and even bulky. An interesting feature of it is the uselessness of re-tying, which is very convenient (especially for men who are often too lazy to tie a tie again and again). So, to remove this element of the wardrobe, you just need to lower the knot along the wide end from the outside and carefully thread it through the head. Very convenient, isn't it !?
French knot

The French knot is an option that really deserves close attention. Why is this happening? On the one hand, it is quite difficult to perform and to obtain a satisfactory result, you need to practice well, and on the other hand, the French knot looks really great. Even its name speaks of femininity and originality, doesn't it !? That is why it is an excellent addition to the office image, allowing, in a sense, to cross out the official framework and add a certain ease and sophistication to the employee's style. How long have office workers dreamed of this!
In the process of forming a French knot, it is necessary to carefully monitor that small folds are not accidentally created, because even they can in some sense spoil the appearance of the entire structure. By the way, modern stylists argue that it is advisable not to tighten this knot, but to lower it a little. This undoubtedly adds originality to the image. In this case, the top button of the shirt or blouse should be unbuttoned. Through such a secret in one image, you can collect sexuality, and severity, and coquetry, and femininity. Great, isn't it?
Sometimes, no matter how you tie an accessory, the narrow end is always lower than the other. But according to the rules of etiquette, this is unacceptable. So what do you do? Carry the product in the atelier to be shortened? This option is only permissible in extreme cases. There are other ways to deal with this problem.
Some men hide the peeking end in a shirt between buttons or under a trouser belt. According to the rules, you cannot do this. But such a trick can sometimes be resorted to. So that the unexpected does not happen (the tip does not come out and does not appear out), you must definitely wear a clip. It will help hold the accessory in place and prevent the tip from coming out.
The most rational solution is to find the right way to tie.... Classic knots are easy to tie and don't require much fabric. And, for example, Eldridge or Trinity, on the contrary, take away most of the narrow edge. Therefore, before cutting off a tie, you need to try to tie it different ways.
How to tie to make it shorter?
Here's how to tie a tie to keep it shorter.
There are many ways to tie long ties. When choosing it, you must take into account the place, time, physique of the owner, suit and shirt. For meetings with friends, "Prince Albert" is better suited, for work "Small".
Prince albert

The most suitable knot is "Prince Albert". It has a slightly asymmetrical shape and is quite simple to perform. Suitable for informal meetings.
Elongated narrow ties work best for him. Prince Albert looks neat and beautiful.
To tie it you need:
- Place the accessory on the neck so that the wide edge is on the left and 30 cm below the narrow one.
- Cross the wide edge with the narrow one (wide on top) and hold under the narrow one.
- Make another turn around the knot with a wide edge (it should be in its original place after the turn).
- Make another half turn and insert the wide end into the neck loop.
- Thread a wide edge into the resulting eyelet (top-down movement).

Prince Albert knotting pattern
For detailed instructions on how to tie the Prince Albert knot, see the video below:
Small knot
This is the easiest way to tie... It is very similar to the classic one, but simpler to perform. It is suitable for work, official meetings, negotiations. It is an unchanging classic, therefore it is suitable for almost any occasion. This option is suitable for tall slender men.
Instructions:

This tying method is very simple. The result is a neat little knot that matches any shirt and suit.

Tie knot pattern Small
other methods
For long ties, it is preferable to choose knots that can adjust the length. If a man is tall enough, then he can afford almost any method of tying.
Average men need to choose their tying method carefully. Long ties are not recommended for short men... The easiest way to adjust the length is Eldridge and Trinity. They are tied with a narrow part, not a wide one (like most knots), so the length can be adjusted.
Long models are coming into fashion. If the narrow edge "looks out", and you can't hide it in any way, then you need to choose a suitable tying option. You can tie a tie beautifully and quickly with knots "Prince Albert", "Eldridge", "Trinity".
The ability to tie a tie can be useful to every modern man. You shouldn't wait for the moment when best friend will invite you to the wedding as an honorary witness, or you will be awarded the medal of the best worker, which will be presented by the mayor of your city personally. Master a couple of the simplest knots, and at any time you will be ready to appear in the form of a true gentleman - in a suit and tie. We'll show you how to tie a tie correctly.
How to tie a tie
We do not recommend torturing the cat or looking for other improvised devices to practice the skill, since it is better to tie a tie right on the shirt collar. So stand in front of the mirror, peek at our step-by-step instructions and find the option that suits you. We prepared better ways, with which you can tie a tie, from the simplest to the most difficult to repeat.
The classic preferred by most men. This is one of the most comfortable and stylish looking knots and is recommended to knit on thin single-layer ties.
Note: the knot owes its name to Edward VIII, Duke of Windsor. The king of Great Britain tied dense silk scarves with a simple quadruple knot, while it turned out to be voluminous, and was perceived by others as innovative.
A step-by-step scheme will help you tie Windsor, if not on the first, but on the third attempt, for sure:
- place the tie on the neck, cross its parts so that the narrow end is under the wide one;
- put the wide part of the tape under the narrow one, and then into the loop under the neck of the shirt so that you get a loop on one side of the knot;
- now put the wide part of the tape under the knot and again throw it into the loop on the neck so that on the second side of the knot you get the same exact turn;
- stretch the wide part in front of the knot, put it up in the loop around the neck;
- now pull the tape into the knot and pull it down.

Tip: do not tighten the knot too much and try to make it perfectly straight. The tie should not resemble a tight noose around the neck; it should be tied slightly casually.
Pratt
Another popular and fairly simple way to tie a tie is the Pratt knot. If you follow the simple instructions exactly, you will get a knot that will not come loose. So if a work dress code forces you to wear a tie 5 days a week, be sure to master it so you don't have to tie it from scratch every morning.

An interesting fact: Americans call this method Shelby, and Europeans call Pratt, and all because the scheme of how to tie this knot almost simultaneously occurred to John Shelby from America and Jersey Pratt from England.
The instructions will show you how to reproduce the Pratt node. Repeat step by step:
- throw a tie around the collar so that the front side is facing the shirt;
- cross the free ends of the tape, the part with the smaller width should be on top of the wider end;
- pull the lower end into a loop under the shirt collar, and then throw it to the opposite side of the knot;
- now pass the wide end into a loop under the collar so that it is above the knot;
- it remains to pass it into the knot and pull it down.
All this is illustrated in the photo diagram below. This easy way to tie a tie is great for thin skinny ties, popularly called herring.

Another knot that works great for thin and tight skinny ties is Prince Albert. It is important that the accessory is long enough to make several turns of one end of the tie around the future knot.

Note that a properly tied Prince Albert knot looks asymmetrical, if not slightly skewed. If the accessory has stripes, they will only enhance this effect. The method will not appeal to men-perfectionists, lovers of strict lines and regular shapes. If, on the contrary, you want to make your image less formal, you will like this simple option.
Note: Prince Albert looks beautiful on colorful solid-colored ties. On the other hand, printed fabrics can disrupt the "pattern" of the knot and simplify its appearance.
A step-by-step diagram and a photo will help you quickly master this method:
- place the accessory under the shirt collar;
- there should be a narrow end on the right, on the left the one that is wider (provided that you tie it around your neck);
- place the wide end over the narrow one, then pass it under it;
- make another full turn over the knot, and then another one (as a result, the knot will be formed from 3 layers of fabric);
- it remains to bring the "working" edge of the accessory into a loop under the neck and pass it into the resulting knot, and finally straighten the folds on the fabric.

Tip: If you don't need to stick, the tie knot can be slightly loose and positioned 1 to 2 centimeters below the shirt collar.
Let's complicate the task a little! Having a herring tie in your wardrobe, you can tie it in a diagonal way:
- place the wide part over the narrow one;
- the wide end will be "working", wrap it under the narrow part of the accessory once, and then repeat this step to get a second turn;
- then pass the end of the tie into the loop under the neck and bring it to the side;
- it remains to thread the "working" end of the accessory into the lower loop of the knot and pull it down.

A beautiful diagonal knot will be best "read" on solid-colored ties of calm colors.
Advice: to tie a tie "herring" in this way is worth men of medium or thin build. It is better for large, stocky representatives of the stronger sex to choose wide accessories made of dense fabrics and more complex patterns that create some volume.

Those who are not looking for easy ways through life, and in the question of how to tie a tie, even more so, it is worth mastering this scheme. Even in the photo, the Eldridge looks difficult, and, having a detailed step-by-step guide, only a few manage to tie it correctly the first time. The scheme was invented only 10 years ago by Jeffrey Eldridge. To make it easier to understand the intricate intricacies, we recommend tying the Eldridge on a thin, unlined tie.

The picture shows in detail how to tie a tie with an Eldridge knot. Please note that the "working" part in this case is a part of the accessory with a smaller width. Therefore, the first step in tying a knot is to determine its location:
- put the accessory around your neck;
- lower the wide part of the tie so that its end is at the level of the belt buckle on the trousers;
- now cross the ends of the tie together - this is where the knot will be.

If the first attempt fails, do not rush in despair to grab a bow tie or tie with an elastic band. The video below will tell you exactly where you turned the tape in the wrong place.
And finally, one of the most unusual looking ways to tie a tie is the Onassis knot. It is named after its inventor, who, incidentally, is one of the richest people in the world, Aristotle Socrates Onassis. If all of the above schemes were suitable for both "herring" and for moderately wide accessories, then Onassis is picky about the width of the tape. For the result to look really impressive, and most importantly - neat, one end of the accessory should be at least 2 times wider than the other. The optimal width is 8-9 centimeters.
To tie Onassis, the photo below and our tips will help:
- we cross the ends of the tape so that the wide part is on top;
- then we wrap it around the narrow end twice and put it under the loop that goes around the neck;
- from top to bottom we pass the "working" end of the accessory into the knot;
- then we throw it again through the loop under the collar and gently straighten it.

That is, in fact, you first need to tie a simple knot, and then close it with a wide ribbon.
In the video below you can see 2 simple knots, the ability to tie which can be called a "minimum program" for every modern man.
Tie a tie: step by step video