How to make an orchid from foamiran with your own hands step by step with a photo
Do-it-yourself phalaenopsis orchid from foamiran.
Archvadze Yulia Dmitrievna, teacher primary gradesPlace of work: MBOU "Budanovskaya secondary school named after Hero of the Soviet Union MV Greshilov", Budanovka village, Zolotukhinsky district, Kursk region.
Material description: the master class will be of interest to primary school teachers, teachers of additional education, schoolchildren from 10 years old and older, educators, and parents.
Purpose: Making a phalaenopsis orchid from foamiran.
Tasks:
- educational: expand children's knowledge of orchids;
- developing: develop visual-figurative thinking, Creative skills children, fantasy and imagination, fine motor skills; instill an interest in arts and crafts;
- educational: to educate artistic taste, accuracy, perseverance, hard work.

Orchid is a butterfly ...
Orchid is a bird ...
How mysterious she is, how tender she is! ..
Lost in the memory of names and faces
Only she will remain in memory alone.
With delicate petals ...
Anxious and imperious ...
It seems to enchant, bewitch the look.
Will conjure carefully, lure it dangerously,
The sweet scent will intoxicate your head.
It seems like a moment ...
Wind blowing ...
A light moth will carry away the vision ...
Orchid is a butterfly ... Orchid is a fairy ...
Unreal - a fabulous, unearthly flower. Irina Maiskaya


For work you will need:
- foamiran (lilac, dark lilac, green)
- black beads (according to the number of colors);
- a piece of foil;
- crepe paper (green);
- wire;
- universal glue-gel;
- flower pot;
- gypsum;
- Styrofoam;
- scissors;
- pieces of bark.

Progress
First, we will prepare cardboard templates for all the parts that we will cut from foamiran.
Templates

On a lilac-colored foamiran, we outline the patterns of petals of future flowers with a sharp object (an awl, a toothpick), on a dark-lilac foamiran - patterns of the middle of a flower, on a green one - leaves. We cut out the necessary details.


We tint the flower petals and the middle with crayons or colored pencils.

Give shape to all parts of the flower.
Use your fingers to warm the material a little and stretch it gently so as not to damage the integrity of the material.

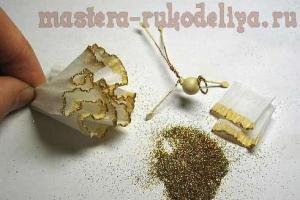
We string a bead onto a piece of wire 8 cm long, twist the ends. Then, in the upper part of the part, we make a hole with a needle and string it onto the wire.

Then we attach double petals, followed by triple petals.

The flower is ready. Let's make the rest of the flowers in the same way.

Making a bud. We wrap a small piece of foil around the wire, forming a bud. Then glue the foamiran petals. We make a green bud in the same way.


Making roots. Cut the wire into pieces of arbitrary length, glue it with strips of green crepe paper.

We attach flowers, buds, roots and leaves to the peduncle. We glue the peduncle with green crepe paper.


Half-fill the flowerpot with pieces of styrofoam (to make the product lighter). Fill the top with gypsum diluted in water (not very liquid) and insert a flower into the middle. We hold it until the plaster hardens. On top, carefully lay the pieces of pine bark.

Gorgeous foamiran orchid: a great addition to the interior
It is interesting to decorate the interior of the house with a beautiful foamiran orchid. It is difficult to find a more fascinating and exquisite flower among plants than an orchid. The plant has a unique structure and fascinates with the variety of its forms and colors. If your interior does not yet have an orchid, you can make it yourself. Artificial flowers do not require maintenance, and you will definitely receive an aesthetic appearance and moral pleasure.
The structure of an orchid is slightly different from that of an ordinary flower. It has 3 sepals, 2 side petals and a central petal that looks very much like a baby's lips. The color scheme is varied, from pale white to red and dark purple.
One of the most beautiful orchid subspecies is the cymbidium. Made of foamiran, plastic suede, it looks very natural and will decorate any corner of your home.
 Before you start making an orchid, you need to choose the right colors for foamiran
Foamiran stretches easily when heated, acquiring the desired shape, which allows you to make magnificent petals.
In addition, he:
- Environmentally friendly;
- Easy to cut with scissors, which is very important for children's creativity;
- Products can be washed with water without fear of losing their shape;
- A wide range of colors allows you to make a flower as close to living as possible.
Today this material is very popular among needlewomen. Foamiran can be found in any craft store.
Foamiran orchid pattern: simple and tasteful
Unique orchids are considered a symbol of the tropics. They are so colorful and diverse that sometimes they amaze with their forms. The flower is based on petals, depending on the species, their shapes are slightly different from each other.
 Pre-prepared patterns will help you make a beautiful and neat flower
Almost all patterns consist of:
- 5 petals;
- Lips;
- The middle of the flower;
- In some more complex patterns, columns and stamens are added.
The most common species is the Phalaenopsis orchid. Making a pattern for such a flower is not difficult at all. Flower sizes vary from 5 to 15 cm. It is enough to make a template of one petal and lip, transfer it to suede, and collect the flower. You can make a lip pattern yourself by carefully looking at the flower, or you can borrow from professionals without bothering.
For a subspecies such as cymbidium, you will additionally need to draw a template for a column of the middle of a flower, and Cattleya will require the needlewoman to use a stencil 2 different forms petals.
Choose the flower you want, take a closer look and start creating.
Cymbidium or foamiran orchid: master class step by step
Making an orchid from foamiran is not at all difficult.
The main thing is to have a great desire, a little imagination and free time.
Following the instructions for beginners, you will certainly make a beautiful and unique flower. For work, you will need foamiran of the required shade, scissors, a toothpick or a knitting needle, a mold for Cattleya orchids, wire, green tape, an iron, Moment glue, beads and a stencil. It is necessary to follow the sequence of work
 In order to learn more about how to make an orchid from foamiran, you can watch a fascinating master class
Stages of work:
- Making flower templates;
- Preparation of orchid parts;
- Giving texture and color;
- Assembling the flower.
That's all it takes to get the job done.
Cooking do-it-yourself templates for the foamiran orchid
Let's move on to one of the critical parts - making templates. It is necessary to make templates from ordinary cardboard or thick paper, which we then transfer to foamiran.
For the construction of the cymbidium, it is necessary to make 5 petals, a tongue and a column. Ready-made templates can be spied on from others, and, with a creative approach, draw yourself.
For the petal, draw a vertical line 6 cm long.At a height of 3 cm, draw a perpendicular horizontal line, and lay on it from the left and right side 1.5 cm each. We connect the resulting points with smooth lines, giving the shape of a leaf. We obtain a column by drawing a rectangle 6.5 cm high and 1 cm wide. We smoothly round the corners of the rectangle and make an incision on one side, 3 cm long. The “tongue” consists of 2 shapes - a circle and a heart. Draw a heart shape 3 cm high and 4.5 cm wide, then place a circle over the heart with a radius of 1.5 cm so that the shapes touch. Circle the resulting drawing around the office - this is the "tongue". We apply the finished templates to the suede and carefully circle with a knitting needle or a wooden stick. We carefully cut out the details of the orchid along the contour.
It depends on your imagination what color the cymbidium will be. We tint the petals with acrylic paints or pastel pencils. Usually the bright spot of a flower is its lip, the color of which is decorated with many lines, specks and combs. Look at the idea in the photos or come up with an ornament yourself.
 If you decide to make an orchid from foamiran with your own hands, then you should first prepare special templates
The next step is to create the texture of the product. In stores, you can find ready-made molds, cast molds, to give the petals a realistic texture, characteristic of fresh flowers. If there is no mold available, it can be replaced with a corrugation. In this case, a separate piece of corrugation will be needed for each petal so that they do not lose their characteristic structure.
Technique of the step-by-step method:
- We apply foamiran to the iron. The temperature should be the same as for ironing wool or silk.
- We shape the petals on the mold. If there is no mold, we put a warm petal on a sheet of corrugated paper and quickly twist it into a tube, then, straightening it, give it the desired shape, stretching and pressing on the part.
- We process the column with an iron, alternately applying the edges so that they bend inward.
All the details are ready, you can start assembling the flower. Most easy way, this is to plant the entire bud on one wire.
For this:
- We put a bead on the wire, bend the metal in half and twist it slightly, we get a flower eye.
- We pierce the foamiran in the middle of the column, then we put the tongue on the wire and, finally, the petals.
- All the details of the orchid are carefully fixed together with glue.
- We make out the reverse side of the cymbidium from the remaining pieces of suede, twisting it into a tube in a spiral at the base.
- With a green tape, we wrap the twisted foamiran in a circle, and then, along the wire obliquely downward.
Such an orchid can be added to ready-made compositions or made as an accessory element. She is perfect for a romantic evening, decorate with herself festive table... Arrange several flowers in a large transparent glass and guests will appreciate your taste and originality. A black brooch, hairpin or headband decorated with orchids will be a great addition to your spring and summer wardrobe. Imagine and give yourself and others joy.
Beautiful orchid flowers from foamiran: twig decoration
An orchid is a light-loving plant, and if there is no way to provide the flower with a lot of light, and you really want to fill the interior with delicate beauty, compositions from foamiran will be an excellent alternative.
If we want to make a twig of an orchid, then, in addition to several flowers, it is necessary to make buds. They will give naturalness and completeness to the image.
The live orchid in the pot has faded, add a sprig with artificial flowers to the real plant. Flowers look very laconic when decorating an interior in Japanese style.
 Many needlewomen prefer to use foamiran, as it allows you to create realistic flowers.
Master class for making buds:
- To do this, we make a hook at one end of the wire;
- We wrap the hook with cotton to the desired size of an oval-shaped bud;
- With a light green tape at the base of the structure, we wrap the wire in a spiral, going down 3-4 cm;
- We cut out 3 small petals from foamiran, giving a slightly curved shape with an iron;
- Gently glue it to a cotton bud - the petals should adhere to each other, forming an unopened small flower;
- We paint in the color required for the composition.
Our flowers and buds are ready, let's start forming a twig. It will be based on a wire to which flowers and buds are screwed. The arrangement of flowers on a branch should be asymmetrical, one above the other. Spiral the stem of the product with green tape. That's all, a unique orchid sprig is ready. A twig planted in a pot will look very gentle and natural. The soil for such a beauty does not require watering, but for a varied pot decor, imagination may not be limited to the ground.
Foamiran orchid: master class (video)
In conclusion, it should be noted that glass vases and pots with decorative stones and orchid sprigs will effectively emphasize and lighten the interior. White orchid always looks gentle and impressive even on a white background. A branch of a black orchid looks fantastic, combined with shades of gray and white. When decorating a room, the orchid should become the main accent in the room.
Examples of orchids from foamiran: master class (photo)


Similar materials


We will need:
- foamiran (yellow and olive colors 1mm and, if available, a small piece of foamiran 2 mm yellow);
- paint (I have oil and dry pastels, you can use any that is convenient for you);
- floristic wire No. 24 (wrapped);
- floristic mold (with longitudinal veins);
- stacks with balls suitable size(or their substitutes);
- A cylindrical metal object with a diameter of 0.5 cm;
- hot glue;
- second glue;
- iron.
Preparation
Let's cut out the following templates:
- No. 1 - the middle of the orchid (narrow part, upper - column and wider part, lower - lip);
- No. 2 - upper left lateral petal;
- No. 2a - upper right side petal;
- No. 3 - lower left side petal;
- №3а - lower right side petal;
- No. 4 is the upper petal.
Sizes of templates:
- No. 1 - the height of the whole part is 8.2 cm, width: the widest place in the upper part is 1.2 cm, the widest place in the lower part is 3.5 cm;
- No. 2 - height 5.2 cm, width 3.3 cm;
- No. 2a - height 5.2 cm, width 3.2 cm;
- No. 3 - height 5.5 cm, width - 4 cm;
- No. 3а - height 5.5 cm, width 4 cm;
- No. 4 - height 6.2 cm, width 4.3 cm.
Be careful, the left details are a mirror image of the right ones (and vice versa). For convenience, I have made each detail separately.

Cut out all the details from the yellow foamiran. For one orchid flower, we need to cut each piece one piece at a time.

Next, cut out a small part in the form of a rounded rectangle from foamiran 2 mm. It will be equal to the middle part of part # 1. I got a part 0.9 cm wide and 1.5 cm long.If you don't have 2 mm foamiran, then you can make 2 parts from the existing foamiran and glue them together, or choose a thicker piece of foamiran (such pieces often found in Iranian foamiran).


Making petals
Now we tint individual parts of part # 1. I will tint with soft oil pastels (you can tint with any paint that is convenient for you). Let's take 3 pastel colors: orange, yellow and black. We tint the edges of the antennae in black in the upper and lower parts of part No. 1 on both sides. Then, with orange, we tint the middle part on the lip between the antennae, on both sides, you can also tint the edge of the detail (see photo). Then yellow on the one hand, we tint the middle area of part No. 1. My color is slightly darker than the material, and it is practically invisible in the photo, but this will give its result after assembly; you can take a slightly darker shade of yellow.


Next, tint the edges of parts # 3, 3a and # 4. We will tint by mixing 2 colors: orange and light brown (my shade of brown is called golden ocher). First we apply one color to the sponge, then another, and tint the desired parts of the details on both sides.


Now we will process parts No. 2, 2a, 3, 3a and 4 using a mold and an iron. We use a mold with longitudinal veins. We heat the part on the iron, hold the mold as close as possible to the iron and transfer the part to it, push the texture well over the entire surface.
IMPORTANT!!! First, lay out the parts, as in photo number 1: there they are located in the assembly order, and the direction of the folds is different for everyone. So for example, if you take part No. 3a, then the fold should be directed downward, and apply to the iron in this way. Then, with the same side that was applied to the iron, we apply it to the mold.
Next, turn the part over to the opposite side, where there is no texture. Gently stretch horizontally at the base of the petal, then from the base along the petal on both sides we make grooves, passing with a pad thumb from the base to the top of the petal.


We will process the edges of parts No. 2, 2a and 4. Fold the edge of the petal along the center to a depth of about 1 cm, attach the fold to the iron and quickly push the vein and bend the edge of the petal down a little. Further, for part No. 4 from the fold, we twist the edges inward (first we apply the desired part to the edge of the iron), and for parts No. 2 and 2a, on the contrary, outward.


We will process details No. 3 and 3a in the following way: first, make a fold in the center (as in the previous petals), then stretch the edge of the petal along the top line a little along, in the direction from the base to the edge. Next, we twist the edges from the fold outward on both sides.


Making the middle
Let's start processing the middle of the orchid (part number 1). We need stacks with balls of a suitable size and a metal rounded object with a diameter of 0.4-0.5 cm, I have the top of the stack.

Let's start processing from the bottom (lips), we will heat it on the iron in parts. First, we heat the middle part, quickly press the stack against the ball and hold it until it cools down (or push the part on the sponge with a ball, do whatever is more convenient for you). Then we warm up the side parts of the lip ("wings") and push the grooves with a stack ball, the details will be wrapped inward. Then we go down below the "wings" and warm up the edge of the wide part of the part and twist it outward, on both sides. Then we heat the metal stack on the iron (or any metal cylindrical object), put it in the center of the lip and hold it on both sides until it cools down.


Let's continue processing part # 1. We will process the upper part (column); we will also warm it up in parts. Warm up the top of the column and hold (or push) on the stack ball until it cools down. Then we warm up the side parts and twist inward on both sides. Next, we heat the stack on the iron, put it along the center of the column, hold it until it cools down.


Now we take the prepared oval platform and the wire in the winding (I have # 24). Let's make an oval spiral out of the wire, bend it with the letter "g" and bend it a little in the center. Having stepped back from one edge of the site four millimeters, we make a hole and thread the wire, glue it.


Then we glue part No. 1 to the platform so that the wire is on the side of the column (the top of part No. 1).

Assembling a flower
All the details for assembling the flower are ready.

First, glue the petals # 2 and 2a to the middle. Glue the petals along an inclined line in relation to the central platform of part No. 1, glue the base of the petal to the platform from the side of the lip.
Be sure to first try on the petals and then glue them on.


Next, we glue parts No. 3 and 3a. We begin to glue the base of the petal to the site from the side of the column, retreating from the edge of 3-4 mm, and place the petal in such a way that the lower part of the petal No. 3 covers the lower corner of the petal No. 2, and the opposite sides of the petals No. 3 do not overlap each other after gluing, but were located side by side.
First try on the petals and then glue.
Then we drip a drop of glue onto the edge of the platform (in photo 84, the place where the glue was applied is shown with a toothpick) and glue the lower edge of the petals.


Now glue petal # 4, first trying it on. It should be located between petals # 2 and 2a and should not overlap with petals # 3 and 3a. For the convenience of gluing on the base of petal No. 4, we make a small incision 3-4 mm deep, pass the wire into the slot and glue the petal.


Assembly
Then take a stem of the length you need (stem 0.5 cm in diameter) and glue the flower into it. You can see how to make a stem from foamiran.


And yet, I decided to make a bracts for an orchid (in case you will make a flower on a stem and use it in compositions). Cut out a rectangle 3.5 cm wide and 6.3 cm long from olive foamiran. Cut out the bract from it.
- white phalaenopsis orchid, from foamiran, the master class will be with step by step photo.
For this we need the following materials:
Cardboard or paper for templates;
a toothpick or thick needle;
scissors;
foamiran white for the petals and yellow for the middle;
a pin with a bead at one end;
art pastel brown;
pencil;
candle;
glue gun.
It is best to use a real orchid flower for the template, which must be carefully disassembled into separate parts and placed under the press so that they are aligned. Then we outline all the pieces on the cardboard and cut out.
If you do not have one, then you can enlarge the templates in the computer to the desired size and copy.

Then we circle all the templates on the foamiran with a toothpick or a thick needle. Cut the middle out of yellow foamiran. The petal, which is single, we first circle once, then we unfold it symmetrically and circle its mirror image. As a result, we will get a double part of two petals, like in an orchid.

Stretch the middle of each petal slightly, pressing it with your thumbs and creating volume.

We also stretch the edges of the petals a little bit.

Draw the middle of the two lower petals and the upper part and the middle of the yellow blank with artistic pastels. In this case, you need to shade the pastel so that there is no clear edge.

We pierce the pin in the place shown in the figure. If you look closely, then in the same place in the real flower there is also a similar detail. But in our case, the needle with back side will also serve as a retainer for the petals.

In order to form the twisted center, we take the pin by the sharp end and hold the bead down over the candle flame for just a couple of seconds, barely touching its heat.

The workpiece quickly folds up and takes on the shape we need.

We begin to collect our flower. First, string a double petal in the middle and glue it.

Then we string a blank of three petals, without going over the other two with a needle.


It turns out such a delicate foamiran orchid, which cannot be distinguished from the real one and can be attached to a pin, hairpin, hairpin, etc.


Orchid is a beautiful exotic flower that people love to decorate modern interiors with. It is quite difficult to care for orchids, so we will make this exotic flower. Foamiran flowers look beautiful and do not require any maintenance. Any orchid can be made from foamiran. I will tell you how to make a white orchid, phalaenopsis orchid, cymbidium orchid and other types of these flowers.
White foamiran orchid, master class with step by step photos
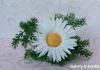
When it comes to white orchids, Phalaenopsis is the most common variety. In the photo you will see what kind of orchid we should get in the end.
Photo of white orchid from foamiran
To create an orchid from white foamiran, you will need:
- foamiran white;
- yellow, lilac oil pastels, as well as a sponge for applying and shading;
- Phalaenopsis orchid mold and Cattleya mold;
- iron;
- second glue;
- scissors;
- cotton swab.
Pattern for white orchid

The pattern was developed by the foamiran master Elena Semanova. For one flower, we need only three details.

We cut out all the details one by one from white foamiran.
Assembling a white orchid flower

We start processing the petals of the orchid. We heat the three-petal circle on an iron, one petal at a time, at a wool-silk temperature, and wring it out on a Cattleya mold.

We also heat the double petal on the iron, one petal at a time and squeeze it in turn on the phalaenopsis orchid mold.

Before processing the tongue of the orchid, we will tint it with oil pastels. We apply tinting on both sides. We tint the tail in lilac, the head in yellow, tint the wings at the edges with lilac, and put red dots in the middle.

After that, we begin processing on an iron at a silk-wool temperature. We apply all the parts in turn with the front side, so that they are slightly bent. Tail, head, wings. Then we collect them all together upwards and warm up the base and process with a gouge on a sponge.

Prepare cotton swab, slightly dip its head in PVA glue, let it dry and tint with oil pastel or acrylic paint. A little brighter than the tongue itself.

 Here we have such a white orchid.
Yellow orchid from foamiran, a master class with step by step photos
I decided to make a yellow orchid in the form of a Christmas tree toy in a transparent plastic ball. The idea of creating such a toy belongs to the master of foamiran Elena Semanova.

I propose to make such a “snowy” orchid in this master class.
For a yellow orchid, we need:
- foamiran white;
- red and yellow, orange oil pastels, as well as a sponge for applying and shading;
- mold orchid cattleya;
- iron;
- lighter;
- second glue;
- scissors;
- artificial snow;
- 2 large stamens;
- red acrylic paint;
- the ball is transparent;
- ribbon.
Yellow orchid pattern

According to the pattern, we cut out blanks of parts for making an orchid from white foamiran.

We cut out all the details in two pieces in the same way as we will attach the flower to the ball.
Collecting a yellow orchid

We tint the cut out details with oil pastel on both sides. We tint the edges of all details with yellow pastel. In the middle is orange. And the tail at the tongue is red pastel.

We take a piece of yellow foamiran, 1.5 cm * 0.8 cm, fold it on both sides and glue it.

We fix the glued part from below with a drop of glue, and cut the upper part with a fringe.

And glue it in the middle of the tongue. Apply dots on the tail with red acrylic paint and apply waves on the wings.

We take double and triple petals, fold them with an accordion and grind them between our fingers.

Then we take a double petal, heat it on an iron at a silk-wool temperature and squeeze it well on a mold.

We also heat the triple petal on the iron and process each petal separately on the mold, additionally process each petal with a bulka. Pulling it out with a gurgle like a boat.

Then we process the edges of the petals with a lighter making small waves on them. And glue the triple and double petals in the middle.

We process the head on the iron, apply it to the iron with the front side so that it rises to the top. We also apply the tail with the front side, it also rises to the top. Warm the wings on the wrong side of the iron.

Glue the tongue in the middle of the glued petal circles. Slightly above the tongue 0.5 cm, we make a hole and glue a large stamen.

Here we have such a beautiful yellow orchid.

We form Christmas tree toy with an orchid.

We take a transparent ball, fasten the orchids together with the tips of the petals and glue them to the ball. We pour artificial snow.

We close the ball and glue it with a beautiful tape.
 Here's a Christmas tree toy in the form of a “snow” orchid.
Black orchid from foamiran, a master class with step by step photos
 Photo of black orchid from foamiran
To make a black orchid, we need:
- foamiran white and black;
- red and yellow acrylic paint, as well as a sponge for applying and shading paint;
- phalaenopsis orchid mold;
- iron;
- lighter;
- second glue;
- wire # 28-30;
- scissors;
- elastic band for fastening the orchid.

Collecting a black orchid flower
According to the pattern from black foamiran, we cut out the main petals of the orchid and from the white tongue of the flower.

To make one orchid flower, we cut out one piece, each blank.

We take detail D - a comb and cut out finely cloves.

Then we take the red acrylic paint and apply tint on all black petals. We apply tinting along the very edge of all the petals. We also tint the butt of the petals.

We tint the tongue on both sides. On one side, tint the sharp tip with yellow paint, then apply red paint with light touches of the sponge and tint the tip with red.

On the other side of the middle of the tongue, tint with red, the edges of the entire tongue with a light touch of the sponge with pale red.

Then we heat the edge of the scallop on an iron at a silk-wool temperature and iron it between the fingers, as if pulling the edges and thinning them. Then fold the comb in half and warm it up on the edge of the iron, making the main vein.

We heat the petal B on the iron separately both petals and squeeze them well on the mold. Then we apply the tip of each petal and pinch. Forming a fold.

Petals B, we also process the same as petals B. But additionally we make the main veins by folding the petals in half and process them at the end of the iron.

We heat petal A on an iron and squeeze it well on a mold, then heat the tip of the petal and squeeze it.

We heat the tongue on an iron at a silk-wool temperature at the beginning, one tip, as it were, folding it into a tube, then the second. Letting go the other way.

We take the wire and put on the tongue, piercing it just above the yellow tint and glue it.

Then we put on the comb on the tongue, piercing it with a wire at the bottom and gluing it.

We pierce the petal B in the middle and put it on the wire, glue it slightly lifting the petals. Cut off the excess from the bottom of the scallop.

Also, piercing and putting on the wire, we glue petal A to the comb.

Then we put it on the wire and glue the petals C to the petals B, slightly lifting and pressing.

We have collected such a black orchid. Cut the wire and attach the flower to a hair elastic.

We take an elastic band and a piece of black foamiran and glue the flower.

All our hair accessory is ready.

We have learned to make such beautiful three orchids.