New year is very close! Stores Fit the abundance of a festive decor: balls, garlands, pendants, all kinds of decorations ... However, the heart and soul of any creative person protests against the same factory Christmas tree toys, because we all want to somehow stand out, create your festive cozy atmosphere, or just Make the original decor in a single style.
It's time to do the decor of the New Year's balls! Today we will consider different options for the decor of these, it would seem like simple traditional Christmas decorations.

The classic method of decor is a different painting of New Year's balls. There are many techniques and styles that can be applied to create an original toy. It is a double smear, and traditional popular paintings, like Gzhelev or Khokhloma. And, of course, a classic drawing on the glass made by thin brushes.


Painted painting has great popularity. Having only a few contours in stock, you can create a stunning decor.


One of the ways of point painting New Year's balls can be found in this m aster class.
But some schemes for point paintings that you can inspire and try yourself in this kind of creativity.


You can also create original textures, inflicting patterns through stencils, create imitation of mosaic or imitation of stained glass on glass bowls. Flight of fantasy is unlimited!

Decoupage of New Year's balls. Methods and ideas.
However, the most popular way of decopting a Christmas ball is, of course, decoupage. A huge selection of suitable images on decoupage cards and napkins allows you to come up with and create your own unique New Year's ball.

However, there is some difficulty ... The ball is round, and the napkin or decoupage card is flat :) Therefore, the majority of newcomers who used to be cleaned the skill of the decoupage on more or less flat and smooth surfaces, deciding to grasp a Christmas ball, stand in a dead end. How to stick the image on the sphere with a minimum number of folds? ..
First of all, it is worth deciding with the intent.
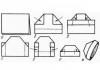
Herepossible types of compositions for painting or decoupage on New Year's balls:
One or more slotting lines;

Cap / Cape;

Homogeneous loose elements;

Several large elements in combination with small;

Division on slices;

Big drawing. Working with a big drawing, you can also use different layout options:
Single big fragment;
With a supporting composition on the reverse side;
Two equivalent drawings on both sides.

Is it possible to stick a Christmas ball with a drawing completely? Can! But in this case, get rid of the folds or hide them will be much more complicated. If you have a desire, the drawing from the napkin completely covered the entire surface of the New Year's ball, you can go different ways:
Small pattern fragments are broken from one or more napkins and glued to the basis-ball with a malfunction on each other.

If there is an insurmountable desire to transfer the napkin completely to the ball, then it is also possible. To do this, it is necessary to make a divorce as a globe. The length in this case will be the length of the girth of the ball (measured by a centimeter tape), and the height is half of its girth.

When the ball is saved, this method is very important to choose the right napkin. The petals of the expandment will still go a little on each other, and getting a strict geometric pattern is unlikely to succeed. But the decoupage napkins or cards with an abstract background, chaotic colors and patterns are perfectly suitable.


Additional decor
To see the ball after decoupage, you can use additional decorative materials and techniques:
Applying volumetric patterns (the use of embossed, structural pastes; modeling gels; contours and contour pastes);
Hardworking - bright light burns in life, lazy - dull candle
New Year's toys do it yourself - quickly and simple. Part 1.
visibility. 5551 View
Hello, dear needleworks, I begin the cycle of articles on the creation of Christmas toys with your own hands.
We will paint purchased Christmas balls, decorate New Year's balls with rhinestones, braid and beads; Melt the New Year's toys from the threads, sew stylish Christmas toys from the fabric, knit with knitting and crocheted Christmas decorations and even embroider them with a cross on canvas.
Many ideas and pictures on the creation of Christmas tree toys do it with your own hands you will find in our cycle of articles "New Year's toys with your own hands - quickly and simple."
So proceed ...
Today we will paint purchased Christmas balls with paints.
What paints will fit
- acrylic (Sold in the stationery department in the same packages as a gouache, or each color separately in bottles, similar to those in which in our child's ink and mascara was sold)
- paints for work on glass and ceramics are called
- gouache (also comes, if after it drying is covered with a varnish (hairpath, lacquer yacht - Sold in construction stores.)
These are the materials that are tested by me and familiar craftsmen - otherwise you can experiment yourself. How to paint the balls I will tell just below. In the meantime, here is a bunch of ideas for inspiration.
New Year's toys do it yourself. Simple strips.

One who is not confident in his artistic abilities can decorate the New Year's balls with stylish strips.
New Year's toys do it yourself. Monogram and crossheads.

Curls, hooks, stalks, monograms - first better work on paper. And then the most successful options for artistic twists can be captured on the New Year toy.
Christmas toys do it yourself. Openwork snowflakes.

Snowflakes - the opportunity to compete in fiction with the creator himself. As is known (and proven by scientific observations), there are no two identical snowflakes in nature. So your snowflake will also be unique in its kind.
New Year's toys do it yourself. Flowers.

For those in the winter period, there are not enough summer joys - I suggest finding consolation in the New Year's toys that flourish under your brush.
Christmas toys do it yourself. BIRDS.

And of course poultry - on white snow, on fir branches, on zugenous hedges. Cute, zyabko lagged fluffy lumps. It is not really difficult to draw them. Draw a rounded spot is a tummy. Then one smear of a wide brush - the wing, the second smear - the tail. Glazik, Kuvik - And all - anyone will tell you that it looks like a bird.
New Year's toys do it yourself. Christmas trees.

The fastest and easiest way to draw the Christmas tree - you see just centered our photoering. But in general, the tree is very simply drawn - and it is even interesting to come up with your own image of the Christmas tree (like, for example, on the first ball - a Christmas tree with curls on the Mater Roofs of the Japanese Pagoda).
New Year's toys do it yourself. Winter hut.

Snow-covered hut - Immediately imagine how there is warm and cozy: the cracked lamps in the stove, the affectionate is covered on the table, in the corner the cat washes the tongue of kittens. So I want to look into a small luminous window.
Christmas toys do it yourself - painting. New Year characters.

Well, of course, what new year without the goodness of Santa Claus and ruddy smiling Snow Maiden. Well, a friend-snowman, go to our Christmas tree, you will be a guest. You can draw a New Year's character from any picture or postcard.
New Year's toys do it yourself. Favorite cartoons.

"Well, do you draw, my little?" - You advise you with your favorite tea. And he, no second, is not doubting you in the presence of artistic talent, it feels: "Vini-Pooh and Piglet!" And I do not want to do, but you need to try and depict the requested object on the Christmas ball. Slightly below will tell you how to recharge the picture on the ball.
New Year's toys do it yourself. Christmas angel.

Christmas angels with their wings and magic intentions - draw and believe that when the picture is completed, the angel will ventilate and will definitely make a Christmas miracle for you.
Christmas toys do it yourself. Church of Zlatagnaya.

Temple, church, dome and crosses - such a New Year's toy made with your own hands - the best gift for the Christmas of Christ. With the wish of happiness, love and health.
Well, how were already inspired?
Then, as promised, I will tell you how to draw.
- Draw a sketch on paper.
- We take a bowl in hand and pencil, felt-tip pen draw the outlines of the future picture.
- And on top of the pencil outlines already draw paints.
- First, paint one side of the ball (after all, over the other way we hold
- We give paint drying (acrylic dries quickly, but often in recommendations for the use of acrylic paints - indicate the rows of drying in 24 hours).
- One side of the New Year's ball dried - you can paint another.
- Then the ball can be covered with varnish (I wrote about varnishes above in this article).
How to translate a picture from books on the ball.
- Put a plastic bag (better transparent file - it is smooth).
- Bring the picture to the felt-tip pen.
- Attach the file drawn to the ball, carefully press - the felt-tumbder must be imprinted.
- Cut the resulting imprint on a ball once again a felt-tip pen.
- Further paint the paints as in the picture.
there is another technique for translation pictures with paper napkins for Christmas ballswhere nothing needs to draw anything. I will tell about it in one of the following articles of this cycle, and you still look for a beautiful paper napkins with Christmas motifs.
That's all that I wanted to tell about the painting of New Year's toys do it yourself. Forward, and, as they say, brush you in hand.
Questions and advice will be glad to see in the comments to the article, just below.
Sincerely, Olga Klishevskaya, especially for the site.
New Year's toys is an excellent decoration for the Christmas tree. Indeed, in the new year the Christmas tree decorate various balls and other Christmas toys. But simple balls on the Christmas tree look very boring. And to revive such toys will help the painting of Christmas toys, which you can apply to toys with your own hands. But before you start such work, find out how paints are used in this case. So, for the painting of the Christmas toys will fit:
- acrylic paints,
- glass paints
- gouache.
How to paint christmas toys
Starting of course, in this case it stands from the simplest. If you do not have any skills, then just decorate the balls with beautiful and pretty stripes. Also use in this case a variety of patterns.


Already trained their skills, then try to make various curls and monograms. But in order to prevent errors, try to prevent similar items on ordinary paper.


Christmas toys can also decorate beautiful snowflakes. Today there are many versions of snowflakes that can perfectly decorate your Christmas balls.


To decorate the Christmas balls, boldly use various materials. But the best option is the painting of the ball. If in the winter time you lack summer motifs in the New Year holidays, then draw flowers on the Christmas balls.


What new year you can imagine without birds. They can be located on the snow-white snow, branches of the Christmas tree. In general, turn your imagination start creating something interesting. It is worth saying that the birds draw very simple. You first draw a rounded spot, which will be a tummy. Make another smear that will be a tail. And do not forget to draw keyboards and eyes.


Very easy and moreover, very quickly you will get a paint christmas balls with chips. Look at some such examples.


Very interesting on Christmas balls, a hut will look, which is all in the snow. Choose the perfect version of the christmas ball mural.


The main satellite of each new year is Santa Claus and various fabulous characters. Therefore, their images may appear on your Christmas balls. 

Christmas ball can also decorate a fabulous angel. Indeed, such a painting will fill your Christmas tree with extraordinary magic.


As you can see, there are a lot of options and how you decorate your New Year's ball depends only on your imagination.
How to paint christmas balls
Above you could see examples of christmas balls. However, to paint similar toys is not easy. And now it is worth leading the basic rules that will enable how to cope with this work.
- So, first draw sketch on paper.
- On the balls it is with the help of a marker or pencil draw the contours of the future image.
- And now, we take paint and begin to draw on top of the pencil outlines.
- First paint one side of the ball. And give paint to dry. When one side of the ball dry, take painting the second side.
- At the end, the ball is covered with varnish.
How to translate the image to the surface of the ball.
- We decided to decorate your ball with a beautiful image then follow these steps.
- At your favorite image, attach a transparent package of polyethylene.
- Circle the picture by a felt-tip pen.
- Attach the package to the ball to the side where you draw out contours. Gently press the package so that the contours are imprinted.
- The imprint, which turned out to circle a felt-tip pen on the ball.
- Next, the sketch is just coloring.
Remember all these tips and then you will have the most interesting New Year toys that will attract the attention of all your guests on New Year's Eve.
Factory christmas decorations are almost in every home. They are definitely very beautiful and with good combination with other decorations in the house are able to cause a decent aesthetic effect. But just buy New Year's balls is boring. Uniqueness can only be achieved by making the decor of New Year's balls with their own hands.
Christmas balls from threads
For a long time, a method for making balls from the threads is used. Products are obtained by an additional decor. It is possible to vary the size.
For manufacture, it will be necessary: \u200b\u200bthreads (with a large percentage of natural fibers in the composition for good impregnation with glue), PVA glue, disposable glass, round-shaped balloons.
Production Stages:
- Prepare glue for work. Highly thick dilute to the state of the depletion of sour cream.
- Inflate the ball to the extent that the size of the toy is planned.
- Soak into the glue segments of the thread 1 m.
- Cutting the way "web" so that the free openings do not exceed 1 cm diameter.
- Give dry glue (from 12 to 24 hours).
- Get the ball from the product, carefully bursting it and getting through the ball hole.
- Redurate the product. To do this, use: shine, paper cutting of different shapes, sequins, beads, semi beats, etc. Products from threads can be painted from a balloon or acrylic. Watercolor and gouache will not fit, as they are able to twist the product and lead to his spoiled appearance.
Having made the New Year's balls of different diameters, they can decorate any corner of the house: Christmas tree, candlesticks, compositions in a vase, on the windowsill, etc. The decor from the balls can be done like this: to put a light garland on the tray lay out on top of the product of different sizes, but one color. With the garland enabled, they will be highlighted and creating an interesting effect.
From Bead.
Very nice and spectacularly on the Christmas tree, balls from beads will look. In this case, the decoration of foam spheres of blanks will occur. In addition to the foam blank, there will be beads, pins (sewing needles with caps, like on carnations), tape.
The method of manufacture is very simple:
- Hang one bead per pin.
- Attach the pin to the foam basis.
- Repeat actions until there is no free space on the basis.
- At the end, attach a ribbon-loop to hang decoration.
Beads are desirable to take the same size to avoid empty places based on. The color gamut is chosen both in one tone and in different. It all depends on the individual preferences and the overall stylist of the decoration of the room.
Instead of a foam base, you can use plastic factory balls. Only here to mock the beads in this case will not be on the pins, but on the thermoclate.
From buttons
No less original and unique will look at the Christmas balls from buttons. Old unnecessary buttons are not necessary to pick up in one color scheme. After all, they can always be repainted and achieved the desired shade. Speeciously look in gold, bronze, silver shades, as well as all colors with a spraying "Metallic".
To make such a decor of New Year's balls, you will need: buttons (you can with through fastening and hidden), thermocons, foam or plastic blank, tape.
- Apply a small amount of thermal oil on the inner side of the buttons.
- Attach a button to the base.
- Perform actions from paragraph 2 until the entire surface is covered with buttons.
- Attach the tape so that the ball can be switched.
Placing on the Christmas tree, you need to follow, so that they are not too much focused in one place. It is better to dilute such decorations by others.
From paper
Original Christmas balls can be made simply from paper without using any foundation.
Colored paper bowl
This will require dense (about 120 g / m2) paper, scissors, pin clamps, tape. It is very simple to make a blank.
- Cut from paper 12 strips of 15 mm x 100 mm
- Credit all strips from one to the other side by pins, retreating from the edge of 5-10 mm.
- Place the strips in a circle for forming the sphere.
- Attach the ribbon to the base of the ball.
Strips can not be cut off straight, but with other uneven lines. You can use figure scissors.
Corrugated paper
Corrugated paper will also come in handy. From it creates balls-pumps. To do this, you will need: corrugated paper, glue, scissors, tape.
- If the paper is new and packaged, then it is necessary to measure 5 cm from the edge and cut off. Then remember 5 cm and cut off again.
- Two billets cut the "scallop" with the interval of 1 cm strips is not renewable to the base of 1.5 cm.
- Dismiss one workpiece and start twisting the "flower" in a circle, gradually gluing. Get a magnificent pompon. Repeat the same action with the second harvest.
- Connect with glue two billets of pumps at the place of gluing. Get a lush ball. At the place of gluing to attach a ribbon loop. Flush the resulting pompon.
Bilateral colored paper
You can also make a ball of double-sided colored paper. To do this, it is necessary: \u200b\u200bcolored paper, scissors, glue, round item (cup, for example), tape.
- Cut the cup on paper 8 times. It will turn out 8 equal circles. Cut them.
- Fold every circle four times.
- Cut extra circle smaller diameter.
- Glue the billets to the center to the center on one side (4 pieces will fit), and on the other hand so itself.
- Disclosure each fold and glue on the place of the junction. It turns out a ball with "petals".
- Attach the ribbon.
Paper balls, as a rule, do not serve long and one season is used. It is not worth it in large quantities on the Christmas tree, it is better to "dilute" by other decorations.
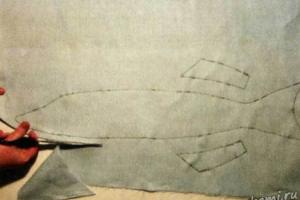
From fabric
If an old blouse was sent in the closet, which is sorry to throw out, the rejection of recycling was the right solution. From it you can make a pretty Christmas tree toy. For manufacture, you need: knitted fabric, scissors, needle sewing with thread, cardboard, ribbon.
- Cut the maximum long strips from a width of 1 cm. Stretch each strip so that it turns the edges.
- Cut the cardboard with a size of 10 cm x 20 cm.
- Hound the resulting strips on the cardboard in width.
- In the center from one and the other side to combine strips with a needle with a thread. Pull cardboard.
- Cut the formed loops along the edges.
- Flush and attach tape.
There is another way that implies the decoration of the billet of the foam or plastic billet with a cloth. Need any fabric (can be different color), thermoklay, scissors.
- Cut the fabric with rectangular flaps, 3 cm x 4 cm.
- Fold them like this: two upper angle roll to the center of Niza.
- Print to the workpiece with rows, bends inward from Niza.
- Plug the whole ball. Attach the ribbon.
Applications from fabric can be made varied, using more and additional remedies - beads, braid, rhinestones, tape.
With embroidery
The decor of New Year's balls is also possible in such a way. The new trend was the design of decorations for the Christmas tree embroidery. To do this, use a pre-embroidered image. We also need fabric, blank of foam or plastic, thermoclay.
- Attach the embroidered image with glue.
- Reduce the rest of the ball in the applique of the fabric.
Instead of applications, you can use the same fabric on which embroidery was made. Alternatively, you can make a pattern of a fabric, where one of the parts will be embroidery. You can also decorate each part of the pattern with separate embroidered images and fasten. After these actions, you can additionally add beads, rhinestones, sequins, sequins.
With filling
It will be implicitly looked like on the Christmas tree and the composition of the compositions from the balls such copies. For the manufacture of unusual balls, it is necessary to stock plastic transparent billets.
Opening the Hat Hat, inside you can create various compositions:
- Pour acrylic paint in different colors inside, facing the ball so that all the inner walls are painted, give dry. Pigment paint inside the workpiece and it will acquire a unique color.
- Fill the interior with small colored feathers and beads.
- You can also fall asleep inward confetti of different color.
- Pieces of old tinsel are used to fill.
- Favorite photos also have inside. To do this, you need to twist a small photo into the tube (look at the diameter of the ball) and straighten it inside. Complete confetti or sequins.
- Color wool fill the inside and complement beads. Colors can be selected different. Crab pain in acrylic paint. Fill the wool after complete drying.
- Multicolored sisal can be placed inward and enjoy the color and originality of the decoration.
Fantasies about filling the transparent ball can be different. All of them relate to personal preferences and moods during the needlework.

Christmas balls created by their own hands, parents along with children are not just symbols of celebration, and inexhaustible sources of precious memories that will live as much as the toys will serve. Each such ball is a real work of art into which the soul of the creator is invested. Therefore, their value is incredibly high. We invite you to familiarize yourself with the selection of interesting and unusual ideas that will be prompted, how can I decorate the New Year's balls with your own hands for 2017.
How to make Christmas balls with your own hands?
Make New Year's balls at home today will not be problems. Shops for needlework and creativity provide a wide selection of decor elements, as well as special blanks that can be used as a basis for future toys.
New Year's balls do it yourself from threads and glue
You can create original New Year's balls with your own hands from threads and glue. This will require such materials:
- air balls;
- decorative threads (preferably dense);
- pVA glue;
- capacity under glue;
- needle;
- scissors.
Consider how to make balls from the threads with your own hands step by step.

1. First, the balloon should be inflated to the necessary sizes and tie it tightly. To give a ball rounded shape, it is recommended to change it slightly. Next, it is necessary to put the thread chosen for the decor in the needle, pierce it near the bottom of the pennation from the plastic candy. After the thread, it is necessary to close through the tank and pour into the last glue.
Attention! So that the ball turned out to be durable and did not lose its appearance, it is not recommended for water to dilute glue.
2. The thread must be impregnated with glue. To do this, it should be stretched through the container, filled with PVA. Immediately and its winding on the air balloon is carried out. While the thread is wound, the ball turning should be performed very intensively. Since the air ball at the end of the procedure is extracted from the inside, the wound should be made not very tight in the place where it is tied. It is better to leave below a small free space.
3. When the ball turns out so dense, as far as he thought, it is necessary to cut off the string, but leave a small tail in order to be able to form a loop later.
4. Such a ball is recommended to postpone into a dry place for a while until it is finally driving. If there is no desire to wait, you can use the hairdryer and speed up the process of drying the toys. It will take it only from 5 to 10 minutes. When the threads are absolutely dry, you can pierce the ball ball with a needle and pull it out of the inside toys in a place where there was a tie, but very neatly, so as not to damage the created beauty. From the tail of the string, it is necessary to make a loop and you can decorate the New Year tree.


New Year's balls do it yourself from ribbons
The Christmas balls are fascinating with their own hands from the ribbons. To make them, it is necessary to have such a set of materials in arsenal:
- ribbons satin two colors: one - about 2.5 cm wide and about 3 m long, and the second is a bit already, with a length of approximately 1 m;
- blank ball;
- wire;
- awl;
- beads and sequins;
- thermopist;
- thread for the loop.

Important! Since the base from the finished ball will not be removed, you can use inexpensive light foam blanks.

Start follows and the formation of the loop to hang up the future toy. To do this, it is necessary to mark the middle on the blank for a ball and with the help of sewing on both sides to pierce it through. Plugs should be trained with a bead fixed from above.
From ribbons you need to form petals, make flowers from them, collect on the string and stick to the ball so that the wire is in the center of the flower. Top should attach the decoration and create a vertex. From it it is necessary to move down and smoke the petals from the ribbons, alternating colors, for example:
- in the first row: two white, two red, two white, two red;
- in the second row: one white, three red, one white, three red;
- the third row needs to make an increase in the number of petals: two white, six red, two white, six red.
Next, it is necessary to glue the petals without adding to the moment they will not be too closely fit to each other. In this moment, it will be necessary to reduce their quantity to the initial (i.e. up to eight) and tweak to the end.
So that the ball turned out more lush, it is necessary to make more petals in the first row - not eight, and ten.


Paper Balls do it yourself
For lovers of openwork products in an interesting way to manufacture New Year's toys can be a paper version. Such Christmas balls will be harmonized with any interior, and there will not need a lot of time on their manufacture.

First you need to cook:
- dense colored paper (A4);
- knife designed for art cutting;
- thread;
- needle;
- scissors;
- glue;
- beads;
- openwork patterns.


1. The selected templates are printed on paper. Their size can be adjusted depending on the size of the paper and personal preferences. The following templates must be carefully cut. To do this, use a knife for artistic cutting.
If there are concerns that the drawing in the process of work will be stolen, you can close it with a paper sheet.
2. When the pattern is cut, you should start cutting the scan of the ball.
3. Using a round pencil, it is necessary to give a circular shape pattern. At the tip of the petals you need to pierce the holes.
6. Then you should create a loop from beads. To this end, they must be riveted on the string and stretch it inward through those holes that were previously made in each petal.
6. The final barcode is the creation of hinges for hanging. And the ball is ready to decorate a New Year tree.

Ball from foam with her own hands
Foam balls have many versions. Billets from this material are selected as the basis for future Christmas decorations. Such balls are decorated with the help of multicolored pieces of felt, sequins, paper flower, beads, threads, etc.

As one of the ways to create an original decoration of foam on the Christmas tree, you can consider the "ball-cake". To make such an appetizing decor element, you will need:
- foam blank in the shape of a ball;
- pVA glue;
- small white sequins;
- a thread;
- scissors;
- red bead.
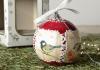
To begin with, the foam spherical workpiece must be abundantly wrapped with glue. Then it must be omitted into the container with pre-filtered small sparkles and carefully cut into them so that there are no missed locations. Then you need to give a ball to dry carefully.
After final drying with the help of fabric or from corrugated paper, you can form a beautiful skirt - wrapper for the cake, which to attach from the bottom. On the vertex of the resulting decorative delicacy should stick a red cherry bead. The last step will be the formation of the pendant from the thread on the ball from the foam.

Other options for balls from foam


New Year's balls do it yourself - decoupage
An interesting variety of modern decor is the decoupage. Such art can be applied to create New Year's balls.

This requires a set of tools and materials consisting of:
- plastic balls (in diameter about 8 cm);
- napkins with New Year's drawings;
- multicolored acrylic paints;
- brushes;
- pVA glue;
- acrylic varnish;
- manna cereals;
- sequin;
- sponges for washing dishes;
- boards for modeling;
- contours to work with ceramics and glass.
A small amount of white acrylic paint should be put on the board, swing in it a sponge and apply to the ball using point movements.
Important! It is recommended to carefully ensure that the sponge is uniform and well in the paint. Otherwise, the decoupage of the New Year's balls will be spoiled by the visual effect of the presence of a snowy fly on their surface.
So you need to paint all the balls that are planned to decorate. While they will dry out (approximately for an hour), it should be proceeding for the preparation of napkins. The top packed layer must be separated from the bottom and gently cut the New Year's drawing. Next should be made of glue with water in a 50/50 ratio. The cut out drawing must be mixed in the adhesive solution and attached to the ball. The process of its gluing is recommended to start with the middle, smoothly moving towards the edges.

And then around the glued picture you need to create a background of the appropriate color. To do this, the acrylic paint is again needed to lay out on the board and with the help of a sponge apply on top of a white background on a bowl. After this procedure, christmas toys should be left in a dry place to the final drying, and then completely cover their surface with the help of acrylic varnish.

You can create a snow effect like this: mix white paint with a semita (there should be a thick casheaking consistency) and put a thin brush in those places of the ball, where snow should lie. When the snow dries, you can decorate it with the help of silver sparkles, which need to be applied to a precompanied surface. With the help of a string, a loop is made, and the creative process is completed.


Other ideas of New Year's balls do it yourself
Among other ways, make Christmas balls with their own hands, you can allocate:
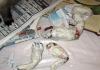
- Soft fabric balls. For the embodiment of such an idea to life, patchworks of different sizes will be needed. As the basis, you can use the old sock, well filled with rag or cotton so that a spherical figure is obtained. You can also purchase foam blanks. The decoration of balls of flaps is possible in the form of Ryush, and by dense sewing to each other of the tissue rectangles to give a toy "shaggy" appearance. Decorate the fabric balls with nice buttons of various sizes and shapes.

- Christmas balls lace. It is also necessary to take foam blanks, which can be placed by pieces of openwork lace. It can also be squeezed to provide an old look. Lace can be made independently - to tie with thin thread and hook.

- Toys from a floristic sponge ("Oasis"). From this material there should be a ball to which small toys and fir sprigs with wire trigs are added. They are suitable for a big and magnificent Christmas tree.

- Balls from old CDs. The latter should be cut into small pieces of different shapes and carefully glue glass transparent billets. By the same principle, you can make a decor of balls with beads.

New Year's balls with their own hands, master classes in their manufacture, considered by us, will certainly help you to inspire the creation of creative designs of Christmas toys. Create with pleasure, share your experience, replenish the piggy bank of creative ideas and the best samples of their incarnation!