Origami technician is multifaceted, it includes not only the addition of a variety of paper sheet models, but also modular figures that suggest the manufacture of identical elements with their subsequent merging into one. It is for such a principle that Kusudam is made, so-called floral balls created from individual elements.
The Japanese word "Kusudama" is translated as a "drug ball". Previously, the Japanese were placed inside Kushudam various therapeutic herbs and prevented her over the sick bed. And now these magic balls are used simply for decorating and decor.
Kushudam - photos and schemes how to make
In this master class, I will show 5 options - how to make cushudam from paper with step-by-step photos with your own hands.
Openwork ball of paper

These paper balls with a brush can be used to decorate the premises or hang on New Year's Eve. It all depends on your imagination. Openwork ball is very original and beautiful.
To create it, the following materials will be required:
- white strips - 30 pieces (size 4.5x9 cm);
- blue strips - 30 pieces (size 4.5x9 cm);
- pVA glue;
- knitted strong thread.

Stages of work:
Take a blue strip of paper and bend it from left to right in half.


Then return to its original position. Thus, the middle of the strip is visible.

Upper left corner strips bend up to the middle.

The same to do with the second angle, that is, right. Only it needs to be bent top down.

Now the upper left corner bend down, and the right-up to the center line.


Repeat actions 3 and 4 again.


Now neatly deploy everything to the initial position of the leaf.

Take a white paper blank and bend in half.


Then retreat about 0.5 - 0.7 mm down and bend again.

Carefully fold up to the middle of the leaf accordion.
At the end of the last time, the corrugation is not necessary, the protrusion should remain.


With the second side of the workpiece do the same. In the end, it should be like this.

Now it is necessary to shut down the left lower and the right upper angle.

From the reverse side, the workpiece looks like this.


Then bend on both sides already on the outlined lines.


All detail bend along the lines of blue blank. As a result, it turns out like this.


White middle need to glue with plow glue.

Such blanks should be 30 pieces.

Now assembling a ball. Take one module and wrap in glue pockets near the corrugation.

Print the second module, so on the photo.

So glue 5 blanks.


Continue glue side modules in a circle until the ball is formed.


At the end, make a brush and attach to the ball.

Here is a beautiful and original openwork ball of paper. It can be used simply to decorate the interior.
In addition, such a crawler can be done with children and attract them to creativity.


Sonob Shaz
This cowudam is perfect for a beginner. It consists of only 30 modules that are very simple in folding.

You will need 30 paper squares from 8 to 10 cm. It is very convenient to use sheets from blocks for entries, but you can cut the squares from the colored paper. In this embodiment, the squares of 8.5 cm of five different colors are taken.

We will proceed to folding the module. We take the square of the paper and fold in half.

We deploy and re-fold the edges to the median line.

From the opposite sides, bend the corners to the first horizontal line.

Once again bending the corners.

We fold the parties to the center of the square.

We make two diagonal folds.

We repeat the action in the other direction to get such a pattern from the lines.

We turn out one side of the workpiece and put the corner there.

Return the bend to the place.

On the other hand, refuel the edge of the paper into the resulting pocket to get rhombus.

Bend rhombus in half.

Triangle fold to the center of the module.

We do the same with another edge. Module is ready.

When all 30 pieces are collected, we start assembling the Kusudama. Wake up the angle of one detail in your pocket.

We form a pyramid of three modules.

In the future, when assembling, focus on the "star" of five pyramids. This is how the correct side of Kushudama looks like the correct side.

We continue to collect. If the modules were made carefully, then everything will turn out exactly and without glue. The last 2-3 modules are difficult to insert. Watch your creation to be broken.

Our kosudam is ready.

It can be decorated with a ribbon or tassel and attach a hollow for hanging. And you can leave so.

Kushudam Floral Ball "Bells"
Bells are very beautiful flowers. They can be easily made of paper and arrange in the form of a ball. This will help a little-known technique that is called Kusudam. At first glance, it may seem that the craft is very complicated, but it is not. If you clearly follow the instructions, then such a ball can be done quickly and easily.

Necessary materials:
- paper squares measuring 8x8 cm - 60 pcs.;
- pVA glue;
- clips;
- knitting thread;
- big bead.

Cousudama Bowl Shipping Scheme
01. Take one billet, that is, the square and put it with a sharp angle up to get a rhombus.

2. Now bend the workpiece from the bottom up horizontally.


4. Then the left half bend in half from top to bottom.

5. Right half of the workpiece bent down. After that, bend it in half.


6. Now put the left corner of the module to the right so that they do not overlap each other, and simply come into contact.

7. The right angle of the module hide, as shown in the photo.


8. The upper triangle that goes beams, bend down.


10. Such blanks need to do 60 pcs.

11. Each flower consists of five modules. They must be glued in a circle. So that they are fixed, they must be copped with clips.


12. Total should get 12 flowers.

13. All billets of bells also need to be glued together with glue and grind up clips.


14. The remaining flowers are glued in a circle and shape the ball.


15. Make a brush from knitting thread.

16. After the ball gets free, and the parts will hold hard, remove the paper clips and through any hole in the bowl stretch the brush and fix the big bead. Kusudama Ball "Bells" is ready.


This beauty can be made with your own hands. This ball can be hanging on the window or on the wall in the room. You can also decorate even the New Year's Christmas tree. It all depends on your imagination and preferences.

Master class on making this bright flower of cowdam from paper.

To work, it will take a color sheet of paper, any object for drawing circles, pencil, scissors, PVA glue.

On paper, draw six identical circles and cut them out.

One of the circles will lay down in half.

We will deploy it, after which one of the halves must be tilt in the middle.

Invert the workpiece with the other side and form small recesses at the top.

For one fourth circle from the edge, I appline a little gland plow.

Connect this part of the circle, after which I will apply glue to another quarter of the circle.

Gear it, our billet has acquired the following appearance.

This looks like one of the petals from the front side.

For the same principle, we make 5 more petals.

We begin to glue these elements among themselves. One of them will strike the glue strip.

Connect this petal with another.

We continue to glue them with each other, in the end we get a flower.

Flower in Kusudam's technique is ready!

Video lesson "Kusudam Supershire"
Origami technique every day becomes more and more popular. And it is not surprising. After all, with its help you can create masterpieces from paper. Such a process is so exciting that it is even impossible to convey words. Of course, it takes a lot of time and materials to create crafts. But such work brings pleasure, including aesthetic.
Paper is a wonderful material for crafts with children and not only. In the Origami technique, you can perform an infinite number of features of the figures and decorations. Our task is today - a bowl of paper in the Origami technique.
In order to make the flower ball origami, we will need:
- Paper (monotonous or color), sliced \u200b\u200bby squares. I use blocks for posts with a side of 7cm. You can take a greater or smaller paper. From the squares with a side of 7cm, a ball is obtained, a diameter of about 13 cm;
- PVA glue;
- Stationery clips;
- Tape. You can use the lace, chain, etc.;

1. We fold the petals for colors. To do this, take the square and fold it diagonally. It turns out a triangle.

2. Bending both corners to the top of our triangle so that the correct rhombus turned out.

3. Now alternately turn the corner outside.

4. We begin towards yourself the protruding parts (ears).

5. We fold our corners along the fold line inside.

6. Introducing the ages of half the corners and glue with each other. Jam. When the glue dries. It turned out one petal.

7. For a single flower you need five such petals.

8. glue all five petals among themselves, the flower is obtained.

9. For Kusudama, we need to make 12 flowers. They can be one color, can be multi-colored who like it. I see, as you see, color.

10. When all the colors are ready, we start collecting the ball. First we collect two halves of 6 colors in each. Places of contact with clips fixing.

11. Then connect the paper with two halves of the ball. This is what should happen about. While we did not fix all glue, the flowers can be changed in places.

12. When the composition is ready, glue the places of the place of contact of the petals. Let the glue dry. It turns out such a ball origami out of flowers.
The pre-New Year Jewel will begin very soon and for most parents the question of decorating a class or group in kindergarten will rise. We offer you the original New Year's handicraft to school or kindergarten, which can be done with the child. Craft paper ball from flowers will be a wonderful decoration of a class or a gift that the child will make it yourself. At first glance it seems that the drill is complex. However, make it very simple.
To work, you will need: Colored paper, glue, pencil, scissors

It is better to take the adhesive pencil, it glues faster and stronger. Cut the colored squares with a side of 7 cm. Our ball will consist of 12 flowers, each flower of 5 petals. Total need 60 squares. We made 2 types of flowers. Color combinations can pick up various, and you can make one-picture flowers, such as white paper, then our ball will look like a fluffy snowflake.
Crafts Paper Ball Flowers
Fold the square diagonally

Bend the corners of the resulting triangle to the center. It turned out a diamond, but much smaller.

Bend the upper layers of rhombus as shown in the photo. There should be such a tribal.

Will the corner of the triligent. Well stroke the fold line with your fingers.

Now lay down the extreme petals of the triligent in half along

We will overtake the workpiece by pressing the edge to each other.

Gear the edges of the workpiece. Press them more tight to each other to glue well. It turned out the petal of one flower.

We will make several such petals and glue them with each other.


For one flower, we took 5 petals

Shades of petals in one flower can be combined

We start gluilding flowers with petals among themselves.

As a result, it turns out such a bright ball. Through the center of the ball, we skip the colored cord, having preheated it with glue. The end of the cord can be decorated with a tassel. To decorate a class or group, make some such paper balls from colors.
Mastery of folding various figures from paper sheets - origami several thousand years. His homeland is China, where the first paper was invented. In Japan, the art of folding crafts from paper has come after five centuries.
Initially, paper figures were ceremonial and religious. Since the paper was rare and expensive, to afford figures from it only very rich and noble people could. Samurai gave them to each other as gifts. Also, paper crafts were decorated with Noshi - a meal-offering in Buddhist temples. Over time, folded figures became the main component of offering and acquired a mystical meaning.
At the weddings, the butterfly from the paper was accompanied by the bride and groom and symbolized their clean souls.
Over time, paper has become cheap, and people of different classes and weakness could have folded figures. The number of features of the figures grew and at the end of the 18th century the first book was published with instructions for folding crafts.
The name "origami" itself went into use in the 80th year of the 19th century from the two words "oku" and "kami", which means "to fold" and "paper".
In modern art, origami has several directions. One of them is modular origami. DIY are created by laying small details folded in a certain way - modules. It is also called 3D origami. One of his branches is Kushudam - the creation of bulk balls.
This article will offer several master classes to create paper balls from small modules. With detailed schemes and description of the work, even newcomers in the art of origami will be able to create such a beautiful handicraft.
The first master class is quite simple and devoted to the creation of a ball of colors. Make it very easy. This handicraft will be for even children, which will beneficially affect the development of the shallow motors of their fingers, the ability to think logically and not standard and develop imagination.
Origami Ball Flowers
It will take:
- Square paper paper. (You can use multi-colored squares from blocks for records. Of these sheets with a side of 7 cm, a floral ball 13 cm in diameter is obtained;
- PVA glue;
- Clips;
- Laugh, ribbon or chain;

First stage Folding petal for flower.
Take the box of paper and bend it diagonally. The fold line is located below. It turned out a triangle.

Right and left corners bend to the top so that the figure takes the type of proper rhombic.

Failure lines and corners that come into contact along the central line of rhombus must be deployed so that two incorrect rhombus is on the right and left. (The fold lines will be held in the center of new diabiks).

On the right and on the left of the protruding parts of the new diamonds to get on the front side (to itself).

On the fold line (passes through the center of Rhombikov) to fold the corners of the workpiece so that it is inside.

Those halves of folded corners that are on the front side to smear with glue and fold the workpiece. Wait until they stick. One flower petal is ready.

For one flower, there are 5 such billets.

For a flower ball, you will need to make 12 flowers. Multicolored or monophonic - it will tell your fantasy.

The next step is to create a ball.
First you need to collect 2 halves of 6 billets in each. For the convenience of flowers can be fixed with clips.

Then connect both halves together. While the floral ball is fixed only with clips, the placement of individual colors can be changed. If the color combination is successful, the next step will be the bonding of flowers.
The last stage is an assembly.

Since the flowers in the center fit loosely, in this hole you can go tape or laugh. At the output, you can fix it with a beautiful bead or simply tie a bow. Kosudam is ready to decorate your life.
The next master class will require more skill and time. Modules for this cushudam are more difficult, but the result is worth the time and effort.
Supershore origami from modules.

It will take:
- For training, double-sided paper of 15 x 15 cm (one side is white);
- Glue.
The first stage is the folding of a double square.
Fold the sheet diagonally to the color side out. Expand.
Fold horizontally and vertically coloring inside. Expand.

The photo shows the direction of further addition to create a double square.

The next step is to create a blank for the module.
Locate the square so that the deaf corner is from above. Right and left upper sides fold along the vertical median line. Turn over and folded on the second side in the same way.

Those pieces that raised turned out triangular. They must be flattened and wrapped in inside.

That's what it turns out.

Locate the workpiece with a deaf angle down (it is acute in appearance). Fold the right and left corner, as shown by the arrows in the picture.

It turns out four sharp corners. Everything must be bent down.

The next point is the folding of the workpiece.
Now, when all the necessary lines are planned, the entire workpiece should be deployed and placed so that the white side looks at us, and the color was external.
You must click on the billet center (see photo).

With a careful study of the workpiece, four squares are visible on it, they must be folded along the marked lines. They are indicated in the photo in the form of a red arrows.

The same arrows indicate the direction of folding - the corners are triggered behind the triangles from behind. They have to settle down. It is necessary to adhere to the marked lines of the fold and everything should succeed.

Here's how the billet looks like a white side. The next step is to bend the left and right corner around the arrow and the top corner bend down.

The first of four squares is complicated, it is just necessary to fold the right corner with the left (as if shifting the page of the book).

For the second square, the corners for triangles are also attached, etc.


Just do the third square. The billet with three folded corners looks like on the image.

The last corner will be more difficult. It is necessary to carefully control the ones to bend on previously marked lines. Look in the photo.

Bend the right angle, bring the left side and bend the left corner.
Slightly dissolve the workpiece and gently lower the top sharp corner inward.


The origami module is ready and you can proceed to the creation of a ball.

Volumetric balls can be collected from double modules (you need 32 pcs.) Or single (it will take 40 pcs.). The first are more original.
The double module consists of squares - 9 x 9 cm.
Green modules are made as in the master class above completely, and yellow to half. They must be left at the stage of sharp corners and not turn.

Connect both modules as in the photo.
Build ball.
Fold together billets from two modules. Glue glue. There are 9 blanks in the circle.


For the next row, 6 blanks need.

For the top of one half, another billet is needed. Insert it.

Similarly, to make the second half of the supersatr.

Flat side of one of the halves. Loose with plenty of glue and attach a loop from a ribbon or lace.

Connect both halves and supershire ready.

The following option was created on a stand from three blanks. Quadics 12 x 12 cm, 11.5 x 11.5 cm and 11 x 11 cm went on it.

The rest of the modules for the ball double. Connect them similarly to the previous one.
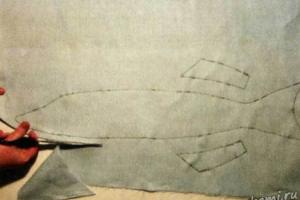
Next Master Class Bowl It will be distinguished by the fact that paper leaves will be not square, but a rectangular shape. Parties 2: 1.

It will take:
- Paper green and red (or your taste any colors);
- Glue.
For one ball, you will need 30 sheets of rectangular shape of green and red. Double modules, therefore, it turns out only 30. At first glance, this handicraft seems difficult, but it can easily be performed in a couple of hours. If you are just starting to master the art of origami, one hundred is worth choosing the size of the leaf 8 x 4 cm. The size of the ball will be 9.5 cm with a diameter.
The first stage is the creation of modules.
Green module.
Stop rectangles in half. Expand, and the right and left side to connect along the fold line.


Fold in half. Module is ready.

Red module.
Flashing in half along the long side.

Fit line below. Bottom left corner. Top.

Bend it back it (see photo). Corner inward.

Breast corner on the other side (bottom right). The resulting triangles bend as in the photo.

This is what the ready-made module is red.

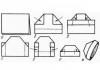
The next step is the assembly of the workpiece from the modules.
Expand both modules and connect both in the image.


Such blanks need 30 pcs.

The last stage is a bowl assembly.
Apply glue to module tips. Connect the billets of the angles of pink color, insert in pockets. To begin with, connect five blanks in the star.


Then connect the triangles formed around the asterisk. Add 1 billet and close five triangles.


The next step is to add three more available billets for three more - the stars turned out.

The triangles turned out again.
In the photo by arrogers, it is shown where you need to add to another 1 billet and where to simply connect the adjacent modules.

Now 1 billet is added to each sprocket.


Connect the last asterisk with glue and the ball is ready.


If you wish, you can change the roles of green and red sheets, and two different module color will turn out.
After completing the creation of Kushudama, it can be decorated with various beads, ribbons, laces, sparkles, attach suspensions from beads and crystals, or decorate any other fittings on your choice.
The magnificent balls made in the Origami technique will look great and on the New Year tree and in the form of a festive pendant on the Christmas tree and in the original garland. The modular product can be made rainbow and bright.
Such balls can be given to relatives and loved ones, and you can - bring to the office or school class as an element of the Christmas decor. Improve the origami wisdom is easy, but some patience still need.
Create modules for making a ball
"Building material" to create any volume products in Origami techniques are pre-made triangular modules. Make them easy, however, as practice shows, the implementation of the first ten figure takes a certain time.
Then the process becomes automatic, and they are created quickly. Then the modular construction turns into a favorite occupation, and the balls are only the beginning of a large path.
First of all, it is worth taking a sheet of the A4 format and divide it to 16 or 32 the same parts. After that, it is necessary to cut ordinary paper triangles.

- Bend the rectangle in half along, after which it must be driven across.
- Bend the corners of the rectangle on the same principle, as in the manufacture of a conventional paper rectangle.
- The resulting figure must be bent again twice, right in the middle to the outside, between the raised edges. The protruding parts need to be adjusted, and the edges turn outward.
- Finally bend the workpiece in half, and it acquires the necessary triangular shape.
To get a ball in the Origami style, you will need at least 280 such modules made of multi-colored sheets, previously divided into 32 rectangular parts. This, of course, is quite a lot, but if you bring the whole family to class, you will get wonderful creative gatherings for good music and a pleasant conversation.
Modular creativity is very useful for children, since a more efficient exercise for the development of shallow motility is even difficult to imagine.
Making a beautiful ball

Now, when we have a large set of "spare parts", we start creating your modular creation. The first three rows will consist of seven modules with beautiful alternating colors.
In the fourth year, it is worth using fourteen modules, putting on new blanks for each of the corners of the previous row. In the fifth row, seven more triangles will be added - the first one is put on two corners of the previous series, and the next two are one corner of each of the modules of the past row. Next again one module is put on two corners, then again one by one and so on.
From the sixth to the fifteenth row, we save 21 module in each, but, starting from the sixteenth row, again begin to reduce the number of "triangles" for seven pieces, that is, everyone is already put on three corners of the previous series. So gradually you will create an original Christmas tree bowl.
It will only be left to glue a beautiful bow. It will be fine if you create a whole set of such multi-colored balls in Origami technique. On the Christmas tree, these man-made products will look original to purchased toys. Modular creativity can be improved by creating other New Year's masterpieces.
Origami ball from modules. How to make a ball from origami modules

New Year Origami The ball from the modules is simply made with their own hands from paper, you will have a wonderful decoration on the Christmas tree. How to make a ball from Origami modules will say the master class made by the old one. Origami The ball consists of 280 triangular origami modules. Colors for a paper ball Choose without the help of others - 7 colors are useful for 40 modules of each. The size of the triangular modules 1/32 of the A4.1-th, 2nd and 3rd rows of 7 modules, mix as in the photo. If you use a bowl for the scenery, you definitely glue with glue each assembly step, so as not to crumble.
From the 6th to the 15th row of 21 module in each row.
Creator Ohlchik - http://stranamasterov.ru/node/835576?c\u003dnew_328,451 Material taken from the origamka.ru website
1. Romantic Gift Bride or Beloved. Crafts in the shape of a ball of alive or artificial flowers
If you want to give the original gift to my mom for birthday or make an unusualaccessory for the bride to the wedding then this article is for you! Here you will find useful ideas, schemes with instructions,master Classes, Video Lessons With the help of which you can make a beautiful ball of colors with your own hands.
The most popular material for the manufacture of artificial flower balls is paper . Craftsmen make stunning spherical crafts with flowercorrugated and colored paper , from newspapers and cardboard. But besides paper for the manufacture of such crafts, you can successfully use skin pieces,satin or rapeseed ribbons , Cutton segments from cotton or woolen threads.
There is a huge number of ways to fold balls from homemade colors. For example, very beautiful compositions are made of paperin the technique of Kusudama (direction in the art of origami). In one of the previous materials, we told you how to do with our own hands unique volumetric craftsin the technique of modular origami. Balls of happiness (or cushudama) Origamists make a similar way. But instead of the triangular modules for folding the composition in the shape of a ball, paper flowers are used with petals of different shapes.
The balls from artificial colors can be beautifully decorated to decorate a children's holiday room, a banquet table, an anniversary and weddings. You can decorate such balls by serpentine and silver "rain" - great christmas toys for the new year.
You can make it yourself elegant accessories for a wedding event. - balls from white colors (both artificial and natural) that will be replacedwedding bouquets For bride girlfriends. And multicolored balls from small paper flowers will be interesting to look at the vases and in the composition of the wedding tree,in bouquets of candy. 
From spherical crafts with large and small flowers, designers make interesting compositions in the form of decorative trees - Topiaria. It is said that Topiaria, adorning window sills, can attract luck to the house! :) 
How can I make your own balls from living colors? As the basis, you can take a round floral sponge. We take a flower (excellent version - carnation), cut off the stem, leaving 4-5 cm. Sticking the blanks in a sponge, beautifully decorated with a floral ball.
2. Easy to perform a ball from paper colors. Instructions for beginners
For the manufacture of a blank for a ball, take 3-4 sheets fine (can corrugated paper) and simultaneously fold them with harmonica;
A piece of ribbon is tightening the workpiece in the middle, cutting the edges and giving the desired shape on both sides of the workpiece;
Each fold is lifted separately. Future flower petals are obtained;
Neatly straighten each petal while holding the middle of the workpiece;
For the design of a multicolored paper ball, use colored paper.
3. Master classes and schemes. We make original cowdams and balls from paper colors
Option number 1:
MASTER CLASS. How to make a very beautiful craft of paper in the shape of a ball. We learn how to put petals correctly, collect flowers and form a ball - a wonderful decoration on the Christmas tree for the new year or on the window bargain to the children's holiday.
Option number 2:
How to make flowers from paper and fold from them a big ball in the technique of Origami Kusudam. Step-by-step instructions with photos.
Option number 3:
Learning to make a classic Kusudam model with your own hands. Step-by-step circuit and photo of a flower bowl made according to the scheme.
Option number 4:
Scheme of the original ball in the technique of Kushudam with flowerflocks in the form of stars. Wonderful option for making homemade Christmas tree toys for the new year.
Option number 5:
How to make floral.
Option number 6:
Very beautiful ball that you can collect from cut paper blanks by template. It is advisable to use bright colored paper for work.
Option number 7:
How to make it yourself