New Year's panel with your own hands. Step by step instructions with photo
New Year's master class "Christmas tree - a magic needle"

Author: Kuzmina Mila Vladimirovna, Deputy Director for educational work of the Medvezhyegorsk secondary school No. 1 of the Republic of Karelia
On fluffy branches
Ray in the arms of snow
sparkled rare
Silver light.
The sun smiled
Christmas tree is a beauty.
Is our Christmas tree
You may not like it?! (Alexander Metzger)
Target: making a New Year's panel in mixed media (quilling with scrapbooking elements)
Tasks:
- continue acquaintance with the technique of quilling and scrapbooking;
- learn how to compose;
- develop creative imagination, fantasy and sense of taste;
- educate attention and care for friends and relatives;
I bring to your attention a New Year's panel, in which two techniques will meet: quilling and scrapbooking. Thanks to quilling, the Christmas tree is voluminous and fluffy. Scrapbooking makes it possible to decorate an item with paper, decorative elements. Working in mixed media, children learn to convey the feelings and emotions of the New Year holidays. The New Year's panel will decorate your room and will be a wonderful gift.
The master class is designed for elementary school children. The children of the preparatory group of the kindergarten with the help of adults will also cope with this work. The work will be of interest to everyone who loves children and knows how to discover creative abilities in a child in any work. New Year's crafts can be done collectively in small groups.
Required material:


winter background:

Paper plates, colored cardboard, crepe paper, winter picture, PVA glue, double-sided tape, glue gun, decorative buttons, ribbon, beads, sequins, scissors.
Step by step production:
1. Cut a strip 2 cm wide from a roll of crepe paper

2. Fold the strip several times and cut it to the middle. Craftswomen call it "noodles"

3. Using a quilling tool, we make rolls, gradually gluing the edges.

4. Ready rolls straighten, fluff

5. The number of rolls depends on the size of the Christmas tree. We cut out a triangle from cardboard and begin to glue the rolls on it - the details of the Christmas tree, filling the entire triangle


6. The Christmas tree is ready. While it dries, we proceed to the main blank, which consists of a paper plate and a winter background (the plate can be replaced with a circle)
By the size of the bottom of the plate, cut out a circle from the winter background

7. Glue the cut out circle onto a plate using double-sided tape

8. Glue the finished Christmas tree on the background

9. We decorate the Christmas tree with buttons, beads, a flower (the top of the Christmas tree)


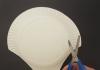
10. We process the edges of the plate with curly scissors

11. Glue the ribbon on the reverse side with hot glue, decorate the work with sparkles


12. If there are errors in the work, then one more plate can be glued on top of the reverse side


The work is ready. Thank you all for your attention!
Master class: decorative panel "New Year's Surprise"
Tsareva Tatyana, pupil of the creative workshop "House of Miracles" of the KhMAO-Ugra "Rehabilitation Center for Children and Adolescents with Disabilities "Solnyshko", a branch in Yugorsk.Age 13 years.
Supervisor: Nazmutdinova Tatyana Stanislavovna, labor instructor of the KhMAO-Yugra Rehabilitation Center for Children and Adolescents with Disabilities “Solnyshko”, a branch in Yugorsk.
Purpose: interior design, making gifts for relatives and friends.
Target: making a souvenir for the New Year holidays.
Tasks: improve skills and abilities in decoupage technique, develop imagination and creativity, cultivate perseverance, diligence, accuracy.
Hello dear colleagues and friends!
This master class is intended for children of school age. The idea of making a souvenir will be interesting for teachers and parents.
So, let's start making our souvenir - a decorative panel.
For work, we need the following materials and tools:
disposable paper plate, primer (white acrylic paint), three-layer napkins for decoupage with a winter theme, glue - pencil, glue - moment "Crystal", acrylic lacquer, acrylic blue paint, blue and white office paper, white thread (No. 10) , decorative beads, beads (by the number of pendant threads), felt snowflakes, foam balls, white lace, contours for decoration, brushes, scissors, ruler, simple pencil, needle, figured snowflake hole punch.

Execution sequence:
1. We prime the paper plate with white acrylic paint 2-3 times.

2. We glue the selected napkin, having previously cut off or cut off the pattern and separated the white layers using the decoupage technique. If anyone is not familiar with this technique, I draw your attention to the fact that glue (PVA diluted with water 1: 1) or varnish (we immediately use acrylic varnish) is applied with a brush from the center to the edges over the pattern, which is previously applied to the plate. It is better to use a flat brush made of synthetics. Let's dry.


3. We paint over the edges of the plate with acrylic paint of a suitable color.


4. Using a figured hole punch, cut out the snowflakes and glue them along the edge of the plate using the decoupage technique. We cover the entire plate with acrylic varnish.


5. We make paper beads for hanging threads. To do this, we draw a sheet of blue printer paper into triangles with a base of 2 cm. On the top edge of the sheet, mark 1, 3, 5 cm, etc. On the bottom edge of the sheet 2, 4, 6 cm, etc., each time add 2 cm. We connect the marks and cut them into triangles.


6. We make paper beads using a toothpick. We glue the end of the triangles with glue - a pencil.

We cover the finished beads with acrylic glossy varnish.

7. For hanging threads, cut off 20 - 25 cm. At the end of each thread, we tie a knot and string a bead.

Then, using decorative beads, foam balls and made paper beads, we collect pendant threads.


8. Cut off individual elements from lace.

We glue the pendant threads and lace details from the wrong side. We fix the threads with rectangular pieces of paper.
9. We decorate the plate with additional contours, highlighting the details of the picture.

10. Glue decorative felt snowflakes on lace details - pendants.

And our decorative panel is ready!

That's all!
We wish you all creative success, new ideas and inspiration!
DIY Christmas wreath. Step by step instructions with photo
Production of the volumetric work "Symbol of Christmas"
Suetova Alena Alexandrovna, teacher of additional educationPlace of work: MBDOU kindergarten No. 114 of the city of Nizhny Novgorod
Description: the master class is intended for older preschoolers under the guidance of a teacher, for school-age children, teachers of additional education, teachers and creative parents.
Purpose: for interior decoration, gift, work for an exhibition, competition.
Target: production of a panel with a Christmas wreath
Tasks:
- to form practical skills in working with paper, scissors, glue;
- practice non-traditional painting technique "spray"
- develop aesthetic taste, creative abilities of children,
- develop fantasy, imagination, fine motor skills of hands;
- coordinate and synchronize the movements of both hands;
- to form the desire and desire to make gifts with their own hands;
- educate independence, patience, perseverance.
Necessary materials:
- A3 sheet
- Glue
- Scissors
- Pencil
- Burgundy (red) velvet paper
- Colored paper in red, green and silver
- Color foil
- Compass
- Dry glitter
- Two spruce branches (can be artificial)
- Two gold beads
- Cotton wool
- Thick cardboard for the base of the wreath
- Old toothbrush or glue brush with hard bristles
- White gouache
- Thin brush
- Watercolor blue, lilac, purple
- Palette


When working with scissors, follow the safety rules:
- Put the scissors with rings towards you.
- Pass the scissors with the rings forward, holding them by the closed blades.
- Do not leave scissors open.
- Watch the movement of the blades while working.
- Do not play with scissors, do not bring scissors to your face.
I bring to your attention a master class on making panels "Symbol of Christmas" with your own hands.
In our work, the wreath is made of paper, in the middle of the wreath we will place a candle, stylized spruce branches and a holly. (The leaves of the holly are specially made red in order to avoid merging with green branches)

The Christmas wreath appeared in the history of the holiday almost 200 years ago in Europe. For a long time it served as a table decoration. Initially, four candles were necessarily installed on it, which were sequentially lit before Christmas. Later, the candles disappeared, and the wreath began to decorate, including the front doors to the house. Wreaths are most often made from live or artificial spruce branches, decorated with fresh, dried, artificial inserts, decorated with ribbons, Christmas decorations.

The holly is another Christmas symbol. He has a wonderful ability to remain green and beautiful even in winter, when nature is deprived of most of its colors.
Step by step job description:
1. Take a watercolor and stir it with water in the palette to the state of "colored water". Dip your toothbrush into the paint and start splattering on the sheet. It will come out like a blizzard.

2. With a pencil, draw a circle in the middle of the sheet, as large as it fits on the sheet. And outside the circle we will draw winter patterns. To do this, take a thin brush, white gouache and blue and purple watercolors.

3. Now you need to make a wreath. It is made of colored paper and thick cardboard. Take green colored paper and cut out strips 30 cm by 2.5 cm in size. Then make “grass” with scissors to the middle of the strip.

4. Cut out the outline of the wreath (circle) from thick cardboard. (I have divided it into parts for convenience).

5. Glue the strip and wrap it around the outline of the circle. You will get an imitation of a branch.


6. Let's make one more stylized coniferous branches, we will place them on the sides of the candle. To do this, cut out 2.5 cm squares from colored green paper and twist them into tubes. Do as many as you need. In this work, there are approximately 33 of them.

7. Glue the tubes on the sheet on the sides of the circle in the middle.

8. Let's make one more decoration for work. Red bow. Cut out two strips measuring 30 by 3.5 cm. Cut the strip into smaller strips, not reaching the edge. And glue each tip as shown in the photo.


9. Cut out another strip (for the middle of the bow) measuring 21 by 4 cm. Cut the strip into smaller strips, not reaching the edge by 8 cm (as seen in the picture). From this edge of 8 cm, make a tube, gluing the tip with glue, and twist the small strips with scissors.


10. Connect the parts and the bow is ready.

11. Cut out two holly leaves from a sheet of velvet paper.

12. Glue artificial spruce branches to them. Can be decorated with beads.

13. In order to make a candle, take silver paper 9 by 15 cm. Roll the paper into a tube and seal it.


14. Colored foil is used for the candle flame. Wrap and crumple colorful sheets of foil to simulate flames. Insert the flame into the silver tube. Glue.

15. All the details are ready, glue them one by one to the sheet. Start with a wreath.

16. Then glue the candle.

17. Next, on the sides of the candle, glue holly leaves with coniferous branches decorated with beads.

18. Cover the candle and twigs with "snow". Use cotton wool for this.

19. Use white gouache to create frost on the wreath. Lightly run paint over the tips of the needles.

20. Glue a red bow under the candle and snow.

21. My A3 sheet was too small for the frame, so I glued pink paper on top and bottom of the sheet. Got a passport.
More than one master class is adopted by both adults and children to make really some incredible New Year's composition. And you can meet 2018 with a homemade wall decoration. This can be a craft on canvas, where not the most familiar things in creativity are used as the main material. You can hang elegant collages on the wall, plasticine panels, panels depicting the Snow Maiden or Santa Claus, or maybe the symbol of 2018.
It all depends on your imagination, what materials are not used for crafts - cereals, buttons, sparkles, old puzzles, etc.
Often parents have to work hard and do something with their own hands for children. These are the same decorative works for the kindergarten, as for the panels, every third master class is dedicated to them.
Or maybe you yourself work in a kindergarten, and you are faced with the task of making beautiful wall compositions? Then wind on your mustache!
New Year's pasta panel
Why from pasta - yes, because pasta remarkably age into figures, beautifully painted, glued, and from pasta, as from a designer, you can do anything.
A panel for the new year from pasta can be like this:
- Panel Snow Maiden. It is not necessary that the entire Snow Maiden should be made of pasta, you can trim the fur coat with pasta, or a hat. Snowdrifts can be made of pasta, or a sleigh in which the Snow Maiden rides. Or the Snow Maiden will be with two braids of pasta.
- DIY Christmas panel. The Christmas panel is dedicated to the theme of the bright holiday of Christmas - this is a fir tree, the star of Bethlehem and, of course, angels. If the panel is for children, then everything that is depicted should be clear to kids. Volumetric paper angels, a star made of shiny textured paper, snowdrifts made of cotton pads. Children themselves can make a panel for Christmas from pasta - simple figures of angels are made from different types of pasta.

Of course, this is not all, but the simplest way to use pasta is snowflakes. For the youngest children, this is a feasible task - to make a simple do-it-yourself panel, where large snowflakes from painted pasta flaunt on a plain canvas.
New Year's panel of cones
A panel of cones is a more difficult job, since cones are not very easy to work with. By the way, snow-white can be made from simple pine cones, and all this with the help of simple whiteness. Well, already such white cones - where you just don’t use it.

Floral panels and collages for the New Year from cones:
- Herringbone. The composition can be large - Santa Claus, his granddaughter, animals. It is not necessary to make everything from cones, it will be enough just to lay out the tops of the cones painted in green with a Christmas tree.
- fantasy composition. To do this, you need to look at the master class, where many natural materials are used at once, where only the center of the composition, the dominant, is laid out of cones.
- Minimalism. And this is the so-called empty panel of cones. Considering that such minimalism in decor is relevant today, it is worth taking note of the topic. Moreover, it is so simple: you hang or fix ribbons with bumps in the painted hollow frame at the top. It turns out that you have bumps inside the frame, right on the wall.
And from the cones you can make the same monkey, the symbol of 2018.
New Year's panel from disposable forks
And this is a good way to make a large patterned snowflake.

The master class will be simple:
- In the center of the composition there is a dense circle where rays from disposable forks will be attached;
- This circle is decorated, wrapped with tinsel, the ends of disposable forks are fixed to it with hot glue;
- The wide part of the forks is also covered with tinsel in a circle.
It turns out that the forks are the faces of the snowflake. On the other hand, if you decorate such a composition more, you will get a New Year's wreath from disposable forks. In the center of such a circle, Santa Claus, or the number 2018, can be depicted.
Panel for the New Year using scrapbooking technique (MK video)
New Year's panel from cotton pads
From cotton pads, children are very fond of doing various things. You can start with a simple application, and finish with a beautiful panel.
Moreover, from cotton pads you can lay out figures with round outlines, or you can use cotton wool itself. For example, it is clear how to make a snowman or a hare from disks, the same snowdrifts. Well, the background can be made from cotton wool itself.
New Year's panel from plasticine
A plasticine panel can be a real work of art. And for 2018, this material is relevant.

From plasticine you can make:
- Panel Santa Claus do-it-yourself. Santa Claus is the center of the composition, but he can be surrounded by a spruce wreath made of plasticine, or snowflakes made of plasticine. The Christmas tree and Santa Claus is a story familiar to everyone, but Santa Claus and the monkey are already something interesting. You can also make a three-dimensional plasticine panel, where numbers can be three-dimensional (2018), or some details of the panel - the same Santa Claus or individual elements of his outfit. Or maybe use real candy in his bag?
- Panel for children with their own hands. Make your own master class, where a whole New Year's fairy tale will be molded from plasticine. Ask the children to add something to the plot of this fairy tale, perhaps a small star or a bird, just let the kid do it himself with your help.
And interesting panels can be made on the window.
Panel-calendar for 2018 shabby chic (video)
New Year's panel on the window
Usually, under such words, plot compositions on the window are usually taken, where a whole New Year's fairy tale is played out. Here Santa Claus is riding in a sleigh, here are funny snowmen frolicking, and the Christmas tree is all under the snow.

How to stick such a panel on the window:
- Arm yourself with a regular brush and liquid soap, you can simply smear the parts on the reverse side with soap and glue on the window;
- There is another interesting way where milk is used instead of glue;
- As an option - starch paste;
- If all else fails, you will have to use narrow tape.
And the snowflakes themselves and other New Year's figurines can be printed on a printer by downloading a sample from the Internet, and then cut out with a clerical knife.
New Year's panel on the door (video master class)
DIY panel for the New Year 2018
Panels with retro pictures are considered to be interesting and one of the most popular. Again, they can be downloaded on the Internet, and then cut out the necessary fragments. There you can also take the backgrounds that go under the name "backgrounds for decoupage."
You can make panels-collages, where symbols and stories of past times are intertwined, combining plots, heroes, patterns. Beginners can also make such decoupage collages, the main thing here is accuracy and varnishing to one final thickness of the panel.

Panel "Christmas fantasies"
New Year's fantasy is a composition in which there is more creativity than technology. It's just a combination of techniques.
Examples of such work:
- Batik + decor with beads and rhinestones;
- Decoupage + embroidery (embroidery can frame the work);
- Applique + patchwork;
- Application + quilling;
- Decoupage + painting with acrylics.
Well, the heroes of such works can be Santa Claus, and New Year's fairies, and angels, and children from pre-revolutionary postcards. Mix, match, decorate - the creative appetite also comes with food.
New Year's panel from a vinyl record (video master class)
If the New Year is around the corner, and you want something unusual for your home decor, and a hand-made series, this may well be a festive panel. If it is made with high quality, then for many years on the eve of the holiday it will delight you, filling the house with man-made beauty.
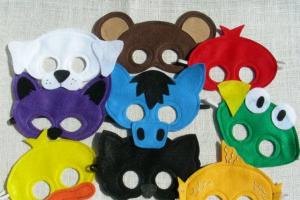
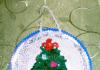
New Year's panel (photo ideas)