In connection with the development of country construction, all the items to decorate the interior of the house and the plot around it were widespread. Depending on the preferences and financial capabilities of the Homeowner, these decorations may have a wide variety of forms, and for the manufacture of them can apply a wide variety of materials.
These are natural materials - granite, marble, artificial - polymers, papier-mache. Such interior decorations are in the form of alpine slides, artificial water bodies and sculptures of the most different shapes and sizes.
Of all the materials used to decorate the interior, Papier Masha is perhaps the easiest in the manufacture. Anyone, not possessing special skills, can make crafts from papier-mache for giving.
The figurines installed on the territory are becoming increasingly popular - numerous animals, gnomes, storks and elephants, a variety of characters of fairy tales make the surrounding interior fabulous and interesting. Delight defensions will be provided! And especially if in the process of making sculptures they will still participate.
What is Papier Masha?

This is a mass that includes various materials such as paper, cardboard and fastening elements in the form of adhesives, gypsum, etc. In general, translated from French Paper-Masha means "chewed paper". The first products from this material were found when conducting archaeological studies in China and dated IIIVEK to our era.
This material is widely used in the manufacture of layouts, dules, butafory, and after special processing, for the manufacture of elements of furniture designs or other design elements.
Methods for obtaining sculpture from papier-mache

In practice, two methods of obtaining products (sculptures) from this material are used.
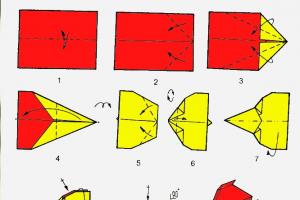
Method 1
- the model of the future sculpture is manufactured;
- several layers of paper are pasted on the prepared model (the number of layers can reach 100).
The result is a sculpture of a hollow inside.

Method 2
- the paper is finely cut, placed in hot water and withstand about 24 hours;
- after exposure, the paper is boiled, pressed and dried. The dried mass is thoroughly stirred with a small powder, in the process of mixing the glue (carpentry or monitoring) is added;
- as a result of mixing, a homogeneous mass is obtained, which can be laid in a pre-prepared form or apply to the frame of a future sculpture.
Frameless sculptures are solid without inner void.

Materials used for making sculptures from papier-mache
Paper is used as the main materials with a density of 40-60 Gy / m 2 (newspaper), joinery glue, alert or PVA glue is used as the adhesive component. To increase the strength characteristics of the sculpture, it is advisable to use reinforcing materials, it can be a gauze and plastic mesh, which is stacked between papier-mache layers.
In the manufacture of papier mache for the garden, it is necessary to remember the effects of atmospheric precipitation in the form of rain or morning dew. That is why, to extend the lifetime of the crafts from Paper-Masha, after the manufacture, it must be carefully primed up with a water-repellent putty, and after staining, apply several layers of varnish.
One of the factors that can significantly reduce the life made by their own hands the sculpture is the pest invisible to the eye - mold, fungus, microorganisms. In order to minimize harm in the manufacture of mass, it is necessary to make special additives. It may be salt, lavender oil. To remove the smell of glue, you can add various fragrances.
Required tools and materials

- paper, cardboard;
- glue - a wobbly or pway, you can use the homemade hubber;
- paints and brushes;
- kleenka - to protect the working surface;
- sunflower oil and liquid soap;
- frame for salabing;
- protective gloves;
- knife or scissors.
Variety of shapes

Showing a creative thought, anyone can make sculptures from Paper-Masha, in full compliance with its fantasies. The fact is that with a large selection of garden figures in building supermarkets, they repeat each other, these are gnomes, hedgehogs, various animals and agree, the presence of the same dwarves in neighboring sites is unlikely to please your child.
As trials, you can try your hand in the manufacture of mushrooms, fruits and vegetables, that is, the simplest figures, at the base of which the ball lies. On the surface there is an idea to arrange a copy of the pyramid of Heops on its plot. As experience gains, you can go to more complex forms.
Installation of sculptures

The weight of the figure of the figure is determined by its dimensions, but in any case, the design of paper and glue will have a small mass and therefore when it is installed on the site it is necessary to think about the place of place. It is desirable that it would be a place protected from the wind, if there is no such place, then the sculpture must be fixed to the soil either a little touch it, or apply an anchor, you can inside the papier-mache figures for the garden to build the cargo in advance.
Despite the fact that the figures have protection against moisture, it is necessary to remember that the papier-mache is based on paper that is not entirely friendly with excessive moisture, so the place for installation should minimize the access of excess water in the form of rain or dew.
After the end of the summer season, the sculptures must be removed from the site and transfer them to the room, otherwise, snow and frost can destroy them.
The resulting result will be happy to please you, your children and loved ones, and most importantly - what will be installed on your site will not be repetition of serial shop crafts. Yes, probably, store sculptures can last longer, but on the other hand, it is a stimulus to make new figures and sculptures to the new season.
No matter how hard the manufacturers of garden inventory and decor were trying, but to achieve the charm, which is caused by independent crafts of creative dachants, they are not under power. Figures for a garden from plastic bottles, automotive tires, dad mache, plywood, a variety of tubes and other breeding raw materials cause a real delight and give a smile to anyone who meets them.
Garden figures do it yourself
Hand dexterity and no fraud

How nice to meet among monotonous and boring courtyards with a professional and identical landscape design or its absence is a miracle: decorated with fairy-tale heroes, flowers, cartoon characters or non-existent good monsters plot!

Unwittingly stop, admire, absorb positive vibrations and notice how bad thoughts left their heads, and with a barely noticeable smile continue the way ...
Who are they, the creators of this wonderful fairy-tale world of the Master? Maybe there are some artists or just rare talented people? In fact, these are simple daches that showed some love for their garden and engaged in his creative transformation.

Create similar shapes for a garden from plywood with their own hands, everyone can just start. In the process, you yourself make sure that everything can go to the move, unless at the beginning you need a small instruction, management, and we will try to provide you.

Important!
The most difficult thing is to believe in your strength and cross over shyness.
Javit my love and joy to the world, and he will answer you with reciprocity, and the technical side of the question comes in difficulty with the crafts of a circle of children's creativity.
Plastic

Plastic is a favorite material of amateur. It is easily processed, it is amenable to various methods of fixation and installation, and its source is ordinary kapron bottles and plastic containers, which accumulates the whole sea besides your will.

Of course, you can only work with bottles and plastic, but more often in the course there are combinations of materials, among which you can meet:
- Papier mache . We all remember the technique of gluing newsprints with gradual buildup of the layer and the formation of the figures or part we need. Here any adhesive for wood or paper will suit here, you can use the homemade hubber or PVA.
- Metal wire. An excellent way to fasten the parts, fixation and ligaments of individual parts with each other. The fuel material is easily cut by nipples or scissors, in abundance is presented at any summer attic, basement or workshop;
- Concrete. This material is also available in the country household and plays the role of plaster, only solid and water-resistant gypsum. Garden figures are made from concrete much easier than it may first seem;
- Plywood. From cropping or entire sheets (if not sorry, of course) you can cut any or detail, because electric jigsaws allow you to do this without having special skills and experience;
- Different pieces of plastic pipes, hoses, corrugated channels, insulation - These are almost finished paws, fingers, necks and tails of fabulous or real animals, it all depends on your imagination and courage.

But back to the plastic. Empty eggplants are just a klondike: here you can see a whole torso, and a finished pig, and cutting it on the right pieces, you can collect a plumage, petals, ears - yes, anything.
Important!
The material is easy to cut, glue, fasten with wire or fishing fishing line, self-drawing and other materials.
Thus, plastic can serve as the basis of the product and the elements of its decor.
Mushroom Giant of Bottle and Papier Masha

So, so that you understand what we were talking about and believed our bikes, consider the manufacture of the mushroom step by step:
- We take a plastic lid from paint or putty, cut the hole in her center and put it on the neck of 1.5-liter eggplants;

- We are dragging PVA glue in water, cut the strips with a newspaper and stick to the bottle and cover with layers using the Papier Masha technique. We form the figure of the fungus;

- Machine on the night in a basin with water eggs, then this mass is crushed in a blender and add some PVA and putty. Mix to a homogeneous state;

- We apply the resulting masses to our mushroom, giving it a more natural outline. The mass is applied with hands, it is well lipnet and quickly grasps;

- Lepim from the same egg-tray mass elements of the face - nose, cheeks, beard, eyes. We add at the request of the hands and other details of our hero. Let's dry;

- After a complete drying of the mass coating our giant waterproof grout for tile seams. Grout is prepared according to the instructions on the package;

- When the grout dried, paint the hero of the facade paint. It is better to use acrylic or silicone paint. Voila - our mushroom giant is already asking for a garden, where he prepared the most prominent place.

Important!
Do not forget to apply a good layer of waterproof grout and two or three layers of facade paint, otherwise it rains will quickly turn your masterpieces into a pathetic sight.
How many people are so many ideas

Now we want to say the main thing. You are not limited to anything, except for your fantasy and creative thinking: Figures of garden from metal, empty pots, old dishes, toys - yes, what you can not meet.

Experiment and not be afraid - this recipe gave many interesting and even important results during the history of human development, and work and work will make you truly happy people.
Start with a small one, try your hand in various techniques, and over time you will understand that there is nothing impossible, you will find your material and equipment, style, and perhaps you will be conspired as a new sculptor self-taught, whose works will be in an example. Other and post on designer forums.

Most of those who earn today on the manufacture of exclusive garden sculptures, began to be exactly the case, without having the slightest idea of \u200b\u200bpainting or sculpture, so that there is a sculpture - a banal modeling.
Not academic knowledge is important here (although they will not be superfluous), but the desire to create, the desire to re-feel like a child, the desire to give people a minute of joy from contemplating your work.

Important!
Even if you do not find a big talent, then make primitive, but beautiful and non-trivial things you can.
The main thing is to try, start, and there will be visible, in any case, all that you lose is a few hours, empty bottles and old newspapers.
Output
Decorate your garden personnel - What can be natural and harmonious? And if it turns out that it is also simpler, then there will be no obstacles at all. The video in this article will convince you finally.
Look at what dolls from papier-mache can be done using toilet paper. From the same material you make a piggy bank, toys, New Year's crafts.
How to make a piggy bank from papier-mache with your own hands?

You make such a funny tiger, if you take:
- two sheets of white paper;
- newspapers;
- plasticine;
- small polyurethane jar;
- pVA glue;
- scissors;
- paste;
- gouache;
- stationery knife;
- thin and thick brushes;
- acrylic pistachio varnish.

Prepare a hub. To do this, take a glass of cold water, pour it into a saucepan, pour 2 liters here. Starch, well stir. Put the container on the fire, often stirring, bring the fluid to a boil, remove from the stove. When the Claysther cools, it is ready to use.
Remove the cover from the can, turn the container, put it on the table. Warming the can of the plasticine, immediately form ears, eyes, paws, features a tiger. That's how to make a piggy bank further.

Brush the newspapers into small pieces, begin to shit them the workpiece. First layer attach with water. The remaining 10 layers, you need to fix, lubricating each piece of the newspaper Cleaster.

Leave the workpiece overnight so that it is dried. In the morning, cover it with pieces of white paper, which need to be attached using PVA glue, which will give the product of strength.

Give the toy to dry completely, then cut it with a stationery knife for two halves.

Remove these details from the can, connect them again, gluing in a plus place with white pieces of plow plow.

At the top of the stationery knife, make a section of this size so that in the piggy bank through this hole to lower the coins of the desired nominal.

Now go through the outer surface of the product with a white gouache to primar it. When it snacks, paint the product in the right color.

That's how to make a piggy bank from paper and newspapers. If you want to see how to make a funny pig, which is also intended for storing and multiplying the little things, then read the second master class.
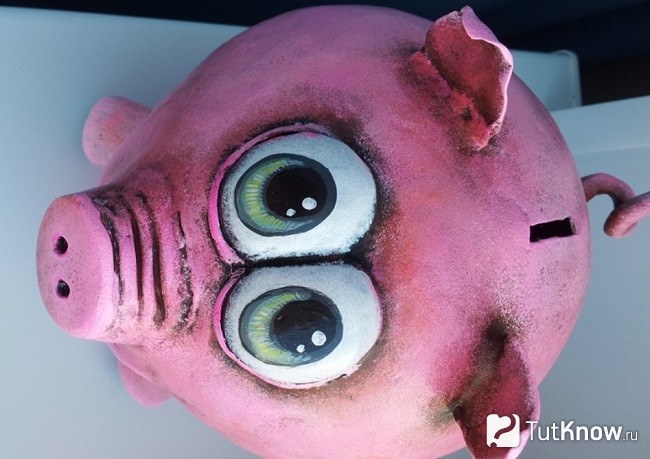
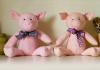
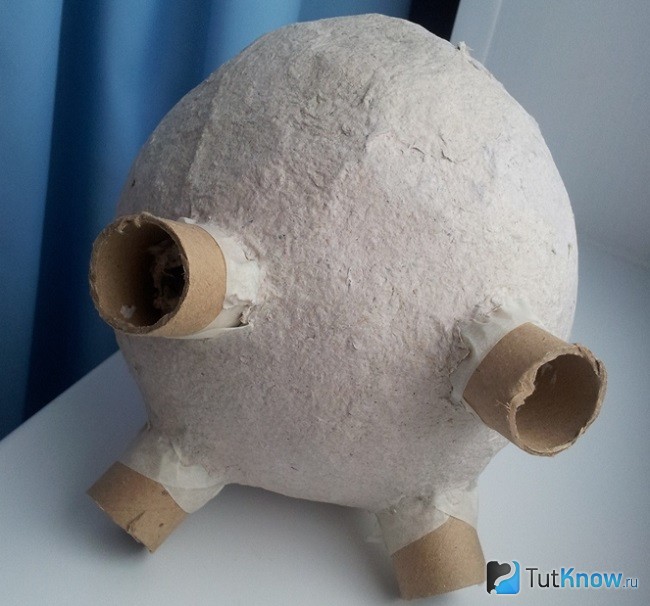
This is so touching and at the same time the piglet will turn out. To make it, use:
- inflatable ball;
- toilet paper;
- acrylic paints;
- construction PVA;
- foil;
- newspapers;
- toothpick;
- acrylic putty.
You can first clean the pieces of the newspaper in the water, then to dip them in the PVA, drawing up the surface of the ball, sticking torn papers here.
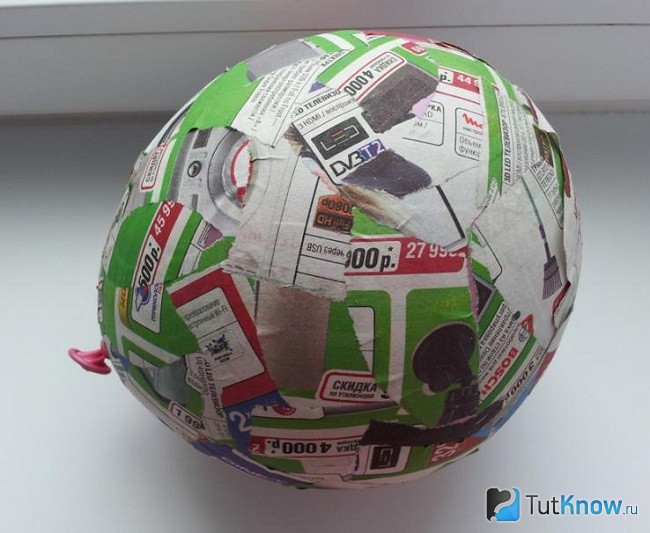
We make a lot for Papier Masha, for this, from toilet paper, tear up quite large pieces. Put them in the container in which you need to add PVA. After that, the content will remain well. Now, with a sponge or hands in rubber gloves, apply this mass on the ball, placed by newspapers.
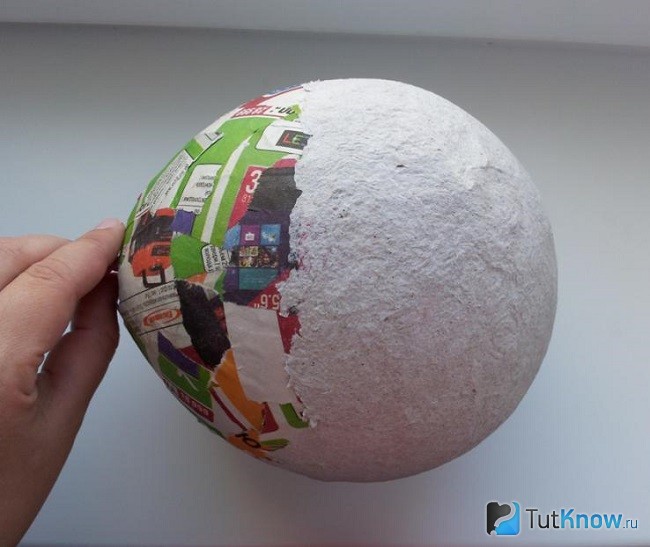
When it dries well, make a puncture with a needle, get a bundled ball through the bottom hole. Close the slot with two strips of paint tape, which are attached crosswise. Pogwood legs can be made of bobbins left from foil or stretch film. These cardboard tubes need to be cut into 4 parts with a knife. If you want, you can use bushings from toilet paper.
These workpieces need to be attached to the basis of painting scotch, on top of the also apply a mass for papier-mache.
Make a piece of foil, attaching that toothpicks and scotch. Plue it operated in glue to the toilet paper, form the nose.
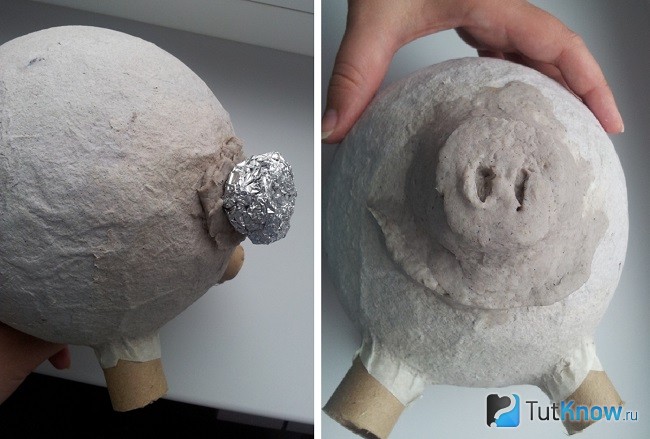
From her, you will need to cut out eyes, attach them to the place with the help of glue. Ears can be made of papier mache or clay
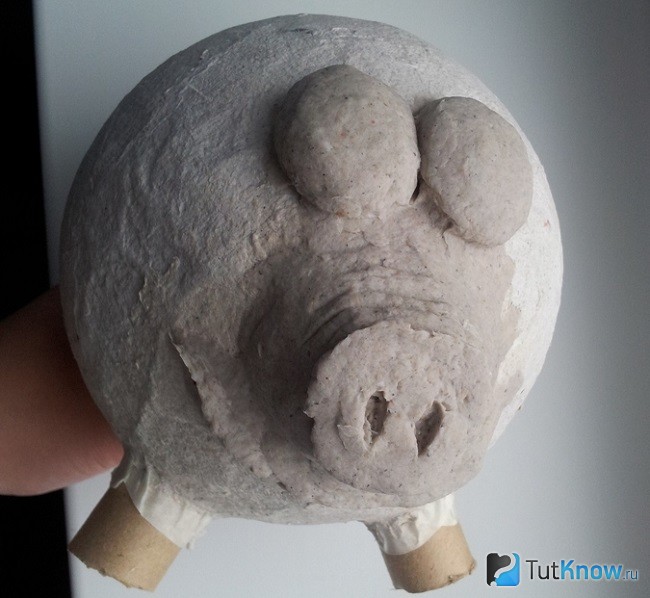
Now you have to leave a pig piggy bank so that the papier-mâché dried well. Then with emery paper we grind the workpiece, then we apply an acrylic putty on it. We are waiting when it dries, then, wipe the piggy bank with a damp cloth to align the product. We apply a putty into several layers until the surface becomes smooth.

Stationery knife make a hole for coins. We attach the tail to do in advance from the wire and papier-mache.
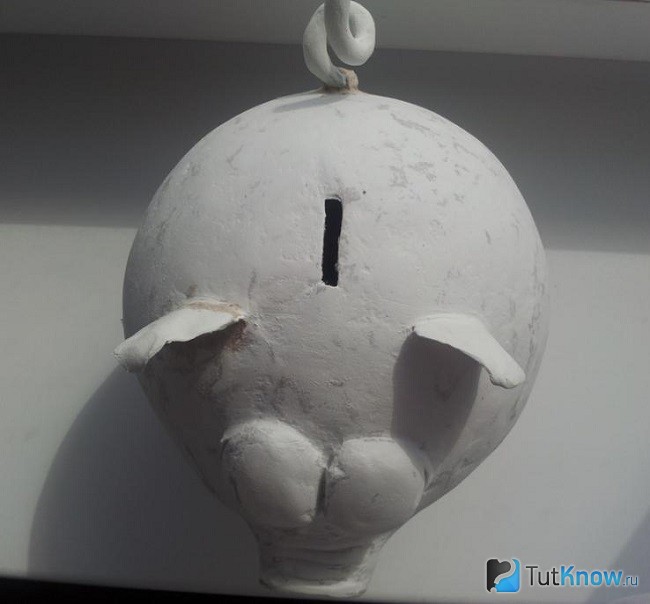
We start painting the product. First we apply any dark paint, then, with the help of a sponge coated red.
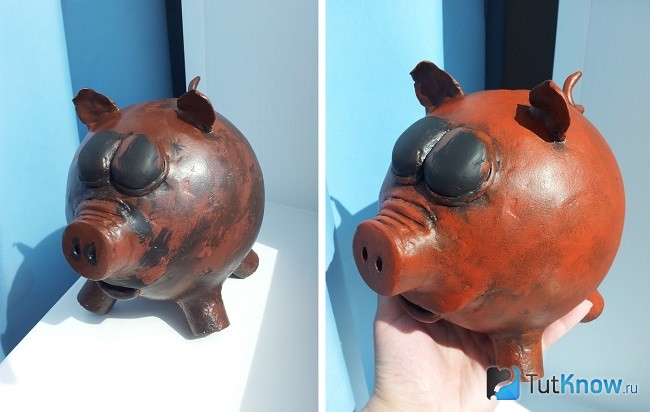
Next, it goes pink, after it is a mixture of white with pink. The next layer of white paint, but it takes quite a bit.

It will remain paint the eyes, after which the piggy bank from Paper Masha is ready.
How to make a lot of paper modeling with your own hands?
Not always the foundation is simply punctured by torn newspapers, there are very interesting recipes for making a mass for dad Masha. Get acquainted with one of them.
From such a mass, you can make an animal figurine, such as a bear. Take:
- 2 rolls of the cheapest toilet paper gray;
- 3 tbsp. l. linen oil;
- 500 ml of universal or construction glue PVA liquid consistency;
- 1.5 liters of water;
- gauze;
- big bowls;
- entround paper of medium and fine fraction;
- colander;
- pVA glue.
Now you need to squeeze paper. For this, laying on a colander rolled in several layers of gauze, put a little mass, part of the water stalks. The rest remove, lifting the edge of the gauze, pushing the paper. Also leaving the rest, but do not overcover, leave some water.
Fold all this paper into a large bowl, then add building glue there. Stir the mass. It will be easier to do if you get mixed paper with glue with small portions.
Add linen oil, mix. It will allow you to become a mass of plastic. Now you can sculpt from papier mache or put this mass in the form to make toys details. You will glue with the help of PVA, which is called the "moment of the joiner".
When within a few days, the blanks from Papier Masha are completely dried, they will need to be an arched middle, then shallow sandpaper.

The finished product is ground, then paint.
Master Class: Hut Baba Yaga do it yourself
It can also be made of mass, the recipe of which you just learned or use others. This is the way of this fabulous character.

But for this you need to work hard, but first cook:
- bottle of suitable size and shape;
- napkins;
- stack;
- pVA glue;
- line;
- pencil;
- mass for papier-mache.

Beginning from below, the mass is glued for papier-mache stripes. Register at once two sides, forming mugs in the form of logs of logs.

Using the stack, make stripes on the doors, logs so that they pass the texture of the tree.

Make smaller doors details.

Let the house dries during the day.
Take the masses for the papier-mache window, shutters. Using stack, decorate them with carvings. We start making a attic, in the photo it is pink.

Such elements need to be made above the window and above the door, then we decorate the roof.

Having made a row from one and on the other hand, leave for drying, only after that make another tier.

Then perform the third row and pipe.

Using stack, make a brick drawing here, then give these elements roundness.

Upstairs the pipe will be another row. Then decorating the wall with mumoric clay with mumorists.

Leave the house for complete drying. After that you need to paint it.

Baba Yaga's hut is ready.
Dolls from papier mache do it yourself
It is not even believed that such wonderful works of art can be created from toilet paper.

To make such a snow maiden, take:
- empty glass bottle in the form of a trapezium;
- copper wire;
- pliers;
- mass for papier mache from toilet paper;
- rubber glue;
- polymer clay;
- cotton;
- elastic bandage or well-stretched canvas;
- scissors;
- paints;
- cloth for clothes;
- satin hair ribbon;
- rhinestones for decoration.

Cut from the wire pliers a piece, wrap them with the neck, so that the handles of doll dolls are from Papier Masha.

Weling with rubber glue an elastic bandage, wrap it with them.

Now lubricate this bandage on top of PVA glue, attach a papier-mache here, forming the chest and back of the doll.

From the same mass make your head for her.
To use less papier-mache, you first can crush the top wire with foil, then cover it with this mass, forming the facial features, ears.
Leave the workpiece to the end to dry, then squeak it, apply putty. After drying, it also needs to be treated with sandpaper.

To make hands, wet the wool with an aqueous solution of PVA glue, apply it on the wire. Wind with moistened with an elastic bandage or a strip of fabric. Make a polymer clay. Paint a doll using a bodily color, mark the eyes, eyebrows, lips with appropriate shades.

Slice for doll bottom skirt and dress, from cardboard. Reducing the satin ribbon of brown color, you will get such luxurious shiny hair. For the manufacture of a similar doll from Papier-Masha, a lot of time will be required, but the materials will cost a little, and which luxurious result will be waiting for you!

If you want to get acquainted with one sample, then see the second master class of this section.

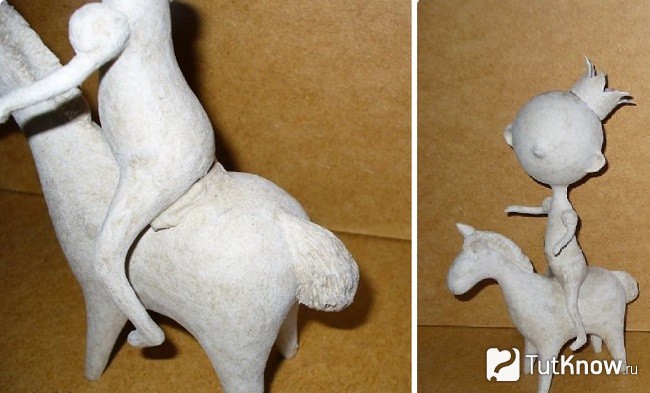
Here is such a wonderful doll on the horse you will succeed. For the manufacture of this duet you will need:
- toilet paper;
- wire;
- cardboard;
- styrofoam;
- durable fat thread;
- newspapers;
- foil;
- acrylic paints;
- foam ball.

Give a doll with the desired shape by placing a mass of papier-mache.

Making a horse. Bend the wire, as in the photo, wrap it with a foil.

Deliver this workpiece mass for papier-mache.

When she dries well, look in it two wire segments to make the legs of the animal.

Cover the top of the blank wet papier-mache. Give the horse to dry well. Now we need to be both billets add volume, for this we also use the papier of Masha, including to make the ears and the nose of the prince. And the ears of the horses produce from cardboard, cutting out the details of the corresponding form. Skarite billets.

Cut an excessive wire on the animal legs, add the mane, tail, and the muscle prince. From the cardboard, cut the strip with zigzag edges, plunder with it with newspapers, turn in the form of a crown. Daily papier-mache.

After the finishing grout, the doll's sandpaper will look like this.

Enclose the crown using papier-mache. We combine two heroes in the same mass.
For the platform, a piece of foam, which needs to be placed by newspapers is used.

Wheels cut out of the cardboard, taking a coin as a template. Also cover their newspapers and papier Masha.

Apply the same mass on top in 4 places of the trolley to attach the horse.

Okarite billets, then paint them.
Create them using all the same papier-mache technique. Want that on the Christmas tree we were melted here such fun hedgehogs, then proceed to creative work right now.

To create them, they will also need such materials that do not need to buy - savings are obvious. Take:
- two bushings from toilet paper;
- cones;
- mass for papier Masha;
- cotton discs;
- paints;
- plasticine;
- titan glue;
- two wooden skewers;
- tassel;
- sequins.

Disassemble the cones on scales, stick them on one side of the roll, as well as from the sides. Form the rows starting from below, placing the elements of the subsequent rows in a checker order. Use for this titanium glue.

At the beginning of the article you read how to make a mass for papier mache from toilet paper. You can use other similar materials, such as paper towels. In this master class, yellow wipes were taken for this, their color does not matter. Form the body and spout of the hedgehog from such a mass.

Give her to dry, make the front paws, attach them to the tummy, using all the same mass. Here are what interesting crafts for the new year 2017 are obtained. But while you need to give our hedgehog to dry well, then cover the handles and the tummy beige color, and then also brown. Crowd animals in the reverse order - first use brown tone, then beige or white. Then the hiring fur coat will be as if sorrodied by snow.

Make out of plasticine eyes, eyebrows, mouth, nose, cut out mushrooms, attach it between the animal handles.

If you want, you can make the lower legs for the animal from plasticine or plastic, placing them at the ends of the shoelaces, the middle of which is done through the upper hole. You can attach the bell tile so that the hedgehog makes the hedgehog made interesting sounds.

Here are such wonderful most interesting crafts for the new year you will have.

Close to them together with children. If the kids are difficult to do this, then tell them the interesting idea of \u200b\u200bcreating cakes from papier-mâché, which they will gladly return to life. Let the child makes such as a New Year's treats of their dolls, toys.
To do this, put next to him:
- foil;
- cardboard;
- two bowls;
- not a food spoon;
- newspapers;
- paper towels or cloth to wipe hands.
Shipping the table with newspapers in advance, cover it with a plastic film. Then the child does not steal the working surface.
Let it bloom or cut the newspapers into small pieces, put them in a separate container. You need to pour a holter to another. It is prepared as: in the pan, pour a glass of water, add 2 h. Flour or starch, mix. Put on the fire, bring to rapid boiling with intense stirring. Let the Clastier cool down, recover it in a bowl.
Let the child roll the balls from the foil.

From the sheet of cardboard it is necessary to make a box. Look in the scheme, how to cut its sidewalls, fold them, gluing.

Everything is ready, it's time to get to the manufacture of crafts for the new year with your own hands, the photo will show how to make it.

Everything you need lies on the table. Let the child roam the lumps in the foil in Cleaster, then attaches pieces of paper here.

Then you need to leave the cradle for a few days so that the glue is good. If this is not done, work can begin to mold.
When the cakes are well dried, let the child give the will of fantasy. Taking advantage of paints, small red pompons, finely chopped with colored pieces, will make such a festive treat for dolls.

When paint dries, it's time to place such cakes to decorate the toys.
In the same technique, you can make other children's crafts for the new year. With your own hands, they will coope the billets from the foil, which should be placed by pieces of the newspaper. This process has just been described. To attach a toy on the Christmas tree, at this stage you need to tie a lace or rope ring for carpets, as is done on the tip-photo.

This is followed by another 2-3 layers of Papier Masha from newspapers, after which the Christmas toys need to paint.

Now you can make dolls from papier-mache, New Year's toys from the same material, piggy bank. We offer to familiarize yourself with the process of manufacturing an apple. It turns out so realistic that guests should immediately be warned, and home that the fruit is not edible.
If you want to see how to make a lot of papier Masha, then look at the second story.
The artist Vally Nomidou creates its sculptures in the form of human paper shapes using the papier mache technique. Her sculptures are women and girls with anatomically realistic proportions But their external appearance looks unfinished, with open cavities in bodies where partially fastens their wire and supports wooden frame.

Man from Dad Masha
Figures from Papier Masha are made in an original human scale. To achieve such realistic, the author removes plaster cast parts of the body of the models. Already inside the cast, the author lays the paper layer behind the layers by sizing them - forming this way each part separately, which are then connected into the overall composition.

The frame is increasing from the inside with additional layers of paper and cardboard. Externally, it is additionally decorated with paper lace and wire.

External inclusion of work: translucent paper layers and newspapers, protruding wire, open cavities - this is a conceptual decision of the author, caused by a shocking impression. The combination of human form with this kind of elements does not characterize healthy human form cause a painful reaction.

Open cavities in the "bodies" of sculptures make the viewer, in curiosity, look inside.

Some work and immediately repeat only part of the person's shape - this is how the fragment of the person himself, a little hanging sadness, causing to think about the phonicity of existence.

This bulk figure of a person remained to be on a nothing not covered with a wooden frame instead of a full-fledged shape.

Of course, all this creates a little frightening impression, but all the same characters are made very skillfully.


From ordinary cardboard and paper, the volume figures made in the papier-mache technique repeating the human body look very realistic if it were not for their conceptual incompleteness.
Want your cottage to have a unique and unique landscape design? Then you will be helped with beautiful garden crafts that can be made with your own hands with minimal costs. - This is one of the most popular techniques that makes the figures of any size from newspapers or toilet paper. Learn with a master class, how to make crafts from papier mache for garden and garden.
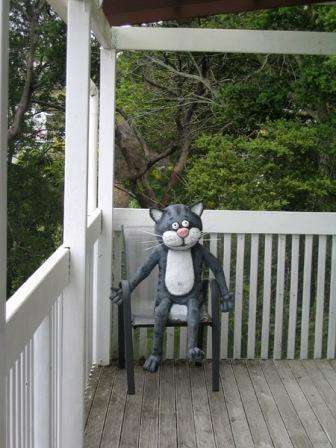
Master Class: Garden Figure Cat from Paper Masha
First you need to prepare the following materials:
- paste;
- paper or newspaper;
- scissors and tassels;
- cardboard;
- identical plugs from plastic bottles;
- painting tape;
- cardboard;
- putty;
- scotch;
- paints;
- plastic bottles.
To make a cat's head, you need to inflate the balloon and smear it with a cream. After that, bridge the newspaper on small pieces and start folding the ball, missing it with a hub with PVA. Try the layers to impose gradually so that there are no irregularities and the head turned out to be beautiful.

After that, you will need to leave your head for a few days so that it can dry. The balloon can be pierced and pull out, and then proceed to the further design of the head. To do this, you will need two identical caps from bottles that need to be fixed using a painting tape. It will be your cat's eyes from Papier Masha for a garden and a garden. You will need to make a spout of a large lid or foil.

Now cut out the ears from dense cardboard and secure them on your cat's head. With multiple paper layers, try to give the shape of the cheeks. Do not hurry, because all the details should be good to dry, so that then it was possible to handle them better.

In order to make a cat torso, you will need a basis, for example, a large plastic bottle. You can make a frame from plasticine, and then cover it in a papier-mache technique. When the frame dries, it will be necessary to cut it to separate from plasticine, and then glue.

Couple a head and torso with each other and dear the putty to hide letters on the newspapers. While the cape from papier-mache will dry, start making hands and legs. To do this, you can use newspapers that twist into rolls in several layers.


Recipes Papier Masha from toilet paper
Recently, needlewomen use toilet paper as a material for papier-mache. The fact is that even small details can be swallowed from the resulting mixture, so try

- Slow two rolls of toilet paper and put in a small container.
- After that, fill with water paper until it is completely covered.
- Put a saucepan with water and paper on fire and constantly stir.
- You must have a homogeneous mass, which then should be thrown into a colander.
- Squeeze the paper from the water well and take the weight of the blender to a homogeneous consistency.
- Lay out the mass on polyethylene and let it dry for half an hour.
- Then you need to pour out a mass for papier-mache into the container and add PVA to it.
- Mix the mixture well with the glue and begin to wash the crafts for the garden with your own hands.
We offer several photo ideas Papier Masha from toilet paper.