Many dads and mothers have not forgotten the cartoon about the cheerful and cute bee Maya since their carefree childhood.
Today's kids also enjoy watching entertaining episodes about this heroine. A master class and an understandable knitting pattern will help create Maya and enjoy a wonderful toy with your children.
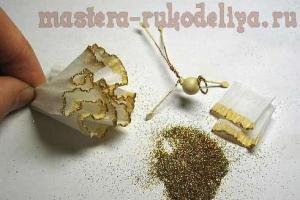
In addition to a little time and a little patience, you will need:
- a small ball of yellow yarn;
- very few black or dark gray threads for stripes and white for wings;
- synthetic winterizer;
- two doll eyes;
- hook, darning needle, scissors.
Abbreviations used in the master class:
VP - air loop;
RLS - single crochet;
The scheme of knitting the body of a bee


1 p.: Type 2VP crochet with yellow threads, knit 6 RLS of them.
2 p.: In each loop of the previous row, make 2 sc.
3 p.: 1 sc, from the next two loops - 2 sc.
4 p.: 2 sc, from the 3rd loop - 2 sc.
5 p.: 3 sc, 2 sc in the 4th loop, etc.
6 p.: 4 sc, 2 sc in the 5th loop of the 5th row.
7 p.: 5 sc, 2 sc in the 6th loop, etc.
8-9 p.: RLS with black threads.
10-12 p.: SBN with yellow yarn.
13 p.: 5 sc, then make decreases by knitting the 6th 7th loop together.
14 p.: Black yarn 4 sc, 5th and 6th loop together sc.
15 p.: With black yarn, knit RLS without subtraction.
16-18 p .: 4 PRS with yellow threads, 5th and 6th stitches together.
19-20 p.: Black threads 3 sc, 4th and 5th stitches together sc.
21 p.: With yellow threads 3 sc, 4th and 5th loop together sc.
22 r .: 2 sc, 3rd and 4th stitches together sc.
23 p.: 1 sc, 2nd and 3rd stitch together sc. Leave a few loops that remain as a result uncovered. Stuff the body of the bee with padding polyester.
Bee head and hair
 Maya the bee's head can be done in three ways:
- Crochet RLS separately the head, separately hair with elongated loops in the form of a hat and then attach it to the head.
- Start knitting the head with elongated loops and RLS, and then proceed to creating a face with ordinary RLS.
- Run the head of the RLS and sew the hair with a needle.
Let's use the last option.
1 p.: Type 2VP with yellow threads, then knit 6 sc from them in a circle.
2 p.: 2 sc in one loop.
3 r .: 1 sc, from the 2nd loop, knit 2 sc.
4 p.: 2 sc, from the 3rd loop - 2 sc and so on.
5 p.: 3 sc, 2 sc from the 4th loop, etc.
6 p.: 4 sc, 2 sc from the next loop.
7-10 p.: Knit all rows of RLS.
11 p.: 4 sc, 5th and 6th stitches together.
12 p.: 3 sc, 4th and 5th stitches together.
13 p.: 2 sc, 3rd and 4th stitches together. Fill the detail tightly with padding polyester.
14 p.: 1 sc, 2nd and 3rd loop together. Leave a few loops uncovered. Pull the thread from the yarn 15-25 cm in order to then attach the head to the body with a needle.
From the center of the crown of the head with a darning needle, begin to perform Maya the bee's hair. To do this, thread a needle with a yellow thread into one of the loops on the head, pull the thread and tighten it tightly with a knot. Sew all hair in the same way.
Maya's legs

1 p.: Dial 4 VP, turn the knitting back and forth and knit 1 RLS into each loop of the chain. Next, do the work in a circle, making 4 more scs along the same VP, but along the bottom.
2 p.: 4 sc, 5th loop - 2 sc, 4 sc, 9th - 2 sc.
3-5 p.: RLS, at the tops of the oval, make increments of 2 RLS.
6 p.: Make half of the RLS row, decrease 3 loops at the same time and continue to perform the RLS row.
7-14 p.: Perform the rows of RLS, making decreases by 2 loops in the center of the row.
15 p.: RLS, pull the thread 25 cm and cut it with scissors.
Perform the other leg in the same way. Stuff both legs with padding polyester.
Hands

1 p.: Close 2 VP, 3 RLS into a ring.
2-3 p.: Knit 2 sc from each previous loop.
4-6 p .: RLS.
7 p.: 1 sc, decrease. There should be 6 stitches in a row.
8-12 p .: SBN. Without closing the rows, pull out and cut the thread.
Bee wings


1 p.: Crochet with 3 VPs with white threads, knit them with three RLS, 1 VP. Turn the job over.
2-6 p.: Perform the rows of RLS, adding 2 RLS, 1 VP on both sides.
7-12 p.: RLS, making a decrease on both sides, 1 VP.
13-17 p.: See 2-6 p.
18-22 p.: See 7-12 p.
Antennae
 Connect 2 VP from black yarn into a ring, knit 3 RLS from them. Continue doing the rows in this manner until the antennae are of the desired height.
Nose
 Crochet 3 RLS with a yellow thread around the circle and, having made two such rows, finish knitting.
Assembling the toy
The final step of the master class will be the assembly of Maya the bee. To do this, sew the body with the head using the threads left. Attach the legs, arms and wings to the bee's body, the nose to the face, and the antennae to the hair. Glue eyes, sew mouth.


Thanks to the master class, cute and funny Maya the bee is ready!
Using the described master class, you can make various options for a fairy bee yourself. Change facial expressions, hairstyles, knit each finger on the handle, add jewelry or other elements. In addition, with the help of the same master class, you can make her friend Willie and other characters of your favorite cartoon for Maya.
Here is such a wonderful knitted toy a smiley bee will teach us how to make us a craftswoman with the nickname I Elena M.
A great handmade gift... And most importantly, it knits easily and quickly. and see what positivics. You can also experiment with faces.
Symbol:
RLS - single crochet.

Ponytail - At the beginning of knitting, leave a thread long enough to make a few stitches.
Description
Knit 7 stitches with black yarn, turn knitting
From the second loop from the hook of the loop 5 RLS, in the last loop 6 RLS, close them in a ring.
2 row- 6 increments = 12 PRS
3 row- 1 sc, 1 increase - repeat 6 times = 18 sc
4 row- (yellow yarn) 2 sc, 1 increase - repeat 6 times = 24 sc
5 row- 3 RLS, 1 increase - repeat 6 times = 30СБН
6 row- (black yarn) 4 PRS, 1 increase - repeat 6 times = 36СБН
7 row- 5 PRS, 1 increase - repeat 6 times = 42СБН
8 row- (yellow yarn) 6 RLS, 1 increase - repeat 6 times = 48СБН
9 row- 7 RLS, 1 increase - repeat 6 times = 54СБН
10, 11 rows- (black yarn) 54СБН
12, 13 rows- (yellow yarn) 54СБН
14 - 17 rows- (black yarn) 54СБН
18 - 20 rows- (yellow yarn) 54СБН
21 row- 7 sc, 1 decrease - repeat 6 times = 48 sc
22 row- 6 sc, 1 decrease - repeat 6 times = 42 sc
23 row- 5 sc, 1 decrease - repeat 6 times = 36 sc
24 row- 4 PRS, 1 decrease - repeat 6 times = 30СБН
25 row- 3 sc, 1 decrease - repeat 6 times = 24 sc
26 row- 2 RLS, 1 decrease - repeat 6 times = 18СБН, Stuff.
27 row- RLS, 1 decrease - repeat 6 times = 12СБН
28 row- decrease - repeat 6 times = 6 RLS Pull the hole, fasten the thread.

The tail turned out to be a little on the side and sticks out to the side. Now, using the thread that was left at the beginning of knitting, we place the tail as we like.

Before making out the face, we determine where the top will be. Where the tail "looks".

Spout
Knitted in a circle with black yarn.
First, a chain of 5 chain stitches
1 row- from the second from the hook of the loop we knit 3 RLS, in the last loop 3 RLS.
We continue knitting on the other side of the chain: 3 RLS, in the last loop 3 RLS. A total of 12 sc.
2 row- 3 RLS, increase, RLS, increase, 3 RLS, increase, RLS, increase. A total of 16 sc.
3 row- 16 sc.

Eyes
Both eyes are knitted with one piece in the shape of a trapezoid.
1 row- chain of 10 air loops
2 row- from the second from the loop hook we knit 9 СБН
3 row- 8 sc
4 row- 7 sc
5 row- 6 sc

We embroider the eyes along the contour in black, sew on beads-pupils, embroider the mouth.

Wings

Then it is imperative to run the line along the edge.
The photo below shows the difference. One wing is simply tied, and the other is already with a line.
We attach the fishing line to the edge of the wing and tie it with a crochet, at the same time grabbing the fishing line.

Antennae
We put 2 beads on the wire and give it the shape of an antennae, twist it.

Then we wrap the wire with a black thread. We fix it at the bottom, leaving a little for sewing.

Sew on antennae and wings and admire. You can tint your cheeks a little with blush. Done!

Many thanks to Elena for the master class.
Source liveinternet.ru/users/i_elena_m/post179796590/#
If you recommend my site to your friends and click on the social media buttons, I will be very grateful to you.
Copyright © Attention! Please use the materials of the site with a link.
A toy with your own hands is always valued an order of magnitude higher than a thing purchased in a store. Knitted toys for a child will bring only joy and goodness to the house. a bee with a step-by-step description will create an atmosphere of beauty and comfort in the house.
The size: height 20 cm.
Required: 50 g of residues of acrylic yarn of different colors, straight needles No. 1, circular needles No. 1, hook No. 2, sewing needle, synthetic winterizer, 2 beads, 30 cm of narrow ribbon, 4 pieces of thick wire.
Front surface: front rows - faces. n., purl rows - out. P.
Performance: a toy bee consists of separately connected parts: head, torso, legs, feet, arms, cap, antennae, shoes, wings.
Torso: start knitting from the bottom up. Cast on knitting needles with black yarn 5 sts and knit 2 rows from bottom to top with front satin stitch, adding loops from the broach (10 sts in total). Knit 2 sts with front satin stitch with yellow yarn. Then knit with front stitch, alternating color every 4 rows.
4th p.: Knit without additions (10 p.).
5th p .: evenly add 10 points from broaches (total 20 points)
6th p.: Knit without additions (20 p.).
7th p .: evenly add 10 points from broaches (total 30 points)
8th p.: Knit without additions (30 p.).
9th p .: evenly add 10 points from broaches (total 40 points)
10th p.: Knit without additions (40 p.).
11th p.: Evenly add 10 sts from broaches (50 sts in total)
12th - 27th rows knit with front stitch without changes. Starting from the 28th row, decrease the loops in this way:
28 p.: Evenly around the entire circumference, subtract 10 sts, knitting 2 sts together every 3 persons. p. (40 p. left).
29th - 31st p.: Knit without subtraction (40 p.).
32nd p.: Evenly around the entire circumference, subtract 10 sts, knitting 2 sts together every 2 persons. p. (30 p. left).
33rd - 35th p.: Knit without subtraction (30 p.).
36 p.: Evenly around the entire circumference, subtract 10 sts, knitting 2 sts together through each 1 person. p. (20 p. left].
37th - 43rd p.: Knit without subtraction (20 p.). Then knit the head with a flesh-colored thread.
Head: continue to knit with the front satin stitch with a flesh-colored thread.
1st p.: Add 5 sts evenly around the entire circumference, knitting 1 person at a time. n. from a broach (25 n. in total).
2nd p.: Knit without changes (25 p.).
3rd p.: Add 25 sts evenly around the entire circumference, knitting 1 st from the broach (50 sts in total).
4th - 28th p.: Knit without changes (50 p.).
29 p.: Evenly around the entire circumference, subtract 10 sts, knitting 2 sts together every 3 persons. p. (40 p. left).
30th p.: Knit without decreasing (40 p.).
P. 31: evenly around the entire circumference, subtract 10 sts, knitting 2 sts together every 2 persons. p. (30 p. left).
32nd p.: Knit without decreasing (30 p.).
33rd p .: evenly around the entire circumference, subtract 10 sts, knitting 2 sts together through each 1 person. p. (20 p. left).
34th p.: Knit without decreasing (20 p.).
35th p.: Evenly around the entire circumference, subtract 10 sts, knitting 2 sts together (10 sts left). Cut the thread, pull it through all the loops, pull off and fasten.
Hat: cast on the knitting needles with yellow yarn 58 p. Knit the 1st row on two knitting needles, and then distribute all the loops on 4 knitting needles and knit in circular rows.
2nd -19th p.: Knit with front stitch (58 p.)
20th p.: Evenly around the entire circumference, subtract 8 sts, knitting 2 sts together (50 sts left).
21st p.: Knit without subtraction (50 p.).
22nd: evenly around the entire circumference, subtract 8 sts, knitting 2 sts together (42 sts left).
23rd p.: Knit without subtraction (42 p.).
24th p.: Evenly around the entire circumference, subtract 8 sts, knitting 2 sts together (34 sts left).
25th p.: Knit without subtraction (34 p.).
26th p.: Evenly around the entire circumference, subtract 8 sts, knitting 2 sts together (26 sts remain).
27th p.: Knit without decreasing (26 p.).
28th p.: Evenly around the entire circumference, subtract 8 sts, knitting 2 sts together (18 sts left).
29th p.: Evenly around the entire circumference, subtract 9 sts, knitting 2 sts together (9 sts left). Cut the thread, pull it through all the loops, pull off and fasten.
Paws-pens: cast on the knitting needles with yellow yarn and knit tightly with the front stitch,
20th p.: Evenly around the entire circumference, subtract 2 sts, knitting 2 sts together (8 sts remain).
21st -40th p.: Knit without decreasing (8 p.). Cut the thread, pull through all the loops, fill with padding polyester, tighten and secure.
Feet-legs: cast on the knitting needles with black yarn and knit tightly with the front stitch.
1st - 19th p .: Knit with front stitch (10 p.)
20th p.: To form a knee, you must first add 1 st from the broach, then subtract 2 sts, knitting 2 sts together, then add 1 st from the broach again (10 sts in total). Where there is a decrease, a knee bend is formed.
21st-39th p.: Knit without subtraction (10 p.).
Boots: change the yarn to yellow and continue knitting with the front stitch.
40th - 42nd p.: Knit with front stitch (10 p.)
43rd p .: to form a heel, you must first subtract 2 p., Then add 2 p. From the broach, then subtract 2 p. Again (10 p. In total). Where the decrease is made, a heel protrusion is formed.
44th - 47th p.: Knit with front stitch (10 p.)
48th p .: evenly along the entire circumference, subtract 2 sts, knitting 2 sts together (8 sts left).
49th - 54th p.: Knit with front stitch (8 p.)
55th p .: evenly along the entire circumference, subtract 2 sts, knitting 2 sts together (6 sts remain).
56th - 58th p .: Knit with front stitch (6 p.). Cut the thread, pull through all the loops, fill with padding polyester, tighten and fasten.
Crochet along the top line of the shoes. Pull the inlaid edge of the leg, cut the thread and fasten.
Spout: with flesh-colored yarn, cast 7 sts on the knitting needles and knit 7 rows with the front satin stitch. Pull the thread along the perimeter of the resulting square and pull it off. Put a little padding polyester inside.
Wing: crochet the wire with white yarn with single crochets. Connect the ends during the strapping process. Fill the free space with sirloin mesh.
Antenna: grease the wire with PVA glue, wrap it with threads and fix it on the cap.
Assembly: make seams on the head and torso, fill them with padding polyester. Fasten the cap with antennae on the head. Sew on handles and legs. Strengthen the wings on the back. Tie a bow around your neck, attach pom-poms. Sew the nose and bead eyes on the front side of the head, embroider a smile with colored thread.
That's all the toy bee with your own hands is completely ready!
Provided by Yu.M. Sachik
Material taken from the magazine - Crochet Cozy House No. 19
We invite you to please the little cartoon lovers and connect the well-known characters of the cartoon "Maya the Bee".

Attention!
Copying site articles to other Internet resources, as well as to print publications is FORBIDDEN! Partial copying (announcement) of the article is allowed with a mandatory active link to the source. When selling toys related to the use of this master class, it must be indicated: "Linked by Anna Sadovskaya's MK, website."
You will need:
- Alize "Softy" (for each bee there are 2 skeins of yellow and one skein of black, it is enough for two bees). You can knit from any other thread - acrylic, cotton ... whatever your heart desires, just the bees will be of a different size
- for Willie's hairstyle you need a brown thread, I knitted from "Paula" by Richard Simon, choose the main thread you need by the meter
- hook number 2.25 or any other for your strings
- a little black cotton for antennae, the footage is about 200-250 m / 50 g, for them you will also need a chenille wire (about 30 cm for each bee)
- yellow fleece for Maya's hairstyle, a piece of 25x50 cm left me
- white fleece for the wings, inside I cut out the base of thin foam rubber, you can use thick plastic
- handles, legs and my head are on plastic mounts, the diameter of the mounts is 15 mm for handles (2 pcs.), 20 mm for legs (2 pcs.) and 35 mm for the head (1 pc.)
- filler (holofiber)
- glass eyes on a hinge, diameter 11 mm
- a little brown floss for embroidery of eyebrows and mouth
When using these materials, bees are 37 cm tall (without antennae)
You can ask any questions about the description on our forum
Abbreviations
sbn - single crochet
kill - decrease (knit 2 sbn together)
pr - an increase (knit 2 sbn from one)
ss - connecting post
vp - air loop
The toy is knitted in a spiral, without connecting posts and lifting loops.
The description of knitting this toy is compiled on the basis that the beginning of the row during knitting of the entire part does not shift and passes in an even line, but since we knit in a spiral, without lifting loops and a connecting column, the beginning of the row will shift to the right, therefore, every 4- 5 rows need to be knitted at the end of the row an additional offset column so that the beginning of the row is again in the same place. These additional columns are not included in the description of the rows.
Upper legs
Alize "Softy" yellow, hook number 2.25. The marker for the beginning of the row runs along the edge of the palm for the left foot and on the opposite side (near the thumb) for the right foot.
Fingers(for each hand 4 fingers, we do not cut the thread from the last)
1 row: 2 ch, 6 sc in the first loop (6)
2-4 rows (3 rows): 6 sbn (6)
Cut the thread, fix it. We knit 3 more fingers, we do not cut the thread from the last, we connect the fingers in the palm:
5 row: we continue to knit on the finger from which the thread was not broken: 3 sbn, 3 sbn on the second finger, 6 sbn on the third finger, 3 sbn on the second, 3 sbn on the first (18)
6 row: 12 PRS, PR, PR, PR, 3 PRS (20)
7-8 rows (2 rows): 20 sb (20)
For the left foot:
9 row: 3 sc together with the fourth finger, 17 sc (20)
10 row: 3 sc on the fourth finger, 17 sc (20)
11 row: sc, dec, 6 sc, dec, 9 sc (18)
12 row: (ub, 4 sbn) x 3 (15)
13 row: 15 sb (15)
14 row: 7 sc, dec, 6 sc (14)
For the right foot:
9 row: 7 sc, 3 sc together with the fourth finger, 10 sc (20)
10 row: 7 sc, 3 sc on the fourth finger, 10 sc (20)
11 row: kill, 6 sbn, kill, 10 sbn (18)
12 row: (ub, 4 sbn) x 3 (15)
13 row: 15 sb (15)
14 row: kill, 13 sbn (14)
We fill the palm with filler, you can not fill your fingers.
15-23 rows (9 rows): 14 sbn (14)
24 row: (ub, 5 sbn) x 2 (12)
25-31 rows (7 rows): 12 sbn (12)
32 row: 2 sc, run, sc, skip (hole for fastening), 9 sc (12)
33-34 rows (2 rows): 12 sbn (12)
We fill the handle with filler. Insert the mount into the hole of the 32nd row (I have 15 mm).
35 row: dec x 6 (6)
We fix the thread, cut it off.
Lower legs
Alize "Softy" yellow, hook number 2.25. The start marker runs down the middle of the heel.
1 row: 11 ch, from the 2nd loop from the hook: pr, 8 sc, 3 sc in the first ch, on the other side of the chain: 8 sc, pr (23)
2nd row: (pr, sc) x 2, 7 sc, 3 sc in one, 7 sc, (pr, sc) x 2 (29)
3 row: sc, pr, 2 sc, pr, 9 sc, 3 sc in one, 9 sc, pr, 2 sc, pr, sc (35)
4 row: (2 sc, pr) x 2, 11 sc, 3 sc in one, 11 sc, (pr, 2 sc) x 2 (41)
You can cut an insole out of dense plastic to fit the shape of the sole and then put it into the foot.
5-7 rows (3 rows): 41 sb (41)
8 row: sc, dec, 16 sc, 3 sc together, 16 sc, dec, sc (37)
9 row: 17 sc, 3 sc together, 17 sc (35)
10 row: sc, dec, 13 sc, 3 sc together, 13 sc, dec, sc (31)
11 row: 14 sc, 3 sc together, 14 sc (29)
12 row: 11 sc, dec, 3 sc together, dec, 11 sc (25)
13 row: 11 sc, 3 sc together, 11 sc (23)
14 row: 4 sc, dec, 4 sc, 3 sc together, 4 sc, dec, 3 sc, dec (grab one column of the next row, transfer the marker) (18)
We fill the foot with filler.
15-26 rows (12 rows): 18 sbn (18)
27 row: 4 sc, dec, 6 sc, dec, 4 sc (16)
We fill the leg with filler.
28-37 rows (10 rows): 16 sb (16)
For the right foot:
38 row: 3 sb, run, 1 sb skip (hole for fastening), 12 sb (16)
For the left foot:
38 row: 12 sbn, run, 1 sbn skip (hole for fastening), 3 sbn (16)
39-40 rows (2 rows): 16 sb (16)
We fill the leg with filler. Insert the mount into the hole of the 38th row (I have 20 mm).
41 row: (2 PRS, UB) x 4 (12)
42 row: dec x 6 (6)
We fix the thread, cut it off. We knit the second foot in the same way.
We start knitting with black thread. The row start marker runs down the middle of the back.
2 row: pr x 6 (12)
3 row: (pr, sbn) x 6 (18)
5 row: (3 sbn, pr) x 6 (30)
7 row: (5 sbn, pr) x 6 (42)
9 row: 48 PRS (48)
10 row: (7 sbn, pr) x 6 (54)
11 row: 4 sbn, pr, 7 sbn, vp, 1 sbn skip (hole for attachment), pr, (8 sbn, pr) x 3, vp, 1 sbn skip (hole for attachment), 7 sbn, pr, 4 sc (60)
Mark the holes for the fasteners with a contrasting thread.
12 row: (9 sbn, pr) x 6 (66)
13 row: 5 sc, pr, (10 sc, pr) x 5, 5 sc (72)
Row 14: 3 PRS, PR, 17 PRS, PR, 10 PRS, PR, 6 PRS, PR, 10 PRS, PR, 17 PRS, PR, 3 PRS (78)
15-16 rows (2 rows): 78 sc (78)
On a note: when knitting with textured yarn, very often you have to knit by touch, since the loops on such a fabric are very difficult to see. To reduce the time for bandaging (if a mistake is made), you can use an additional marker. When the row is large enough, I place a second marker that marks the middle of the row. If desired, mark every third or quarter of the row.
________________________________________
17-23 rows (7 rows): 78 sc (78)
We change the thread to black, do not cut off the yellow one, freely stretch it along the seamy side along the black rows upward, to the next yellow strip.
24 row: 78 PRS (78)
25 row: (11 PRS, UB) x 6 (72)
26-27 rows (2 rows): 72 sc (72)
28 row: 5 sc, dec, (10 sc, dec) x 5, 5 sc (66)
29-30 rows (2 rows): 66 sc (66)
We insert the fasteners of the legs into the holes of the 11th row, click into place.
________________________________________
On a note: plastic fasteners are quite difficult to snap into place, but there is one trick - lower the fastener in boiling water for 5 minutes, it will become softer and there will be no problems with fastening.
________________________________________


We change the thread to yellow, we do not break the black one, we freely stretch it along the seamy side along the yellow rows upward, to the next black strip.
31 row: 66 PRS (66)
32 row: (9 PRS, UB) x 6 (60)
33-34 rows (2 rows): 60 sbn (60)
35 row: 4 sc, dec, (8 sc, dec) x 5, 4 sc (54)
36-37 rows (2 rows): 54 sc (54)
Change the thread to black, cut yellow and fasten.
38 row: 54 PRS (54)
39 row: (7 PRS, UB) x 6 (48)
40 row: 48 PRS (48)
41 row: 11 sbn, run, sbn skip (hole for fastening), 24 sbn, run, sbn skip (hole for fastening), 11 sbn (48)
42 row: 3 sc, dec, (6 sc, dec) x 5, 3 sc (42)
43-44 rows (2 rows): 42 sbn (42)
We insert the fasteners of the handles into the holes of the 41st row and snap into place.
45 row: (5 PRS, UB) x 6 (36)
46 row: 36 sc (36)
We fill the body with filler.
47 row: 2 sc, dec, (4 sc, dec) x 5, 2 sc (30)
We fill it to the end. Insert the head mount (I have 35 mm). Unfortunately, I didn't find a plastic mount, so I used a cotter pin with a plywood disc.
48 row: (3 PRS, UB) x 6 (24)
49 row: sc, dec, (2 sc, dec) x 5, sc (18)
50 row: (sbn, ub) x 6 (12)
51 row: dec x 6 (6)
Cut the thread, fix it.

2 row: pr x 6 (12)
3 row: (pr, sbn) x 6 (18)
4 row: sc, pr, (2 sc, pr) x 5, sc (24)
5 row: (3 sbn, pr) x 6 (30)
6 row: 2 sc, pr, (4 sc, pr) x 5, 2 sc (36)
7 row: (5 sbn, pr) x 6 (42)
8 row: 3 sbn, pr, (6 sbn, pr) x 5, 3 sbn (48)
9 row: (7 sbn, pr) x 6 (54)
11 row: (9 sbn, pr) x 6 (66)
19 row: (17 sbn, pr) x 6 (114)
20 row: 9 sbn, pr, (18 sbn, pr) x 5, 9 sbn (120)
21-39 rows (19 rows): 120 sbn (120)
40 row: 9 sc, dec, (18 sc, dec) x 5, 9 sc (114)
41 row: (17 PRS, UB) x 6 (108)
42 row: 8 sc, dec, (16 sc, dec) x 5, 8 sc (102)
43 row: (15 PRS, UB) x 6 (96)
44 row: 7 sc, dec, (14 sc, dec) x 5, 7 sc (90)
45 row: (13 PRS, UB) x 6 (84)
46 row: 6 sc, dec, (12 sc, dec) x 5, 6 sc (78)
47 row: (11 PRS, UB) x 6 (72)
48 row: 5 sc, dec, (10 sc, dec) x 5, 5 sc (66)
49 row: (9 PRS, UB) x 6 (60)
50 row: 4 sc, dec, (8 sc, dec) x 5, 4 sc (54)
51 row: (7 PRS, UB) x 6 (48)
52 row: 3 sc, dec, (6 sc, dec) x 5, 3 sc (42)
53 row: (5 PRS, UB) x 6 (36)
54 row: 2 sc, dec, (4 sc, dec) x 5, 2 sc (30)
We fill it to the end.
55 row: (3 PRS, UB) x 6 (24)
56 row: sc, dec, (2 sc, dec) x 5, sc (18)
57 row: (sbn, ub) x 6 (12)
58 row: dec x 6 (6)
We fix the thread, cut it off.
![]()
Cut out blanks for a wig from yellow felt. We will need 11 parts # 1, 2 parts # 2, 3 parts # 3 and 8 parts # 4.

We apply detail # 1 to the head, outline the location and pin it with pins. Sew the detail to the head with a sewing thread to match. Leaving 2-3 cm unfinished, fill the resulting lock with filler. Sew up the hole to the end.
In the same way, we sew 4 more parts No. 1 along the perimeter of the head (5 strands in total).

We begin to form a line of "hair" growth on the face. We sew two more details No. 1 on the left and right sides of the face, stepping back a little up from the already sewn details.

Step back a little up again and sew on 2 parts # 2, on the left and right sides of the face. The top of all strands "tends" to the center of the head (last row).

Fill in the remaining space on the back of the head by sewing on 4 pieces # 1.

Sew on 3 parts No. 3, forming a bang from them, add 2 more parts No. 4 to the back of the head, in arbitrary places. From the remaining 6 parts No. 4, we sew separate, standing strands on the crown: we apply 2 parts with the front sides to each other, sew, but not completely, turn them over to the front side, add a little filler, sew up the hole. In the same way, we sew 2 more strands, sew them to the crown.


Alize "Softy" yellow, hook number 2.25. The row start marker in this part does not need to be aligned.
1 row: 2 VP, in the first loop 6 sbn (6)
2 row: sc, pr x 4, sc (10)
3 row: 2 PRS, PR, PRS, 2 PR, PRS, PR, 2 PRS (14)
4 row: 2 sbn, pr, 8 sbn, pr, 2 sbn (16)
5-6 rows (2 rows): 16 sb (16)
We fix the thread, cut it, leaving a small tip for sewing.
We begin to knit with Alize "Softy" thread, yellow, hook number 2.25.
1 row: 2 VP, in the first loop 6 sbn (6)
2 row: (pr, sbn) x 3 (9)
3rd row: 9 sbn (9)
4 row: (sbn, ub) x 3 (6)
We fill the resulting ball with filler.
Change the thread to black cotton, hook No. 1.5 and knit 6 sbn (without increments and subtractions) until the total length of the antennae is 13 cm. Cut the thread, leaving a small tip for sewing. We insert a senile wire into the antennae.
We knit the second antennae in the same way. Sew the antennae to the head.
Wings
Cut out 3 parts for the wings according to the template - 2 parts from white fleece and 1 part from foam rubber. Having laid the foam rubber between the parts of the fleece, we sew the wings over the edge along the entire perimeter, capturing both the fleece and the foam rubber.


We sew the wings to the back of the bee.
We knit the legs, body, nose and antennae in the same way as in Maya. We make the wings in the same way.
Alize "Softy" yellow, hook number 2.25. The row start marker in this part does not need to be aligned.
1 row: 2 VP (the first loop needs to be made larger, then we insert the fastener into it), in the first loop 6 sbn (6)
2 row: pr x 6 (12)
3 row: (pr, sbn) x 6 (18)
4 row: sc, pr, (2 sc, pr) x 5, sc (24)
5 row: (3 sbn, pr) x 6 (30)
6 row: 2 sc, pr, (4 sc, pr) x 5, 2 sc (36)
7 row: (5 sbn, pr) x 6 (42)
8 row: 3 sbn, pr, (6 sbn, pr) x 5, 3 sbn (48)
9 row: (7 sbn, pr) x 6 (54)
10 row: 4 sbn, pr, (8 sbn, pr) x 5, 4 sbn (60)
11 row: (9 sbn, pr) x 6 (66)
12 row: 5 sbn, pr, (10 sbn, pr) x 5, 5 sbn (72)
13 row: (11 sbn, pr) x 6 (78)
14 row: 6 sc, pr, (12 sc, pr) x 5, 6 sc (84)
15 row: (13 sbn, pr) x 6 (90)
16 row: 7 sc, pr, (14 sc, pr) x 5, 7 sc (96)
17 row: (15 sbn, pr) x 6 (102)
18 row: 8 sc, pr, (16 sc, pr) x 5, 8 sc (108)
19 row: (35 sbn, pr) x 3 (111)
20-28 rows (9 rows): 111 sbn (111)
29 row: (35 PRS, UB) x 3 (108)
30 row: 108 PRS (108)
31 row: 8 sc, dec, (16 sc, dec) x 5, 8 sc (102)
32 row: 102 PRS (102)
33 row: (15 PRS, UB) x 6 (96)
34 row: 96 PRS (96)
35 row: 7 sc, dec, (14 sc, dec) x 5, 7 sc (90)
36 row: 90 PRS (90)
37 row: (13 PRS, UB) x 6 (84)
38 row: 84 PRS (84)
39 row: 6 sc, dec, (12 sc, dec) x 5, 6 sc (78)
40 row: 78 PRS (78)
41 row: (11 PRS, UB) x 6 (72)
42 row: 72 sc (72)
43 row: 5 sc, dec, (10 sc, dec) x 5, 5 sc (66)
44 row: 66 PRS (66)
45 row: (9 PRS, UB) x 6 (60)
46 row: 60 PRS (60)
47 row: 4 sc, dec, (8 sc, dec) x 5, 4 sc (54)
48 row: 54 PRS (54)
49 row: (7 PRS, UB) x 6 (48)
50 row: 48 PRS (48)
We insert the body attachment at the beginning of the knitting of the head, click it. We fill our head with filler.
51 row: 3 sc, dec, (6 sc, dec) x 5, 3 sc (42)
52 row: 42 sc (42)
53 row: (5 PRS, UB) x 6 (36)
54 row: 36 sc (36)
55 row: 2 sc, dec, (4 sc, dec) x 5, 2 sc (30)
We fill it to the end.
56 row: (3 PRS, UB) x 6 (24)
57 row: sc, dec, (2 sc, dec) x 5, sc (18)
58 row: (sbn, ub) x 6 (12)
59 row: dec x 6 (6)
We fix the thread, cut it off.
![]()
The wig is knitted from three separate parts.
Richard Simon Paula Brown Hook # 2.25. The row start marker in these parts can be misaligned.
2 row: pr, 5 sbn (7)
3 row: pr, 6 sbn (8)
4 row: pr, 7 sbn (9)
5-7 rows (3 rows): 9 sb (9)
8 row: kill, 7 sbn (8)
9 row: 8 sc (8)
10 row: kill, 6 sbn (7)
11-12 rows (2 rows): 7 sc (7)
We fill with filler.
13 row: kill, 5 sbn (6)
14 row: 6 sbn (6)
15 row: kill, 4 sbn (5)
16 row: 5 sc (5)
We fix and cut the thread.
We knit the second same "hair".
We knit the third "hair" a little more:
1 row: 6 sc in amigurumi ring (6)
2 row: pr, 5 sbn (7)
3 row: pr, 6 sbn (8)
4 row: pr, 7 sbn (9)
5 row: pr, 8 sbn (10)
6 row: pr, 9 sbn (11)
7-9 rows (3 rows): 11 sbn (11)
10 row: kill, 9 sbn (10)
11 row: 10 sc (10)
12 row: kill, 8 sbn (9)
13 row: 9 sc (9)
14 row: kill, 7 sbn (8)
15 row: 8 sc (8)
We fill with filler.
16 row: kill, 6 sbn (7)
17-18 rows (2 rows): 7 sc (7)
19 row: kill, 5 sbn (6)
20 row: 6 PRS (6)
21 row: kill, 4 sbn (5)
22 row: 5 sc (5)
Cut the thread, leaving a small tip for sewing.
First, we sew three parts together, placing them on top of each other, a longer strand in the middle. Then we sew the wig to the head, positioning it slightly at an angle.

Registration
Sew on the nose, stuffing it a little with filler. Cut out two circles (for Maya) or two ovals (for Willie) from white felt - these are the whites of the eyes, sew on. We embroider the mouth, Willie embroider the eyebrows, sew on the eyes. You can slightly tint the cheeks and the upper contour of the eye.