Modular origami "Swan double" is an improved version of the conventional modular swan, its difference is that it has very graceful double wings, which makes it an amazing fairy creature. Such a swan gives a real scope for the flight of imagination: you can make wings of different colors, add patterns on them or paint them in a special way - everything is in your hands!
The basis of this swan, like all similar works, is triangular modules. If you suddenly forgot how to add them, then this diagram will remind you:
How to build an origami module?
First, fold the paper rectangle in half.  Now bend and unbend it again, marking the middle line
 Now fold the edges towards the middle.
 Turn over.
 Raise the edges from bottom to top.
 Bending the corners over the large triangle, bend them.
 Unbend again.
 Fold the small triangles back along the marked lines and lift the edges up.
 Fold the resulting triangle in half.

You have got a module with two corners and two pockets.

If you make a lot of such modules, then with the proper level of skill and imagination, you can assemble almost any figure from them.
Now, how do you assemble an origami modular "double swan"? Get ready that this work will take you more than one day. First, collect the modules. They will be needed as much as 1502 modules. If you want to make a one-color swan, then all these modules must be white (or whatever color you like best). If the swan is two-color, then there will be 1322 white modules, and, for example, pink - 180.
As always, the modules are assembled in this way.

Assemble a round base of thirty modules by attaching them to each other. In this way, lay out five modular rows.

Do not stop at what you have reached, continue to fasten the modules until you have accumulated fifteen module rows. In the course of work, do not forget to slightly stretch the body of the swan to the sides to make it more voluminous. When fifteen rows are ready, you can divide the body into wings, neck and tail. For the tail, you will need four modules to start, six for the neck and ten modules for the wings. Collect rows, reducing the number of modules by one, as shown in the figure.

On both sides, start assembling the wings, attaching the modules in this way. Collect modules until you have ten rows.

It will be more convenient if you collect two wings at the same time. Then it is easier to make sure that they are symmetrical.

When ten rows are ready, continue to recruit rows, while reducing the number of modules in each new row by one module, and so on until there is only one triangle at the top. This was the largest and most difficult part of the swan, it will be a little easier further.

If you want the swan to be stable, glue it to the stand, which looks like the very first row from the beginning of the master class.

We collect the second and third part of the swan
The main part of the swan is ready and you need to start working on the "inner" wings. There are twenty modules in one row, seven rows in total.


Now divide the workpiece into two wings, each with ten modules.

Three more rows - like this:

"The Swan Princess" and "Wild Swans", "Geese-Swans" and "Swan Story" - how many fairy tales about this amazing bird do you know? Do you know how to make a paper swan to tell your baby your story in pictures about a mythical bird? However, an elegant paper swan is not so much a toy for children as recognition of loved ones in the most tender feelings. The bird was endowed with romantic meaning in legends, in most of which it is a symbol of loyalty and endlessly devoted love. Presenting a figurine of a paper swan as a gift, we still talk about the main thing without saying a word. The symbolic bird will tell about everything by itself.
Before you learn how to make a paper swan with your own hands, we just barely touch on the topic of the meaning of a unique bird in different parts of the world. So in India, for example, the figurine of a paper swan symbolizes the universal birth. And the Slavs saw in an elegant bird a sensual feminine principle - a graceful amulet of the family hearth. The Celts considered the bird to be the rebirth of human souls, and in Greece, the origami swan from paper still personifies the divine principle. The Europeans considered the big swan to be a true symbol of immortality - a stage in the purification of the soul before returning to human incarnation. In general, there is no part of the world where swans would remain undeservedly forgotten.
Materials and components
We will show you how to make origami a swan according to the classic generally accepted technique (not to be confused with). You will need an ordinary square sheet of any desired color (classic - white and black for a swan pair). The size of the sheet determines how large your craft will be. Plain paper can be replaced with soft corrugated paper - the silhouettes of the figures will become more realistic, almost animate. You can make a swan from table napkins, since there is no shortage in their colors now either. You can decorate the eyes and wing lines (optional) with a simple felt-tip pen or watercolors.
In fact, the choice of material for this craft is entirely up to you. If you want, take a foil or a starched square towel (conveniently folds, more common among European hoteliers). You can rehearse on a piece of newspaper. Do not forget that one swan is usually not done, so as not to trigger loneliness. The bird is steamy, so immediately plan the second half for it. You can collect a swan in greater numbers, and then arrange the products into a single pendant or table decorative composition, and also use the figurines as details of the original dinner setting.
3D folding scheme
Consider how to make origami a swan by basic scheme... It will be a voluminous, feathered 3D, able to stand on its paws, spreading its spectacular wings. Understandable step-by-step instruction will allow you to fold the figure in stages without much difficulty, even for beginners in the origami technique. Be sure to involve the kids in the process. Shall we start our instructive workshop? Work boldly, sparing no paperwork, and everything will work out the first time.

- You probably know how you can select a square from a standard A4 office sheet: bend its small edge to a larger one, forming a corner fold, and cut off the excess with scissors. Then work with the sheet step by step, without haste;
- Press through the diagonal folds of the square (starting geometry) for easy folding. Next, we will work through the sheet along one of the diagonals. Place the workpiece in front of you, as shown in fig. 1;
- Following the instructions in the pictures, fold the diagonal corners on top, orienting the edges in the center of the sheet. The top corner of the workpiece will become sharper than the bottom. You can continue folding according to the pattern or slightly change the procedure (see below);
- Turn the bundle upside down with the front part, and then again sharpen the already sharper corner of the workpiece with the folds of the upper planes with the edges towards the center. Now you need to fold the bundle horizontally almost in half, but without bringing the upper and lower corners together (not "reaching" 2-2.5 cm);
- We bend the sharp "nose" towards ourselves - this is the head of the future paper bird. Now we fold the entire structure along the vertical axis in half from ourselves. All that remains is to take and straighten the neck (and head), unfold the swan's wings and put the bird on its "rib-legs".
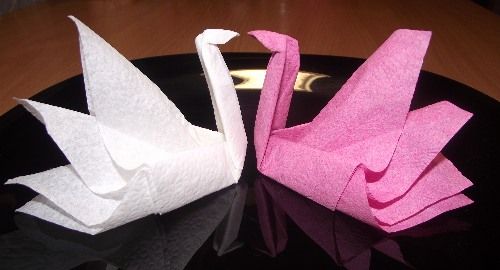
The step-by-step assembly of the basic model of the noble feathered is completed. It's time to make a worthy pair for an elegant swan. This time, take paper napkins to work and hone the skill at random - proportions by eye. It will be useful not only for housewives for aesthetic table setting, but also for young people on a romantic date, it will always come in handy - every girl will be pleased to receive such an impromptu gift. And then young dads will have something to teach their baby.
Swan napkin holder (candy bowl)
Now we will consider a practically useful option - we will undertake to make a swan out of paper, which will serve as a spectacular stand for napkins or a small candy holder (business card holder, paper clip - whatever you wish). Making this paper swan with your own hands is almost easier than the first "basic" model of a noble bird. Use a colored square sheet and proceed according to the step-by-step layout:
- Press the square sheet along the diagonal guidelines, sharpen the corner along one of the diagonals by bending inward 2 planes (just like in our first scheme), then turn the product face down;
- Connect the far corners by bending the workpiece in half along the horizontal axis. Change the front again, and then unfold (and squeeze) the peculiar pockets on the bottom. The figure will now have 2 conical corners - sharp and even sharper opposite;
- Change the front again, positioning the workpiece with an acute angle downward. At the top, you will see a horizontal reference fold. Bend the uppermost corner (any of the 2) to the reference fold, marking an additional edge of the marking;
- Bend the lower sharp corner of the workpiece up, bringing it to the additional marking edge. Continuing to work out the lower limb, bend its "nose" towards you, focusing on the central axis of the convolution - this is the planned head of the future bird;
- Fold the entire structure on the vertical axis away from you - paper origami "swan-napkin holder" is almost complete. Straighten the neck and head of the feathered bird, bend the bird's legs from below to both sides;
- If you want, give the wing-pockets a complex geometric shape (optional) - the boxes will become curly.
It remains to open the wings-boxes and fill them with a scattering of sweet dragees or insert table napkins into the wings-pockets - at your discretion. To decorate wedding table these swans can be made from white paper. At such a celebration, they will become an inexpensive, but very aesthetically advantageous accessory. And also candy birds can be made of multi-colored foil - they will keep their shape better if there are many sweet teeth in the family, in whom the swan will have an obvious high interest. Do not be upset if such a candy bowl soon becomes unusable. Making a new one is no longer a problem for you. Moreover, with each new swan, the figures will become even more successful - the skill will be developed.

Modular origami is a technique that allows you to make amazingly beautiful volumetric figures from paper. The difference between this technique and classic origami is that not one, but several sheets of paper are used to create crafts, from which modules are made, which, in turn, are folded, forming the desired figure.
One of the striking examples of the technique is the swan from triangular modules... As a result of simple, but rather painstaking work, you can get a beautiful bird. Depending on what color paper you have at your disposal, you can make a white or colored rainbow swan from modules.
Looking at photographs of ready-made figures, it is even theoretically difficult to imagine how to make a swan from modules - it seems to be very difficult and intricate. In fact, there is nothing difficult in making figures, it is enough just to study in detail the master class on making a swan from modules with an assembly diagram and consistently follow the steps described there.
We bring to your attention a detailed guide, consisting of two stages - the manufacture of components and the assembly of the finished product.
How to make a swan from modules?
First you need to make the modules. To do this, you only need sheets of plain xerox paper, white or colored, depending on what you want as a result.
Working process:
- We bend a sheet of A4 paper in half in width.
- Bend it in half again.
- And bend it in half again.
- Expand and flip so that the fold lines are vertical.
- Fold the sheet in half again, but in a different direction.
- And fold it in half again.
- We unfold and cut or break the sheet along the fold lines so that we get 32 \u200b\u200brectangles.
- Take one of the rectangles and start making the module.
- We bend it in half.
- Now bend across the first fold line.
- Unfold and fold the bottom corners inward towards each other.
- Fold the top corners as shown in the photo.
- Now bend the top down to form a triangle in the end.
- We fold the resulting triangle in half.
- We repeat the same actions with other paper rectangles.
- We got a triangular module with a pocket so that we can insert another into it.


How many modules do you need for a swan?
The number of blanks directly depends on the assembly scheme and the size of the future bird. For example, the assembly diagram below uses 458 white triangles and one red one. By reducing their number and simplifying assembly, you can get a small swan from modules.
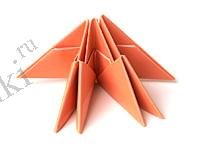
Assembling a swan from triangular modules
- We arrange the three modules in the order shown in the picture.
- We insert the corners of the two upper modules into the pocket of the lower one.
- In the same way, we attach two more triangles to the structure.
- Insert 3 pair of triangles into the outer modules.
- Then we proceed in the same way.
- Using 30 modules, we get this design.
- We add 3 more rows, in total there should be 5 rows of modules.
- Pressing on the structure in the middle, we turn it inside out.
- We bend the edges up so that the bowl learns, as in the picture.
- Bottom view of the structure.
- By the same principle as before, we put on the 6th and 7th row of modules.
- Starting from row 8, we proceed to the construction of the swan wings. To do this, put on 8 next to 12 modules, skip 2 and attach another 12. In the place where 2 triangles are missing, there will be a neck, in the remaining section of the 7th row there will be a swan's tail.
- In the 9th row, each swan wing is reduced by 1 triangle.
- We continue further, with each row reducing the wings by 1 until there is one module left.
- We make a tail, similarly reducing the row by 1 module.
- For the neck and head, we take 19 white and 1 red module in which we glue the corners so that we get a beak.
- We begin to collect the neck, putting the corners of one module into the pockets of another.
- We bend the structure with a crochet.
- The final step is to insert the neck into the gap between the swan's wings.
- The swan from paper modules is ready.


You can make other crafts from modules, for example,
The swan is a noble bird that personifies loyalty, devotion and spiritual purity. Many homes have swan-shaped décor elements. People believe that this symbol will preserve their well-being and family peace. A swan made with his own hand has more strength and energy. Therefore, today we will tell you how to make a paper swan with your own hands.
Origami swan made of paper: a master class for beginners
If you are just now starting to work with paper in this direction, then lightweight designs are suitable for you. Try to make a swan like this.
1) Fold a square sheet of paper in half diagonally, then straighten it.
2) Bend the two untouched corners towards the center.

3) Bend the resulting corner so that the tip slightly crosses the line of the bent sides. Bend the tip halfway and fix.

4) Turn the workpiece over and bend it diagonally. Pull your head and position it at the desired height.
5) Bend the tail down, then bend the tip up.
6) Peel back the wings and the simple swan is ready.

Crafts for beginners from paper do not take much time and materials. The made figures can be given to the child for play, or you can put them on your desk for distraction in between work.
Swan with double wings
There is a step-by-step assembly of a swan, similar to the first, but with double wings:
- Bend the square diagonally, straighten it.
- Fold adjacent corners to the middle along the diagonal line.
- Fold the sides of the resulting triangle by one third.
- Bend the resulting corner a little more than half. Fold back the corner that will be the swan's head.
- Fold the workpiece in half, fold the tail, and spread the swan's wings.

More on video:
Origami swan made of paper from modules (for the more experienced)
- The large swan, which looks like a real work of art, is made by folding in parts. To design a bird figurine, prepare the modules that will make it up:
- Fold the rectangular sheets (4X6 cm) in half.
- Fold the resulting rectangle vertically.
- Fold the corners along the vertical fold.
- Bend the lower free parts up, bend the corners inward along the large triangle.

There are 459 such modules, where one should stand out in color, like a beak. Other triangles can be any color: white, black, or multi-colored. When all the elements are ready, you can get to work:
1) Take three modules and insert the corners of two into the pockets of one.


2) Take two more elements and attach to the first three from the side.
3) In this way, collect the entire row of 30 modules. The first circle consists of two rows.

4) In a checkerboard pattern, put another 30 pieces on the resulting circle. There should be five rows.

5) Take the workpiece and push it in the middle, as if turning it inside out. On one side, a vase should turn out, and on the other, a flat stand.


6) Turn the workpiece over with a vase and continue working. Put on the sixth row (30 modules).
7) The seventh row should be 24 modules. To position them correctly, choose the side where the neck will be attached. Leave two corners from two different modules. The rest begin to fill in parts of 12 on each side.
In this lesson, you will learn what is modular origami and a diagram of the assembly of a double swan will be presented, which you can assemble with your own hands.
Modular Origami - Double Swan
Is it possible to make it memorable without spending a significant amount of money or without possessing some special skill and skills? Many will say no. But the master class given in this article once again confirms the truth of life: nothing is impossible! With it, you can make a truly wonderful and wonderful gift with your own hands. And not just a gift, but a real small masterpiece that will take its rightful place in the house of the future owner and will leave this day in memory for a long time.
All you need for this is a small stack of sheets of plain A4 paper and patience, with the last component being the determining one. But let's talk about everything in order.
So, as it already became known, our gift will be a paper swan. But how to do it, and by what technology, you ask? Everything is very simple. It will have to be assembled from small component parts - modules, and this technology is called "modular origami".
Modular origami - a fascinating way of creating, which appeared for the first time in China, and based on the assembly of various figures from a large number of identical parts (modules). Modules come in different types, but usually (as in our case) the classic version is used - triangular. They are made according to certain rules that allow them to be connected by nesting one into another. The resulting frictional force prevents the modules from falling apart, making the overall structure strong and, at the same time, flexible and resilient.
To get a classic triangular module, you need to cut an A4 sheet into 32 equal parts. This can be done by methodically bending the sheet in half, and cutting it along the fold line with a clerical or any other sharpened knife. Now that the "material" for the origami module is ready, we begin its direct production. Details of this process can be found here:
We figured out how to make the modules, we proceed directly to the manufacture of the paper swan itself. This is what the finished shape looks like:

And here is what the material from which it will consist looks like:

Yes, it is not without reason that we mentioned patience at the beginning of the article. To make such a large pile of modules it will take a lot. But at the same time, it is not necessary to make all origami modules at once. The process can be extended over several days or weeks. And if you have relatives and friends who are ready to help, invite them to work hard for a common cause. After all, working together is much more efficient. In addition, for children, such an activity will even be useful, since it develops certain skills, perseverance and hand motor skills. Turn the process of creating modules into a fun game and time will fly by!
As you can see, a total of 1502 modules are required to create a swan. If you want to make it white, they will all be made of white paper. But you can experiment with color. For example, in the swan, which is indicated in the master class, 1322 white and 180 pink modules were used.
Well, if you nevertheless decided on a feat and mastered 1502 modules, you can proceed to the most interesting! We begin the process of assembling origami from paper modules. Let's break it down into several successive stages.
1. We connect 2 modules in this way:


3. We continue to add rows of modules. 5 rows are done.

4. Made 10 rows. In the process, we slightly bend the workpiece inward, giving our base a slender look.

5. Add 5 more rows and stop, continuing to bend and stretch the workpiece, so that later our swan is slender and well-fed.

6. Now that 15 rows are assembled, proceed to create the neck, tail and wings. The neck will take 6 modules, the tail - 4, and the wings - 10. Let's start with the neck.

7. Collected the neck.

8. Begin to collect the tail exactly opposite the neck.

9. Move on to the wings. The first row of each wing consists of 10 modules.

10. We begin to make the second row. Here, from the side of the tail, it is necessary to dress the module in the manner shown in the figure below.

11. We continue to dress the modules in the same way, spending 10 pieces for each row.

12. Gradually raise the wings of our swan to 10 rows. We do both wings at the same time, observing that the height of each row is at approximately the same level.

13. When raised by 10 rows, for each subsequent one we spend 1 less module.

14. As a result, you should get such a product, consisting of 770 modules. The lion's share of the work has been done, with which we congratulate you.

15. For the stability of the structure, we will make a stand. We put the modules on glue, and we try to do it evenly so that our swan can subsequently stand firmly on its “feet”.

16. When the first row is dry, glue the second.

17. Moving on to the second component of our gift - the inner wings. We are starting to do it according to a similar scenario, only there will now be 20 modules in a row.

18. We make 7 rows, pulling out the workpiece in parallel.

19. We begin to raise the wings. Let's select 10 modules for each.

20. Raise 3 rows, as shown in the picture.

21. After that, we begin to reduce each subsequent row by 1 module.


22. As a result, these are the inner wings!

23. We begin work on the third component. The scheme is the same, but there are now 12 modules in a row.

24. Raised 6 rows.

25. In the 7th row, we use 1 module less, thereby dividing it into two parts, and after that we reduce each subsequent row by 1 module.

26. The final insert is ready!

27. Now that all the components are done, we begin to put them together.

28. If the inner wings come in with difficulty, insert them slowly, gradually spreading seat at the base.

29. The third insert may also not enter smoothly, gradually push through it. If it doesn't work, you can put it on glue.

30. With the neck, you have a lot of room to maneuver. We recommend starting with 3 or 4 modules. Their number here may differ - you yourself choose the degree of cervical bend. You can also put the first few "basic" rows on glue to prevent this part from breaking off.

That's it! The swan is ready!
You can decorate it if you want. But you should not be very zealous in this matter. Few ribbons, a bow and a minimum of other decorations. Although without all this, your swan will look great, believe me!
Give your loved ones and loved ones good gifts... And what could be better than handmade, which has always been valued and will be most appreciated? After all, after all, a piece of your soul and efforts is put into it!

No less interesting articles:
And here is a video on this topic: