For many people, creating comfort in their apartment is a very important moment. You can decorate your home with modern figurines, paintings, flowers, everything that is sold in the store for your home. But if these jewelry are made by hand, then it warms the soul of the creator of such a thing even more. The most pleasant souvenirs are felt crafts, they are soft, fluffy and more like real animals.
Personally, I find it most pleasant to make animals out of felt, they turn out like real ones. Here are some animal patterns.
Turkey
Hares

Lizard - gecko

Owlets


Craft from felt with patterns: clever owl
We will print the patterns and attach them to the felt, cut out the necessary details.


We cut out all the parts of the owl, decorate it with flowers and apply blush.

Now we glue the fabric to the felt and glue the braid at the place of their connection.

You can use buttons as eyes, cut out felt circles or embroider directly on the face.

We chose the option with cut out felt, sew on the eyes.
We make wings.

Sew the felt with the fabric and lightly fill them with padding polyester.

We sew all parts of the owl with a overlock stitch.

Sew on the back of the owl (back), leaving a hole to fill it with padding polyester.
We finish sewing the owl's head and decorate it with something, it can be beads or embroidered decorative elements. We remind you that the topic of today's article is p dressings made of felt, patterns with your own hands.

Our little owl is ready.
Patterns of flowers from felt
Now I offer you some flower patterns.

8 flowers from largest to smallest,

5 colors, from the smallest to the largest,

The pattern consists of 3 flowers, which all come together to form one lush flower.
Consider in more detail floral felt crafts patterns and patterns.

Using the last pattern, we cut out the component parts of the flower.

cut out details from red felt, flowers of different sizes, depending on the level of their location. You can sew each flower along the edge, you don't have to, at your discretion.

We put the flowers on top of each other to reduce the size and sew them in the middle, as tight as possible so that the flower deepens in the center. A circle of gray felt will serve as the core; it will simply need to be glued to the center of the flower. You can additionally decorate the flower with embroidery or beads.

The flower is ready, it remains only to sew either an elastic band to the flower, if it will serve as an ornament for the hair, or attach a pin, if it will be a brooch.
Craft from felt with patterns: cat
Children will be interested in making animals such as puppies, kittens, chickens and the like with their own hands. To make an elegant and impressive cat with your own hands, let's see the cat patterns presented in separate parts: tail -
New Year's holidays, St. Nicholas Day, Christmas are approaching. These are the most beloved holidays of our children. After all, they are associated with receiving gifts. If you want to please your beloved child with something original, soft to the touch and pleasant, we can give helpful advice: Sew the baby hare out of felt.
This is a favorite children's character in many fairy tales and cartoons, and it's very easy to sew it. Let's see why recently the use of felt for children's crafts, making soft toys has gained such popularity.
What is felt
This soft and fibrous material is made on the principle of felt by heating, moistening and bonding the fibers of sheep's fur with an admixture of rabbit fur. Now they produce natural, semi-artificial and fully synthetic felt. It is sold in separate small sheets in sewing accessories stores.
He fell in love with hand-made masters because it is very easy to construct handicrafts from it, the material is malleable, does not crumble, it can be cut like paper, glued, stitched. For making crafts, you can choose any color and shade, which makes it an absolutely irreplaceable material for handicrafts.

You can make both appliques and toys from sheet felt. Wall panels look elegant. In the article we will look at how you can quickly, beautifully and interestingly create a toy hare out of felt. Let's talk in detail about necessary materials, on how to make a pattern and fasten the parts together.
Drawing a pattern
Any craft production begins with a drawing or pattern. You don't have to be a professional artist and have incredible talent to do it. It is enough to have a computer and the Internet.

After choosing a picture with the outline of a hare, you need to print it and transfer it to cardboard. Cutting the image along the contour, we get a ready-made pattern. Such an image must be transferred twice to a felt sheet according to the template. For the second time, the template will just need to be turned upside down.
You will get two identical parts that you just need to sew along the edges with thread. You can take a beautiful shiny floss thread. In order for a felt hare to be voluminous, you need to fill it through a small hole with cotton wool or synthetic winterizer, and then finally sew it.
Work on decoration
To make the toy bright and like the baby, you can decorate it in other colors. In the middle of the long ears of the hare made of felt, you can insert thin ovals of pink material. Make a white muzzle, black nose and eyes. Attach a mustache sticking out to the sides, which can also be made of felt, only by cutting the material along the edge, such as a fringe.

Instead of eyes, you can sew on black round buttons. And sew the small features of the muzzle with threads. Separately, you can make an orange carrot with green tops for a felt hare with your own hands.
Now let's look at another toy character, which is made of pieces connected together.
Bunny from separate parts
You can make a hare from felt as a toy not whole, but from separate parts. The body is presented in the form of a matryoshka: two circles - one larger, the other smaller, connected by concave smooth lines. After drawing the template, its contours are transferred to felt, folded in half. All parts are paired, so you can cut out the parts by folding the sheet in half at once.
The feet consist of two ovals of the same size. They are larger for the legs than for the hands. It is easy to draw a carrot, as well as leaves.

As you can see, it is very easy to sew a hare from felt. You don't need to be an artist to paint such light details in a regular shape. Since felt is a material that does not crumble, overcasting is not necessary. Pink heels for the animal can be simply glued. The rest of the details are sewn with threads. Instead of eyes, two black round buttons are sewn.
from felt
Such a cute bunny can be made using patterns from several parts. The finished templates are transferred onto felt sheets. Details are sewn from the inside from the wrong side so that the joints are not visible. The volumetric parts are stuffed with cotton wool after almost complete stitching and turning out. The filler is stuffed into the remaining slot with a stick. Only then the detail is sewn up to the end.

To make the tail, a circle is cut out of felt, and a cotton ball is placed in its center. Stitches are pulled along the circumference of the pattern with a simple gray thread, then it is pulled tight and a knot is tied.
After transferring the ear template and cutting out the parts from the material, you need to sew the dart from the wrong side. Then they are sewn together, also from the inside out, paired parts and the workpiece is turned inside out to the front side. Then cotton wool or synthetic winterizer is stuffed with a long stick, then not much, the ears should not be thick.
The muzzle and heel pads are made in white or light gray to contrast with the main shade.
It remains to sew on the eyes-buttons and make black spot for the nose. You can simply glue it onto the tip of your nose by cutting a circle out of black felt.
Whole bunny
Such a small hare made of felt with your own hands can be made as a pendant for a child on a backpack or women's bag. This is a very fashionable trend now. This is a one-piece bunny that can be cut simply along the outline drawn on the cardboard.
Even small child able to complete this task, and even a hand-made master can do it all the more. Then the resulting template is transferred to the fabric and cut out of a sheet bent in half with scissors. The edges are not completely sewn together, you must remember to leave a slot for the filler. Since the figurine is small, you don't even need a stick, this task can be done with your fingers.

To make the bunny colorful, you can add small details to it. To make a ponytail, you can make a pompom from pink knitting threads.
Let us remind you how to do it. You will need two cardboard rings and pink yarn. Details made of cardboard are wrapped with threads and threaded through the central hole. When everything is completely wrapped, a knot is tied and the threads are cut. To do this, you need to thread scissors between the rings and carefully cut everything. A simple thread is passed between the rings and a strong knot is tightened. Then the cartons are cut and the pompom is pulled out. If the threads stick out unevenly in different directions, then after production they are trimmed.
You can embroider a nose with pink threads. It remains only to attach the eyes-buttons. To keep the hare on the child's bag or backpack, you need to sew on a chain or rope with a metal key ring. Everything, the craft is ready!
Conclusion
Now you know how to make a hare out of felt different ways... It can be a large toy or a small bag keychain. But all felt products are easy, pleasant and simple to sew. And you can make a pattern using templates, hand-drawn or printed from the Internet. It's not difficult at all. So good luck with your work!
Good day friends!
I want to devote today's article to felt toys. Such toys have become popular not so long ago, but many mothers and children have already fallen in love with them. And this is not surprising because such crafts have a lot of advantages.
For example, felt is a natural material that is made mainly from sheep's wool. It is very convenient and easy to work with it, it does not crumble and does not need to be processed.
Products made of felt are soft, bright and varied, and most importantly, safe and suitable for any age without restrictions.
Every normal parent cares about the health and safety of their child, and approaches the choice of toys responsibly.
So I prepared detailed master a class for creating toys from felt, as well as templates with patterns for different toys.
Such toys can be created by adults themselves and by doing the same together with children. This is a very exciting form of creativity.
Therefore, choose the template you like, watch a detailed master class and start creating.
DIY felt toy step by step wizard class.
Penguin pattern
For work we need:
Felt of different colors
Needle with thread, (threads can be used to match felt or monofilament)
Scissors
For decorating toys, a satin or rep ribbon, beads, beads, buttons, here at will, you can decorate as you like and with anything.
Sintepon
Pattern with a pattern
Pencil
Sheet of white paper
Like that's all, then let's get started!
Redraw the pattern on a sheet of paper. You can print the pattern or attach a sheet of white paper to the computer screen and lightly circle it with a pencil. The pattern with the pattern can be enlarged to the desired size.
In my case, I slightly changed the template, removed the penguin's cheeks. You can also modify the ready-made template at your discretion, although it is better for novice needlewomen to start using a ready-made template with a pattern to try how it goes.

Next, you need to separately draw and cut out each part on paper.
For example, a completely penguin, then a breast, cheeks, nose, legs. In general, everything that needs to be sewn on separately.
Then we apply the pattern to the felt and pin it off with pins, carefully cut it out.

A whole penguin needs two parts.
We apply a middle pattern to one part, pin it off with pins and outline the outline with soap or chalk.

Cut out the middle, but not clearly along the contour, but leaving an allowance


Cut out the middle from white felt.

Now we apply the white center to the blue to the part where we cut out. Sew along the edge of the cut the middle to each other.

This is how it should turn out.

This is the reverse side.

We outline a place for the eyes and embroider them with black thread.
And also the beak, two small triangles are sewn together on both sides and stuffed with padding polyester


We cut off the excess synthetic winterizer so that it does not stick out.
We sew the beak into a circular one.

Sew on the cheeks next

Here is such a cute face)

And this is the downside.

Now we put the two parts of the penguin base together and sew the whole penguin in a circular shape except for the bottom.

We fill the penguin with a padding polyester through the lower holes that are not sewn, fill it tightly so that there are no voids, but not too tight so that a bun does not turn out, everything is good in moderation!

Now we sew up to the end.

Cut out the legs 4 pieces and sew them together.

We fill with padding polyester and sew to the penguin


And the finishing touches - we decorate the penguin.
I cut a flower out of red felt and sew it on to the penguin, also a scarf. I cut off the tape, tie and sew.

back side

What a cute little penguin turned out.
Isn't it lovely for a child to play with such toys!?!

I hope my master class will be useful for you, according to its principle, you can create any such toy.
Below you can find a lot of templates that you can use to sew different toys and for different purposes, for example, for electric vehicles or felt books, finger games or educational aids for toddlers.
Choose the template you like and create with pleasure.

3 Patterns with a rabbit or rabbit pattern made of felt


5 patterns with a dog pattern made of felt


2 Patterns with a lion pattern made of felt


2 Templates with a pattern of a deer made of felt


Today we want to tell you how to make a bunny out of felt with your own hands. It is very simple to create such a toy, there would be felt and some free time available, and our pattern and step-by-step master class with a photo will help you in your work. Our felt bunny will win your little ones!
Tools and materials Time: 1-1.5 hours Difficulty: 4/10
- felt;
- cotton wool or any other soft filler;
- scissors;
- bunny template (provided below);
- pencil or pen;
- needle;
- threads to match felt or contrasting;
- black threads;
- small black beads.
Step by step instructions with photo
Do you like small plush toys? Felt toys are very popular these days! So why not create a couple of such rabbits, especially since they are so easy to make? This felt bunny is so adorable that your kids will be happy to play with it!

Before starting work, process the bunny template on a computer and enlarge or reduce it accordingly to the required size. Then, if you can't print at home, go to a printing center and print a pattern.

Step 1: print the template
Print and then cut out the template.
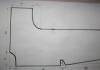
Bunny pattern made of felt:

Optionally, you can attach an oval circle or heart to the Bunny's tummy.
Step 2: cut out the patterns
Choose a felt fabric that matches the color and size. Place the bunny's body on the felt and carefully trace all sides of the felt with a pencil. You need 2 such details.
Then place the ear and tummy patterns (oval or heart) on the pink felt. Trace the details around the perimeter with a pencil.
Using scissors, cut out all the necessary elements.

Step 3: sew the pink details onto the body
Place the pink parts on the hare's body according to the photo below.

Sew on the figure's ears and tummy using hand overlock stitch.
Step 4: make a muzzle
Sew on the face of the figure two black beads in the form of eyes. Using black thread, carefully embroider the nose and mouth.

Step 5: sew the body
Place the top of the hare on the bottom so that the drawing is at the top. Use a hand overlock to join them together. Start sewing the elements either from the bottom or from the top of the hare. We started with the right ear.

When you're halfway through sewing, fill the craft with cotton, wool, or any remaining felt. After filling the half, continue stitches. Fill in each part after you sew it. After finishing the connection, tie 2-3 knots on the remaining thread and cut off the excess.
A cute bunny made of felt - can be decorated and used in different ways: with an unstitched bottom part - a toy for finger theater; on a stick - a funny souvenir for Easter or New Year or also a home theater character; without a stick, but with a base-pin on the back side - an original brooch for a blouse, handbag or children's backpack. How to make a bunny out of felt with your own hands - in our master class.

To sew felt bunnies you needed:
felt in two colors (I have beige and white) and colored trimmings (I have pink);
pink floss for spout embroidery;
black half-beads 6-7 mm for the eyes;
glue for gluing eyes (I have "Focus");
wooden or plastic buttons for decoration;
synthetic winterizer for stuffing;
black and pink pencils;
optional - narrow satin ribbon matching felt;
wooden skewers;
white gel pen;
sewing threads to match felt;
pieces of paper;
pVA glue;
simple pencil.

DIY felt bunny: job description
To begin with, we will draw a bunny pattern by hand or print it from this file:

Next, let's prepare the base sticks. To do this, we will cut the paper into arbitrary rectangles, fold each in half, grease it with PVA glue, put the tip of the stick and squeeze the paper moistened with glue around the stick to fix it well. We do this as many times as we want to get bunnies at the exit. Leave the sticks to dry completely.

At this time, we make cutting on felt. It is convenient to cut on colored felt using a white gel pen or a self-disappearing marker - as you are used to.
I used 2 sheets of A4 felt for eight birds with one stone. The bodies, ears and abdomens fit perfectly on one sheet. Beige bellies went to white hares, and white - beige.

We cut out all the details with sharp scissors; do not leave seam allowances.

We make out the front part of the bunny. Sew on the abdomen, leaving the lower part unsewn! For decoration, I came up with the idea of \u200b\u200bcutting out hearts from the remnants of pink felt and sewing them through a button, for each bunny - in a different place. We glue the half-bead eyes; we embroider a floss nose and mouth; with a colored pencil with slight pressure we make pink cheeks. I made small eyelashes for some bunnies with a sharpened black colored pencil.

We return to the sticks-bases. They are already dry. Cut off the corners of paper stoppers and try them on to the felt blank to make sure that the stopper is not too large.

We wrap the stopper with a small amount of padding polyester and put it between the back and front parts of the felt bunny.


We take the thread to match the abdomen and sew the lower part of the body so as to securely fix the stick.

And the last - we stitch along the perimeter, except for the lower, already stitched, part, the whole hare, not forgetting to put the ears in the place they should. The work has been completed. If you wish, you can tie a satin ribbon bow on the stick.