You can find out how to make a small swan from modules from our article
You can learn how to make a small swan from modules using the origami technique from our article. It takes little time and materials to make. Almost anyone who has the necessary materials and a simple tool, such as scissors or a stationery knife, can cope with the work. A small swan figurine will be an excellent decoration on your desktop or as an addition to a gift for a loved one. Origami is a very ancient art form that came to the world with the light hand of the Japanese. Various paper figures amazed us with their simplicity and, at the same time, beauty and grace. Products made using the modular origami technique have a particularly unique look. Everyone without exception likes their expressiveness and realism. For the most part, these are quite large, voluminous products, the production of which takes a lot of time. But there are also small modular figures that are in no way inferior to their larger relatives. In our article we will talk exactly about such small origami. Today you will learn how to make a small swan from modules.  To get started, we need to take paper of three colors - white, red and orange. And, of course, scissors. To begin with, we will prepare modules - individual elements, which are the material for constructing the product. To operate, you need twenty-two orange modules. This color is not important, so you can replace it with any other. Also, it is necessary to prepare one hundred and thirty modules of white color and one of red.
  Making modules is easy. We will take an A4 sheet of paper and fold it in half. Fold the resulting version in half again and again. Then we unfold the sheet. By cutting it along the folds, we get sixteen modules. To make them smaller (ideal for our product), we will fold the sheet in half one more time, which will give us the opportunity to get thirty-two modules. After these steps, using scissors or a stationery knife, we will cut it into separate parts (sixteen or thirty-two). Then we proceed according to the proposed scheme below.
  As a result, we should have the following elements - modules.
  Each individual row of the little swan will consist of fifteen modules, which we will place as shown in the photograph.
  We connect them together as follows.
  In the process we will see this picture.
  We finish working with the second row of the product and move on to the third.
  We will perform the third row according to the principle already known to us.
  After finishing work on the third row, we will get this nice pointed figure.
  We continue to attach modules in subsequent rows (fourth, fifth, sixth and seventh).
  In the next row we begin to form the wings of our little swan. To do this, we will connect the modules in the following order: one orange module, four white modules and again one orange module.
  In the next row we attach in order: one orange module, three white modules and one orange.
  Next we will connect the modules in this order:
- one orange module, four white modules, one orange module;
- one module orange, three white, one orange;
- one orange, two white modules, one orange module;
- one orange module, one white module, one orange module;
- two orange modules;
- one orange module.
 We will make the second wing of the swan in the same way.
  We get the following result.
  Now we need to make the neck. To do this, we will put fifteen white modules on top of each other and one red one, which will serve as a beak.
  We attach the neck to the body.
  A small swan made using modular origami technique is ready. If desired, we can make a whole family of cute little swans.
Comments
Related posts:
You can learn how to cut a children's hat from fleece by reading the materials in this article. You can find out how to sew a laptop bag with your own hands by reading the article.
The swan is a beautiful and noble bird, with which many legends and tales are associated. A symbol of immaculate beauty, purity and inspiration. The house was often decorated with the image of this bird, in the hope of attracting love, wealth and family happiness. Using the origami technique, you can create a swan figure with your own hands at home. Thanks to its unique appearance, an origami paper swan will harmoniously fit into the interior of your apartment or serve as an unforgettable gift.
There are many ways to make an origami paper swan. They all differ in complexity, the amount of material used or the appearance of the finished product. Tables at weddings and birthdays are served with simple figurines of birds made from napkins. Many simple options can be made with children in kindergarten classes or during labor lessons in the classroom. Children enjoy making products in the form of cranes and peacocks. Crafts made using modules will be labor-intensive, but beautiful.
In this version of paper origami, a swan, the step-by-step assembly of which requires painstaking work, will look impressive and unique.
You can read about how to make a swan from origami paper in this article. In it you will familiarize yourself with detailed instructions and work diagrams.

Option for the little ones
Parents can make such a figurine for their child to visualize animals. It is also suitable as a Christmas tree decoration or a decorative element for scrapbooking.
This craft is suitable for younger children or those just starting to practice this hobby.
Materials:
- A sheet of paper in the shape of a square (you can use white stickers).
- Scissors.
- Black and red pencils.
- Glue or stapler.
Instructions:
- Fold the sheet in half diagonally.
- Using scissors, make small cuts along two sides of the resulting triangle. This will create "feathers".
- Draw a line for the neck and head along the long base and cut along it symmetrically.
- We unfold the workpiece, connect the upper and lower corners, fix them with glue or a stapler, leaving the head free.
- We draw eyes and a beak on the head - the bird is ready.

There are many more types of paper origami swan, including patterns for beginners. Many step-by-step instructions describe the process of making paper bird figures step by step.
You can find the option that suits you with pictures illustrating the entire manufacturing process. A detailed presentation and commentary on actions in video materials will help you understand the sequence and nuances of the model’s execution.
Origami swan from a napkin
You can create an origami swan not only from paper using step-by-step instructions. A neat swan figurine made from a napkin will help you decorate the table before a big celebration and impress your guests. This serving detail will not go unnoticed and will emphasize the triumph of the moment.
To make this you will need a medium sized square napkin.

Instructions:
- The napkin should lie in front of you with an angle down. Mark a vertical center line using a fold.
- Fold the corners towards the center line.
- Turn the workpiece over with the back side up, bend the corners to the center.
- Fold the top down so that the top corner touches the bottom.
- Fold half of the resulting angle upward again. This will be the bird's head.
- Give volume to the figure by bending it in half vertically. Gently align the neck and head using the same folds.
- Adjust the angle of your neck. You can slightly raise the inside of the wing, giving it additional contours.
The figurine is ready - place it on the table or plate.
Note. The napkin is a very soft material. She can't always keep her shape. Working with it requires special subtlety and accuracy. Therefore, it is recommended to practice on plain paper.

Swan created from modules
Modular origami is one of the most painstaking and meticulous activities. Origami from paper swan diagrams includes many nuances in the process of such creativity. Creating each individual detail can take a lot of time and effort, but the result is worth all the expectations. This model has smooth curves and flexible moving parts, such as the neck. A bird model in this design can be safely demonstrated as a real work of art.
Creation using this technique is only possible for craftsmen who know their craft, however, you can increase their number thanks to further instructions on how to make an origami paper swan using modules.
Note. The modules are strung on top of each other, which makes them hold their shape tightly, however, for greater stability in work, cardboard of different colors will serve.
Manufacturing of main parts
We will need a small piece measuring 7.4 by 5.3 cm (for a large craft). A regular office sheet needs to be divided into 4 equal rectangles (16).
If the size is smaller, the sheet should contain twice as many rectangles. Then the blanks will be 5.3 by 3.7 cm in size.
Creating a structural element:
- Place the rectangle like a landscape sheet. Fold in half horizontally.
Note. If the paper or cardboard is colored on one side, place it with the back side facing up.
- Mark the center line by folding the piece of paper vertically and straightening it out again.
- Fold the sides at the top corners toward the center. Turn it over.
- Bend the extreme corners of the protruding ends upward. Next, bend the remaining ends to the top.
- Fold the resulting triangle in half lengthwise.
You have a triangular modular blank. It is very important that each of them have the same amount of bonding to each other to create an even composition. It is also necessary to ensure that the parts fit on top of each other equally, otherwise the figure will be uneven and the parts will stick out.

Small buildable swan
Before creating a large model, you can practice by making a smaller version. Good for beginners. In this option, you will get your hands on the production of parts and their fastening. Follow the instructions “paper swan origami”, which shows step-by-step assembly of a small copy.
Instructions:
- For the base we will need 3 triangles: we press 2 of them against each other, and insert their corners into the pockets of the 3rd, which is located with the long side down.
- Take two more. Fasten them to the resulting workpiece in the same way, pressing the sides together, placing the corners in the pockets. In this way, you must attach another 40 parts (20 adjacent corners and 20 fastening them). As a result, you should end up with a circle consisting of 2 rows.
- Using 20 pieces, create the 3rd row, also putting modules on the corners. Repeat the procedure, creating the 4th, 5th rows using the same quantity.
- Bend the resulting circle inward. This will give you a stable base.
- Perform the 6th of 20 elements, pointing them slightly upward.
- We create wings. To do this, determine a couple of corners where the bird’s neck will be located. Attach the module to them for reference. Move 8 elements away from it in both directions - these are the bases for the wings.
- Make the rest of the formations, reducing the number of parts on each new one by ONE. As a result, you should have triangular-shaped wings.
- Making a ponytail. To do this, we attach 3 elements to the base, then, as in the wings, we reduce each subsequent row by 1 element.
- Modeling the head. To do this, we use 16 elements, which we string on top of each other in the previously marked place on the base. With each new element we gradually “bend” our neck. The last detail should be red - this is the beak of our bird.
- Adjust the shape of the wings by slightly bending them outward. You can glue small bead eyes onto the bird's head.

Our little bird is ready. The height of such a work is approximately 20 cm, using large parts.
Volumetric swan from 3 parts
Unlike the previous version, this specimen has more lush, expressive parts, such as, for example, double wings. Due to the large number of elements and the sequence of their connection, paper swan origami requires step-by-step adherence to the fastening of the elements.
To make a large copy, you will need 1502 parts, of which 1322 are white and 180 of any other color. The creation process involves 3 separate designs.
This is covered in detail in the following guide.
Instructions:
- Make a blank of 3 modules, as in the first case.
- Now create 2 rows of 30 pieces.
- Add 5 more in the same order. The number of elements in each of them is maintained.
- After creating the 10th, we bend the disk inward, slightly stretching the volume of the future body.
- We continue to add along a new line, up to the 15th. We gradually create a three-dimensional body.
- The base is ready. Now we form the neck. To do this, we create a system of 6 modules: we attach the first to the last in a different color, doing the same in the next rows of the neck. We rise, reducing the number by 1 in each subsequent one.
- Opposite the neck we collect the tail using the same technique. Only now we have in the initial system not 6, but 4 parts.
- We measure out the wings. Each wing has 10 initial elements.
- From the 2nd order, we make the first and subsequent elements a different color. In this order, we create the height of the wings at 10 lines.

Note. Make sure that the height of each line is the same. Otherwise, you may end up with asymmetrical wings.
- After the 10th build, we begin to reduce the quantity in each subsequent one by 1 part. Don't forget to frame the first and last details with color.
- Carefully bend the wings. In the end, we got the main part.
- To ensure that the product stands firmly, we create a stand. To do this, use glue to secure the modules at the base of the body. After the 1st amount has dried, apply the 2nd.
2 design:
- We begin to create the internal part in the same way as the main one, but we now have 20 elements in the set.
- Step by step we build 7 rows. We try to stretch the body a little.
- After the 7th we make wings: 10 parts each. The edges of each line are indicated by a different color.
- After 3 lines, reduce each subsequent one by 1 detail.
- As a result, we should have inner elongated wings.

3rd design:
- The technique for creating the base is the same. Now there are 12 parts each.
- Create a height of 6 modules. Turn the base side down.
- From the 7th row we attach 6 elements of a different color, use 1 less element, dividing the body into 2 parts.
- The central part is ready.
- All that remains is to put all the details together. Carefully fit the inner wings into the main part, widening it slightly. Take your time to avoid damaging the case.
- Also insert a small insert into the middle part. If possible, secure it with glue.
- Before creating the neck, it is recommended to coat the initial rows with glue, since this part is very long. To create, you can use 3-4 parts at the base and continue their height in the same quantity, right up to the head. Fix the penultimate corner with black, and the last with red. This will create an edge around the beak.
- Attach artificial eyes to your head (beads or stickers). Shape the wings and neck. Now our piece is ready!
Conclusion
If desired, the finished version can be decorated with a ribbon at the neck and base, and other decorative elements can be attached to complement the image. Such a bird will be appreciated by your friends. A do-it-yourself paper swan like origami art will serve as a great gift and will perfectly decorate your home interior.
Alexandra is a regular expert on the PupsFull portal. She writes articles about games, pregnancy, parenting and learning, child care and the health of mother and child.
The swan is a very graceful and beautiful bird. It is a symbol of fidelity, purity and faith! Such a wonderful bird can be easily made from paper with your own hands using the origami technique.
To easily create such a swan, you should read this master class.
Having prepared all the necessary materials, and this is just paper and a ruler, you can begin the process.
You need a sheet of paper, you can choose any shade or even use white. All sides of the leaf must be the same.
The sheet must be folded diagonally.


Then, along the main line, which is located in the center, fold the sheet in half and press all the fold lines thoroughly. You will get something like this.

Having unfolded it, you need to fold the other side of the diamond in this way.

Afterwards, the tip is folded in the other direction.

Fold the lines of the first and second fold so that another line is formed between them.

Afterwards, the workpiece is folded in half again.

The result is a small swan tail, which needs to be slightly raised and fixed.

The sides of the workpiece must be bent, aligned with the main line.


Using a ruler, another fold line is made. By placing it on the upper point of the bend of the neck and the lower point of the tail, a fold is made without removing the ruler.


Do the same on the reverse side. You can mark them if you wish.

Then, along these lines, fold the workpiece.

Afterwards, a bend of the neck is created. To do this, you need to fold part of the workpiece like this, aligning with the line of the wings.

Then, along the resulting lines, the neck is folded.


Then in half again.

Then continue working on creating the curve of the neck. Not far from the previous fold, you need to make two more, on each side, according to the same principle as the first.


The result is something like this.

There are only a few finishing touches left. Give the swan's beak the necessary shape.

And also spread the wings a little, making it a little voluminous.

Paper swan, ready!

The final look of the craft. Photo 1.

The final look of the craft. Photo 2.

The final look of the craft. Photo 3.
The whole process of creating a swan is very exciting, and at the end it turns out to be quite a fun craft!
Crafts using the origami method are gaining more and more popularity. Volumetric models, for example, the figure of a swan, are especially beautiful.
Involve children in making the swan figure. Working together not only strengthens the family, but also develops fine motor skills, and also affects the development of imaginative thinking and promotes speech development.
To create an origami swan, prepare sheets of paper in white, orange and red. Place the pre-prepared modules in different bags for convenience. You will also need stationery scissors, a black marker and PVA glue.

The process of creating a swan from modules is divided into several stages.
Based on the photo below, you need to glue together the main parts for the future figure.

By assembling and gluing 25 prefabricated models, you will prepare the basis for the craft. The correct placement of parts is shown below.

Glue the outer modules together so that you end up with an even circle. The base for the figure is ready.

You need to add a few more rows to the finished bottom of the figure, enough to reach five layers.

Thus, you should end up with a three-dimensional “salad bowl” shape. The appearance of the toy directly depends on the accuracy and precision of the movements; do not allow yourself to rush when working.


The next step is to create the swan's wings.
On one side of the finished structure, place the orange module in sequence, then 9 pieces. white and the final one, orange again.

Lay out each next layer with a reduction of 1 piece. number of white parts until 1 orange module remains. Layer 2 will consist of two orange and 8 white parts and so on.


Assemble both wings.

The final step is to create the swan's neck. To do this, add 2 white modules to the space between the wings, and place 1 orange one between them.


There should be 12 such layers, and make the next 12 layers exclusively from white modules.


Attach the red module to the very top of the neck - you get the beak of a swan. Mark the bird's eyes with a marker.


An original creative gift made with your own hands will not leave anyone indifferent. It will decorate any interior. If you made the craft together with your children, don’t forget to praise them and place the figure in a children’s exhibition.


The final look of the craft.
Please also pay attention to a simple and interesting master class that clearly demonstrates how to make paper claws with your own hands. This craft is perfect for children's entertainment!
An elegant, proud, regal bird – these are the epithets poetic natures bestow upon the swan. And the swan couple also personifies love and fidelity, although in nature this is not at all the case. Making a swan with your own hands means not just making another craft, it is something more, carrying a certain energy load to attract love and happiness into your life. This article tells you how to make a swan out of paper.
From one sheet
The simplest option that beginners can do:

Graceful origami swan from half a square sheet:


Scheme for assembling a small swan from a square sheet:

How to make a swan craft step by step:
- Diagonal folds are made on a square sheet;
- The sheet must be folded in half lengthwise and crosswise;
- Having received the necessary folds, a double triangle is folded;
- The side triangles are bent towards the central axis. First the lower ones, then the upper ones;
- The upper ones open back, and the top of the diamond bends down. The whole figure is squashed and smoothed out;
- The layer of paper on top rises and is pulled upward;
- One triangle bends from left to right;
- The whole figure is bent in the middle;
- The inner triangles are pulled out to the sides;
- Now you need to slightly stretch the swan by grasping the points at the junction of the triangles;
- Pull first along, then vertically;
- A swan's head is formed from the edge of the left triangle.

Craft from modules
There is such a direction in the art of origami as assembling products from modules.


At first glance, it may seem that making such a voluminous swan is very difficult. Actually this is not true. Making modules is a very simple task; assembling figures from them is also not difficult.
The most difficult thing is that the larger the figure, the greater the number of modules that need to be made. If the paper sculpture must consist of several colors, then it is important not to get confused about the color.
For modular figures, A4 office paper is best suited. It is dense enough to hold the desired shape and does not tear at the folds.
How to make a module: We divide the A4 sheet into 16 pieces of paper. Depending on the size of the module, the leaves can be made either smaller or larger.

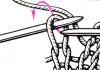
The leaf needs to be folded in half lengthwise, then across, then unfolded again. From a rectangle folded lengthwise, a triangle is formed with the vertex at the intersection of two axes. The bottom edges are folded up and ironed. Then the excess ends protruding beyond the edges of the triangle are hidden inside the fold. The workpiece is folded in half along the central axis. The module is ready.

How to assemble modules step by step:
The corners of two modules need to be inserted into the pockets of the third.

The next two modules are inserted into the pockets on the sides.

In the same way we insert two more modules.

To prevent the resulting workpiece from falling apart in your hands, we fasten the two ends of the modules with another module, thereby forming the third row.

We continue to make the third row, adding new modules. The structure is no longer falling apart.


We collected 30 modules in each row and closed them in a circle. We dress the 4th and 5th rows in the same way as the 3rd.

We take the workpiece with both hands and press the middle with our thumbs.

This is what it looks like from the side:


We do the 6th row as before, and from the 7th row the wings, neck and tail begin.

Between two rows of 12 modules there are 2 corners for the neck; in a wide place there will be a tail.
The next row in each wing is one module smaller.

We continue to reduce the rows of wings in the same way, bending them at the desired angle, until we reach 1 module.

The wings are ready, we make the tail using the same principle.

The swan neck is assembled differently. Modules must be inserted into each other from top to bottom.

In this way, 19 white modules and 1 red are assembled.

Carefully place the neck on the 2 corners left for this.

The module swan is ready.
Video on the topic of the article
From paper:
Graceful origami swan:
Small:
Modular:
Rainbow:
Features of modular origami:
The classic origami technique is the folding of various paper crafts without the use of scissors and glue. In addition to the classical technique, other types of work with paper have become widespread. One of the most popular is folding three-dimensional figures using numerous paper modules. Modular origami swan is a prime example of what beautiful figures are created using triangular parts.
Bright three-dimensional models attract everyone's attention. It seems that creating such works requires special knowledge and skills. However, even a novice amateur can assemble such a craft. It is worth carefully studying master classes on this technique and following the recommendations of experienced masters. Crafts made using this technique require, first of all, attentiveness, perseverance and painstakingness.
Each master has his own designer. This construction set includes disassembled elements of old or unsuccessful figures. Triangular parts for new work are also assembled in advance. To create modules, colored or white A4 paper is used.
The sheet is divided into 2, 4, 8, 16 or 32 equal parts. Most often, paper is cut into 16 or 32 pieces. For children, to make it more convenient and easier for them to assemble the craft, the paper sheet can be cut into 4 or 8 parts.
To make 16 identical rectangles, the paper sheet is divided into 4 equal parts in width and length. For 32 rectangles, the sheet is divided in width into 4 and length into 8 parts.
Triangles are assembled from such rectangles to create three-dimensional paper figures.

To create a module, you need:
- Fold the rectangular sheet in half. Fold the resulting rectangle in half again and straighten it. This outlines the two main folds of the workpiece.
- The edges of the rectangle are bent towards the midline. The figure turns over.
- The bottom edge rises. The corners on the left and right bend along the line of the large triangle.
- Unbend the lower part.
- Along the marked lines, small triangles are folded from below. The edges are raised.
- The resulting triangle is bent in half. The result is a module with two pockets and two corners.
Triangles can be attached to each other in three ways:
- Connected by long sides.
- The connection goes through the short sides.
- One module on the short side, two on the long side.
Which exact assembly method is used is usually indicated in the instructions for the circuit.

For newbies
Beginners will definitely need detailed step-by-step instructions for assembling a paper swan using the modular origami technique. Such instructions and step-by-step explanations can be seen in video master classes by recognized origami experts.
There are many groups that share a love for this type of creativity, and where you can get advice on how to make an origami swan from modules with your own hands.
For beginners, specialized stores offer a huge number of kits for working in the modular origami technique - swan figurines and step-by-step assembly diagrams.
Before you start assembling such an elegant figure as the modular origami of a beautiful double swan, you should practice on lighter models. Simple models can be assembled by a preschooler with the help of teachers in kindergartens or with the help of his mother.
The most tedious thing for a child is creating triangular modules. Fine motor skills have not yet developed properly, and the baby has difficulty assembling small parts. That is why for children's crafts it is better to assemble modules of large and medium sizes. Preschool children quickly get tired of monotonous, boring work, so the mother’s task is to help make blanks for crafts.

It is better to set aside a special time and day when all family members will work together to assemble an openwork air composition. The elements necessary to create a three-dimensional figure must be prepared in advance. The child will be interested in engaging in the creative process with his parents. Adults will be able to tell you how to assemble modular figures correctly.
An easy craft that does not require much time or pre-assembled materials to assemble is a figurine of a small swan. To create a modular origami “little swan” you need to make 70 triangular modules, 69 pink or blue elements and 1 red for the beak.
Let's look at the step-by-step assembly of a small swan.
Assembling the body. The basis is 3 rows of assembled elements. There are 12 triangular blanks in each row. The resulting strip is connected into a circle. It is necessary to give the resulting part the shape of a bowl.
First wing – 4 modules are put on. The following rows are in decreasing order: 3 triangles, then 2. The tip of the wing is two elements, placed one on top of the other.
Breast - immediately after the wing, 2 modules are put on. 1 piece is attached on top with the short side. The breast is ready.
Second wing. Immediately after the breast, the process of assembling the second wing begins. Both wings are assembled according to the same scheme: 4 parts, 3 elements on top, then 2 triangles. The tip of the wing is two rows of one triangle.
Tail. First row - 2 parts. 1 more piece is attached to the top.
Neck, beak. For the neck we connect 5 elements vertically, the 6th row is completed by a red triangle - the beak. Carefully give the neck a slight bend.
Connect the neck to the last breast module, which was assembled with the short side.
Assembling such a small figurine will not take more than 10 minutes. You can create a whole family of beautiful birds. To make it more convenient for a child to hold the modules in his hand, the parts can be made large. A child can make such a craft as a gift to his grandmother or mother. The size of the small swan can be changed by adding additional pieces.
Simple model
Once you have mastered the process of assembling a small craft, you can begin to work on a more voluminous and complex figure.

To create one model you will need 458 multi-colored modules and 1 red triangle for the beak. Fans of classic models choose black or white colors for crafts.
Let's look at the step-by-step creation of a modular origami swan from prepared elements. The presented model is of an average level of complexity and requires precision and care.
- A strip is assembled from 30 blanks and connected into a circle.
- We make 4 more circles in the same way.
- The resulting part must be carefully turned out. Make sure that the modules do not fall out and the workpiece does not crumble. The result is a figure shaped like a bowl. 2 more rows are attached to the top of the bowl.
- On the 8th row, the process of forming the wings begins. For the wings we attach 12 blanks, skipping 2 parts. The neck of the craft will be attached at the place of the pass. After the missing triangles, we reattach 12 parts. The remaining free area is the place to form the tail.
- The wings are made as follows. Starting from the 9th row, in each subsequent row the number of paper modules is reduced by 1. The wing is considered complete when 1 triangle remains.
- In the same way, reducing each row by 1 piece, the tail is made.
- The neck is made separately from 19 elements and 1 red triangle for the beak. The corners of one part are inserted into the pockets of another. Complete with a red triangle. The resulting part must be given a slight bend, similar to the position of the swan's neck.
- Attach the neck of the craft to the space left between the wings. The result was a paper swan using the modular origami technique.
The main element of this craft is a bowl-shaped body. This technique is used to create other figurines: vases, dragons, animal models and fairy-tale characters. Using the swan pattern as a basis, you can create a three-dimensional heart.

Having studied the assembly diagram of a modular origami swan, a beginner is already able to come up with and implement his creative idea.
Many experienced craftsmen are improving this type of craft and creatively rethinking the approach to classic model assembly. Thus, in the modular origami swan (the master class presents extraordinary models on the Internet), for example, the figurine is made in blue tones with an unusual wing shape.
This unusual craft can be made in the colors of the country’s flag.
Origami double swan
This type of craft is more complex. However, the double swan looks brighter and the figure is more voluminous. This is due to the fact that the model is assembled according to the matryoshka principle. Several smaller ones are hidden in one figurine.
Before you start creating such a masterpiece, prepare 1502 elements. To emphasize the unusual shape, add colored triangles. Then you will need:
- Colored blanks – 180 pcs.
- White – 1322 pcs.

Part one
Its assembly will take 770 modules.
- For the base, we assemble and connect 2 rows of 30 parts into a circle.
- Add 2 more rows. Carefully turn out the resulting part. The result is a figure similar to a bowl. We make 10 more lines on top. While working on the figure, constantly correct it. Give a slim look.
- We collect 15 rows in this way.
- On the 16th line we outline the places where the neck, wings, and tail will be formed. You will need:
- Neck – 6 elements.
- Wings - 10 pieces per wing.
- Tail – 4 elements.
We make the neck according to the following scheme:
- 6 modules: 1 pink, 4 white, 1 pink triangle.
- Each subsequent line is reduced by 1 piece until 2 triangles remain. The neck is ready.
We collect the tail opposite the neck. The tail starts with 4 pink elements and removes one from each line until 1 piece remains.

After completing the assembly of the tail, we move on to the wings. The formation of the left and right wings is the same.
- First row: 1 pink triangle, 8 white ones and 1 pink piece closes the wing.
- Second row: the last module from the tail side is put on the inside of the corner.
- The wings rise in 10 rows, each line has 10 elements. To control the height of the wings, they must be assembled at the same time.
- Starting from the 11th row, the wing elements are reduced by 1 piece. in each subsequent row. The decrease occurs among the white parts. The pink border remains in place.
- The wing is complete when there is 1 pink triangle left.
So, the main part of the double swan has been assembled. To prevent the created structure from falling and crumbling, make a stand of two rows. Strengthen the stand blanks with glue to make the craft stable.
Part two - inner wings
The base of the second part is made similarly to the first figure. Only 20 elements are collected in a circle. After 2 assembled rows, turn the craft blank inside out and add 5 more lines. Be sure to draw out the figure.
Each wing consists of 10 parts: 8 white in the center, 1 pink at the edges. Each wing rises by 3 stripes.
Starting from row 4, white elements are reduced by 1 pc. with each row until the pink triangle closes the line of the wing.
Part three
The beginning of the third part is similar to the two previous parts of the swan figure. There are 12 triangles at the base alone. The figure rises 6 rows and turns inside out. In the last line, 2 pink pieces are put on.
From the 7th row we reduce each row by 1 white triangle. The last part is ready.
The three assembled parts must be carefully and carefully inserted into one another.
Parts may fit tightly and cling. Slowly, slowly, move the base of the wider figure apart. After all the details of the future craft have been collected, start working on the neck.

Neck
For the neck, space was left for 6 modules, but it is better to assemble it from 4 or 3 parts in width. The length of the neck depends on the wishes of the master. To prevent the parts from falling apart when bending a long workpiece, it is recommended to place them on glue. A red beak ends the neck. You can optionally glue on drawn eyes or make them from buttons.
The craft itself can be decorated with a chain, bow or a string of jewelry. This figurine is both a beautiful interior decoration and an original handmade gift.
"The Swan Princess"
One of the most beautiful three-dimensional figures is the modular origami Swan Princess. It is in the creation of fairy-tale characters that masters and lovers of this type of creativity give free rein to their unbridled imagination.

The source of inspiration is the princess from the fairy tale of the same name. There are as many masters as there are models depicting the fairy-tale heroine. Some people create a princess figurine, however, most people like to create a fairy swan.
There are quite a lot of step-by-step ways to create this craft. For the base, you can take a classic model, add elegance to the craft by making a longer and curved neck, and decorate the head of the figurine with a crown.
Prepare the following modules:
- Green – 166 pcs.
- White – 615 pcs.
- Blue – 680 pcs.
- Yellow – 335 pcs.
Start working on this model by creating the tail. The base contains 30 parts. The colors of the triangles can be combined as desired or made according to the scheme.

After the blue petals are collected, the reduction of details begins from the top point of such a petal. 1 element is removed from each side of the leaf.
For a fluffy tail, you need to collect 1 large feather and 8 small feathers.
Small feathers are made in two colors, 4 pieces each:
- Vertically connect 5 elements, alternating 2 colors.
- Place 2 green triangles on 2 corners.
- In the center there are 2 yellow modules, and at the edges there is 1 green one.
- Next line: green, yellow, green, yellow, green.
- Green, 2 yellow, green. The outer parts are put on the inside of the lower module.
- The following lines are made in reduction in a similar way.
- The same feathers are made in a different color.
A large feather is assembled from two small ones, located vertically above each other.
The feathers are neatly attached to the tail. To prevent them from falling, it is recommended to put them on glue.
Assembly of the body
The base consists of 36 elements. There are 11 blue lines in a circle. From the 12th line, the breast of the craft begins to form. The coloring is collected from 2 stripes. The center of the wings is highlighted in yellow, the breasts are green, framed by white triangles.
On line 12-1, a breast is formed in the center: each row, 1 piece is removed.

Neck
Alternate elements in lines of 2 and 3 pieces. Height – 25 stripes.
For the wings, 7 parts are used on different sides, opposite each other. For each line, 1 element is also removed.
The tail is gathered in front of the breast. To create a ponytail, 11 elements are used, the number of which decreases with each strip.
The stand is made of two circles with 39 modules each.
It is better to attach the finished craft to a stand with glue so that you can move and rotate it without fear of it falling apart. The figures can be of different sizes - from a few centimeters high to one and a half meters or more. Large and tall crafts necessarily require additional strengthening of the composition.