Time flies not noticeably, it seems that there was just a New Year, Shrovetide and Valentine's Day, and it's time to congratulate our men on their truly men's holiday, February 23rd.
And there is nothing more beautiful for every dad than a gift from a child, made on his own. In our country, it is very common in schools to make various postcards during labor lessons. But sometimes you want something original and interesting to perform.
We tried to find you the most interesting and unusual options for the execution of greeting cards. The main thing is to follow our instructions exactly and the result will please you.
Tricolor as a gift
Quite patriotic and simple in execution, your dad will definitely like it. 
Required tools:
- Multi-colored cardboard sheets - 2 pcs.
- Multi-colored paper (blue, red, white) - 3 pcs.
- Sharp scissors -1 pc.
- Ruler - 1 pc.
- Stationery glue - 1 pc.
 You can start:
1. From each sheet of multi-colored paper, cut a strip at least forty millimeters wide.  2. Bend the workpieces and stick to each other. Then give them the shape of the flag of the Russian Federation.
  3. Draw and cut out the flag holder on black cardboard.
Instruments :
- Colored paper - 4 different colors
- Glue - 1 pc.
- Scissors. - 1 PC.
How it works:
Cut out a rectangle 25 * 20 centimeters. Cut off a strip 5 centimeters long from above, stepping back 5 centimeters from the top. And cut the tie out of black paper.
Glue these two pieces together.
Cut a rectangle 40 centimeters wide and 20 centimeters long from green paper. Glue shoulder straps and buttons of yellow paper to it.
Connect all the parts together.
Postcard peaked cap
Such a cap can be made by February 23rd.
Service in the army and the army itself are very popular in our country. In the last decade, the state has greatly encouraged its military personnel, which gives them a reason to be proud of their work. Therefore, we suggest giving your dad a postcard with a cap, which will always remind him of serving in the army. 
List of required tools:

Let's get started:
Draw a cap on colored cardboard. And cut it out.  Cut out a visor, an asterisk, a rim, a cockade and petals in a quilling style from multi-colored paper. Divide the lace into two parts, by cutting off 1/3, this will be one part.
  Assembling the cap: We attach the rim to the blank, attach the visor, the asterisk and the cockade with decorations.
  That's all you can congratulate the defender of the homeland on his professional holiday.
Postcard - congratulations
Surely everyone wants to convey to their beloved dad an incredible amount of warm phrases, but in our rhythm of life there is no time or it is not appropriate. Only on holiday do we allow ourselves to express ourselves from the heart. Therefore, we bring to your attention a way to say dozens of congratulations at the same time. And it will be a joyful memory for many years. 
Required tools:
- Multi-colored squares - 16 cm.
- Scissors - 1 pc.
- Ruler - 1 pc.
- Pencil - 1 pc.
- Stationery glue - 1 pc.
- Gel pens - 1 pc.
You can start:
We bend one workpiece diagonally and along the floors on both sides.  On one of the resulting squares, retreat 2 cm from the fold and draw a line, not reaching the edges of 1 cm, then draw from the ends of the strip to the upper corners to make a trapezoid.
  Spread the remaining piece with glue and glue it from below to the adjacent sheet.
  This is how it should develop for you.
  We carry out exactly the same manipulations with the rest of the colored paper.
  Next, we glue them one by one to each other. Pressing them tightly together. Then we attach a card of a different color to the center of each base. And we write different words on it.
 We glue the date of the celebration on the front side. That's all you are done.
DIY postcard with a ship
Sometimes it doesn't take much effort to craft a pleasant surprise. And the pleasure received from the words of gratitude will more than block your efforts. 
Instruments:
- Blue cardboard - 1 pc.
- A sheet of white paper - 2 pcs.
- Scissors - 1 pc.
- Glue - 1 pc.
Let's get started:
Fold a white leaf in half and on one side draw a sketch of the future ship on the waves, seagulls and clouds.  Cut out the outline of whatever you have drawn.
  Bend the two parts of the boat, as in the picture. Draw the hold windows on three floors. You can draw them square or round, or as in the picture, in two versions.
  Spread glue on the top of the workpiece and the side parts.
  Gently, but quite firmly, press the smeared parts against the sea-green cardboard.
  We glue additional decor details around.
  Ready. Look at the beauty you get. Add congratulations on the front and you can safely give the recipient.
DIY gift for February 23rd - tank
Required tools:
- Coca - Cola cans - 3 pcs.
- Candy m * ms - 2 pieces
- Two types of ritter sport chocolate - 1 pc.
- Rondo candies - 1 pc.
- Tik tak candies - 1 pc.
- Any gum - 1 pc.
- Military fabric - 1 pc.
- Green strips of fabric - 1 pc.
- Scissors - 1 pc.
- Double sided tape - 1 pc.
Let's start making:
We wrap the lemonade in military cloth using adhesive tape. And we fasten together with ribbons.  Alternately, using double-sided tape, we attach the sweets to our base, checking for strength each time. Try to fasten them so that the tape does not show through.
  That's all your gift is ready!
ZD postcard for February 23 do it yourself
In the modern world, development does not stand still, 3D cinema, pens and printers appear, which have already learned how to print human skin. Therefore, we can also make a 3D postcard as a gift with our own hands. It looks unusual and interesting. 
Required tools:
- Empty box of any chocolates - 1 pc.
- Picture or own drawing - 1 pc.
- Styrofoam - 1 pc.
- Scissors - 1 pc.
- Glue gun - 1 pc.
- Toothpicks - 3 pcs.
- Cutting board - 1 pc.
- Stationery knife - 1 pc.
- Color plasticine - 1 pc.
You can start:
Take an empty candy box.  Using a ruler and a pencil, draw the outline of the future picture.
  Place a cutting board under the box and use a clerical knife to cut out the part that is not needed.
  Choose a painting with a military theme or draw it yourself.
  Cut the figures out of the foam and cut them out.
  To mold a tank and an airplane from colored plasticine.
  Using the glue gun, attach the picture and figures to the box.
  The 3D postcard is ready, you can congratulate!
Postcard insert for February 23
Postcards inserts, which consist of several prefabricated elements, also look very interesting.
You can exactly repeat the postcard according to our example, and here it is also allowed to replace the elements with something else according to your taste. 
Necessary materials :
- Several different colors of double-sided cardboard - 5 pcs.
- Ruler - 1 pc.
- Pencil - 1 pc.
- Glue stationery - 1 pc.
- Contour map - 1 pc.
- Silver braid - 20 centimeters - 1 piece.
Let's get started:
Fold one sheet of double-sided cardboard in half. For a tighter fold, you can press down with a ruler.  Having retreated from the top 4 centimeters, draw a cut line.
Cut off the top. On the first sheet, draw a semicircle in order to cut off the corner. And cut it out. 
 Take the old contour map and trace our front part on it. Cut out.
  Along the fold line at the very bottom, we make an incision of 0.5 centimeters. We bend the right side inward, and cut off the left side.
  Glue the bent strip and the sharp bottom corner of the front part and glue both sides. Reduce the contour map along the edges by one centimeter and glue it exactly to the base.
  Cut a rectangle 4 * 6 centimeters black and 1 * 6 centimeters orange stripes, and glue them together. Next, we glue this blank to the base. We fasten them, beautifully laid out on a postcard. Insert the tape under the star.
  Cut a rectangle 3 * 5 centimeters red and 2.5 * 4.5 white. Write "February 23" on white, preferably in red.
  Cut a yellow shoulder strap 3 * 10 centimeters, attach a red star to it, and make a hole on top. Tie it to the braid. Insert the shoulder strap into the pocket. Our postcard is ready!
Postcard for February 23 in scrapbooking style
Another interesting way to make a postcard as a gift for February 23rd is scrapbooking. Very interesting and exciting, it allows you to create simply unimaginable masterpieces with minimal tools. And the variations of performances depend only on the imagination of the person who creates it. So let's get started. You will need art ink to make this card, which can be purchased at any craft store.
Instruments:
- A4 paper sheet - 1 pc.
- Scissors - 1 pc.
- Seal for ink - 1 pc.
- Ink - 6 pcs.
- Pencil - 1 pc.
Let's get started:
The basic rule of thumb in this technique is to always start with the lightest ink shade.
We take light beige ink and tint the sheet with a special pad printing. Movements are carried out in a circular motion, or, as it were, drawing an infinity sign.  The next ink color is brown, we use them to do the same movements, trying not to leave any painted white spots on the sheet.
  We apply them to the base and tint them especially carefully with each color separately. Here's what we get in the end.
  And now, working with such a base of military camouflage, you have the opportunity to create an unimaginable number of postcard options. For example, with the help of beads, threads and fabric, this beauty is obtained.
  And if you change the theme of the pictures depending on the type of troops, then we get such a postcard.
  Imagine, try different options and you will definitely get something of your own special and unique.
What postcards for February 23 do-it-yourself do for your beloved dad, grandfather, brother? How to congratulate a sailor, pilot, or someone who wears a jacket and tie, and was holding only a virtual or toy weapon in his hands? We tell and show.
In Russia, International Women's Day is celebrated on a grand scale (albeit not at all the way Clara Zetkin bequeathed), and its European counterpart, Mother's Day, has taken root. For men, there is only one such holiday - the Day of Defenders of the Fatherland, and even then there are disputes to this day: whether it is necessary to congratulate all men or only the military with it. We believe - yes, it is necessary and we tell you how to make postcards for February 23 with your own hands.
Today we'll show you how to make origami postcards for February 23rd. how to make a postcard in 5 minutes, how to cut out voluminous postcards for Defenders Day with space invaders or postcards with fighters and ships (for those who are familiar with the basics of scrapbooking).
Po-oh-oh-rode-and-and-and!
In the style of "8 bit": do-it-yourself volumetric postcards for February 23
We will start with the most widespread branch of the armed forces in the country: virtual, or computer. If your dad had the prefix "Sega" or "Dandy", he will definitely appreciate the pop-up postcard with a space invader or scalp.

To make an 8-bit postcard for February 23 with your own hands, you will need 3 sheets of colored paper or cardboard, a ruler, a cutter or scalpel, a piece of tape, glue and a printed template.

Fold 2 sheets in half and set one aside for now. Print out the postcard template, line up the center line with the fold, and use a ruler to make cuts along the red lines. Then bend along the green lines. Glue the blank to the second folded sheet, and build an envelope from the third. The more intrigue, the more interesting the gift.

Done, you are amazing!
Technique parade: DIY postcards for February 23
If you have time, patience and colorful paper, and your dad or grandfather is a real military man with real shoulder straps, make him a more complex postcard with a surprise for Defenders of the Fatherland Day. The materials are the same (only scotch tape is not needed).
Start day you need to bend the sheet correctly for a future postcard for February 23 (see master class). The next step is to glue the stripes: red, blue and green background for the surprise tab. Decorate the "face" of the postcard with a bronze-colored branch applique.
Next, you need to cut out a "pedestal" for the equipment, glue it to the fold of the postcard and fix the figures of tanks, aircraft, etc. on it. The do-it-yourself card is almost ready - all that remains is to cut and glue the numbers, asterisks and from the lumps of paper to make "berries" to the branch.

Origami cards for February 23 in the form of shirts
If your dad is real and has nothing to do with the army and seems to have been born in a jacket and white shirt, fold for him on February 23 origami postcard in the form of a shirt.
It is very easy to make an origami card. Just keep in mind that in the process of work, the sheet will decrease many times, so it is better to take a sheet of paper large and thin enough. This card is essentially an envelope postcard, so you can put a congratulatory note or a small gift (like movie tickets) inside.
You can glue ties or bow ties, pockets, buttons to the finished one - in a word, make them even more like real ones.


Similar shirt postcards can be made even easier. If you do not have a large sheet of paper, but have cardboard, it is better to focus on them.


And here the shirt-postcard is also complemented by a jacket. And for a sailor on February 23, you can make a postcard with a vest.


This Hawaiian card will suit a dad with a good sense of humor.

And for a dandy dad and a favorite of women, you can make a stylish postcard with a pocket.

Do-it-yourself cards for February 23 for grandfather
And this card with a three-dimensional star should really please the grandfathers. It is very concise and simple, and for it you only need a piece of cardboard and 2 colors of paper. The template is attached - you need to print it.


Grandpa will definitely appreciate the lovingly hand-carved postcards for February 23 with fighters or sailing ships.


Last minute postcards
Option number 1 - a postcard with pasta. They need to be painted, glued, signed - and that's it, you're done.

Options No. 2 and 3 - a postcard for February 23rd with a star (mom's help is needed to sew them, but this is also a matter of minutes) and a postcard consisting of a base and several strips of colored tape is very stylish.

Choose a postcard of your choice and please your defenders!
We will start preparing for the men's holiday with the simplest postcards for February 23rd. Children will be able to do some of them even without the help of mom, and dad will certainly be happy)
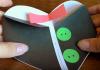
And the first of them will be made in the form of a military uniform.

The simplest materials are needed:
- paper (green, yellow, red, black and white)
- scissors
- PVA glue
- ruler
- pencil

Cut a sheet of A4 paper into 4 equal parts. Take one of these and make 2 small cuts on the top. Bend them down to form a shirt collar. Cut a small tie out of black paper and glue it under the shirt collar.

Cut a rectangle out of green paper (the height is equal to the height of the shirt from the base to the shoulders, and the width is 2 times the width of the shirt). Flex the paper to form the cuffs of the uniform, and peel back the top corners slightly. Then cut out shoulder straps and 3 round buttons from yellow paper. It remains to "put on" a ready-made uniform on the shirt and solemnly hand over a postcard to dad on February 23!

A similar, but more "adult" version of such a postcard is offered by Alexander Parkhomenko:

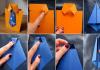
Postcard-cuffs
And another simple option for a postcard for dad. Why not make it in the original shirt cuff shape? You just need to cut a rectangle out of paper and round off the 2 upper corners. Then, very carefully with a clerical knife, you need to make 2 small cuts for buttons. It remains to fold the cuffs in half and glue along the very edge, and then glue on 2 buttons!
You can decorate the cuffs as you wish, add a congratulatory lettering, glue stars, etc., but you must do this BEFORE you glue it on the side!

Figured card with a star
The next postcard is also easy to make, but quite interesting. To make it, print this blank on a regular A4 sheet (you can draw it yourself):


Cut a star out of beautiful colored paper and glue it to the outside of the card.
To cut exactly the same star as on the template, print right away
2 blanks: one will go to a postcard, and from the other you will cut out a star, and then circle it on beautiful colored paper.

The inscription "February 23" can also be done without using a printer: write completely by hand or cut out numbers from paper, and write the month.
Postcard made of ... matches
Matches are not a toy for children, but nevertheless, under the supervision of a mother, it is from matches that you can make a very original basis for a future postcard. Gradually grease thick cardboard with PVA glue and place matches on it in a checkerboard pattern. You can decorate a postcard with fragments cut from a purchased postcard or draw it yourself, and then cut and glue it.


Volume postcard
Children will be able to make voluminous postcards by February 23rd. You just need to understand the principle by which they are made.
A blank for a future postcard is cut out of thick paper. Then it is bent in half and 2 small cuts are made in the very center with a clerical knife. The result should be a cut-out strip of paper right in the center of the postcard.

Now you can cut out a larger blank from colored paper - it will serve as the front part of the postcard. And then a blank with a slot should be glued to this front part. At the same time, the slot DOES NOT stick, but folds into the inside of the postcard like a step.

You can also make 3 steps, as shown in the photo,
then the central picture will hold better.
The base of the postcard is ready, it remains to find a suitable "military" picture, print it, cut it out and stick it to the steps. And don't forget to sign the card before handing it over!

Postcard with a boat
If dad served in the navy, then the child can make a postcard for him or even a whole picture with a paper boat. To do this, you will need thick cardboard as the basis of the entire composition, colored pencils, glue (Moment gel is suitable) and a sheet of paper for making a boat.
Then everything is simple: colored pencils are glued to cardboard or a photo frame around the entire perimeter. A boat is folded out of paper and glued directly to the center of the composition. The sea and the sun are drawn with pencils, and the present for dad is ready!

MEGA-simple stylish card
In conclusion, I would like to show you one more idea for a simple postcard, which nevertheless looks very stylish and festive. To make it, you will have to call mom for help, but the children will be able to cut out the base for the postcard and 3 stars from beautiful decorative paper on their own. Then mom will only have to sew the stars to the paper base. How do you like this idea for a greeting card from February 23rd? 🙂

We hope that you will like the proposed ideas and you will definitely use them to make postcards for all defenders in your family)
Early development has recently become especially popular with modern parents. This is due to a significant increase in the level of training that a first grader should have. "Pea" is website, child development with which it will become an exciting experience for the whole family.
We tried to fill our portal with the most interesting materials that are designed to help parents in their daily work on the upbringing and education of preschoolers. Early Childhood Development Site"Pea" offers all the variety of games and interesting tasks for children, aimed at acquiring certain skills by the child and improving his own skills. All materials posted on the portal have one goal - to prepare the child for school as much as possible.
Presentations for children as one of the best ways to teach a child
Information technology has made great strides in recent years. Modern children easily master computer technology, and as a result of this, they have become especially widespread presentations for child development... This is a special type of material that helps babies to more easily master all the information.
When carried out preparation of children to school, presentation is often of key importance. Bright and colorful pictures allow the kid to visually see the world around him, to imagine plants and animals that he has never met before. Children's presentations for children presented in the public domain, which allows all parents to use them in independent studies with the child.
Electronic presentations for children download - it is so simple
Modern sites present a wide variety of materials that parents can use in their activities with their child. We tried to make our own free presentations for children slightly different, different from all the others.
 First of all, our materials are quite informative. They will be interesting not only for preschoolers. Such presentations for elementary school children will work just as well. A logical question arises - is it possible that a first grader and a three-year-old child can assimilate one volume of information that will be interesting for the first and available for the second to understand.
Definitely not. Our materials work on a slightly different principle. Mainly presentations for children of the preparatory group... They cover all the points a child needs to know before school. However, the child should still start teaching earlier - for example, at 3-4 years old, the child is already ready to see presentations for kindergarten children.
At this age, the baby is tormented by a wide variety of questions that adults, at times, cannot answer. But successful child development possible only when he gets free access to all things interesting in his understanding. He may not understand some of the materials that are not yet so interesting to him due to his age, but if you repeat the lesson six months later, the little one will learn more points.
Preschool development of children using unique materials
 The uniqueness of our materials lies in several important points. First, as mentioned above, is the availability and completeness of information, which makes preschool child development successful. The second point is bright and colorful pictures. Thus, preschool child development site trying to make it interesting, that is, the little one will definitely be interested in high-quality photographs and pictures that are in each presentation.
And finally, one more point, in our opinion, one of the most important. Free presentation for children implies the presence of certain tasks at the end, aimed at consolidating materials and developing certain skills of the baby. These can be games for logic, thinking, speech development, the development of fine motor skills and others. Thus, the child easily assimilates all the information received and has a pleasant time with his parents. Perhaps these are the best parameters for successful learning.
One of the important holidays is just around the corner - Defender of the Fatherland Day. If you still can't think of what to give your beloved men, then create unique gifts for them with your own hands. This article contains the easiest, but at the same time, interesting and detailed DIY crafts master classes for February 23, which your child can easily present to dad or grandfather as a gift for Defender of the Fatherland Day. I present to you the 10 best master classes on how to make crafts for February 23 with your own hands with step by step photos.
This approach to solving the problem of finding an unforgettable gift is traditional when giving children to their dads and grandfathers on February 23rd. How many such gifts are created by children's pens! To do this, they use not only a variety of paper and plasticine, but also sweets, ribbons, ice cream sticks and many other unusual items for this.
The availability and convenience of such materials allows you to constantly use them, and with each new craft, apply them in a new way. It's no secret that the same materials can be used in crafts of varying complexity. There are many similar workshops that are also aimed at children of different ages and with different skills.
Most often, children choose airplanes as a gift for February 23rd. But there are a huge number of ways to create them, as well as the materials possible for this: cardboard, paper, matchboxes and much more. In this master class I will show you how to make an airplane from a plastic bottle using the papier-mâché technique.
We take a plastic bottle, in my case it is a small 0.5 liter water bottle .. Cut it off with a knife just above the middle, and also cut off the nose of the bottle.

We make cuts on both sides and join the blanks.


If you wish, you can copy our sketch and transfer it to a sheet of A4 paper folded in half.

Using glue and tape, we attach the wings and tail.


Airplane wheels require 6 plastic bottle caps. Using scotch tape, we connect two and four covers together.

We glue the wheels and begin to glue the plane with pieces of newspaper, having previously impregnated them with PVA glue using the papier-mâché technique.


Glue the top layer with white paper or white napkins. After all the layers of the craft are dry, paint the finished plane with acrylic paint.


All that remains is to add a star-shaped applique, and the cut-out photos can be glued to the windows.

Our plane is ready to fly!


02. Do-it-yourself plasticine tank
A do-it-yourself tank made of plasticine is an excellent craft for the Defender of the Fatherland Day. In the future, it can be taken to an exhibition or presented to grandfather, dad or brother.

For this master class, we need green, black and red plasticine, also a piece of wire, a toothpick and a pencil.
We will make the lower part of the tank hull in the form of a rectangular bar, sharpening one side of it.

We prepare two black strips by pressing down along the entire length with a toothpick, 10 large cakes and 4 small ones made of green plasticine.

Press down on the cakes with the back of the pencil and draw the axes with the tip of a toothpick.

Putting together 5 wheels and 2 small ones on each side, wrap them with a track.

We glue the green protection tape on top.

We glue the tracks on the sides.

Take the second green bar.

We glue it, beveling the front part with a stack.


We attach the muzzle in front and add small details, an antenna and a red plasticine star.


Our plasticine tank is ready!


In this lesson, we will make such a simple cardboard plane.

Draw all the parts of the plane.

For the case, you can take a juice container.

We cut out the blanks as shown in the photo. Red paper stars.


Glue the tail of the plane to the matchbox.


The cardboard plane is ready!

Such a gift can be made for dad or brother. For this master class you will need:
- candies;
- cling film;
- toothpicks;
- Scotch;
- penoplex;
- blue corrugated paper;
- silver cord;
- glue.

Cut out a circle from the penoplex.

You can first draw a sketch of the steering wheel on paper, then transfer it to penoplex.


We decorate the edges with a cord.


We wrap the sweets with cling film.

Using scotch tape we attach them to a toothpick.


Decorate the steering wheel with ready-made sweets.


Our sweet steering wheel is ready!
05. Tank of two sponges
Such a craft can be a wonderful gift from a child for the holidays on May 9 or February 23. Its production does not take much time, and a sponge for washing dishes will be enough from the materials. Our master class shows the step-by-step production of a tank from scrap materials.

For work you will need:
- two green sponges;
- scissors;
- ruler;
- dark felt-tip pen;
- glue gun;
- ruble coin;
- a green straw.

Tear off a dense layer from one of the sponges.

On the back of this dense layer of sponge, using a ruble coin and a dark felt-tip pen, draw six circles.

We cut them out.

Then we take a glue gun and use it to fix these circles on the sides of the other sponge (three circles on each side).

Let's start making the turret of our tank. To do this, on the remaining soft part of the sponge (from which a dense layer was torn off), we outline a square with sides of 4 cm.

Cut out the tower with scissors.

Cut off 8 cm from the green straw - this will be the muzzle of our tank. We insert it into the tower, having previously made a small indentation in it with the help of scissors.

Apply hot glue to the underside of the tower.

We fix the tower to the main part.

If you wish, you can decorate the tank, for this we cut out small stars from red cardboard.

We glue them to the sides of the tower. Our tank is ready.

Such a craft will not only be a good gift for February 26, but also serve as a toy for a boy.
Such a star is made very simply - for it we need wire, red yarn and PVA glue.

With the help of round-nose pliers, we make a star out of the wire.


We leave to dry.


To create this plane, you will need wooden clothespins, two ice cream sticks, a piece of cardboard for the tail, two thin wooden tubes and acrylic paints.


Using hot glue and straws, we attach ice cream sticks to each other.

We make a tail blank from cardboard.

We glue the tail to the clothespin.

We paint the finished plane with acrylic paints.


Fostering a sense of patriotism in children is one of the most important tasks of teachers and parents. But for young children it is not enough just to talk about the war, about battles, victories and defeats. For them, a very important place is occupied by visual aids, games and classes devoted to military topics.
Therefore, the child should not only hear about the war, but also look at illustrations, filming, photographs, and also capture their emotions in drawings or crafts. Despite the fact that mainly girls are engaged in knitting, this application will undoubtedly arouse interest among the young defenders of the Fatherland.

To knit the Tank applique, you need to prepare the following materials:
- Hook number 1;
- Medium yarn, such as Jeans;
- Decorative star. If one was not found, you can take it from the New Year's pendants to decorate the Christmas tree;
- Scissors
- Moment glue, preferably transparent.
We start knitting the applique with its "caterpillars". To do this, we collect 10 air loops.

Then we knit 3 more air loops for lifting, and after that we knit columns with one crochet to the end of the row. In the very last loop of the row we knit 7-8 double crochets to form a “fan” of loops. If in this place the edge is bent, then we increase the number of single crochet, since the applique should be flat.
Next, we knit the double crochet along the opposite edge to the very last loop, from where we started the row. In this loop we again make a "fan" of double crochets, but in a smaller amount than in the previous case, since there are already several loops in this place. As a result, you should get such an elongated oval - the "caterpillar" of the tank.

In the second row, first we knit 5 single crochets.

After that, we make 1 air loop to highlight the beginning of knitting of the upper part of the tank.


We turn the knitting and again knit 8 single crochet stitches.

To make a tank gun in this place, we knit 5 air loops.

Add one more loop for lifting, and then along these air loops we knit single crochet stitches to the end of the row, including 8 loops of the tank's "cabin".

Turn the applique again and knit 8 single crochet stitches. At the end of the work, using the Moment glue, carefully glue an asterisk onto the “booth” of the tank.

The Tank application is ready. It can be used to make postcards for Victory Day, February 23, or any other themed crafts.
Are you preparing a gift for a man? Nothing to decorate the gift box with? Or maybe you have prepared an original postcard and you need a bright accent for it? A man's flower made will help you get out of any situation. To create such masterpieces, you can use candy wrappers, notebook papers, craft paper, and anything else.

On the Internet, you can find special sheets that need to be cut.

You can take any design paper with a neutral or masculine pattern.

And someone may like this color option.


So, let's start creating. To work you need:
- The above paper is 5x5 cm in size. Having mastered the technique, you can create flowers of any size. The paper may be cut neatly or have torn edges.
- Adhesive for fixing the modules.
The first version of the flower
Fold the module in half, then in half again to make a smaller square.

You need to make 8 modules in this way.

Four modules must be glued to any piece of paper with a small gap, placing them with a folded corner inward.

Then, in the same way, only without indents, we glue four more modules on top, turning them 45 degrees.

We decorate the middle, twist the edges a little, and the stylish decoration is ready.

If, when gluing the first four modules, you leave a larger gap between them, the flower will look different.
The flower is more complicated
Fold the paper squares as shown in the photo. 
First, a diagonal line is found, then the sides of the square are tucked towards it. The resulting airplane folds in half lengthwise. We make 8 identical modules. The last step: you need to carefully nest the modules one into the other, using the resulting pockets.


At the exit we get an original decoration for a man's gift.

In this case, glue is only needed to fix the already finished decor directly on the gift item. If you make modules from squares with the same pattern, fold the modules exactly the same, relative to the pattern, then your flowers will look neater and acquire an additional pattern.
Such a nice tank can be made from matchboxes and colored paper.


We glue the boxes with green paper as shown in the photo. For the tower, we take the green cap from the plastic bottle, for the barrel - we wrap the toothpick with green paper.

Cut the wheels out of black paper.

It remains only to collect all the parts and the tank is ready!


How to make a tank out of money
If your man served in the tank forces or just a specialist in the game of "tanks", then give him such an original gift -.

DIY gift for a man
How to make another very original one, see here.


Original gift set "Grow greens"
How to make such an original one, see here.


Crafts for February 23, created by a child with their own hands with great care and attention, are of great value on this holiday.
A unique gift will bring joy not only to parents, but also to the child himself, because with the help of it he will express his love for them. Let him bring joyful emotions to loved ones!
Not all men have a positive attitude towards useless gifts, therefore, help your child create such a craft with his own hands that will be useful and will not gather dust somewhere in the closet. If you think a little, then the created gift can turn out to be much more surprising and more practical than the purchased one.