In preschool and school curriculum, along with autumn crafts, homemade postcards for March 8 and christmas decorations, have a revenge to be unusual and original products from scrap materials for the Day of Cosmonautics - bright mock-ups of the Solar System, small space stations, stars and asteroids, rockets, spacesuits. Crafts for Cosmonautics Day for kindergarten and school, created with their own hands from paper, cardboard, plasticine, discs, bottles and even pasta, allow children to show their imagination, bring the distant and unattainable world of space closer, open the curtain over dozens of secrets of the Universe, literally touch hands to the secret of the universe. On our page are presented best ideas and step-by-step master classes with photos and videos. Be sure to take advantage of them!
Simple DIY crafts for Cosmonautics Day in kindergarten

We offer the smallest dreamers to make with their own hands a simple craft for Cosmonautics Day in kindergarten - space stars. Unusual figured products with small colored crystals will decorate the exhibition of children's crafts and will certainly bring victory in the festive competition.
Necessary materials for a simple craft for Cosmonautics Day in kindergarten
- chenille wire (fluffy craft sticks)
- sugar
- thin satin ribbon
- wooden skewer
- wide ribbon
- clear nail polish
- cookie mold "star"
Step-by-step instructions for creating an interesting craft for kindergarten for Cosmonautics Day
- Wrap the cookie cutter with red chenille wire. Wrap the ends of the stick, take out the mold and set the resulting figure aside. Do the same with sticks of other colors. The brighter the shades of fluffy wire, the more impressive the finished craft will look.

- Tie a thin sprocket to each finished sprocket satin ribbon... Fix the loop, hang the stars from a wooden skewer, as in the photo.

- Prepare any glass jar (or several if there are many stars). Place the skewer on the neck. Make sure the figurines are hanging loose and not touching the bottom or walls.

- Mix a glass of sugar with a glass of water and heat until completely dissolved. Pour another glass of sugar into the syrup bowl and repeat the process.

- Pour clear, sweet liquid into jars with hanging stars.

- Leave the container in a warm, bright room for several days. Crystals on the stars will form more and more tangibly every day.

- After 3-5 days, remove the stars from the water and place them on parchment paper. Let the crystals dry. Coat the space stars generously with clear varnish.

- Hang dry figurines by a string on a long piece of colored wide ribbon. Now you have ready simple craft do it yourself for Cosmonautics Day in kindergarten.

Interesting crafts for Cosmonautics Day with your own hands to school: a step-by-step master class

Younger schoolchildren are in some way smarter, more assiduous and more patient than kindergarten kids. This means that for the Day of Cosmonautics they will easily prepare not just small space stars, but the whole solar system as an interesting thematic craft. And step-by-step master classes and parenting tips will help you complete the task much faster.
Necessary materials for an interesting craft to school for Cosmonautics Day
- flexible wire
- foam balls
- plasticine
- line
- scissors
- gouache paints and brushes
- glass of water

Step-by-step master class on creating an interesting DIY crafts for Cosmonautics Day to school
- To make the sun and the major planets in the solar system, paint a few foam balls with gouache in matching colors. To create small planets, mix several colors of plasticine and form balls of different shapes.

- Using strong flexible line, twist the "system". To do this, make several orbits, on which the planets will be located. Fix the orbital rings between each other with fishing line.

- Punch through holes in the foam and plasticine balls and put the planets on the wire in the right order. In the center of the composition - the Sun, then - Mercury, Venus, Earth, Mars, Jupiter, Saturn, Uranus, Neptune.

- Tie a loop of fishing line to the very last loop of wire so that the homemade solar system can be suspended.

- At this stage, the master class is over. Take an interesting craft to school for Cosmonautics Day and listen to rave reviews from classmates and teachers.

Funny crafts from pasta and cereals for Cosmonautics Day

Working with the child to create a funny craft from pasta and cereals for the Day of Cosmonautics, parents can not only have fun and usefully while away their leisure time, but also teach the kids important things. So, during the assembly of stars, you can tell the assistants in detail about these distant and magical space objects, about their types and origins.
Necessary materials for a fun pasta craft for Cosmonautics Day
- asterisk shape for cookies
- gelatin and water
- grain and cereals
- pasta
- saucepan and spoon
- pVA glue
- gouache paint
- dry glitter
- parchment paper
- clear nail polish
- jute lace
Step-by-step instructions for creating funny crafts-stars from cereals and pasta for Cosmonautics Day

Bright crafts for Cosmonautics Day made of paper, cardboard and foam: a master class with photos and videos

It will be very interesting for children who are just starting to learn the world to study the layout of the solar system, hear entertaining facts about our galaxy, and learn about the heroes-astronauts. You cannot do without the help of parents in such a matter. Do in your spare time bright craft made of cardboard, paper and polystyrene for Cosmonautics Day and explain to the child in detail what is what.
Necessary materials for crafts from paper, foam and cardboard for Cosmonautics Day
- large cardboard box
- black and white acrylic paint
- wooden skewers
- foam balls
- foil paper
- paints and brushes
- plasticine
- line
- sharp stationery knife
- scotch
A master class with a photo and video on making bright crafts from paper and foam for Cosmonautics Day

Interesting crafts from plastic bottles and cardboard for the Day of Cosmonautics

Interesting crafts for the Day of Cosmonautics from cardboard and plastic bottles can be made even in the company of the smallest needleworkers. But before class, it is better to move actively in order to stock up on perseverance for the entire creative process.
Necessary materials for crafts from a plastic bottle for Cosmonautics Day
- small plastic bottle
- acrylic paint
- bottle caps
- colored cardboard
- glue gun
- scissors
Workshop on interesting children's bottle crafts for Cosmonautics Day

To create a festive atmosphere in school and kindergarten, teachers often use interesting crafts for Cosmonautics Day from paper, cardboard, bottles, discs, pasta, etc. They are easy to make with your own hands at home and even easier to use in decorating children's rooms.
I wonder if astronomers and scientists will ever be able to solve all the mysteries of space, to answer the question - is there life on other planets? Satellites and cameras record unidentified flying objects, directors and actors shoot documentaries and feature films, casual eyewitnesses claim to have had contacts with an extraterrestrial civilization. Maybe there are still intelligent beings in the universe?
While geniuses in laboratories are developing new technologies for studying interplanetary space, and scientists do not take their eyes off the lenses of telescopes, guys 3-5 years old make original and absolutely harmless aliens. The topic is especially relevant on the eve.
To create an alien you will need:
The alien's torso is an empty bottle. Since traditionally earthlings represent aliens in the form of green men, you will have to put on a green suit for the craft.
So, first, a rectangle of such a size is cut out of colored paper so that you can wrap the bottle up to the cap.
Then grease the plastic surface around the perimeter with PVA glue (or a pencil) and apply a green rectangle.
At the next stage, two sticks up to 1.5 cm long are cut from the cocktail tubes. Two pieces of plasticine are rolled into balls. Two cones are formed from strips of green paper - locators. The alien ears are ready.
Hands are performed according to the same principle. The mother cuts out the hands with five fingers from paper, the child deals with plasticine balls and corrugated tubes. Use glue to connect the parts.
The finished elements are attached to the alien's torso. How impressive? It remains to design the face of the alien.
Doll eyes, a cone-shaped plasticine nose and a wide smile crown the work on the craft. The green creature from another planet is ready.
By the way, it would be nice to create a space environment around the alien, to decorate the territory with stars.
The next lesson will have to think about how to design a flying saucer for the hero. Any ideas?
Lorena Kormiteleva
To manufacture we will be in technology« Paper tunnel» .
We will make such beauty with you.
Let's get started!
For work we need:

1. Scissors
2. Cardboard 5 sheets (black color)
2 accordion sheets
3 sheets for background
3. Printed blanks of planets and space background

4. PVA glue
5. A box of chocolates served as a frame for me (you can make from paper)
6. Ruler, pencil
7. Paints (gouache)
Our tunnel consists of 3 elements. Cut out circles in cardboard sheets, clearly in the middle. We decorate with paints using the "splash" method

Now we need to make the side parts of our tunnel.
We measure the height and width of the box.
Then we make two accordions that match the height of your product. Harmonic divided by 1, 5 cm.

We glue the folds.

We glue the background into the box. Insert the accordions, glue.

View from above.


Close-up.

Since my box is white, I pasted over it black paper.
Paper tunnel"Space"ready!
Related publications:
Good afternoon, dear colleagues! I bring to your attention an article on fire safety, made using the "Paper Tunnel" technique.
We take a medium-sized hoop and wrap it with insulating tape. Cover it with a cloth of the appropriate color. Make paper balls.
Lapbook "Cosmos" is intended for the work of a teacher with children 5-6 years old in a group. I made it from an ordinary cardboard box, pasted over with self-adhesive.
To make a model, materials are required: - A sheet for watercolors (A3 format) - 1 pc. ; -watercolors (colors: gray, white, black); -plain.
1. For work we need: - colored paper - black cardboard - glue - scissors - pencil 2. Cut out a rocket stencil from cardboard.
The Cosmonautics Day holiday is approaching. This year we are celebrating the 55th anniversary of the first flight into space by Yu. A. Gagarin. Due.
On April 2, our entire country celebrates Cosmonautics Day. In 1961, on this very day, our planet was shocked by unexpected news: “Man.
Evgeniya Smirnova
To send light into the depths of the human heart is the artist's purpose
You can add more variety and interesting moments to the everyday life of children if you master the new kind activities. To do this, you just need to captivate the baby. One of the developing and very original activities is making crafts with your own hands.
What crafts can be done for Cosmonautics Day with children

What materials and ideas are not used to make crafts on the topic of Space with their own hands. Space-themed items can be made from cardboard, discs, boxes, salt dough, plastic bottles, candy wrappers, plasticine and other gizmos found at home. To arrange beautiful children's crafts for Cosmonautics Day, you just need to tell the child how to do it correctly.
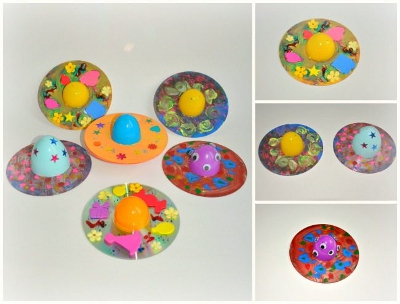
From disks
The handicraft "Flying Saucer" made from the disc will look original and unusual. The halves from the Kinder surprise will serve as a cockpit for the aliens. The plastic egg can be partially used, so it will be much more convenient to fix it on the plate. Do not forget to paint the flying saucer with your baby or stick on top of the craft stars, toy eyes and other items as desired.
From plasticine
To make an astronaut suitable for an exhibition in a kindergarten or school, you need to have plasticine of your favorite colors and imagination. Here is one of the ways how to make a craft in the form of an astronaut with your own hands:
- We roll up a ball of red plasticine - this will be a helmet.
- We fold the plasticine blue sausage and turn it into a spring. We make several spirals, which will become the arms and legs of the hero of the craft - the astronaut.
- From yellow or white plasticine we form a porthole for a helmet, draw a face.
- We attach gloves and shoes made of red color to the spacesuit.
- We cut several small strips of red tone, sculpt equipment for the astronaut and attach it to the spacesuit.
There is another option for making plasticine crafts on the topic of Space:
- We roll two balls - these will be the head and body of the craft.
- We form ten small balls and six a little larger, small ones will serve as handles, large ones - legs.
- We flatten a piece of orange plasticine and attach the crafts to the body. We attach three colored balls to the cover - we get the astronaut's control panel.
- We sculpt a porthole from white plasticine, frame it with a thin strip of red.
- We take black plasticine, make headphones and attach them to the helmet.

Salted dough
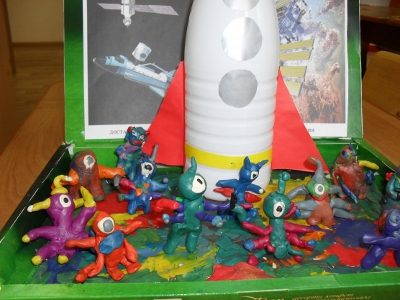
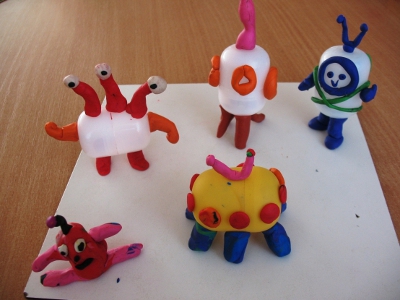
To the Day of Cosmonautics in kindergarten can you bring original craft in the form of funny aliens. To make your own work, take:
- multi-colored salted dough;
- toy stars, buttons and eyes;
- wire;
- stacks.
Aliens can be sculpted in different shapes and sizes, whatever your kid wants. We make antennas out of wire, because what kind of alien will come out without them? We glue small eyes on a creature from another planet, decorate the craft with buttons or stars. If the child does not come up with an image of the future alien in any way, tell him by making an example. You can decorate an alien as you like, it all depends on the crumbs' imagination and craft ideas.
From paper or cardboard
The rocket is one of the most popular DIY space crafts. To make it using the quilling technique, you will need corrugated stripes, an egg from Kinder surprise, PVA glue. The process of making paper crafts with children is as follows:
- Use the halves of the egg as a template for the circles.
- We wind the top of the rocket, wings, base and porthole from the strips.
- Insert an egg from Kinder into the center of the rocket, connect all the details of the craft into a single whole.
Crafts from a plastic bottle
To make a space rocket soaring up with your own hands, you need:
- empty plastic bottle;
- cardboard;
- a pump that inflates balls;
- scotch;
- water.

The main purpose of this craft for kids is to launch it into a spectacular flight. The rocket will fall apart into small pieces, therefore, you should not be too zealous with the details. Follow the instructions:
- It is necessary to cut the top of the craft in the shape of a cone and 3 rocket blades from the cardboard.
- All received elements must be tied with tape to the container.
- After completing the previous steps, insert the pumping needle into the stopper. The hole must match the diameter of the needle, otherwise water will flow out of the rocket. If they do not match, water can be poured already before starting.
- It's time to power the pump and watch the rocket fly!
Step-by-step instructions for making crafts on the topic "Space"
Cosmonautics Day is a great occasion to tell kids about outer space and make DIY crafts on the topic of Space. Any materials at hand will help to create an original work. It's much easier to do any craft with step-by-step instructions in front of you. Use the guide below for detailed steps on how to glue or mold popular holiday attributes.
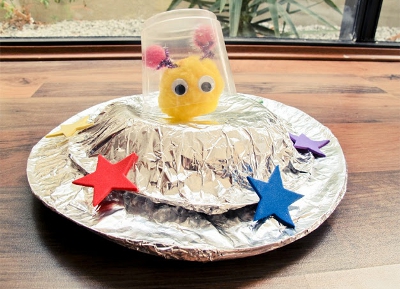
How to make a flying saucer
A self-made UFO will delight the baby. To make the craft, you will need a plastic bottle with a disposable plate. Let's get started:
- Using scissors or a utility knife, carefully separate the bottom of the bottle.
- We cut off its upper part, cut off the neck.
- Put the bottom of the bottle on a plate, draw a circle with a marker.
- Cut out the circle, departing from the drawn borders. We make incisions.
- Insert the upper part of the bottle into the resulting hole. It will be fixed thanks to the incisions.
- We fix everything with adhesive tape, we get a craft cabin.
- Insert the bottom of the bottle from below, fix it.
- Attaching the bottom of the bottle to paper or shiny cardboard, draw a circle and cut out a circle. We insert the plates into the hole.
- We trim the edges of the plate with scissors so that they coincide with the edges of the cardboard.
- Place the top of the bottle in the middle.
- We seat a plasticine alien inside the flying saucer - the main character of the craft.
- With soda, vinegar and citric acid, you can make a real acid rain or a whole volcano! To do this, put a small amount of soda in a container, dilute the vinegar with water, gradually adding vinegar or citric acid to the soda. It will turn out to be an indescribable sight!

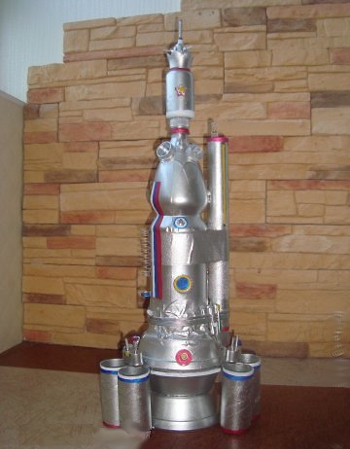
Rocket from a plastic bottle
Making crafts on the topic of Space with your own hands is very interesting. You can make an original rocket with a child if you have:
- white acrylic paint;
- plastic rectangular bottle;
- three lids of different colors and sizes;
- two cardboard tubes;
- thick cardboard orange, red, yellow;
- felt-tip pens and pencils;
- scissors;
- hot glue.
We make the craft step by step like this:
- Pour white paint into the bottle. Shake well so that the paint evenly stains the entire inner surface. It will be less laborious if you immediately take a white bottle.
- We paint the tubes in the desired color or decorate with a drawing. We make tongues of flame from colored cardboard, glue them to the inside of the case. In order for the flame to develop beautifully, you can also cut it out of the newspaper. We attach the nozzles with fire to the bottle with hot glue.
- Multi-colored plastic covers serve as portholes. We attach them to the front of the future rocket with a glue gun.
- Cut out two cardboard triangles, paint with felt-tip pens, glue on both sides.
- We attach the plastic cup to the bottom of the rocket. It will serve as another nozzle and a reliable base for the rocket.
- After the glue dries, the product will be completely ready, you just have to come up with a name.
Planets of the solar system from plasticine

By the day of Cosmonautics, it is better to do crafts on the topic of Space with your own hands. This will help the child learn a lot and have fun with mom or dad. To sculpt the planets of the solar system sculpt easily when there is step-by-step instruction at hand:
- We take a dense sheet and colored plasticine to create an unusual composition.
- The sun will be the central object of the craft, we begin to sculpt with it. To do this, mix yellow, orange, white colors, but so that they can be distinguished, you do not need to make a single color.
- Glue the resulting mass in the center of the sheet, smear it with your fingers in a circle.
- To get the orbits of the planets for crafts, roll out thin threads from white or beige plasticine.
- Create nine rings around the Sun.
- Mercury is the smallest planet. We roll it into a ball, mixing small pieces of gray, brown and white flowers... We squeeze craters with a toothpick.
- We make Venus three times larger from black, brown and gray. Set the relief of the planet with a wire.
- Earth is the brightest planet in the solar system and crafts. We create it from green, blue and yellow plasticine.
- The mysterious Mars is obtained by mixing orange and black.
- For a large Jupiter, you will need beige, brown and orange stripes.
- We form Saturn, attach a ring around its axis.
- We sculpt uranium with a ring from blue shades.
- Neptune looks like a regular blue plasticine ball.
- Little Pluto comes from gray and white.
- When finished, lay out the planets in order and attach to the orbits in which they should be located. The process of sculpting the craft can be made even more creative if you draw a lunar rover or a comet on a sheet.
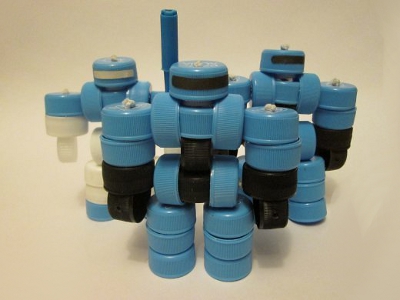
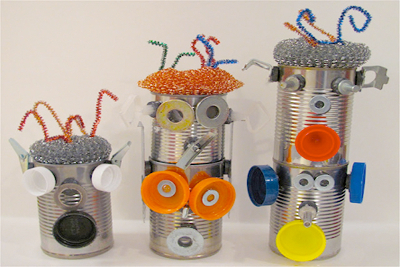
How to make a robot out of scrap materials
One of the simple, but unusual, options would be a robot made of plastic lids. The assembly method for such an original product is simple.
Summary: Cosmonautics Day. Crafts for the Day of Cosmonautics with your own hands. Children's crafts on the theme of space
In many schools and kindergartens last years began to organize exhibitions of children's crafts on the theme of space on the eve of Cosmonautics Day. In this article, we will tell you about what interesting crafts you can do with your children for this holiday. The most popular material used for crafts for the Cosmonautics Day is the so-called. waste material: plastic bottles, cardboard boxes, cardboard rolls from toilet paper, parts from broken toys, etc. When making space crafts, it is also good to have a glue gun on hand.
1. Crafts for the Day of Cosmonautics. Flying saucers
It is very easy to make a flying saucer out of plastic or paper disposable plates... Choose plates of different diameters and depths for this craft for Cosmonautics Day.
Finished flying saucer can be wrapped in foil
or paint with silver spray paint. Don't forget to make signal lights for the flying saucer, for example with buttons or rhinestones.
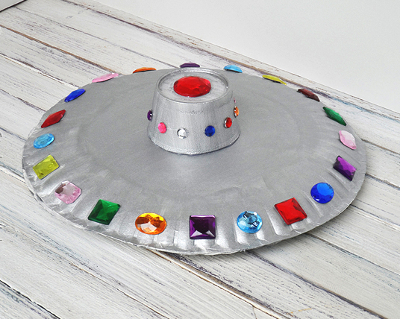
You can also make a flying saucer from an unnecessary CD and half a kinder egg.
2. Day of Cosmonautics DIY crafts. Starships, space stations
In this section, we will tell you about one interesting way to make DIY crafts for Cosmonautics Day. A beautiful starship or space station can be made from waste materialthat you can easily find at home. Use a glue gun or double-sided tape to fasten all the parts of the craft together. Finally, paint your Cosmonautics Day craft with silver spray paint. Additional details can be painted with acrylics.
Here is another example of a similar craft for Cosmonautics Day. The space station body is made of an old aquarium filter, car wheels, plastic bottle, leftovers from pens and all sorts of broken toys, wings - a cut floppy disk. Everything is covered with spray paint. Link.

If your spacecraft made from junk material has few small parts, then at the end you can simply wrap it in foil. See what kind of lunar rover came out of a plastic jar and bottle caps.

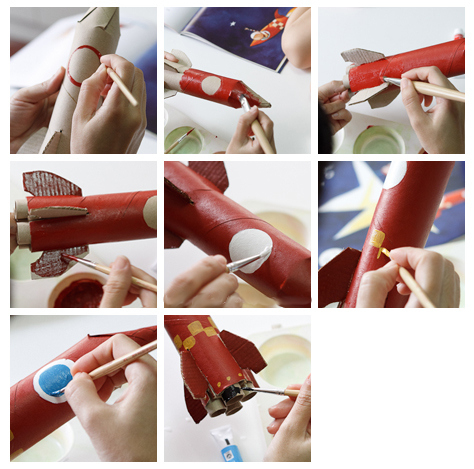
3. Space crafts. How to make a rocket with your own hands
The easiest way to make a rocket for Cosmonautics Day is from a cardboard roll. In the photos below you will find detailed master class for making this space crafts with your own hands.
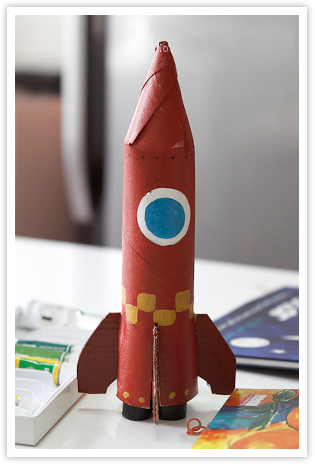
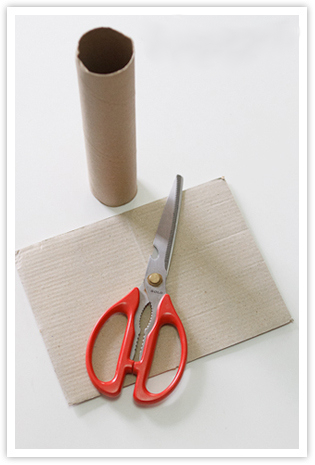
Make cuts on one side of the roll. Twist the strips into a cone, glue them together.

Use an extra piece of cardboard to make a rocket stand and motors.

Paint the rocket with paint. Space craft is ready!
Robot from corrugated cardboard... Link
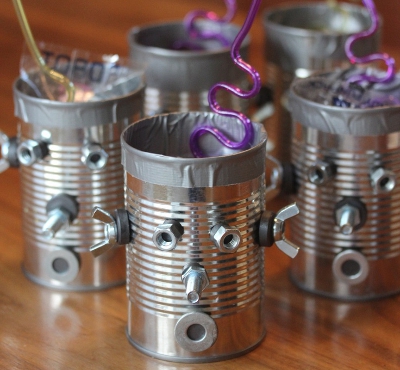
Tin can robots

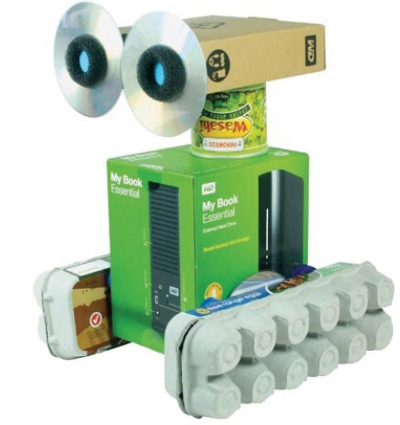
Robots made of cardboard boxes

5. Children's crafts on the theme of space. Aliens
You can make a humanoid from newspapers and napkins by wrapping them on the outside with foil.

You can mold an alien from plasticine
or made from junk material.

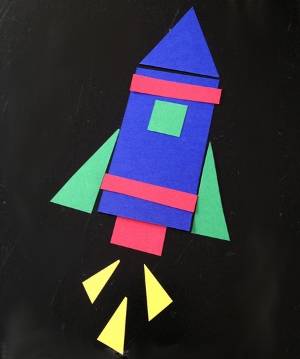
6. Crafts for the Day of Cosmonautics. Space-themed paper applique
A simple craft for the Day of Cosmonautics for children is a paper applique.
Geometric rocket applique
Origami paper rocket