Tatiana Pivovarova
Target: train children embroidery technique"back stitch".
Tasks:
Educational:
teach basic skills embroidery using a cardboard base and a homemade needle, in a safe way. Refresh your sewing knowledge embroidery and the necessary tools for this. Extend Views children about the environment. Activate vocabulary with words « embroidery» ,"needle eye", "stitch", "wrong side, "front side" "clew".
Educational:
develop fine motor skills of hands, coordination of movements. Develop observation and interest children, imagination. Educational: to cultivate a desire to acquire a useful skill in life. Cultivate respect for work embroiderers. Cultivate the ability to notice the beauty of winter nature.
materials: sheets of cardboard with rows of holes (square of 9 rows of 9 holes, homemade needles from straightened paper clips, woolen thread in white and blue colors.

Preliminary work with lacing - tying a knot at the end of the lace, tying a simple knot. Album review "Russian traditional embroidery and embroideries of the peoples of the world» .
move master class:
The whole window is in icy patterns,
Delicate, thin and sparkling!
This, says the winter,
All I embroidered by myself!
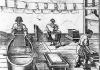
Winter craftswoman, embroiderer. A snowstorm sweeps, a blizzard circles, embroiders patterns on the windows without a needle and thread. We can too embroider a frosty pattern - a snowflake but we need needles and threads. Let's try?
(We distribute "needles", woolen threads and cardboard bases with a traced pattern embroidery.)
Our needles are like real ones, they have a point, and "ear" in which to thread.
Here we have a ball of thread. Usually the thread is measured So: we hold the tip of the thread in our fingers, stretch the ball to the shoulder, and cut off the piece of thread thus thrashed with scissors.
Let's thread the thread.
Now we would need to tie a knot at the end of the thread, we already know how to do this. But the holes in our cardboard are large, and we will fix the end of the thread differently.
Let's see where we start embroider a snowflake. From one of the long rays. On the fabric, we would pierce the holes ourselves, here they already are. When we pierce the fabric, a piece of thread remains on top. This "stitch". We will fasten our thread at the beginning of the ray snowflakes, and we will move along it with return stitches - pierce from the bottom a stitch forward, and returning back. (demonstrate). The secret is to top with our stitches, as it were "drawn" Snowflake. You will immediately see the skipped stitch, and it can be easily corrected. Let's tie a thread in place of the first stitch with a simple knot from below, and start embroider. Whoever finds it difficult - contact me (the teacher helps those who wish to fix the thread, once again individually explains to those who turned to him the beginning and progress of work).
Having finished the first "ray" snowflakes, we will move on to the next one from below. Whoever runs out of thread - you can take another and tie them together from below, on "wrong side" a simple knot. It won't look as pretty as the main one, "facial" side. This is how it should be - we, for example, all noticed that the inside of our socks and tights is not so beautiful, and put on "inside out" thing is immediately visible. " "Facial" party - festive, "purl"- everyday" - says the proverb.
(Children do the work, individual assistance of the teacher in difficult moments).
After completing the main work, children who wish can do "frame" from a blue thread.
After completing the work, we consider them with the children snowflakes Let's remember what we need to do. Solving riddles (from the site “Riddles. RU")
I am fluffy, soft, round,
There is also a tail, but I am not a cat.
I often jump hard
I'll swing - and under the chest of drawers. (Clew).
Not a toy, not a pet
Run - leave a trace.
And always lend an ear
If there is no thread in the ear.
(Needle)
To sew or embroider,
It needs to be taken in hand.
Multi-colored coils
I have a girlfriend.
We embroidered postcards,
We needed (Threads)
One ear, long nose,
No eyes and no hair
Metal body.
She does not sit idle
She pierces the fabric.
This is a sewing (Needle)
Knotted side
No one is visible. (Inside out)
And the other side
fall in love with me (Front side).
Discussing easy or difficult embroider. We note that we have a small embroidery and it wasn't easy for us. Looking back at recent examples satin stitch embroidery(we discuss that this work was usually done by women, we discuss difficult work embroiderers).
We decide with the children where we will place the resulting work (we decorate them with lockers). Suggest embroider a snowflake at home, with parents, on a piece of cloth.

Related publications:
Good afternoon! I want to tell you about the wonderful experience of uniting parents, children and teachers. Recently, we organized a master class.
As they say, "the rules of the road are worthy of respect." This is what we demonstrate to our guys every day, year after year. We carry out.
Master class for children of the preparatory group and their parents "Our Turkic brothers" Master class for children of the preparatory group and their parents "Our Turkic brothers". Purpose: to introduce children to the culture of the Shor people;
Master class "Making a snowflake from threads" Topic: Methodology for organizing and holding an exhibition of decorative art in educational institutions. A series of master classes on decorative.
New Year's Eve is the most favorite holiday for children, and many adults. Children are happy to prepare for the meeting of Santa Claus. Teach.
Many needlewomen prefer to make New Year's gifts with their own hands. But after all, a New Year's gift should be decorated accordingly. Embroidery decoration has always been considered very beautiful and elegant. Snowflake embroidery will make any thing original and unique.
Your ideas for Christmas decorations at home can impress your friends and relatives. So think about how you could decorate the room with more than just traditional decorations. And if you already have almost finished products, but you don’t know how to decorate them, you can always use embroidery. For example, it can even be a simple tablecloth.
Cross stitch for the New Year perfectly decorate the tablecloth, which you can set on the festive table. Embroidery of a snowflake will not take you a lot of time, especially if you take into account that there are schemes of various complexity and size.
Snowflake embroidery will look great on the corners of the tablecloth. And if you take into account what goes well with various decorative elements, such as ribbon bows, rhinestones and beads, your New Year's tablecloth will be originally decorated. We offer you embroidery schemes for the New Year, which depict snowflakes.


Snowflake embroidery can be monochrome, as well as in two or three colors. Monochrome embroidery will take you much less time. But adding color will make your work more decorative. By the way, monochrome embroidery is also good because it is very easy to select additional decorative elements for it.
New Year's snowflake embroidery can also be done using a conventional sewing machine.. You can embroider with a machine very quickly, but the resulting patterns will surprise everyone with their smooth lines and the complexity of the elements. Of course, embroidery with a sewing machine requires some skill, so it is better for beginners to practice on a separate patch. Simply redraw the pattern on the fabric and place the sewing machine in the embroidery position (only if this function is provided in the model of the machine). You can start embroidering snowflakes with the sewing thread you have chosen.
Remember that high quality machine embroidery snowflakes You can only do it on thick enough fabric. Therefore, use a good dense fabric for machine embroidery. When embroidering, always keep an eye on the tension of the fabric. Insufficient tension will cause your work to be damaged.


Using seam back needle, You can also embroider beautiful snowflakes. This snowflake embroidery will look great on things made of thin fabric. Usually, threads of the same color are used for embroidery with a back seam. To emphasize the beauty of embroidery and make it more festive, you can use metallic threads. Such snowflakes will shine and shimmer beautifully. You can also use special threads dyed in three colors. This way you will create beautiful and unpredictable shades!


Snowflakes are so diverse that among the billions of these beautiful creations of nature, no two are the same. Unfortunately they don't last very long...
Due to their beauty and variety of shapes, snowflakes are one of the most common and favorite cross-stitch patterns for embroiderers, along with floral motifs, a variety of stitch types used in embroidery.
Embroidered snowflakes decorate sofa cushions, embroidered pictures, needle beds, sachets, clothes, tablecloths, napkins, curtains, etc.
Using threads of different textures and shades, you can get different results, even embroidering snowflakes according to the same pattern.
Below you will find eight snowflake cross stitch patterns. All of them have the same size - 25 x 25 crosses (Fig. 1-8). To see the diagram in a larger size, click on it.


These snowflakes look great both individually and combined into one composition (Fig. 9)

It is better to embroider snowflakes with white threads (two-fold floss) on canvas or blue, blue, gray, green or beige fabric, as, for example, in the embroidered picture “Snow Tree”, the diagram of which is below (Fig. 10). To see the diagram in full size, click on it. It will open larger. Click on the arrows in the lower right corner and it will open in full size.

Cross-stitching brings aesthetic pleasure to needlewomen in the process of work. From the stitches in the shape of a cross, a picture is formed. Having embroidered one of the schemes, you will remain a fan of such craftsmanship forever. Continuing the theme of cross-stitch, we invite you to study simple snowflake patterns. Such pictures do not have to be created for the New Year holidays. This needlework is done at any time of the year.


Snowflake embroidery patterns are so diverse that it is impossible to find two identical ones. Snowflakes are many-sided and beautiful, they are loved to cross-stitch as well as flower arrangements. They are decorated with small sofa cushions, paintings, zigugu pads for needles. Cross-stitch snowflakes on garments and various textiles, on tablecloths, napkins and curtains. If you use colored floss in your work, the result of embroidery will look more spectacular.
Combine the snowflakes together for an interesting cross-stitched tree. It is present in the photo along with the embroidery scheme. These snowflakes are embroidered with white floss folded in half. Canvas is selected in a contrasting color. It can be blue, grey, green or beige.


New Year's embroidery of snowflakes
 Homemade gifts will delight relatives and friends more than those bought in a store. These are kitchen utensils or handkerchiefs with embroidered snowflakes. Buy socks without a pattern, and embroider an ornament of your choice yourself. There are special patterns for embroidering beautiful snowflakes on accessories and clothes. The cuffs on the sleeves or the edges of the collar are embroidered with a cross. A simple winter sweater will also be wonderfully decorated with scatterings of snowflakes. You need to think in advance how far the snowflakes are from each other, the shape and size of the details.
Embroidery process
Choose a suitable snowflake pattern, transfer it to the canvas, and insert the fabric into the hoop. Use shades of thread depending on the color of the canvas. Don't limit yourself to standard shades. Start making the first stitches according to the pattern so that they are diagonal. Then go back and do another strip, also diagonally. It turns out the first row of cross stitch embroidery.
Continue to embroider the next rows and refer to the selected pattern. When you are done with one thread color, move on to the next shade. Embroidery begins in the center of the canvas, gradually moving to its edge. The stitch that ends the row is directed in one direction.
On thick fabric, embroider with a needle-forward stitch or chain stitch. In it, the stitches are directed from the center. It is important to follow this pattern, otherwise the cross-stitch will not look neat, and the flaws will become obvious. If you are working on a thin canvas, make stitches using the “back needle” technique.
On the wrong side, the main material is attached under the stitches of the embroidered strip. For those who decide to embroider a snowflake on clothes, it is better to use an additional canvas. Get your child involved. Children associate snowflakes with the arrival of winter and the New Year holidays, so they will love cross-stitch.
Video: Cross stitch patterns for snowflakes
Schemes of snowflakes in the technique of the cross