As you know, no home can do without a needle. But, unfortunately, they can easily get lost and pose a danger to others. To prevent such troubles from happening, it is better to get a needle bed, moreover, of your own production. It's nice when this piece of furniture looks unusual and aesthetically pleasing, pleases others, and inspires the hostess to new achievements in the field of needlework.
Of course, you can also buy a needle bar in a store, but a hand-made product will never compare with the purchased product. And the variety of ideas for needle beds is so huge that each needlewoman will be able to choose a model to her taste. In addition, this archival item of sewing accessories is often made from the remnants of fabric, lace, a piece of felt or patches, which will not require special expenses. But the process of creativity and creation of a small work of art will bring a lot of pleasure and positive emotions.
In the selection of today's material, various ideas for making needle beds are described, ranging from the simplest and most elementary to more complex and artsy products.
The master classes and recommendations for creating needle cases presented in the article will make the process simple and accessible even for beginner craftswomen. A thematic selection of photos and a detailed video lesson will surely inspire you to create a new masterpiece in the form of a home needle bed.
By the way, this item for needlework is perfect as a gift or present for any woman.

In the process of sewing, it is very convenient to have a needle bar on hand to prevent the loss of a needle or sewing pins. Needle beds come in a variety of sizes, textures and shapes. It can be a simple pillow, a knitted mushroom or cactus, or it can be an elegant hat or a stylish mannequin. In this case, it all depends on the desire, skill and availability of the necessary materials.
Simple do-it-yourself needle beds
Perhaps the most simple will be needle beds - pads that are easy to make without any patterns and special tools.
You need a piece of fabric, filler (synthetic winterizer, cotton wool) and a needle and thread. But even in such light do-it-yourself needle cases, there is scope for a flight of fancy. By sewing on buttons, beads or beautiful braid, embroidering initials or making a rose from a thin ribbon, you can completely transform a model of a needle bed that seems so simple at first glance.

Here is the simplest example of making a round needle bed:
- a circle is cut out of cardboard (for the stability of the future needle stand);
- a piece of fabric is prepared larger than a circle of cardboard; slightly pulled together with a simple seam along the edge of a circle of fabric;
- a synthetic winterizer is placed in the fabric, and a cardboard circle is placed on top;
- connecting the parts (you can additionally glue the fabric to the cardboard) with stitches by hand, fix the product around the cardboard frame;
- decorate the needle bed with beads, beads, thin braid.


A variation on the theme of a round needle bed will be “pumpkins” or “flowers”.

In this model, a cardboard circle is not required. Two, identical in shape, round parts are sewn together, stuffed with soft material and decorated with large stitches. At the end of the work, they are decorated with improvised means (a beautiful little button, a bright ribbon).

Another interesting and convenient device for a seamstress will be such a needle holder with a fixing tape on the arm. It can be a thick thick elastic band or Velcro tape.

Such needle beds can be of different shapes: round, square, heart, or, more complicated, in the form of an animal, handbag, shoe.
Needle beds made in the form of ladies' hats look original and elegant. Making them is not difficult at all, and the result will exceed all expectations.
Do-it-yourself needle case "hat"
Let's consider a step-by-step master class of an unusual do-it-yourself needle bed "Hat in peas":
- Prepare a cardboard circle and a twice as large circle of fabric - these are the future fields of the hat.
- Carefully fix the fabric on the cardboard circle, making uniform folds.
- Cut out a second circle of fabric, equal in size to the cardboard pattern.
- We place a small piece of synthetic winterizer inside the fabric and sew it together.
- We connect two parts (you can sew or glue).
- We decorate the needle hat with a ribbon with a bow and small flowers (you can use beads, beads, decorative ribbon bows and artificial small flowers).
- In 30-60 minutes you get a great tool for needles and pins.

By changing the color or fabric of the product, you get a completely new and beautiful masterpiece, which you can admire endlessly. At will, you can create hats of different styles: gentle and aristocratic or modern and sporty. There are, in fact, a great many options. The main thing in this business is to show imagination and realize what was planned.


Do-it-yourself needle beds from a jar
Many needlewomen, in the manufacture of needle beds, use improvised tools such as cans. Jars are chosen whole, small, if possible - beautiful. But ordinary small jars of mustard or baby food are also suitable. The main thing is to skillfully decorate the container and turn it into a "assistant for a seamstress." What is the convenience of such needle beds?

And the fact is that the jar, in addition to the needle pad, also serves as a storage place for small buttons or beads. Thus, the double task of the product is fulfilled: practicality and beautiful appearance.

Consider a detailed master class for making a needle case from a jar with your own hands.

You will need a jar with a lid, thick fabric for a pillow, decorative elements (linen ribbon, lace, paper flowers, silk ribbon), synthetic fluff, glue, cardboard.
- A jar with a lid of the desired size, wash and dry.
- Prepare a pincushion for decorating the lid.
- To do this, cut out a circle of fabric (twice the diameter of the lid) and a cardboard circle (equal to the diameter of the lid).
- Put a little synthetic down or synthetic winterizer and a circle of cardboard for a strong fixation (detailed instructions are given in the description of the manufacture of a round needle bed).
- With stitches, firmly tighten and fix the fabric around the cardboard circle, while pressing the sintepuh.

- Glue the finished pad to the lid of the jar (you can lightly sand the surface in advance for a tighter fit).
- Decorate the jar with braid and ribbons using special glue.

In order for the jar to remain functional, when decorating it, you should not glue the junction with the lid. It is enough to decorate the pillow on the lid, for example, with an embroidered flap and matching braid.

If the manufacturer does not pursue such practical goals, the jar can be completely decorated, changing beyond recognition.


Do-it-yourself needle beds from felt
A very popular material in modern needlework is felt and felt. Soft and pleasant to the touch, easy to sew, felt in handicrafts looks bright and original. Needle beds were no exception: products in the form of animals, plants, household items cannot but cause a smile and tenderness of others.
Actual models will be cacti, the needles of which will visually replace sewing needles and pins. Such a needle case looks natural and is very easy to make.


- First, you need to cut out all parts of the needle bar from felt.

- You can make a pattern yourself or use an approximate option, double it and print it on a printer.
An approximate pattern of a do-it-yourself needle bed "Cactus"

- On the finished parts you need to leave allowances for seams.
- Sew all the details, turn them out and fill them with some soft material (foam rubber, cotton wool, remnants of fabrics or threads).

- Connect the parts to get a whole product.

- Decorate the cactus with a felt flower in a bright color, such as burgundy or red with a button instead of a core, and the needle bar is ready!

Felt is a non-woven durable material with a soft, felt structure. It is very easy to work with, because its edges do not crumble and do not need to be additionally processed with an overlock. It is perfectly bent, glued, has no inside and face. And crafts made of felt are soft, slightly fleecy and very pleasant to the touch.
That is why felt needle beds are distinguished by some kind of “homely”, warm atmosphere of perception, they create real comfort in the house.


These funny and cute needle beds can be sewn from pieces of felt. By the way, the task is greatly facilitated by the fact that now felt in small pieces is sold in needlework stores, especially for crafts. And the color scheme is so diverse that you can easily choose the right shades, combining and combining, “as your heart desires.”
Do-it-yourself needle book
You can also make needle books from felt. They are very roomy and unusual. Well, everyone can decorate and transform such a “book” at their own discretion.
The main thing in such needle beds is to think about what the main frame will be made of and what decorative elements will be used. The book can be either whole or divided into halves, sewn by hand or on a sewing machine. A fundamentally important condition is the presence of soft felt in the middle of the book so that the needles can easily be fixed in the needle bed.
Pincushion books are popular, the flyleaf of which is decorated with embroidery. Such an unusual solution for the needle bed makes it look like a real mini-book or notebook. The drawing for embroidery is selected small, compact, ornamented. Most often, these are plant and floral motifs. Connect the book, as a rule, with a silk ribbon. On the inside of the book, the felt is either glued or sewn on.


Thematic decorative elements used to design the “title page” (pin, miniature scissors or reel) are easy to purchase in specialized needlework stores. Such details refresh the craft in their own way, giving it an individual character.

The fastener for the needle book can also be made in the form of a loop and buttons. There may be two or more pages in such a "book", depending on the need. They can be completely made of felt or partially glued to the base material.


Application on the book-pincushion is a stylish and fashionable element of decor.

If there is no felt at hand, a needle bed of this shape can also be sewn from another material: cotton, cotton or linen.
With this shape of the needle bed, it is convenient to take it with you in case of departure or give the child for labor lessons. All sharp needles will be securely hidden in a soft book. This is one of the main advantages of such a needle bed, all other models have an open look.


One of the most difficult, but also the most attractive, is the mannequin-shaped pincushion. Graceful figurines are often made in a romantic, vintage style, which makes them seem even more sophisticated and delightful.
Do-it-yourself needle bed "mannequin"
Such needle beds are made in full silhouette or on the footboard, using many additional accessories. A beautiful do-it-yourself needle bed, in addition to its intended purpose, will become a real decoration of the interior. Of the materials, you may need silk, velvet, velveteen, cotton, flannel, tulle and a variety of stylized accessories.

Subject: work
Lesson topic: Making the Pincushion - "Hedgehog" as a gift to mom.
Goals:
Educational
To introduce students to the types of seams.
Exercise children in sample analysis, planning, control when doing their work
Educational
Education of will, perseverance, accuracy, commitment, respect for materials and tools. Education of diligence, conscientiousness, diligence, aesthetic taste, a sense of respect for work, the ability to work in a team and for the team, work culture.
Educational
Improvement of the sensory sphere, development of figurative logical thinking, development of its spatial representations, development of design and creative abilities, development of memory, imagination, attention and speech
Lesson plan:
The topic of the lesson is designed for two lessons.
Preparation for the lesson: each student should purchase a white padding polyester, a pack of pins, and will also need cotton wool, a needle, white and black threads, pieces of dark-colored cloth, scissors.
We purchased the synthetic winterizer in bulk, so to speak, so we cut it into pieces about 20x10 cm in advance

During the classes.
1. Organizational moment.
Prepare the workplace (remove all unnecessary, get what you need).
Hand out pieces of padding polyester to the attendants


2. Explanation of goals and objectives.
Remind also about safety precautions when working with sharp and cutting objects.
3. Practical work.
Step 1. According to the patterns, cut out the details of the “back of the hedgehog” from dark-colored matter.


Step 2. Sew tucks on the "back of the hedgehog"


Step 3. Sew the two pieces of the back


Step 4. Cut out the details of the tummy and paws from the padding polyester.


Step 5. Sew the paws, twist and stuff with cotton.


Step 6. Stuff the "back of the hedgehog" with cotton and sew it to the "tummy"


Step 7. Cut out a bag from the synthetic winterizer - it will be a "hedgehog's muzzle", carefully sew along the seam, turn it inside out, put it on the hedgehog and flash it.


Step 8. Decorate the hedgehog's ears


Step 9 And the most pleasant final part of the work. From the pins we make eyes and a nose, we pin the rest of the pins on the back.


10 minutes before the end of the second lesson, we got 8 of these cute and funny creations.

By the end of the second lesson, 13 pleasant surprises for mothers or grandmothers were already ready. The rest finished at home while mom was at work, or in the classroom after school. But there were also those whose needles turned out to be crooked, and the material did not pierce, and the synthetic winterizer turned out to be too loose, well, in general, it would be boring to live without such guys.

Mothers and grandmothers, according to the students, were simply happy when they received such a pleasant surprise.
State secondary school №31 of the city of Nukus

Master class of a trial lesson on labor.
Lesson topic: Making a needle case - "Hedgehog" as a gift to mom.
Primary school teacher. Kovaleva E.V. .
- a necessary thing in every home. This is very convenient, since all the needles are collected in one place and you do not need to look for them. In these master classes, we will crochet four types of needle beds. It is knitted quickly and easily, literally in one evening. But they look very cute and unusual. They exude warmth and comfort, a wonderful gift for a friend, mother or grandmother. 4 step-by-step descriptions prepared for you by our permanent author.
Pincushion "Cup of tea"
To knit a needle bed, we need:
- Yarn of red and sand color;
- Hook;
- Sintepon;
- Needle.
Any yarn is suitable for this needle. You can even use leftovers. Karachay yarn is well suited here. It keeps its shape perfectly due to its roughness and rigidity. You can take a softer and thinner yarn. But then it is better to knit in two threads.
We start with the main part - the cup. We knit two air loops. And then we begin to knit the first row. We knit six single crochets in the second loop. The entire needle bed will be connected precisely with single crochets.
photo 1

Now you need to make increases in several rows. We knit in the second row an increase in each of the loops. In the third - we knit an increase through a loop. In the fourth - after two and in the fifth - after three loops.
So we knitted rows with increments and got thirty loops. No more additions are needed. Otherwise, the needle bar will turn out to be too large.
photo 2

Next, we will knit five more rows in a circle. And we will not make additions to them.
We will get half the ball.
photo 3

Now you need to tie a handle for the cup. Let's make six loops and close these loops into a ringlet.
And then we knit eight rows in a circle with single crochets.
photo 4

And immediately we sew a handle to our cup with a needle.
photo 5

Then we take sandy yarn, or you can use brown, and knit two air loops. Next, we knit six columns in a loop, which is further from the hook.
In several rows, we will perform increases. We knit in the second row an increase in each of the loops.
In the third, we perform the increase through the loop. In the fourth - through two and in the fifth through three loops. If the yarn is thicker than the one from which the cup is knitted, then we knit one row less. If thinner, then a row more.
photo 6

And now we fill the cup itself with synthetic winterizer. And we sew our resulting circle on top. You need to sew so that the seams are not very visible.
photo 7

We hide all protruding threads inside the needle bar or simply cut them off.
The crochet cup of tea is ready! It remains to place needles in it. The needle bar can be placed on the table or hung by the handle on a carnation or hook.
photo 8, 9

A funny and cute needle case came out, what do you think?
And so that our cup is not bored, we will connect another sweetness to it - a cake. In one needle case you can store needles, and in the other, next door, you can store pins.
Pincushion "Cake"
If you like to decorate your house with interesting knitted products, then this master class is for you! In it, we will look at how you can knit a needle bed in the form of a cake with cream.

For such a needle, it took:
- Yarn Art Jeans yarn in beige, Children's Novelty yarn in white and lilac;
- Hook 1, 75 mm;
- Scissors;
- Sintepon;
- Needle.
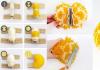
First we knit the shortbread, so we start with beige yarn. We make a sliding loop and perform 6 sbn into it.
We tighten the loop. Next, we will knit in a circle with increases and decreases. In the 2nd row we will knit 2 columns 6 times, that is, 2 in each loop.
In the 3rd row, you also need to perform 2 columns in a loop 6 times, but since there are now 12 loops, we knit 2 sc in each 2nd loop of the row.
In the 4th row, we will perform 2 sbn already in the 3rd loop.
It remains to connect 2 rows with additions.
5 row. We knit 2 sc in every 4th loop.
And the last row with increments remained. We do them every 5, that is, in the 5th loop of the row. A total of 36 loops will be obtained.
Photo 1

In the new row we will knit 36 sbn, we start the hook only behind the back wall of the loop.
Let's repeat the previous row again.
In the new row we will knit for the back walls of the loops and decrease every 4 loops.
Photo 2

Further, we will knit all the rows for both walls of the loops. We subtract after 3 sc.
Then we decrease in 1 row after 2, and in the next after 1 loop. Fill the part with synthetic winterizer. You don't need to fill too tightly. The part should not look inflated.
Then decrease in each loop until the hole closes. We will tighten the thread and break it.
Photo 3

The shortbread is ready. We knit glaze. We start with white. We make 21 air loops. Skip the loop and knit 20 sc.
We knit all subsequent rows for the back walls.
Then we make 1 loop for lifting and perform 2 sc in the first loop. Next, we knit 17 sc. At the end there will be 2 loops. We will knit them together, that is, we will make a decrease.
We change the thread and start a new row with a lifting loop. We immediately knit a decrease. Then 17 sbn, and in a new loop 2 sbn. There will be 20 sc in total again. We turn around, knit air, then 2 sc in the first loop, then 17 sc and then decrease. We change the thread. We do air, decrease, 17 sc, increase.
So we will knit a total of 22 rows, alternating 2 rows of each color. Between increases and decreases should always remain 17 sc. We decrease and add in each row in just the same place.
Photo 4, 5


Now we connect the first and last rows and sew them together. We turn the part out and get a cylinder.
Photo 6

We thread the needle and pass the needle between the rows from above. Then we tighten the thread.
Photo 7

We do the same from below. Now just push the bottom inward. The resulting part must be sewn to the cake.
The pincushion in the form of a cake is ready!
One would like to say “Bon appetit”, but no - carefully, needles!
Then let's knit needle beds, which should be prickly by definition - a cactus and a hedgehog. Here, all the needles are exactly in their place.
Cactus
The pincushion can be knitted in any size, we have it small and compact, but you can make at least a Mexican cactus (by the way, I'm interested, if possible, send a photo 🙂).

For knitting you need:
- Yarn green, pomegranate, yellow and brown;
- Scissors;
- Hook;
- Sintepukh;
- Needle.
Let's make 2 loops. After that, we will make 6 columns without a crochet in 2 loops from the hook. Now we need to work 1 row, making additions to each of the loops.
In the new row, we will continue to make increases. Only this time we knit 2 columns through the loop.
We connect the last row with additions. Increases should be done in every 4th loop. That is, after 3. As a result, we will knit 30 loops on a circle.

The next 4 rows will be knitted simply without additions. 30 columns in each row.

Then we round the part, so we knit with decreases. First, we decrease through 3 loops. In the new row, we already decrease after 2 loops. And knit a row with a decrease through the loop.
We have a hole of 12 loops left. We fill the part with sintepuh.
Now we will knit a process on a cactus. We knit 1 row of 12 columns.

Then we add after 1. We perform 4 rows of 18 columns. Fill in the details. The next rows will all be decreasing. First through the loop, and then we knit the decrease in each loop until the part is closed.
Take the green thread and pull the process. That way it will stand out better.

Then we double each loop. We knit the next row without increments for the back wall of the loops.
Then we will tie the increase through the loop. And we will complete the new row without adding.
Now we will perform additions in every 3rd loop. And then we knit 1 row without adding anything.
Then we will knit 2 more rows without increments. That is 24 columns.

We fill this pot with filler.
We begin to knit the earth. To do this, you just need to tie a amigurumi ring of 24 columns. We also start with 6, then add to all loops, then through 1 loop. And we knit 1 row, adding through 2 loops.

We sew a cactus to the resulting part. Then insert into the pot and sew.

Let's tie a cactus. Let's make it yellow. We collect 7 air loops and perform a connecting column in the very first loop. And again we collect 7 more loops. We carry out the connecting column in the same place. We repeat 3 more times.

Sew the flower to the center of the cactus sprout.

This is how you can crochet a pincushion in the form of a cactus very quickly and simply!
Hedgehog
Now we will knit a needle bed in the form. It knits very simply and quickly, so it does not take much time.

For the needle bar you will need:
- Yarn "Children's novelty" beige and brown, as well as red and green;
- Hook 1, 75 mm;
- Filler for toys;
- Needle;
- Scissors;
- 2 beads.
We will knit in a circle, so first we make a sliding loop. Then we perform 6 sc in a row inside the loop. Pull the tail of the thread and tighten the loop.
Our little detail consists of 6 loops. Next, we knit, increasing their number.
In the 2nd row, you need to perform 2 sc in all 6 loops. So let's double them.
In the 3rd row, to knit 6 increases again, we knit 2 sbn, skipping 1 loop. That is, in each 2 loop of this row we knit 2 sc.
The detail gets bigger. We knit 2 more rows with additions.
In the 4th row, the increase will be performed in the 3rd loop of the row. We knit 2 sc in 1, and in the 3rd loop 2 sc in a row.
In the 5th row we knit 2 sbn in each 4th loop.
The part consists of 30 loops. Now let's lift it up. To do this, we knit 5 rows of 30 sc in each of them.

Now we need to knit a beige part in the same way. Only the last 5 rows without increments are not knitted.

Let's put the details aside. Let's start knitting muzzles. With brown yarn we knit 6 sbn in a sliding loop. We tighten it and knit 1 row without changes.
We change the thread to beige and add it through the column.

Then 1 row must be knitted without adding.
Next, there will be an alternation of rows with and without increments. After each additional row, you need to knit 1 row without additions. We make increments according to the principle of amigurumi. That is, then we add after 2, 3. Between them, 1 row without increments. At the end of 2 rows without increments instead of 1.

Then we take the beige part and sew it to the brown one. In the course of sewing, you need to fill the part with filler.

We sew a muzzle.
Photo 6 
Knit for decor. From the red thread we form a sliding loop and perform again 6 sc. Then we increase the detail by increments through 1 loop. We knit the next 3 rows for 9 sc.
- a necessary thing in every home. This is very convenient, since all the needles are collected in one place and you do not need to look for them. In these master classes, we will crochet four types of needle beds. It is knitted quickly and easily, literally in one evening. But they look very cute and unusual. They exude warmth and comfort, a wonderful gift for a friend, mother or grandmother. 4 step-by-step descriptions prepared for you by our permanent author.
Pincushion "Cup of tea"
To knit a needle bed, we need:
- Yarn of red and sand color;
- Hook;
- Sintepon;
- Needle.
Any yarn is suitable for this needle. You can even use leftovers. Karachay yarn is well suited here. It keeps its shape perfectly due to its roughness and rigidity. You can take a softer and thinner yarn. But then it is better to knit in two threads.
We start with the main part - the cup. We knit two air loops. And then we begin to knit the first row. We knit six single crochets in the second loop. The entire needle bed will be connected precisely with single crochets.
photo 1
Now you need to make increases in several rows. We knit in the second row an increase in each of the loops. In the third - we knit an increase through a loop. In the fourth - after two and in the fifth - after three loops.
So we knitted rows with increments and got thirty loops. No more additions are needed. Otherwise, the needle bar will turn out to be too large.
photo 2
Next, we will knit five more rows in a circle. And we will not make additions to them.
We will get half the ball.
photo 3
Now you need to tie a handle for the cup. Let's make six loops and close these loops into a ringlet.
And then we knit eight rows in a circle with single crochets.
photo 4
And immediately we sew a handle to our cup with a needle.
photo 5
Then we take sandy yarn, or you can use brown, and knit two air loops. Next, we knit six columns in a loop, which is further from the hook.
In several rows, we will perform increases. We knit in the second row an increase in each of the loops.
In the third, we perform the increase through the loop. In the fourth - through two and in the fifth through three loops. If the yarn is thicker than the one from which the cup is knitted, then we knit one row less. If thinner, then a row more.
photo 6
And now we fill the cup itself with synthetic winterizer. And we sew our resulting circle on top. You need to sew so that the seams are not very visible.
photo 7
We hide all protruding threads inside the needle bar or simply cut them off.
The crochet cup of tea is ready! It remains to place needles in it. The needle bar can be placed on the table or hung by the handle on a carnation or hook.
photo 8, 9
A funny and cute needle case came out, what do you think?
And so that our cup is not bored, we will connect another sweetness to it - a cake. In one needle case you can store needles, and in the other, next door, you can store pins.
Pincushion "Cake"
If you like to decorate your house with interesting knitted products, then this master class is for you! In it, we will look at how you can knit a needle bed in the form of a cake with cream.
For such a needle, it took:
- Yarn Art Jeans yarn in beige, Children's Novelty yarn in white and lilac;
- Hook 1, 75 mm;
- Scissors;
- Sintepon;
- Needle.
First we knit the shortbread, so we start with beige yarn. We make a sliding loop and perform 6 sbn into it.
We tighten the loop. Next, we will knit in a circle with increases and decreases. In the 2nd row we will knit 2 columns 6 times, that is, 2 in each loop.
In the 3rd row, you also need to perform 2 columns in a loop 6 times, but since there are now 12 loops, we knit 2 sc in each 2nd loop of the row.
In the 4th row, we will perform 2 sbn already in the 3rd loop.
It remains to connect 2 rows with additions.
5 row. We knit 2 sc in every 4th loop.
And the last row with increments remained. We do them every 5, that is, in the 5th loop of the row. A total of 36 loops will be obtained.
Photo 1
In the new row we will knit 36 sbn, we start the hook only behind the back wall of the loop.
Let's repeat the previous row again.
In the new row we will knit for the back walls of the loops and decrease every 4 loops.
Photo 2
Further, we will knit all the rows for both walls of the loops. We subtract after 3 sc.
Then we decrease in 1 row after 2, and in the next after 1 loop. Fill the part with synthetic winterizer. You don't need to fill too tightly. The part should not look inflated.
Then decrease in each loop until the hole closes. We will tighten the thread and break it.
Photo 3
The shortbread is ready. We knit glaze. We start with white. We make 21 air loops. Skip the loop and knit 20 sc.
We knit all subsequent rows for the back walls.
Then we make 1 loop for lifting and perform 2 sc in the first loop. Next, we knit 17 sc. At the end there will be 2 loops. We will knit them together, that is, we will make a decrease.
We change the thread and start a new row with a lifting loop. We immediately knit a decrease. Then 17 sbn, and in a new loop 2 sbn. There will be 20 sc in total again. We turn around, knit air, then 2 sc in the first loop, then 17 sc and then decrease. We change the thread. We do air, decrease, 17 sc, increase.
So we will knit a total of 22 rows, alternating 2 rows of each color. Between increases and decreases should always remain 17 sc. We decrease and add in each row in just the same place.
Photo 4, 5
Now we connect the first and last rows and sew them together. We turn the part out and get a cylinder.
Photo 6
We thread the needle and pass the needle between the rows from above. Then we tighten the thread.
Photo 7
We do the same from below. Now just push the bottom inward. The resulting part must be sewn to the cake.
The pincushion in the form of a cake is ready!
One would like to say “Bon appetit”, but no - carefully, needles!
Then let's knit needle beds, which should be prickly by definition - a cactus and a hedgehog. Here, all the needles are exactly in their place.
Cactus
The pincushion can be knitted in any size, we have it small and compact, but you can make at least a Mexican cactus (by the way, I'm interested, if possible, send a photo 🙂).
For knitting you need:
- Yarn green, pomegranate, yellow and brown;
- Scissors;
- Hook;
- Sintepukh;
- Needle.
Let's make 2 loops. After that, we will make 6 columns without a crochet in 2 loops from the hook. Now we need to work 1 row, making additions to each of the loops.
In the new row, we will continue to make increases. Only this time we knit 2 columns through the loop.
We connect the last row with additions. Increases should be done in every 4th loop. That is, after 3. As a result, we will knit 30 loops on a circle.
The next 4 rows will be knitted simply without additions. 30 columns in each row.
Then we round the part, so we knit with decreases. First, we decrease through 3 loops. In the new row, we already decrease after 2 loops. And knit a row with a decrease through the loop.
We have a hole of 12 loops left. We fill the part with sintepuh.
Now we will knit a process on a cactus. We knit 1 row of 12 columns.
Then we add after 1. We perform 4 rows of 18 columns. Fill in the details. The next rows will all be decreasing. First through the loop, and then we knit the decrease in each loop until the part is closed.
Take the green thread and pull the process. That way it will stand out better.
Then we double each loop. We knit the next row without increments for the back wall of the loops.
Then we will tie the increase through the loop. And we will complete the new row without adding.
Now we will perform additions in every 3rd loop. And then we knit 1 row without adding anything.
Then we will knit 2 more rows without increments. That is 24 columns.
We fill this pot with filler.
We begin to knit the earth. To do this, you just need to tie a amigurumi ring of 24 columns. We also start with 6, then add to all loops, then through 1 loop. And we knit 1 row, adding through 2 loops.
We sew a cactus to the resulting part. Then insert into the pot and sew.
Let's tie a cactus. Let's make it yellow. We collect 7 air loops and perform a connecting column in the very first loop. And again we collect 7 more loops. We carry out the connecting column in the same place. We repeat 3 more times.
Sew the flower to the center of the cactus sprout.
This is how you can crochet a pincushion in the form of a cactus very quickly and simply!
Hedgehog
Now we will knit a needle bed in the form. It knits very simply and quickly, so it does not take much time.
For the needle bar you will need:
- Yarn "Children's novelty" beige and brown, as well as red and green;
- Hook 1, 75 mm;
- Filler for toys;
- Needle;
- Scissors;
- 2 beads.
We will knit in a circle, so first we make a sliding loop. Then we perform 6 sc in a row inside the loop. Pull the tail of the thread and tighten the loop.
Our little detail consists of 6 loops. Next, we knit, increasing their number.
In the 2nd row, you need to perform 2 sc in all 6 loops. So let's double them.
In the 3rd row, to knit 6 increases again, we knit 2 sbn, skipping 1 loop. That is, in each 2 loop of this row we knit 2 sc.
The detail gets bigger. We knit 2 more rows with additions.
In the 4th row, the increase will be performed in the 3rd loop of the row. We knit 2 sc in 1, and in the 3rd loop 2 sc in a row.
In the 5th row we knit 2 sbn in each 4th loop.
The part consists of 30 loops. Now let's lift it up. To do this, we knit 5 rows of 30 sc in each of them.
Now we need to knit a beige part in the same way. Only the last 5 rows without increments are not knitted.
Let's put the details aside. Let's start knitting muzzles. With brown yarn we knit 6 sbn in a sliding loop. We tighten it and knit 1 row without changes.
We change the thread to beige and add it through the column.
Then 1 row must be knitted without adding.
Next, there will be an alternation of rows with and without increments. After each additional row, you need to knit 1 row without additions. We make increments according to the principle of amigurumi. That is, then we add after 2, 3. Between them, 1 row without increments. At the end of 2 rows without increments instead of 1.
Then we take the beige part and sew it to the brown one. In the course of sewing, you need to fill the part with filler.
We sew a muzzle.
Photo 6
Knit for decor. From the red thread we form a sliding loop and perform again 6 sc. Then we increase the detail by increments through 1 loop. We knit the next 3 rows for 9 sc.