There are many types of collars. In this article, we will look at how to knit a shawl collar using ordinary knitting needles, as well as its placement in various neck openings.
We knit a shawl collar with knitting needles: the principle of knitting it on various necks
Shawl collar- this is a turn-down collar, thanks to which a v-shaped neckline is obtained. It dates back to the Victorian era. Distinguish between a sewn and one-piece collar, which can have a variety of shapes, but mainly a rounded, flowing shape is used.
In order to knit a collar on a round neckline, you need:
1) Cast on loops along the entire length of the neckline + additional loops for the ends that will be on top of each other. This is the one-piece collar method. It is knitted in shortened rows.
2) Tie the collar separately and sew it to the garment. To do this, you need to dial all the loops for the shawl collar, and then tie a kind of trapezoid in shortened rows, where the upper short side is the width of the back neckline, the height is equal to the collar height, and the oblique lines are the sides that will be sewn to the front of the neckline.

For a square cut, you need to knit a rectangular collar separately, where the width is the full length of the "shawl", and the height is the width of the overlapping parts when stitching. Often, such a collar is performed with a 1x1 elastic band.
You can also knit a shawl collar at the v-neck with knitting needles. To do this, you need to cast on loops only on the back, do the work using partial knitting to set loops on the front of the collar, and then subtract the loops on one of the sides (which will be on top) to form the desired cutout.
There is also a double version of the collar in question. It is necessary to separately knit a part with a height = 2x the collar height, fold it in half and carefully sew it to the product.
We study a detailed description of knitting a shawl collar
The classic version of the shawl collar is performed at the neckline with a deep V-neckline.

The neckline can start almost at the waist. On sweaters with buttons, at the same time, the width of the strap for them is usually wider than the standard one, sometimes reaching 8 cm.The direction of knitting can be vertical (along with the detail of the product) and horizontal (when working loops are drawn along the edge of the knitted fabric and the gate is knitted on them).

Consider a detailed description of the sequence of work, which is a theoretical master class.
You need to start work by building a pattern, determining the desired width of the plank. From the center line of the front, half the width of the plank should be set aside in two directions. If the jacket is supposed to have buttons, then only half of the shelf will be displayed on the pattern. In this case, half the width of the bar is deposited inside the part, the bar itself must be extended by the same distance in the opposite direction.
The beginning of the shawl collar is the location of the top button, which depends on the chosen style. In order to determine the location of the remaining buttons, you need to divide the distance between the top button and the bottom edge of the product into equal parts. Their number depends on how many buttons the jacket provides.
To build a general pattern for the collar, you need to put point A on the finished pattern, which is on the bar at the same height as the upper hole. Next, you need to put point B at the place where the shoulder intersects with the neckline. Carry out a segment AB. From point B, build a perpendicular line equal to the sprout (on average, this distance is 5 - 8 cm), put point B at the end. In the direction of the neck, you need to draw a perpendicular to this point. On the resulting line, it is necessary to postpone the width of the collar, we get point G. Now you should connect points A and G with a smooth line, which will be the collar line.
To knit a "shawl" with a shelf with one cloth, calculate the number of loops by adding 0.5 of the width of the strap to 0.5 of the shelf. With this method, you can knit a strap, as well as a collar with a purl or front stitch, garter knitting. The pattern for the plank depends on the main pattern of the product. It should be selected based on the opposite of patterns, for example, if the main pattern is made on the basis of purl loops, then the bar should be knitted on the basis of the front ones.
If the collar is knitted with one fabric with the product, then the buttonholes on the bar should be knitted horizontally. When knitting reaches the top button, you need to start knitting "shawls". If knitting of a classic type of collar is supposed, then it is worthwhile to decrease one loop in each row on the shelf, and add the same amount on the collar.
When the neckline begins, the reductions need to be redistributed: in each 4th row of the collar, we now make reductions, and on the shelves, in parallel, make the same increases, but with the help of a yarn. In the rest of the ranks, everything is unchanged.
Bevel should be performed on the shoulder line, after which continue to make only increases and decreases in every 4th row, as described above. Close the loops at the height of the sprout.
If the collar is made in the transverse direction, then the number of loops for the shelf is reduced by half the width of the strap. The straight fabric is knitted to the top button, and then you need to lower 1-2 loops from the side of the fasteners in each row and through the row, respectively.
Related videos
In the videos below, you can familiarize yourself with knitting patterns where a shawl collar made with knitting needles is used.
In this publication, we will look at knitting with knitted shawl collars on jackets and pullovers. This detail of the needlewoman is also called a shawl collar. This element gives a more sophisticated look to a particular knitted product. Every needlewoman who skillfully owns knitting needles can knit it. Most craftswomen, wanting to complement knitted clothes with a similar collar, face problems when knitting it, since there are quite a few ways to create it. We offer you several options for work, as well as a detailed video tutorial that will help you understand the process of knitting this element.


 This collar is knitted from bottom to top along with the strap. To get such a detail, you need to knit eleven loops according to the following scheme: 1 person., 1 out. in this case, you should start with the edge and one person.
Twenty-five to thirty centimeters before the shoulder line, you can start making extensions for the shawl collar. In this case, it is necessary to knit the buttonholes of the strap, the subsequent loop of the faces. and next to it, dial 1 out. crossed. p. from a cross thread (= thirteen p. of a one-on-one pattern). Similar increases in loops are performed further in all sixth rows (p.) And each time in the pattern, one by one, you need to knit two stitches more with knitting needles. Do this until the shawl collar in width reaches thirty-one stitches. After that, you can knit directly to the shoulder line.
At the next stage, you can fasten or remove shoulder buttonholes on an additional knitting needle and continue to knit a strap with knitting needles, typing in the first p. at the level of the shoulder cut, an additional edging. Subsequently, this edge will be hemmed to the neckline of the back.
To knit the desired width of the shawl collar, follow the outer edge on all sides after every four p. knit five six times shortened p. - approximately three quarters of all loops. In a specific example, these are twenty-four p. Such shortened p. you need to knit with a crochet or with a broach of loops. In the photo, the shawl collar and shoulder bevels were done using a broach.
Thus, knitting goes to the middle of the neckline of the back. Then, all the links must be removed to the additional spoke. The second half of the front is performed in the same way.
At the final stage, the buttonholes of both half on the right and left sides must be transferred to two knitting needles, respectively, and sewn using a loop-to-loop seam. Further, the side edge of the shawl collar is hemmed to the neckline of the back.
One-piece knit shawl on a pullover
In our next training part of the article, we will analyze another way to knit a shawl collar, this time for pullovers.
 In the photo below, we see an example of a knitted pullover with a wide enough shawl collar. In the process of knitting, to achieve this effect, a doubling of the middle twelve buttonholes was used. At the same time, knitting of such a collar can be started with six, eight, or with fourteen or more loops.
At the beginning, you should mark the center twelve points of the front of the product. In the case when the left bar needs to go to the right one, it is necessary to knit the fabric up to the given twelve points. After that, knit 1 out of knitting needles eleven times. crossed. n. from a transverse thread and 1 person. p., the final p. will be edging (= twenty-three p. of the one-on-one pattern). Then continue to knit to the height of the canvas directly.
Consider another case, when, on the contrary, the right bar goes to the left. To do this, you should also knit the fabric up to the given twelve stitches, the first of which is a new edge. Next, knit 1 stitches of faces eleven times in turn. and make an increase of 1 out. crossed. n. from a transverse thread. Then you can continue knitting the main pattern.
After that, as in the first case with a jacket, the pattern should be expanded in all sixth p. into two buttonholes: knit a loop next to the links of the strap., next to it add 1 out. crossed. n. from a transverse thread. In the presented example of a pullover, a similar increase in loops was performed nine times (= eighteen additional stitches) or only forty-one stitches of the strap.
Knitting continues until the middle of the neckline. Here you need to knit forty-one stitches and the next person. p. Then, on the inner edge, dial 1 more additional edging (in order to sew) = forty-three p. To make extensions, starting from the shoulders, after four p. knit outside thirty stitches six times.
For the next plank, dial twenty-three stitches along the inner edge of the upper plank.
The buttonholes of the two halves of the collar on both sides must be transferred respectively to two knitting needles and sewn on the basis of the loop-to-loop seam. At the final stage, the finished shawl collar is sewn to the neckline of the back.
Having finished with the theoretical part, let's move on to practice. In the following videos, for review, a detailed training master class from an experienced knitter is presented, which shows how the shawl collar on a men's jacket with buttons is knitted in stages.
Model diagrams


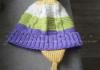
This gorgeous cardigan will not leave indifferent any woman who prefers things that are not only beautiful, but also comfortable.
Feminine Shawl Collar Cardigan
This unusually warm and stylish product will become your irreplaceable companion in cool weather.
And the shawl collar will give the cardigan extra femininity and charm.
Dimensions (edit)
The approximate dimensions for which the calculations are made are 38-40 EUR.
Materials (edit)
You need to purchase 1000 grams of light brown yarn. If you like warmth, then choose a thread consisting of one hundred percent alpaca wool. In addition, in order to knit this cardigan with a shawl, you will need two pairs of thick straight knitting needles: one knitting needles number 7, and the second number 8. You also need circular knitting needles number 7.
Drawings that we will apply
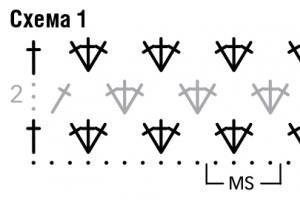
1. "Elastic band": knit alternately 2 persons., 2 purl. Alternate in this manner to the end of the row.
2. Purl surface: in all faces. R. only purl p., and in all purl p. only persons. NS.
3. Main drawing: The total number of all loops should be a multiple of 4 + 2 + 2 edging.
Description
first and third p.: 2 persons., 2 purl Finish with 2 facial.
second p.: Tie the loops according to the pattern.
fourth p.: Only persons, p. In the future, constantly repeat from the 1st to the 4th rows
4. Drawing "Pigtails": Follow this pattern according to the pattern that you had the opportunity to see above.

Knitting density
Before you start knitting a sweater with a shawl collar, you need to make a small square pattern with sides of 10 by 10 centimeters. To knit a sample, knit 15 loops and 18 rows. Use knitting needles # 8 and use the pattern shown in the diagram.
Work description
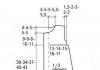
Back
Cast on 80 stitches with smaller needles. The first 10 cm knitting is carried out with the "elastic" pattern. After the elastic is finished, proceed with the main pattern. In the row where the patterns are changed, also change the knitting needles. After 68 cm of work on the back, decrease the loops on both sides for the armholes. To do this, close in every second p. 1 time 2 sts and 4 more times 1 st. After 20 cm from the beginning of the armholes of the back, simultaneously with the rest of the knitting of the back of the cardigan with a shawl collar, close the middle 14 loops, and you will finish the resulting 2 sides separately. To obtain rounding of the neck, close 2 more loops 1 time.

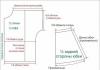
Left shelf
Type 36 stitches with knitting needles # 7 and complete the first 10 cm with a 2x2 elastic pattern. At the end of the elastic, transfer all the work to other knitting needles and continue knitting according to this pattern: first 7 sts - purl, 28 sts of braids 5 sts. pattern "purl surface". After 55 cm of work, start closing the eyelets for the neckline. This is where the shawl collar of the cardigan will begin. For the cutout, close one stitches in each 14th row 4 times. The depth of the shawl collar can vary depending on your wishes. If you like deep necklines on cardigans, start knitting the collar neckline a little earlier than indicated. If you want to reduce the depth of the collar, then knit a few more rows with a straight cloth. Remember to subtract the armholes the same way you did on the back.
Right shelf
The production of this part is carried out in the same way as the left shelf in the mirror image.
Sleeves
Dial 30 sts and make the elastic band as long as you need. When you go to the main drawing, do not forget to change the knitting needles to a different number. In order for the sleeve on the product to have the desired shape, it is required to add loops along the edges. To do this, make additions in every 7th p. 1 p. 6 times, and in every 4th p. 2 times, 1 p. When the sleeve length reaches 49 cm, make an okat. For him, close at the beginning and at the end of every 2nd p. 1 time 2 sts, 10 times 1 st and 2 times 3 sts. Then close all the loops that remain.
Assembly

Sew the blouse along the shoulder seams. Use a needle with a large eye for this purpose.
Now how to knit a shawl collar. Type 92 stitches along the edges of the left and right shelves, 58 stitches along the neckline, and 30 stitches along the back cutout. The straps and the collar itself are made with a 2 by 2 elastic pattern. Loops that belong to the collar are made in shortened rows. These include the backrest and the hinges for the bevelled cutouts of the front shelves. Start the collar with the back loops, and then repeat 14 times, adding 4 loops each time on both sides of them.
After you knit 28 p., All bevel loops should be involved in the work. When you knit another 10 cm on these loops, close them. That's all the wisdom of knitting such a collar. As you can see, there is nothing difficult here. The main thing is to count the loops correctly so that both sides of the collar are symmetrical to each other.
Now sew the cardigan along the side seams and join the seams of the sleeves. Cast on 10 loops and tie a 155 cm long belt. For the belt, use a 1 on 1 elastic pattern. Lightly steam the blouse or wash it in lukewarm water. Your new thing is ready. You can be sure that this incomparable handmade product will warm you in any bad weather and can easily cheer you up even on the most cloudy day.
In this publication, we will look at knitting with knitted shawl collars on jackets and pullovers. This detail of the needlewoman is also called a shawl collar. This element gives a more sophisticated look to a particular knitted product. Every needlewoman who skillfully owns knitting needles can knit it. Most craftswomen, wanting to complement knitted clothes with a similar collar, face problems when knitting it, since there are quite a few ways to create it. We offer you several options for work
One-piece knitted shawl on jackets
This collar is knitted from bottom to top along with the strap. To get such a detail, you need to knit eleven loops according to the following scheme: 1 person., 1 out. in this case, you should start with the edge and one person.
Twenty-five to thirty centimeters from the shoulder line, you can start making extensions for the shawl collar. In this case, it is necessary to knit the buttonholes of the strap, the subsequent loop of the faces. and next to it, dial 1 out. crossed. p. from a cross thread (= thirteen p. of a one-on-one pattern). Similar increases in loops are performed further in all sixth rows (p.) And each time in the pattern one by one it is necessary to knit two stitches with knitting needles. Do this until the shawl collar in width reaches thirty-one sts. After that, you can knit directly to the shoulder line.
At the next stage, you can fasten or remove shoulder buttonholes on an additional knitting needle and continue to knit a strap with knitting needles, typing in the first p. at the level of the shoulder cut, an additional edging. Subsequently, this edge will be hemmed to the neckline of the back.
To knit the desired width of the shawl collar, follow the outer edge on all sides after every four p. knit five six times shortened p. - approximately three quarters of all loops. In a specific example, these are twenty-four p. Such shortened p. you need to knit with a crochet or with a broach of loops. In the photo, the shawl collar and shoulder bevels were done using a broach.
Thus, knitting goes to the middle of the neckline of the back. Then, all the links must be removed to the additional spoke. The second half of the front is performed in the same way.
At the final stage, the buttonholes of both half on the right and left sides must be transferred to two knitting needles, respectively, and sewn using a loop-to-loop seam. Further, the side edge of the shawl collar is hemmed to the neckline of the back.
One-piece knit shawl on a pullover
In our next training part of the article, we will analyze another way to knit a shawl collar, this time for pullovers.
In the photo below, we see an example of a knitted pullover with a wide enough shawl collar. In the process of knitting, to achieve this effect, a doubling of the middle twelve buttonholes was used. At the same time, knitting of such a collar can be started with six, eight, or with fourteen or more loops.
At the beginning, you should mark the center twelve points of the front of the product. In the case when the left bar needs to go to the right one, it is necessary to knit the fabric up to the given twelve points. After that, knit 1 out of knitting needles eleven times. crossed. n. from a transverse thread and 1 person. p., the final p. will be edging (= twenty-three p. of the one-on-one pattern). Then continue to knit to the height of the canvas directly.
Consider another case, when, on the contrary, the right bar goes to the left. To do this, you should also knit the fabric up to the given twelve stitches, the first of which is a new edge. Next, knit 1 stitches of faces eleven times in turn. and make an increase of 1 out. crossed. n. from a transverse thread. Then you can continue knitting the main pattern.
After that, as in the first case with a jacket, the pattern should be expanded in all sixth p. into two buttonholes: knit a loop next to the links of the strap., next to it add 1 out. crossed. n. from a transverse thread. In the presented example of a pullover, a similar increase in loops was performed nine times (= eighteen additional stitches) or only forty-one stitches of the strap.
Knitting continues until the middle of the neckline. Here you need to knit forty-one stitches and the next person. p. Then, on the inner edge, dial 1 more additional edging (in order to sew) = forty-three p. To make extensions, starting from the shoulders, after four p. knit outside thirty stitches six times.For the next plank, dial twenty-three stitches along the inner edge of the upper plank.
The buttonholes of the two halves of the collar on both sides must be transferred respectively to two knitting needles and sewn on the basis of the loop-to-loop seam. At the final stage, the finished shawl collar is sewn to the neckline of the back.Shawl collar models