We learn how to grow eyelashes and piece eyelashes: photos, videos, recommendations.
We have already shown beams in great detail. Today I decided together with you to figure out how to grow eyelashes at home. Taking a break and having studied a bunch of all kinds of information on the world wide web, I present you with very useful and practical tips about home building.
Learning to grow eyelashes yourself is certainly possible, but quite difficult. I’ll make a reservation right away that for this type of activity you will simply need a large amount of patience, strength and nerves of steel. Not everyone succeeds the first time. But it's still worth a try. After all, if you succeed, you can save a decent amount of money and a lot of time that would be spent on daily painting and lengthening your own eyelashes. Have you decided? Well, let's get started then.
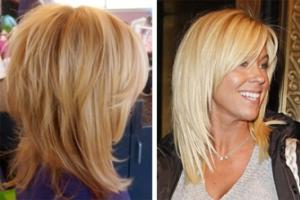
eyelash extension photo


Eyelash extensions at home
What you will need:
- eyelashes of different lengths (piece or bundle)
- special glue for building
- degreaser (alcohol-based solution)
- a needle or toothpick to separate the eyelashes
- tweezers
- eyelash brush
Eyelash extension
For this method of extension, you will need piece eyelashes, most often they use mink, sable and silk eyelashes. Usually use 80-120 piece eyelashes for each eye. For building, a special glue-resin is used. A small amount of glue is squeezed onto a flat surface. The eyelash is taken with tweezers and lowered with a blunt end into the glue by half.
For a more natural effect, take eyelashes of different lengths. The so-called effect of the cat's eye: the shortest cilia are glued to the inner corners of the eye, and the longest to the outer corners. Piece eyelashes are extended on their natural eyelashes - an eyelash on an eyelash. You can start building up from any edge, but it is better to glue in a spread so that the cilia do not stick to each other and the glue has time to dry. Be sure to separate your lashes. It is more correct when an artificial eyelash with glue does not touch the eyelid itself during extension, even if only by half a millimeter.
Professionals advise building up piece cilia in several approaches for each eye, the first - 25-30 eyelashes per eye, then the first trip to the second eye. And only then the second approach in the same order and quantity. This is done to prevent sticking. The third approach is to fill the gaps between the eyelashes 30-40 eyelashes. The fourth stage is visual alignment by number plus 5-10 eyelashes.
If the eyelashes are very rare, then two artificial ones are glued to one natural one, but this is not applied to all eyelashes, but only to 7-10. It turns out the visual effect of a slingshot.
We invite you to watch the entire eyelash extension procedure on the video.
Eyelash extension video
Eyelash extensions
Eyelash extensions can be easily done at home. This extension lasts up to three weeks. Usually artificial beams are used in an amount of 15 to 20 pieces per eye. The materials needed are the same as for eyelash extensions. The bundles should also be chosen in different lengths: longer on the outer corners, medium on the middle and short on the inside. The bundles are glued between their eyelashes almost on the eyelid.
It is very important to carefully remove the bundles from their box, as they may lose their shape.
And again, we offer a look at the video tutorials for eyelash extensions in bunches.
Hair extensions video
We grow eyelashes ourselves
And one more photo master class on beam eyelash extensions at home.


How to grow eyelashes at home for yourself? After all, not everyone can boast of their natural length. The process of eyelash extension at home is not complicated. First you need to choose which you will stick. We do not recommend buying cheap ones, as you will not be insured against low-quality goods. Purchase eyelashes and related products in specialized stores. Is eyelash extension harmful? If yours are naturally weak or you have some kind of skin and eye diseases, then it is better to refuse this procedure.
Especially carefully choose eyelash glue that can be sold with them, and sometimes you have to buy it separately. When buying glue, read the instructions to make sure it's hypoallergenic and doesn't contain substances that can irritate your eyes with eyelash extensions.

How to grow eyelashes at home for yourself?
How to grow eyelashes at home? Remove from face before applying eyelash extensions. The skin needs to be degreased. Next, you will definitely need an assistant. It is quite difficult to grow eyelashes in bunches yourself, since you have to keep your eyes closed.

Using tweezers, take a single eyelash or a bunch. Dip in glue and carefully stick the eyelash in the gap between your cilia. Start from the outer corners of the eyes, moving to the inner ones. How to grow eyelashes, see the video.
How to increase eyelashes - video 1
How to increase eyelashes - video 2
The extension technology allows you to make the look bright and expressive. It is quite difficult to do it yourself without the help of a lashmaker, you will need special tools and materials, before you decide on such a procedure, you should be patient and time.
First, carefully examine your eyes, there should be no inflammation, tearing, demodicosis or other diseases. If these symptoms are present, treatment must first be carried out. Contraindications also include allergy to glue, diabetes, cancer, pregnancy. It should be postponed for colds, viral infections, exacerbation of chronic ailments. If a person is concerned about severe prolapse, then you should first consult a doctor.
Preparation for eyelash extensions at home
Before carrying out the procedure at home, it is necessary to prepare the tools:
- You can buy cilia bundle or piece. The first option is easier to apply, especially for beginners. It is not recommended to use bunches with knots, as they will be noticeable, black dots form on the contour of the eyelid. It is very difficult to glue piece hairs for yourself with home extensions, this is painstaking work that requires experience.
- Degreasing is carried out using a primer or a conventional alcohol-containing tonic, the main thing is to avoid getting it into the eyes.
- For fixing, you will need a special resin adhesive (Smart, Elite Flex, Brilliant) or a methyl acrylate-based product (I-Beauty, 3d lashes), which has a lighter texture and dries faster. Carefully study the composition of the preparations, they should not contain formaldehyde, otherwise it will sting the eyes.
- Eyelash extensions are made from different materials. Despite the natural names - mink, silk, sable, all hairs are made of synthetic hypoallergenic fiber, which effectively imitates natural hairs. The highest quality options are premium: Perfect Silk Lashes, Dolce Vita, Novel.
- Of the tools you will need: straight and curved tweezers, combing brush, cotton buds, gel pads for the lower eyelid (can be replaced with paper tape or cling film).
In order to build eyelashes at home with high quality and without consequences, you should not save on material, poor-quality glue dissolves quickly and dries for a long time. The procedure is carried out very carefully with the eye closed, avoiding the ingress of chemicals, this causes irritation and redness of the tissues. Care should be taken with the tweezers, as they are sharp and can injure the mucous membrane.

Step-by-step instructions for building
You need to carefully study the manual and strictly adhere to the indicated scheme.
- First of all, you need to prepare a comfortable workplace, good lighting and a magnifying mirror.
- Then we move on to modeling. Extended eyelashes vary in length, width, color, bend. The longest and most curved hairs are located on the outer corner of the eyelid, and they should gradually shorten towards the inner edge.
- At the next stage, the lower eyelid is covered with special gel substrates so that the cilia are completely closed.
- After combing thoroughly, you can use a clean mascara brush for this. Then natural hairs are degreased, a cotton swab is moistened in an alcohol solution and each hair is wiped.
- The hairs should not be much thicker than natural ones, this is taken into account when selecting the material.
- A drop of glue is squeezed onto a small saucer or piece of cardboard.
- The natural base hair is separated with tweezers, the artificial bundle is dipped in glue to the middle of the length, the excess gets wet on paper. The eyelash is applied with sliding movements to the base. You can not glue the material close to the eyelid, there should be a small distance - 0.5 mm, otherwise irritation will occur, the skin will itch a lot.
- The hairs need to be glued, alternately choosing the base in different parts of the eyelid so that they do not stick together with the previous ones.
- After all the cilia are fixed, using a toothpick, carefully check for sticky hairs, if there are defects, they are carefully separated. If this is not done, discomfort and itching will occur, trying to scratch the eye, you can easily damage the created structure.
- At the end of the procedure, comb and remove the gel substrate from the lower eyelid.
If there is redness of the sclera, lacrimation, you need to drip your eyes with Vizin. Avoid contact with glue or other chemicals. In case of inaccurate handling, the mucous membrane is washed with soap and water and contacted by an ophthalmologist.

Main nuances
With professional hair extensions, the procedure is considered completed when an artificial one is fixed on each natural hair. On average, one eye has 120-160 pieces. At home, it is very difficult to stick eyelashes one by one on your own, so beam material is more often used, 4-7 pieces per eyelid. This method is suitable for girls with sparse hair, but the effect does not last as long as with the piece method.
You can make extensions at home with temporary glue. In case of an unsuccessful result, the eyelashes are easily removed.
- In the first 8 hours after the procedure, you can not touch, wet your eyes and paint with decorative cosmetics. It is also forbidden to visit the solarium and sauna - hot steam and high temperature melt the glue.
- Usually no additional staining is required, but mascara can be applied if desired. Special products are used, which do not contain oils. Do not use oily lotions and creams to remove makeup.
- Wash with plain water and soap in the morning and evening, do not rub your eyes too much. Every day, the cilia need to be combed, because after sleep they get tangled and may look untidy. Regular care is needed, otherwise inflammation of the skin of the eyelids will occur, demodicosis (tick) may develop.
- To strengthen the extended eyelashes, it is useful to coat them with a sealant that nourishes natural hairs. Such a tool can be purchased in specialized stores.

It is possible to perform extensions on your own, but the procedure is very painstaking, takes a lot of time and requires attention and accuracy. The result will last up to 3-4 weeks.
More recently, women who wanted to be well-groomed and beautiful had to seek help from professionals - hairdressers, stylists, make-up artists. With the advent of the Internet era, the situation has changed dramatically and now everyone can learn almost any technique for creating beauty without leaving home. The same applies to those who are interested in eyelash extensions at home. After all, not everyone has the opportunity to visit expensive salons for this procedure.
The reasons are different:
- no free time due to a busy work schedule;
- the presence of small children who have no one to leave at home;
- banal lack of money to pay for the services of a makeup artist.
Luckily, there is a wealth of information on this topic on the net. Any beauty will be able to master the technique of eyelash extensions just by watching a few videos filmed and posted for free viewing by those who understand this. Another option is an article with detailed instructions (for example, the one you are currently reading).
Preparatory stage
In order to properly prepare, you can visit a store specializing in the sale of materials and tools for building. A qualified seller will always tell you exactly what you need if you perform this procedure for the first time on your own.
First, of course, you need to choose the villi that will serve as future eyelashes. Depending on the technology, these can be either bundles or individual bristles.
It is equally important to choose glue without allergens in its composition. Here, of course, one cannot do without the advice of the seller. It is not worth saving on this, since eyelash extensions at home are very difficult to implement if the materials are of poor quality.
You will also need special curved tweezers, a needle or a thin toothpick and a brush that can be used to comb the villi.
It is advisable for the first time to first familiarize yourself with the appearance of the necessary devices by watching the thematic video.

Assistant choice
How to grow eyelashes at home alone? Let's reveal a little secret - it's impossible. You definitely need a person who has the patience for this lengthy procedure (half a day on average). Husband, brother, dad - these candidates can be immediately discarded. A sister, mother or girlfriend is better suited for this. They may have additional skills, and the nerves will be stronger. After all, it is possible that something unpleasant will happen in the process. For example - the glue will get on the mucous membrane of the eye. The man in this case will immediately begin to call an ambulance. And women will solve this problem on their own.
Execution Technology
After preparing the necessary tools and choosing an assistant with strong nerves, you need to get a good night's sleep, or at least rest. It is also advisable to follow the tips below:
- First of all, watch a few videos with a detailed description of eyelash extensions at home.
- Choose for this procedure morning or afternoon sunny time and the venue - near the window. Use additional artificial lighting if necessary.
- Makeup can and should be removed in the evening. This will allow the eyelids to rest before prolonged stress.
- Before starting the procedure, you must thoroughly wash, degrease your hands and eyes (and not only your own, but also the assistant).
- For the first time, a set with a small number of bundles (“fox look”) is suitable.
- A couple of weeks before the scheduled event, you need to start strengthening your eyelashes. Liquid vitamins and vegetable oils are perfect for this.
- Choose only natural villi material (mink, silk). This will avoid the development of allergic reactions.

After reviewing the above points, proceed to the immediate stage of increasing your eyelashes:
- grabbing individual villi or bundles of them with curved tweezers, drop a little glue and attach to the base of natural eyelashes;
- you can’t glue directly to the skin, otherwise you will get irritation even if you use natural materials;
- at the first extension procedure, it is better to get a colorless glue that will help hide particularly unfortunate moments;
- carefully lay artificial cilia, having previously tried on the length. This should be done either on top of native eyelashes, or between them;
- hold the eyelid that is currently being processed with your fingers so as not to blink and disrupt the process.
For more detailed instructions with visual examples, watch several videos on the topic.
The nuances of home eyelash extensions
Like any other specialized procedure in cosmetology, extension has its own characteristics:
- It is necessary to degrease the eyelashes directly, as well as the eyelid.
- Glue on the eyelash must be distributed evenly. If lumps of glue form, remove them with a toothpick.
- Glue the cilia in a cascade, not the same length. This will give the result a natural look.
- If native eyelashes are weakened and poorly prepared, the villi should be chosen not very long to relieve excessive stress.
- An additional thematic video is also welcome.

Features of courtship
After a successful procedure, it is advisable to make every effort to preserve and prolong the beauty of newly acquired eyelashes. Water and makeup removers with fats in the composition are something that your eyes should not have contact with. If you use eye creams, they should also be used very carefully as they can dissolve the glue. Rest lying face down on the pillow, rubbing the eyes with hands and other mechanical influences are strictly prohibited. It should also be remembered that the procedure for removing contact lenses shortens the life of artificial eyelashes.
Advantages and disadvantages
Of course, you can carry out this procedure at home. But only if it justifies the possible risks. Saving money and acquiring such valuable skills are factors influencing the choice in favor of conducting at home. There is another side of the coin - security. After all, in the salon, extensions are performed in a mode of increased sterility, but this cannot be achieved at home. You can not only bring an infection or irritant to the mucous membrane of the eye yourself, but also with the help of poorly disinfected hands of an assistant or an inexperienced master invited to the house.

Eyelash extensions at home do not always go perfectly (especially the first few times), there are various embarrassments and there is a certain risk. But having acquired the necessary skills to perform this procedure, you are unlikely to ever want to seek help from a beauty salon. After all, eyelashes extended “with soul” will always please their owner more than those created by a specialist, for whom you are another “beauty on the conveyor”. And of course, it will be very nice to show off to your girlfriends the fact that you made all this beauty with your own hands (even if not with your own eyes, but in a photo or video).
Not everyone is lucky enough to be born with long fluffy eyelashes. But many girls want to make their eyes more expressive, the hairs - thicker, and the look - livelier and brighter. Is it possible to reconcile with what nature has given? Fortunately, today cosmetic procedures work almost miracles. In the salon, you can build up - the procedure is harmless, but quite expensive, it is not so profitable. In addition, it requires periodic correction. It is easier and more profitable to independently figure out how to grow eyelashes at home.
Where to learn
The cheapest way is to figure it out yourself. There are detailed instructions, one of which will be described below. Bloggers shoot detailed lessons on video, where they describe the whole process step by step with bunches or single cilia, you just need to repeat what they teach. Convenient and profitable. On the forum you can find answers to any questions about common mistakes in order to correct your own oversights.
The main disadvantage of this method is the lack of professional advice. Let it be with the help of users' answers on the Internet, but you will have to correct all your mistakes yourself, training is not designed for this. For beginners, finding something wrong in their actions is already a problem. All the more correct to formulate and correct. Therefore, it will take a very long time to achieve the ideal. If you need to get fast progress, better find a teacher.
A more expensive but effective way is to get trained. Makeup artists and hairdressers often sign up for courses to improve their skills or learn something new. Doing manicures and beauty treatments at home is a fairly easy way to make money, so you can quickly find suitable lessons in salons or beauty studios. Usually they last for several hours 2-3 days, this is beneficial if you work or are constantly busy.
The master will describe in detail the process with beams, after which he will demonstrate it on the model. Then the students themselves will try to repeat everything in stages. The main advantage of the method is that the teacher will immediately explain what you are doing wrong and what needs to be corrected. In addition, often at the end of the course, a gift with eyelash extensions comes as a nice bonus.
The main disadvantage is the cost. The price of the issue is several payments for visiting the salon for building, it will quickly pay off, so such training is beneficial. On average, in Moscow you can find courses from two and a half thousand rubles to twenty. There is also a high chance of stumbling upon newbies who don't teach well, aren't interested in helping you, or don't know enough about how to do eyelash extensions themselves.
Training
 To start growing eyelashes on your own, you first need to learn perseverance. It will take a lot of patience, especially at the beginning. It is better to study on your day off, vacation or vacation. Make sure you have plenty of time to experiment, because nothing is perfect the first time. Prepare the necessary tools:
- tweezers;
- glue for eyelashes, preferably liquid and not drying instantly;
- eyelashes: single at least 50 pieces or in bunches;
- degreaser;
- water-based make-up remover;
- magnifier.
Before proceeding with the procedure, you need to adapt to using tweezers. You will have to get used to wearing them a thin eyelash, so bring the process to automatism: lift the hair, dip it at least in some water and bring it to you. At first, it will fall out, your hands will quickly get tired of the habit, but soon you will get used to it and begin to act better.
Before starting extensions in bunches or eyelashes, degrease the eyelids and eyelashes: you can wipe them with a special tool. Oil weakens the adhesive, so it's best to stay away from oil-based cosmetics for a while.
Individual eyelash extensions
To achieve a natural result, professionals use single artificial cilia. By gluing one to each real hair, you will not only get lengthening, but also doubling their number.
 Prepare artificial hairs in advance. Divide them into two symmetrical groups along the length. Experts advise taking shorter cilia at the inner corner, and longer at the outer corner. Also, don't get carried away with their scope. The eyes will look too pretentious if the difference is more than a few millimeters. Consider what effect you want to get with eyelash extensions.
Take an eyelash with tweezers, dip its lower tip into liquid glue and attach it to a real hair. It should not touch the eyelid, the distance to the skin should be at least a millimeter. Use your fingers to squeeze the two hairs together so that they stick together tightly. The lower ends must be connected to create a feeling of bifurcation - this is usually taught by professional craftsmen. From the outside it will not be noticeable, but with a magnifying glass you can see everything well. In no case do not glue yourself more than one artificial hair to each real one.
Eyelash extensions should be done gradually. We glued a few hairs on one eye - glue the same amount on the second so that there is symmetry. Training on a photo or lessons on a step-by-step video will show in detail how best to do this. Act cilia, do not glue 2-3 pieces into one bundle. In total, you will need at least 20 hairs for each eye to make it beautiful. Eyelash extension lasts up to a month if carried out in the salon. The home result may be saved less.
Bundle extensions
For beginners, the easiest way to learn how to grow eyelashes is to use tufts. They are denser, so they are easier to stick. They require less, so the process itself will be faster. With beams, perfect accuracy is not required. They can fill in the gaps on the eyelid, while with eyelashes you will only improve existing hairs.
 Take a bundle with tweezers and dip in glue. Spread your natural eyelashes in the place where you will attach new ones, and attach the bundle to the eyelid itself. Using a fingernail or a needle, carefully separate the hairs so that they do not stick together. Don't start from the edge. Gently fill the eyelid with bunches from the outer corner to the inner, alternately changing the eyes.
Act slowly and gradually, take your time, especially on the first attempts. It will take time to get used to, do not expect a miracle right away, as you watch useful lessons. When finished, wipe off excess glue. When it dries, wash with clean water. Due to the adhesive, do not use waterproof mascara and oil-based cosmetics in the future.
In contact with