The days before Easter provide a good opportunity to introduce kids to Orthodox architecture.
Show the children pictures of churches, go on a tour of a local temple, and then have your children build a small temple.
There are two ways to do this.
Method one
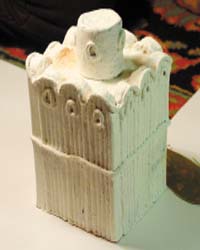
You need to take twelve whole plates of plasticine and round off the ends of each plate from one end. The result was naves - sectors of the temple wall. The nave plates are placed vertically and fastened together so that a “well” is obtained: they must be strongly pressed against each other and smeared on the inside of the “well”. The body of the temple is ready. Then a small piece of cardboard is placed on top of the “well”, which acts as a support, or ceiling, for the roof. The roof is made of a rectangular plasticine cake. And then a dome is fixed on the roof, topped with a cross made of plasticine or thinly sliced matches.Depending on the desire of the child, the temple can be one-domed, three-domed or five-domed. To install more domes, a more massive body of the temple building is needed.
Then they are squeezed out with a stack on the walls - windows are scratched. The side from which the entrance will be is selected. The entrance - the portal - can be molded from plasticine using the overlay method or, as in the case of windows, drawn with a stack.
If the temple was “built” from plasticine of the desired color (white plasticine was used for the walls, and yellow or blue was used for the domes), after the installation of the dome, it is considered ready.
If, in the process of modeling, a variety of plasticine was used, the building must be primed with starch or crushed chalk, and then painted with gouache.
Second way
From a rather large piece of plasticine, a parallelepiped is formed - the body of the future temple. A dome is attached to it. The further sequence of actions is the same as in the first method. This method is simpler, but at the same time it deprives the teacher of the opportunity to introduce the concept of "nave" to children.
The further plan of action is determined by the general plan. Each child can make a special model, inside which he will install his own church. Here you can tell the children that temples were usually erected on a hill. The hill can be made from a plasticine ball, which is given the desired shape. From above it is sprinkled with sand or earth, covered with turf. And you can install in a container with sprouted oats.
Perhaps the children would like the temple to stand on the shore of the lake. Or to have a garden around the church.
The main thing is that the composition should be expressive and through its creation the children would feel a special mood that Orthodox architecture usually evokes.
The days before Easter give the teacher a good opportunity to introduce kids to Orthodox architecture.
Show the children pictures of churches, go on a tour of a local temple, and then have your children build a small temple.
There are two ways to do this.
Method one
You need to take twelve whole plates of plasticine and round off the ends of each plate from one end. The result was naves - sectors of the temple wall. The nave plates are placed vertically and fastened together so that a “well” is obtained: they must be strongly pressed against each other and smeared on the inside of the “well”. The body of the temple is ready. Then a small piece of cardboard is placed on top of the “well”, which acts as a support, or ceiling, for the roof. The roof is made of a rectangular plasticine cake. And then a dome is fixed on the roof, topped with a cross made of plasticine or thinly sliced matches.
Depending on the desire of the child, the temple can be one-domed, three-domed or five-domed. To install more domes, a more massive body of the temple building is needed.
Then they are squeezed out with a stack on the walls - windows are scratched. The side from which the entrance will be is selected. The entrance - the portal - can be molded from plasticine using the overlay method or, as in the case of windows, drawn with a stack.
If the temple was “built” from plasticine of the desired color (white plasticine was used for the walls, and yellow or blue was used for the domes), after the installation of the dome, it is considered ready.
If, in the process of modeling, a variety of plasticine was used, the building must be primed with starch or crushed chalk, and then painted with gouache.
Second way
From a rather large piece of plasticine, a parallelepiped is formed - the body of the future temple. A dome is attached to it. The further sequence of actions is the same as in the first method. This method is simpler, but at the same time it deprives the teacher of the opportunity to introduce the concept of "nave" to children.
|
|
The further plan of action is determined by the general plan. Each child can make a special model, inside which he will install his own church. Here you can tell the children that temples were usually erected on a hill. The hill can be made from a plasticine ball, which is given the desired shape. From above it is sprinkled with sand or earth, covered with turf. And you can install in a container with sprouted oats.
Perhaps the children would like the temple to stand on the shore of the lake. Or to have a garden around the church.
The main thing is that the composition should be expressive and through its creation the children would feel a special mood that Orthodox architecture usually evokes.
Crafts from plastic bottles are very simple and easy to do with your own hands. In this article, we will tell you how you can make church models from ordinary plastic bottles.
It is worth noting that many bottles already have a domed shape, which makes it very easy to make models of churches.
As you can see in the photo, the tops of the bottles are used in this composition.
The pictures are printed on self-adhesive paper using a conventional inkjet printer and glued on top of the bottles, sprinkled with glue and glitter. In addition, beads and foil were used in the manufacture of crafts from plastic bottles.
Quite affordable materials for making DIY crafts, right?

And this craft from a plastic bottle is made using papier-mâché technology, when the paper is torn into small pieces, the bottle is coated with glue and pasted over with pieces of soft paper in several layers.
After that, homemade crafts can be painted with acrylics or gouache.

This plastic bottle mockup is even easier to make. Acrylic paints were used. You can buy “gold-like” paint at the artist’s store, but otherwise, all items for crafting are sold at the stationery store.

This installation uses cutting windows in plastic bottles, the domes are made of polymer clay, we wrote about it in the article. You can take already a golden color, or you can paint it.
As you can see, there is nothing complicated in making homemade crafts from bottles! This is a very simple activity and you can do it with your child.
More crafts from plastic bottles:
A helicopter from a plastic bottle - we make a model of a helicopter.
Water rocket - we make a rocket on water-air fuel.
We present step-by-step photo tutorials that will teach you how to make a church out of a plastic bottle, plasticine, toothpicks, paper, and even pasta.
If you know how to make a church, then you can make this craft from various materials. Not only cardboard, colored paper, but also matches and even pasta will be used.
How to make a paper church

To make it, take:
- whatman;
- cardboard;
- acrylic paints;
- a plastic bottle with a domed top;
- acrylic paint of different colors, including gold and silver;
- scissors;
- glue;
- blue colored paper;
- marker;
- ruler;
- icons scanned on paper.
Before you make a church, provide a pedestal for it. Make it from a sheet of thick cardboard, and cover it with paving stones printed on a color printer on top. Now let's start painting the details. To make the walls, you will need to cut out four such blanks by connecting them.

Cut out rectangles from blue paper, using a ruler and a black marker, draw these future windows as follows.

Cut out the door from brown cardboard, glue both rectangular and semicircular elements on top of it so that this part becomes more voluminous and it is clear that there are stones or bricks on it.

Cut out two door handles from yellow cardboard. To make steps for entering the church, you will need to cut semicircles of different sizes from cardboard, then glue them in order, starting with the smallest ones, ending with the largest ones at the bottom.

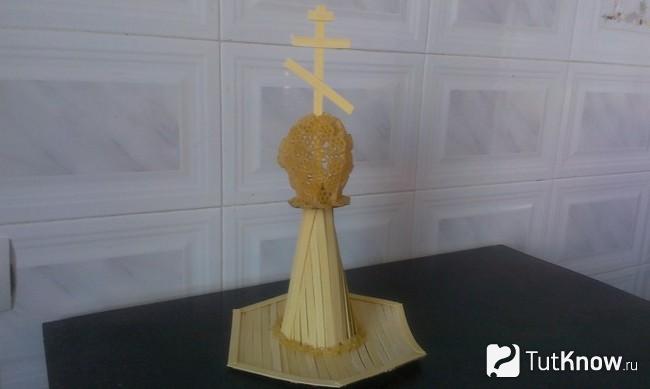
To make a dome for a church, cut the top off a matching bottle. All of it needs to be pasted over with plasticine, close the hole in the neck area and make this part more elongated. Then glue the dome with pieces of newspaper, wetting them in PVA glue.

Prime the dome using a real primer or white paint.


By this time the primer has dried, now you can paint the dome with gold acrylic paint in two or three layers.

Glue the windows to the appropriate markings. Glue the dome on top.

See how you need to assemble and arrange the workpiece. After gluing windows to the walls, attach a brown tape with small windows to the bottom, then glue the church layout to make it voluminous. Do not forget to stick on the appropriate places and icons. Glue the paper on top to become the roof.

Paint it with silver paint interspersed with brown. And with the same composition, mark the forged elements above the visor of the first door, and the column of the other must be painted with brown paint. Glue a silver cross to the dome, then glue the tower in the center of the composition.

Here's how to make a paper church. The process is very interesting, and you and your child will create such a significant thing from improvised materials. This is a model of the church, which is called "Hodegetria of Jerusalem", and it is located in Taganrog.
The next master class will also be easy for the child if you help him.
DIY pasta church
It is from this material that the next church will be built.

These flour products will create walls, openwork pasta will become decoration elements. Here is what you will need to take:
- pasta of different textures;
- scissors;
- pencil;
- ruler;
- long cover;
- foil;
- hot gun;
- cardboard.

Create a hexagon out of cardboard, then use it to make walls of this shape. Cover it with pasta.

Attach flat noodles at the corners and at the top to complete the finish. And with openwork elements you need to steal the top of the walls and make columns by folding this pasta in a pile.

From a sheet of cardboard, cut out a hexagon, as well as a cone. Glue the elements together. Using a hot gun, attach flat pasta on top. Decorate the junction of these two figures with semicircular pasta.

Make a dome from openwork vermicelli. To give it a shape, you can glue the top of a plastic bottle, which is made in the form of a dome, with these flour products. Glue a cross made from flat pasta in the center. Attach this dome to the created roof.
From cardboard, cut out the porch of the following shape, glue it on the outside with pasta.

Decorate the corners of this product with flat noodles, and also decorate the roof over the porch with these pasta and horns.

Cover the elongated cover with plasticine, and then glue this part with foil.

You have a bell. Use a glue gun to stick it in place. Here's how to make a DIY pasta church.

If an adult needs such a thing, then he can use matches as a material. The work is more painstaking, but very interesting.
How to make a church out of matches - step by step instructions with photos

To create such beauty, take:
- candy box;
- toothpicks or matches;
- PVA furniture glue;
- copper wire with a cross section of 0.33 mm;
- for the base - fiberboard, chipboard or plywood;
- floral candy foil;
- veneer.
Here are the tools you will need:
- ruler;
- sharp knife;
- eraser pencil;
- curved or straight scissors;
- bar;
- tweezers;
- compass;
- clothespins;
- carnation 2 mm.

The Lazarevskaya church of the 14th century was taken as the basis.

The master used this photo, making markings here. Redraw or reprint this drawing to know what dimensions will need to be considered when creating a church with your own hands. Calculations are given in millimeters.
To make it easier to make a temple, keep in mind that you need to conditionally divide it into 3 parts. The central one is the church itself, the refectory is located on the right, and the altar is on the left.
Here's how to make a church. To do this, take a thin cardboard and draw four walls, which are a square with sides of 5 cm.

As you can see, you need to draw windows in two walls, then cut them out with a thin knife or scalpel.
You can use matches, toothpicks or a wooden stack to build walls.
The next step is to determine the length of the wooden blanks. If you took a long stack, you will need to cut off parts from it. If toothpicks are used, cut off the sharp ends.

Now you can start making the temple. First decorate the wall on which there is glass.
See how you need to arrange wooden blanks, gluing them.

As you can see, these logs need to be moved through one - then to the left, then to the right. Now cut a strip of cardboard measuring 5 by 2 cm. Bend it approximately in half in the middle.

Make 4 such corners, and with their help assemble the frame of the future structure. As you can see, these corners need to be placed vertically and glued to each of two walls.

Measure the width of the wooden log so you know how much bigger the wall has become. Initially, it is 5 cm, if the thickness of this wooden blank is 3 mm, then it turns out that now the wall is 53 mm. But since the “logs” protrude in both directions, it means that now the wall width is 56 mm. Therefore, it is necessary to cut out two triangles of exactly this width for the pediment. If you have other calculations, then simply attach the wall to a sheet of cardboard and cut two triangles along its width.

Now you will need to glue these two triangles with wooden blanks.

Then attach these gables on both sides to the log cabins, glue them, fix them in this position with clothespins until the glue is completely dry.

Here's how to make a matchstick church next. While the main building dries up, you will be engaged in the manufacture of the refectory. Also make four cardboard walls for it, mark windows on three, and a door on one. The windows must be cut with a sharp knife, and the door must be cut on three sides so that it opens.

Also start gluing matches, pieces of a wooden stack or toothpicks to this blank, moving them to the right, then to the left.

From this strip, make such a box, glue its two opposite walls to make a log house. For a while, also fix this place with a clothespin.

Then, as in the previous case, attach and glue the gables. Please note that one of them is fixed from the side of the door.

Make the third room in the same way, it should be slightly smaller than the first two.


To make a roof, you need to measure the length of the refectory, the altar, the church. Add 4mm.

Now, according to the marking of each building, cut out the roofs from cardboard, bend these blanks in half.

Glue these roofs onto each of your buildings. Now we need to cover them. To do this, cut the semblance of boards from veneer.


Make a cutout on the central roof, glue this pipe here. Cut the veneer into wider and longer pieces, glue them so that they cover the cardboard roofs.

To make a cross, you can use the following device. On such a bar, you need to fill 3 groups of nails on the reverse side. Now start wrapping them with copper wire from above.

Here is the cross.

To make a dome, cut circles. The largest will be 19 mm in diameter, the next 17 mm, 15 mm, 13 mm, 11 mm, 9 mm. The smallest is 5 mm. Glue them like this.

Punch a hole in the center of the round blanks with a nail. Now take a strip of colored foil 10 cm long, put a dome on it, drop glue into the recess, put a cross inside.

Now twist the foil, making the dome in this way.

Cut the foil at the bottom of the dome so that you can glue it later.

From fiberboard, plywood or chipboard, cut out two layers of church bases and glue them together. Glue this blank over so that the surface resembles masonry. Pour glue inside, put the church here and attach it.

It will remain on the made pedestal in the form of a pipe to glue the dome. Here's how to make a matchstick church to look like the real thing.

Sometimes a week of Orthodox culture is held in schools, you need to bring crafts on this topic. If you make such a beautiful blue and white church with your child, he will surely take a prize.

Before you make a church of this kind, you will need to prepare:
- plastic bottle;
- cardboard cover from the box;
- wire;
- rope;
- lace and braid;
- blue and white plasticine;
- cotton wool;
- a strip of roll synthetic winterizer;
- PVA glue;
- foamiran or colored cardboard;
- double sided tape;
- scissors;
- brush;
- white paint.
First, take the lid on which the craft will be located, paint it with white paint. While the drying process is in progress, you will cut strips of cardboard or foamiran. They will help arrange a fence around the temple.

Sharpen the top ends of these strips to make them look like a picket fence.

In the meantime, the white paint on the box has dried, so it's time to glue the planks to the raised edges.

Let the glue dry, in the meantime, take the bottle, cut off the bottom.

You need to take a bottle whose upper part resembles the dome of a church, for example, from mineral water.
Also cut off the top of this container. But here the plastic is durable, so it is better to heat the knife and gradually cut off the excess part.

Now measure 2 cm from the edge of the bottle and cut this part into strips. Then such a trick will help to fix the church on a horizontal surface.

Cover the top of the bottle with plasticine, making a pointed tip out of it here.

To make a cross, take the wire in the winding. Here it is in blue. First, bend it in half, make a loop here, then bend two more loops on the right and left sides.
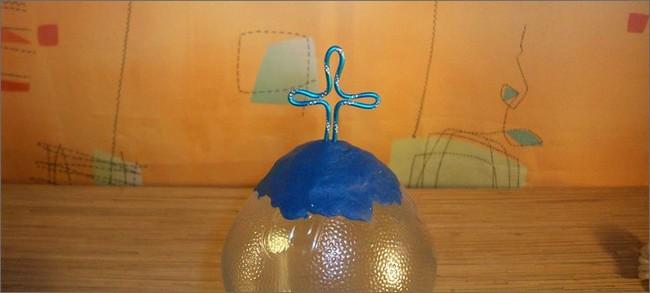
Stick the resulting cross into the plasticine dome cap.
Tape the bottom of the bottle with double-sided tape. Now start peeling off the top paper layer gradually. First, remove it from the bottom coil of tape. Wrap here with the yarn of your choice.

Thus, you need to arrange the entire lower part of the bottle. Now glue strips of lace here. Above and in the middle they can be blue, and below silver.

Now there is another interesting work to be done, which will also shed light on how to make a church. You need to decorate the dome. To do this, together with the child, roll up balls of blue and blue and make cakes out of them. Start gluing them from below in a checkerboard pattern. The second row should be slightly shifted to the right and the subsequent ones too.

Now attach double-sided tape to the bottom of the cut strips from the plastic bottle and stick it onto the box.

You can cover the horizontal surface of the box with grass, glue trees and flowers made of rubber, plastic or other materials here. But in this case, a white and blue composition, so snowdrifts made of cotton wool would be appropriate. Put them on the box by gluing them. And in the center place a strip of padding polyester. It also needs to be glued. Here's how to make a church look so amazing.

If you are interested in learning how to make a church out of matches, then the following master class will help.
An interesting idea is to make a paper temple using origami art. In just 12 minutes, you will acquire the skill and be able to make a church out of this material.
Hello everyone! Handmade Tuesday on the ShkolaLa blog! Get your golden hands ready. Today we will make a very interesting school craft for the week of Orthodox culture. Do these things happen at your school? We have periodicals) So they asked me to do something suitable.
And we decided to make a church. Long thought from what, but how? Thought and thought and thought. We will make a church out of a plastic bottle. The main thing is to choose the right bottle, so that its upper part looks like the dome of a church in shape. And we found one, from under the mineral water.
Well? Begin?
Let's prepare the necessary materials:

- shoe box lid
- plastic bottle;
- rope;
- wire;
- braid and lace for decoration;
- plasticine (we chose white and blue);
- cardboard or baby foam (aka foamiran);
- cotton wool;
- PVA glue;
- double sided tape;
- white paint;
- brush;
- scissors.
First, let's prepare the base of our craft. Paint the shoebox lid white.

Set the box aside for the paint to dry. And we will prepare planks for the fence that will enclose our church. They can also be cut out of cardboard. We used colored foam for children's creativity (foamiran). Draw stripes and cut them out with scissors.

We sharpened the tips of the boards to give the fence more naturalism. "Plates" are ready.

Now glue them to our base.

And we turn to the design of the main object of our crafts.
Take a bottle and cut off the bottom of it. Approximately like this.

The top of the bottle also needs to be cut off. This is quite problematic, since the plastic at the neck of the bottle is quite hard and thick. We heated the knife over the gas and slowly cut it off.

It's time to take care of how our future church will be attached to the base. Using a marker, I marked a horizontal line on the bottom of the bottle, approximately 2 cm from the edge. And segments were drawn down from this line.

The bottle was cut with scissors along the marked lines and the resulting strips were bent. It looks like flower petals.

Let's take care of the dome of our church. We will supplement it to the desired shape with the help of plasticine.

How to make a cross? Very simple. We took a beautiful decorative blue wire, since our church will be all blue and white. But you can use the usual wire, just then wrap the cross with foil.

Well, we first bent the wire in half and bent its tails to the sides.

And then like this. Got a cross!

Now we stick a cross into the top of our poppy head.

We take double-sided tape and glue the walls of the church with it.

Gradually, starting from the bottom, we take away the top layer of double-sided tape and begin to wrap the walls with a rope.

And so to the very top of the wall, to the beginning of the dome.

We mark the doors and windows on the walls with the help of blue lace. We made a front door. A thin strip of lace was glued on the top, and a silver braid for beauty was glued on the bottom.

The windows were arranged as follows: two on the sides, one behind.

Let's start decorating the dome. We roll up balls from white and blue plasticine, turn them into cakes, and glue them to the dome in rows, starting from the bottom.

Each next circle finds a little on the previous one. Like every top row to the bottom. The higher we climb, the smaller the cakes become. This is how the dome turned out! Nice?

We can say that we built a church.

We will install it on our base.
Remember we cut the bottom of the bottle into petals? Now we glue double-sided tape on these petals from below.

We made the stripes that are on the back of the church a little shorter in order to set the building as close as possible to the base wall. Then we take away the top layer of adhesive tape and glue the building to the base. Holds very tight and won't fall off.

It remains to decorate the space surrounding the church. You can make it summer, glue grass, make trees with your own hands and “plant” them around. But we went the other way, faster and easier. Made winter. Everything around the church was “swept with snow”. They made snowdrifts from cotton wool. And "cleared" the path to the doors. Path from a piece of synthetic winterizer. All this was glued to the base with PVA glue.

So our white and blue church is ready)
Already went to the school exhibition.
Now, friends, you know what to do if a week of Orthodox culture has started at school. We hope our step-by-step master class will help you)
By the way, I think that our composition for Christmas with angels can also act as a craft on the theme of Orthodox culture. You will find a master class.
And VKontakte is waiting for you our school group! Become her subscriber! We promise a sea of school positive and interesting information!
Olga Aleshina
In our kindergarten, various competitions are constantly held. Most recently, the results of the competition for the manufacture do-it-yourself temple models. Any material could be used. The main priority was that Temple must be similar to the one actually existing in Russia. The task was quite difficult. The most difficult thing for me was to keep the ratio of all parts temple and its resemblance to the present. Took a few pictures first. temple which is located in the center of our city. We have many churches, but I like this one more than others, and the architecture seemed not very complicated!
For the manufacture of layout has been prepared: 8 empty milk bottles (I picked up only those that fit the shape of the towers, 2 two-liter bottles of kvass, 5 plastic balls for dry pools (one is slightly larger than the others, plasticine, Whatman paper, PVA glue, Moment glue, paints "Gouache", interior, PF115 enamel, cotton fabric and linen cord.

foundation temple became an ordinary cardboard box, which they gave me in a store near the house. True, it had to be slightly corrected so that it matches the size of the selected bottles, painted in the appropriate color

"Onions" temple They were made from plasticine, which stuck tightly to the plastic balls and helped to give them the appropriate shape.

It was much more difficult to give cylindrical bottles the shape of a hexagon. To do this, I used a linen cord, which I pasted on the bottles and covered the future towers with a cloth. It remains only to paint and connect the "onions" with the towers using covers screwed together by "self-tapping screws"

Then I strengthened the towers on the roof of the main building, glued the entire surface of the roof with thick paper, to give shape and even surface, painted the roof with enamel. For windows I used an old x-ray film, for detailing decorations I used foam tiles with a smooth surface, white gouache. The crosses are real. The "golden" paint on the central dome is also gouache. like this I got the temple.

The competition, which was announced on the eve of Easter, was attended by both educators and parents of our pupils. Photos of the competition can be viewed on the website of our kindergarten.

My layout won first place, was awarded a certificate.

Hello everyone! Handmade Tuesday on the ShkolaLa blog! Get your golden hands ready. Today we will make a very interesting school craft for the week of Orthodox culture. Do these things happen at your school? We have periodicals) So they asked me to do something suitable.
And we decided to make a church. Long thought from what, but how? Thought and thought and thought. We will make a church out of a plastic bottle. The main thing is to choose the right bottle, so that its upper part looks like the dome of a church in shape. And we found one, from under the mineral water.
Well? Begin?
Let's prepare the necessary materials:

- shoe box lid
- plastic bottle;
- rope;
- wire;
- braid and lace for decoration;
- plasticine (we chose white and blue);
- cardboard or baby foam (aka foamiran);
- cotton wool;
- PVA glue;
- double sided tape;
- white paint;
- brush;
- scissors.
First, let's prepare the base of our craft. Paint the shoebox lid white.
Set the box aside for the paint to dry. And we will prepare planks for the fence that will enclose our church. They can also be cut out of cardboard. We used colored foam for children's creativity (foamiran). Draw stripes and cut them out with scissors.

We sharpened the tips of the boards to give the fence more naturalism. "Plates" are ready.
Now glue them to our base.

And we turn to the design of the main object of our crafts.
Take a bottle and cut off the bottom of it. Approximately like this.

The top of the bottle also needs to be cut off. This is quite problematic, since the plastic at the neck of the bottle is quite hard and thick. We heated the knife over the gas and slowly cut it off.
It's time to take care of how our future church will be attached to the base. Using a marker, I marked a horizontal line on the bottom of the bottle, approximately 2 cm from the edge. And segments were drawn down from this line.

The bottle was cut with scissors along the marked lines and the resulting strips were bent. It looks like flower petals.
Let's take care of the dome of our church. We will supplement it to the desired shape with the help of plasticine.

How to make a cross? Very simple. We took a beautiful decorative blue wire, since our church will be all blue and white. But you can use the usual wire, just then wrap the cross with foil.
Well, we first bent the wire in half and bent its tails to the sides.
And then like this. Got a cross!

Now we stick a cross into the top of our poppy head.

We take double-sided tape and glue the walls of the church with it.

Gradually, starting from the bottom, we take away the top layer of double-sided tape and begin to wrap the walls with a rope.

And so to the very top of the wall, to the beginning of the dome.
We mark the doors and windows on the walls with the help of blue lace. We made a front door. A thin strip of lace was glued on the top, and a silver braid for beauty was glued on the bottom.
The windows were arranged as follows: two on the sides, one behind.

Let's start decorating the dome. We roll up balls from white and blue plasticine, turn them into cakes, and glue them to the dome in rows, starting from the bottom.
Each next circle finds a little on the previous one. Like every top row to the bottom. The higher we climb, the smaller the cakes become. This is how the dome turned out! Nice?
We can say that we built a church.
We will install it on our base.
Remember we cut the bottom of the bottle into petals? Now we glue double-sided tape on these petals from below.

We made the stripes that are on the back of the church a little shorter in order to set the building as close as possible to the base wall. Then we take away the top layer of adhesive tape and glue the building to the base. Holds very tight and won't fall off.
It remains to decorate the space surrounding the church. You can make it summer, glue grass, make trees with your own hands and “plant” them around. But we went the other way, faster and easier. Made winter. Everything around the church was “swept with snow”. They made snowdrifts from cotton wool. And "cleared" the path to the doors. Path from a piece of synthetic winterizer. All this was glued to the base with PVA glue.

So our white and blue church is ready)
Already went to the school exhibition.
Now, friends, you know what to do if a week of Orthodox culture has started at school. We hope our step-by-step master class will help you)
By the way, I think that our composition for Christmas with angels can also act as a craft on the theme of Orthodox culture. You will find a master class.
And VKontakte is waiting for you our school group! Become her subscriber! We promise a sea of school positive and interesting information!
Enjoy your creativity!
Always yours, Evgenia Klimkovich.

The days before Easter give the teacher a good opportunity to introduce kids to Orthodox architecture.
Show the children pictures of churches, go on a tour of a local temple, and then have your children build a small temple.
There are two ways to do this.
Method one
You need to take twelve whole plates of plasticine and round off the ends of each plate from one end. The result was naves - sectors of the temple wall. The nave plates are placed vertically and fastened together so that a “well” is obtained: they must be strongly pressed against each other and smeared on the inside of the “well”. The body of the temple is ready. Then a small piece of cardboard is placed on top of the “well”, which acts as a support, or ceiling, for the roof. The roof is made of a rectangular plasticine cake. And then a dome is fixed on the roof, topped with a cross made of plasticine or thinly sliced matches.
Depending on the desire of the child, the temple can be one-domed, three-domed or five-domed. To install more domes, a more massive body of the temple building is needed.
Then they are squeezed out with a stack on the walls - windows are scratched. The side from which the entrance will be is selected. The entrance - the portal - can be molded from plasticine using the overlay method or, as in the case of windows, drawn with a stack.
If the temple was “built” from plasticine of the desired color (white plasticine was used for the walls, and yellow or blue was used for the domes), after the installation of the dome, it is considered ready.
If, in the process of modeling, a variety of plasticine was used, the building must be primed with starch or crushed chalk, and then painted with gouache.
Second way
From a rather large piece of plasticine, a parallelepiped is formed - the body of the future temple. A dome is attached to it. The further sequence of actions is the same as in the first method. This method is simpler, but at the same time it deprives the teacher of the opportunity to introduce the concept of "nave" to children.
|
|

The further plan of action is determined by the general plan. Each child can make a special model, inside which he will install his own church. Here you can tell the children that temples were usually erected on a hill. The hill can be made from a plasticine ball, which is given the desired shape. From above it is sprinkled with sand or earth, covered with turf. And you can install in a container with sprouted oats.
Perhaps the children would like the temple to stand on the shore of the lake. Or to have a garden around the church.
The main thing is that the composition should be expressive and through its creation the children would feel a special mood that Orthodox architecture usually evokes.
The purpose of the lesson:
To acquaint children with the internal structure of the temple.
Tasks:
- Give an initial idea of the internal structure of the temple (porch, nave, iconostasis, altar);
- Give an initial idea of why people visit the temple;
- Cultivate a reverent attitude towards shrines;
- Develop imagination, memory, imaginative thinking;
- Develop fine motor skills through sculpting.
Didactic material:
- photograph of a one-domed church (see Appendix 2);
- slide projector;
- slides: “Interior decoration of an Orthodox church”, “Iconostasis”, “View of the throne”, “Festive service in the church” (see Appendix 2);
- a model of the temple made by the teacher (see Appendix 1, pages 1-3, model of the temple);
- figurines of a boy and a girl made of plasticine.
Handout : plasticine, stack, rag, plank.
Preparing the class for class : installation of a screen and a slide projector, preparation of didactic photographic material (attached to the board), a model of the temple is placed on the first desk and covered with a veil, distribution of plasticine for each desk.
Lesson plan.
| № | Stage lesson | Teacher activity | Student activities | Time |
| 1. | Org. moment | Getting to know the students: introduction of the teacher. | Children stand up, say their name, surname, sit down. | 2 minutes. |
| 2. | Conversation | Let's look out the window. What do we see? | Children look out the window. Suggested answers: trees, earth, sky, houses, etc. | 5 minutes. |
| What parts does the house consist of? | Suggested answers: roof, walls, windows, doors. | |||
| Why do you think people need houses? | Suggested answers: to protect from bad weather, to live in them. | |||
| What other buildings exist besides houses? | Allegedanswers: shops, theaters, museums, etc. | |||
| The teacher draws the children's attention to a photograph of a single-domed church (see Appendix 2). and asks: What do you see? | The children look at the photo. Allegedanswers: also a house, a church, a temple. | |||
| The teacher summarizes the children's answers. Such a building is called a temple. And as we can see, it differs from an ordinary house in appearance. What differences do you see? | Allegedanswers: not such a roof, at the top there is a cross, a dome. | |||
| The teacher summarizes the children's answers. Such a roof is called a dome. Since ancient times, people have been building temples and crowning them with domes, so that it can be seen that this is not just a house, a building is an architectural monument, but also some kind of special place. People come to the temple in order to turn to God. Since this is a special place where God always dwells. Before the beginning of the lesson, we got to know each other, called our names. The temple also has a name, they call it - they dedicate it to some event or a holy person. | ||||
| 3. | Considering the layout of the temple | Now let's get to the first part. (There is a model of the temple on the table under the cover). The teacher takes off the veil and says: Now we will make an excursion to the temple. | Children stand around the first desk. | 10 min. |
| You see, I built a small temple, which is similar to the one in our photo. Here are the walls of the temple, the doors, the entrance to the temple, the dome with the cross, which is located on the roof. And now we will remove the roof and see how the temple is arranged. | Children examine the model of the temple. | |||
| The teacher removes the roof. People also came to our temple to turn to God. Girl and boy. The teacher shows figurines of children made of plasticine and puts them in the first part of the temple - the vestibule. When a person enters the temple, he first enters the first part of the temple - the narthex, where people who want to enter the temple enter - this is the threshold of the temple. Let's go further. The teacher moves the figures to the central part of the temple and says: This is the central part of the temple, or as they say in another way, the temple itself, there is another foreign name - the nave. |
Children examine the interior of the temple. | |||
| What do our little men see, what surrounds them? Right. There is another part in the temple, it is called the altar. This is a holy, sacred place, so our little men cannot enter there. Priests enter the altar to turn to God and celebrate the liturgy. Therefore, our little men will remain in the middle part. |
Suggested answers: icons, candlesticks. | |||
| And we'll sit down | The children take their seats. | |||
| 4. | Viewing a slide film | The teacher turns off the lights, curtains the windows, turns on the slide projector. On screen projection first slide:"The Interior of the Temple". | Children look at the screen. | 8 min. |
| Just as in our little temple, we saw that it was not empty, so in ordinary temples we see that faces are looking at us from everywhere. Who are these people? | Allegedanswers: children find it difficult to answer. | |||
| And whose portraits do we keep in our house? | Allegedanswers: grandparents, family, friends. | |||
| The teacher summarizes the children's answers. That is, they are dear to us people. Maybe they are no longer with us, but we have not forgotten them. Surely we remember something good about them. Maybe we want to be like them. | ||||
| So why do we need photos of loved ones? | Allegedanswers: so that we communicate with them or remember any incident from their life. | |||
| In the same way, the temple keeps the faces of the saints so that we can remember them and communicate with them. On the screen second slide"Iconostasis". And this is a special wall in the temple. It separates the altar from the actual temple, so it is decorated in a special way. | ||||
| What is she adorned with? | Allegedanswers: gold, etc. | |||
| This whole wall is in icons. They are located in several rows. In some churches there are only three rows, in some there are five, and sometimes more. | ||||
| Let's look at the bottom row, what do you see? | Suggested answers: icons, doors. | |||
| This series is called local. Since it has an icon (second to the right of the gate) after which the temple is named. Also in this row are the Royal Doors. Through them, the priest enters the altar to turn to God - to read the most important prayer during the Liturgy. showing thirdslide"View of the Throne" Let's see what the priest sees inside the altar. We have a throne in front of us. This is the heart of the Christian church. During the Liturgy, the Lord himself stays here. | ||||
| Let's see what's on the throne. | Allegedanswers: cross, book, candlestick, small temple. | |||
| The teacher clarifies they are sacred things. Cross, gospel, menorah, tabernacle. fourth slide. "Festive Divine Liturgy in the Temple". Here we are again in the middle part of the temple, we see that the temple is full of people. They came to seek God. | ||||
| 5. | Practical work | The teacher turns on the light. Here is our tour completed. But there are only two people in our church. Let's make more people out of plasticine so that our temple is filled with people. Look, on your tables there is plasticine, a stack, cardboard, a rag - everything for modeling. | Allegedanswers; the children agree. | 8 min. |
| Let's cut off a small piece of any color with a stack to blind the torso. | Children cut a piece of plasticine. | |||
| Roll up a thick sausage. | Children roll sausage. | |||
| Teacher's explanation: In order to mold the body of a girl, our sausage must be made thinner on one side, and flattened on the other side to make a dress. In order to mold the boy's body, we leave the sausage flat, cutting it into two parts from the bottom to the middle. Got panties. | Children choose who they sculpt and do the work. | |||
| Now we blind our hands. Cut off a smaller piece and roll a thin sausage. Then we cut it in half and attach the handles to the upper body using the lubrication method. Take white (yellow, pink) plasticine and cut off a small piece. We roll the ball. Attach the head to the body using the lubrication method. Girls should wear headscarves, and for boys, blind hair. | Children perform. | |||
| Take a small piece of plasticine of the desired color and flatten it on the board into a thin cake. Using the method of overlay and lubrication, we will fix the resulting parts on the head of the figure. | Children perform | |||
| And now everyone will try to sculpt the face of their figures and decorate clothes on their own. Here our men are ready. | Children work independently. | |||
| Consolidation of learned material |
Now let's fill the temple with them. Everyone will come up and put his little man in the temple. (The teacher must find out from the child in which part of the temple he wants to put the little man, clarifies / corrects the children's answers.) | 5 minutes. | ||
| 7. | End of class | Our lesson has come to an end. Today we got acquainted with the structure of the temple, now you can tell your friends about it. friends and parents. The teacher thanks the children for their attention and says goodbye to them. |
Children say goodbye to the teacher and leave the classroom. | 2 minutes. |