- Video card;
- processor, cooler and thermal paste;
- RAM;
- motherboard;
- case with power supply;
- Screwdriver Set.
Instructions for assembling a personal computer from components
1 Prepare complete set
We will prepare all the components, once again take a look at them, that we have not forgotten anything. I will assemble a computer from this.
2 Preparation motherboard
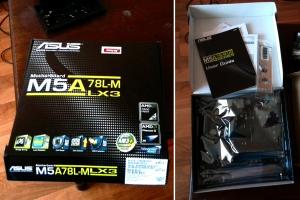
Open the box with the motherboard and pull it out. The box usually contains instructions, a disk with drivers, a rear panel, cables for the drive and hard drive.
It is important not to damage the motherboard with static electricity. Therefore, first discharge the static charge from yourself, "ground" before picking it up. It is advisable not to be dressed in synthetic clothing, and hands should not be unnecessarily dry.
 We take out the motherboard from the factory box
 3 Installation CPU
The first step is to install the central processing unit (CPU, CPU) into the connector on the board. One corner of the processor is usually marked with a triangle. The same triangle is on the board. We put the processor so that the labels match. And then we press it with a special lever located on one of the edges of the processor seat (socket).

4 Installation radiator and cooler
Now you need to install a heatsink with a cooler and connect it to the power connector on the board. If the heatsink is already covered with thermal paste, then it is ready for installation. If there is no thermal paste, it must be applied in an even, thin, neat layer on the surface that will be adjacent directly to the processor. Then put the heatsink on the processor, grind it thoroughly so that the paste is evenly distributed in the space between the heatsink and the processor. Then close the fixing latches. Well, the final touch is to connect the fan wire to the power connector on the motherboard, usually it is marked as "CPU FAN".

Depending on the processor family, heatsink installation options may differ slightly from those described. Usually the technique is described in detail in the passport for the motherboard, read it before starting work.
5 Installing modules random access memory
The next step is to install the RAM modules. If you have one module, then put it in the first slot. It is usually marked as "DIMM_A1" or simply "DIMM_1". If there are more than two memory slots, and there are several memory modules, then put them first in slots of the same color: so the RAM will work faster.

6 Installation back panel
Now we install a shiny metal back panel with holes for all connectors into the case. It is placed from the inside with a simple indentation outward.

7 Installation motherboard
The board has holes for fastening, and the case has holes and a number of metal racks, usually at least 6 pieces. Depending on the size of your board, you need to place the standoffs in the case so that they are under the mounting holes of the board. Now we place the motherboard in the case. There should be racks under all the holes. The motherboard connectors should clearly fit into the holes in the back panel. We fix the motherboard with screws to the racks.

8 Installation video cards
It's time for the video card. Modern video cards usually have a PCI-Express connector. We put it in the slot until it clicks and fix it on the back wall with a screw.

9 Installation and connection power supply
Now we connect the power supply to the motherboard. First, connect the large 20-pin double-row connector ("8" in the picture) to the motherboard. Then connect the 4-pin connector "7". It can be placed either next to or elsewhere on the board. A modern hard drive and a DVD drive are connected by type "3" connectors, the old ones - by type "2" connectors. If you have a powerful video card, then it requires additional power - connectors "5" and "6". Connector type "1" is used to power an obsolete floppy drive.

10 Port Connection and indicators
We connect USB ports, additional audio connectors, an internal speaker and front panel buttons: power and reset buttons, hard drive and computer power indicators. Usually these connectors are all located nearby and are signed on the motherboard like this: USB, PWR_SW, RST_SW, SPEAKER, HDD_LED, POWER_LED.

To avoid mistakes, carefully study the instructions for your motherboard model and follow it when connecting the front panel, buttons and LED indicators.
11 Connecting HDDs, CD and DVD drives

12 Turning on the computer and installing device drivers
Once again, check everything and then turn on the computer. If you have previously installed the operating system, then it should boot immediately. Naturally, the first time you turn it on, you will need to install all the drivers: first on the motherboard and all its devices, and then on the video card.
When you first turn it on, it is advisable to connect the monitor to the integrated video adapter of the motherboard, and not to a discrete video card in the PCI-Express slot. Then, when all the drivers are installed, switch the monitor to a discrete graphics card.

Read the manual (instruction) for the motherboard before starting work.
If possible, after assembly, twist all the wires into one bundle with a wire so that nothing superfluous hangs out, does not stick out, and does not interfere with the free circulation of air inside the case.
After installing the drivers on the motherboard, restart the computer and only then install the drivers on the video card.
note
Make sure you are not electrically charged before handling any computer components. If you are hitting with static discharges, then moisten your hands, touch the computer case or the central heating pipe.