A knitted tablecloth is a unique piece of furniture, an excellent tool for creating coziness in almost any room. However, in the open air, this decorative detail will certainly look elegant and sophisticated.
A do-it-yourself tablecloth in the interior of the house is the pride of any housewife. And the most amazing circumstance is that for such needlework you do not need to buy a lot of tools, as well as complex rare materials that are sold in specialized stores. Everything is extremely simple: a few skeins of yarn and a hook of the appropriate size. By the way, threads are most often used in plain colors, for example, white, cream, pale pink. Some craftswomen knit purple and red tablecloths, but nevertheless, it is these products of light, delicate tones that look best in the interior.
As for the size, it should exceed the parameters of the table surface. Products that hang freely from the edges look best. A tablecloth that slightly covers the table around the perimeter is considered too small. If there are not enough threads and there is no way to buy them, it is better to knit a napkin altogether, taking only the central elements from the diagram. Such a product looks great in the central part of any surface.
The edges of the tablecloth are often decorated with fringe or openwork patterns.
On any crocheted item, upon close examination, knots and protruding threads should not be visible. Accuracy, the almost impossibility of finding the beginning and end of knitting - these are the main features that distinguish the work of experienced craftswomen from products made by beginners.

Many people like tablecloths created from the interweaving of the same elements. First, several dozen parts are made - for example, the same or slightly different in color, one or two types. Then all the elements are connected to each other (most often with half-columns, single crochets, air loops).

Crocheted openwork tablecloths have many advantages over similar products made from thick and solid knitted fabric. Firstly, they look unusually beautiful and elegant, and a huge variety of patterns is an immense scope for creativity. Secondly, skilled craftswomen often knit such products faster. Thirdly, threads for products with many holes need much less, and this is already savings. The most difficult thing is to understand the tricky schemes.

The main qualities of a knitter are attention and accuracy. And the dexterity of the fingers, which often comes with experience, will help to make each type of loop the same size. This will give the product smoothness and symmetry. But as soon as several elongated, sloppy loops appear on one edge of the product, the pattern on the tablecloth can be spoiled.

The mesh tablecloth looks very interesting. Several original patterns can be added to a homogeneous canvas of alternating air loops and columns with the same number of crochets.

Many are sure that such knitted openwork tablecloths are ideal for round tables.

However, the classic version of most kitchens - a rectangular table - also looks great with a crochet tablecloth.

Floral motifs and rings seem to “soften” the corners, fill the interior with smooth lines, gentle graceful curves.

Intricate patterns require a lot of thread and even more patience.

For those who are just learning to crochet tablecloths, it is better to start with small options for children's tables. Uncomplicated plots can be combined with geometric ornaments - it comes out simple, and at the same time original.

What are the advantages of crocheted tablecloths? After all, patterns can be created with knitting needles. Or, for example, a tablecloth can be cut and sewn from a single piece of cloth - it will be much faster and more reliable. And there is no risk of creating uneven loops, a poor understanding of the scheme, there is almost no chance of losing symmetry or losing count ... Maybe it’s easier to buy a cheap oilcloth tablecloth in a stall with little things?
Of course, crocheting tablecloths is a very long and painstaking work. But as a reward, each craftswoman or her customer receives an unusually delicate and refined canvas. Thousands of tiny loops, miniature holes, a lot of neat crochet movements ... Such almost jewelry work is much more appreciated, because so much effort and patience has been invested in it.
Videos crochet tablecloth
Our grandmothers learned to crochet in courses, from books or from other craftswomen.

And today everyone can master the most complex knitting techniques and techniques without leaving home - all you need is access to the Internet.
Also from the videos you can get interesting ideas on the design of tablecloths.
Crocheted round tablecloth


Do not forget that a round tablecloth is ideal for a table of the same shape. To look good on a rectangular surface, the knitted product should be smaller (something like a large napkin).
Rectangular tablecloth crocheted pattern

Rectangular tablecloths made with loin knit, spider and pineapple patterns are quite popular.
The scheme of the fillet pattern is slightly different in designations.


Crocheted square tablecloth
The peculiarity of this tablecloth is the presence of corners. It looks interesting even on a round table.

An additional difficulty for beginner needlewomen is knitting corners. Loops are often added here, so you need to work with the circuit especially carefully.

But square tablecloths from interconnected motifs, on the contrary, are easier to create. When the length of the product should be equal to the width, it is much easier to assemble a patterned picture.

A square tablecloth made of “mill” and “spider” patterns is a real achievement for any craftswoman.

And the tablecloth "Asterisk" seems to have been created specifically for tea parties with loved ones.

Master class crochet tablecloth

For those who are just learning the crochet technique and are not yet strong in disassembling ingenious patterns, it is better to start with a tablecloth made of floral motifs. Using colored yarn, you can create a decor item that fits perfectly into the overall color of the kitchen interior.
Cotton yarn is ideal for such a tablecloth: 300 g of white, 150 g of ivory, 100 and 50 grams of yarn of two saturated colors that combine with each other (we will conventionally denote them 1 and 2). You will also need a hook with number 6.
Knitting a hexagonal part begins with a ring: 5 air loops are fastened with a connecting column. Next, the rows are knitted according to the scheme:

The rows begin with air loops, end with connecting columns in the air loop of the beginning (last). The initial, first, second rows are knitted with a thread of saturated color 1. The third is ivory. the fourth and fifth are white. When the color changes, a connecting column is performed.
A total of 25 color 1 and 12 color 2 parts are made.
Then, with single crochets, the parts are connected with a white thread from the inside. Only the front walls of the extreme loops are hooked with a hook.
How to crochet an oval tablecloth
A table decor is quickly and simply knitted from chains connected by single crochets or half-columns.

The extreme section of the next tablecloth is decorated with a pineapple pattern.

Here are two more options with such popular "pineapples".


Crocheted tablecloth patterns
A flower is very often located in the center, and rays-patterns diverge from it. On a round tablecloth they are the same, on other versions they are of different lengths. A gradual increase in the length of the rows (circles in a round tablecloth) is achieved by adding the number of loops - several columns are knitted into one loop of the previous row, additional air loops are added, etc.
Many craftswomen, having completed the product according to the scheme, independently add an openwork edge. Colored and overlaid elements are additional touches that give the originality of the product.
Video how to crochet a tablecloth a simple pattern
Many craftswomen like “dimensionless” tablecloths knitted from the center. The advantage of making such things is that knitting can be stopped before starting any stage, but the product will not lose its beauty and decorative effect. Later, you can knit a small tablecloth, turning it into a large one.
Many people say that it is very difficult to knit a tablecloth on your own. Maybe this is true. But on the other hand, as a result of the work, the craftswoman will not only gain invaluable experience, but will certainly train patience, perseverance, attentiveness, and determination. And these qualities will be useful not only in needlework, but also in everyday life.

Crochet for beginner napkins is better to start with a thicker yarn (but not very thick) so as not to get tangled in the threads. For example, wool blend or acrylic.
The hook is selected according to the thickness of the thread. This is done by trial: if you take a very thin hook, then knitting with thick yarn will be difficult, almost impossible. A crochet with a very large number will turn out to be too full of holes in the napkin. 
For knitting a thick napkin for beginners, a hook with number 2 - 2.5 is suitable. But, again, I repeat, do not strictly follow what is written. Try it, choose the option that seems more convenient to you. 
It is better for beginners to choose the simplest crochet napkin patterns.
Crocheted small napkins can be used as coasters for glasses, cups. White or multi-colored dense small napkins will look good in table setting.
Well, in the future, for knitting openwork napkins, it is better to use thin cotton bobbin threads, such as those used for sewing (No. 0-10). From them, the product will turn out gentle and airy. 
The hook in this case should also be taken with the smallest number 0.5 or 1.
You can also knit napkins from thicker cotton yarn like Iris, the hook is suitable with the number 1.2-1.5. 
So, how to crochet a doily?
Crochet napkin lesson
An excellent video tutorial on knitting napkins with a hexagon
Doily sunflower crochet video, part 1 and 2
Attention to the training video lesson for beginners.
First you can learn how to knit a small napkin under a vase, for example. How to do it? To begin with, it is worth familiarizing yourself with the implementation of several loops. Knitting is based on an air loop and double crochet and single crochet. Everything else is derivatives of these figures, which, combined with each other, make up patterns.
Making a vase napkin
Napkin with a diameter of about 30 cm, cotton yarn about 50 g and hook No. 1.
As with most napkins, we start knitting with air loops (vp), in this case there will be 8 of them, they are closed with a connecting post (connection item).
Schematic conventions 
Knitting patterns

2 row: we knit 3 in. lifting and 2 columns with a crochet (st. s / n), tied together, forming a ring, (in the diagram, a fragment of a napkin) * 3 c. p., 3 tbsp. s / n, connected together, from * must be repeated 6 times and finish 3 in. item 1 conn. Art. Art. s / n.
Such work is not difficult in the case when the novice needlewoman familiarized herself with the graphic designation of certain loops. You can find simple schemes of various napkins here.
And now attention to our master class below.
Instructions for knitting rows:
You need to score 5 v.p. and connect them. Art.
2nd row: cast on ch 3 lifting and another 2 ch, then in a circle 7 tbsp. s / n, each of which is knitted through 2 ch, carried under the loops of the ring.
3rd row: 3 sts of lifting, 4 tbsp. s / n, knitted under 2 ch, between st. bottom row. Now under v.p. bottom row in a circle of five tbsp. We complete the row by connecting the leading loop from 3 points of lifting.
4 row: we perform 3 p. lifting and 4 tbsp. s / n, knitting them with a single top. Then ch 5 Next comes the alternation of 5 tbsp. with one vertex and c.p. We end the row with 5 ch, the last of which is connected to the 3 st of the rise.
5th row: We repeat the whole row for 9 tbsp. s / n under vp bottom row. We connect the leading p. with the 3rd p.
row: 3 p. lifting, 4 tbsp. s / n with a single top, knitted in st. bottom row, then ch 5 and 5 st. with a single vertex alternate to the end. We complete the connection of the leading loop with 3 points of lifting.
7th row: 3 sts of lifting and 9 tbsp. s / n under 5 vp bottom row. Further *under five v.p. we knit 5 tbsp. s / n, under the next 5-10 tbsp. s / n * and this combination (**) we knit until the end 7 more times.
8 row: 3 p. lifting and 4 tbsp. s / n with a single top, then 5ch and repeat.
9 row: 3 sts of lifting, under 5 ch. the bottom row we knit 9 tbsp. s / n. Further * under 5 v.p. lower-5 tbsp. s / n, repeat this step and under the next 5 cp already 10 tbsp. s / n *. We continue the combination (**) around the circle.
You can adjust the diameter of the napkin yourself.
Napkins can be of various shapes - square, round, rectangular, polygonal, oval, and so on, it all depends on the wishes. The easiest way to make napkins can be knitting identical motifs that simply connect to each other.
square napkin
Square napkins are often crocheted from the same motifs, with an increase in their number, the napkin turns into a tablecloth or plaid. For a square doily measuring 27 x 27 cm, you need 80 g of yarn and hook No. 1.5.
Scheme

As you can see, the napkin consists of large and small motifs.
Large motive: we knit 10 c. etc. and close the chain of connections. Art.
Row 1: Knit 3 in. lifting point, 23 st. s / n about the circle. We finish with the help of the connection. Art.
2 row: we collect 17 in. n. (where 1 v. p. lifting, and the rest 16 v. p.), 2 tbsp. without a crochet (b / n) in the next 2 tbsp. s / n of the first row. Now * 1 tbsp. b / n in the next art. s / n of the previous row, 16th century. n. and 2 tbsp. b / n in 2 tbsp. s / n of the previous row * The combination (* *) is repeated 6 times. That is, 7 arches are formed, only 7 arches, and we end the row with a connection. Art.
row: we knit in accordance with the scheme and at the end we cut the thread. You need 9 such motives.
To connect, we knit a small motive: we dial 8 ch. and close the ring.
1st row: cast on 3 in. lifting and 23 st. s / n in a circle and finish the connection. Art.
2 row: we knit 14 in. p., 5 tbsp. s / n in 5 tbsp. s / n of the previous row. * 1 tbsp. s / n in Art. s / n of the previous row, 11th century. n. and 5 tbsp. s / n in 5 tbsp. s / n of the previous row *, the combination (**) is repeated 2 times, in the total count-4. We finish with the help of the connection. Art. You need 4 of these items. Motives are connected according to the scheme.
Standard round napkins
If we consider the variety of round napkins, then there is room for fantasy to roam. They will become not only an exclusive decoration of the house, but also an original gift. For round oval napkins, you can also use simple and complex motifs. And as a result, very beautiful napkins are obtained, including for beginners.

you will need white thin threads and hook number 1. For a napkin, 7 circular motifs are knitted. They are connected after completing 4 rows, and to complete they are tied with 2 rows of air loops. For each element 8 v.p. connect conn. Art.
row: we knit 3 ch. and 19 st s / n and connect the extreme loop with 3 p.
2 row: you need 5 in. lifting and 2 tbsp. with three crochets in the conn. Art. knit together with a single loop, * 4 c. p., 3 tbsp. with three crochets in the next column with a single loop *. Combination (**) repeat 19 times, 4 more times. n., we complete a series of connections. Art. in the 5th c. lifting item.
We knit the third and fourth rows in accordance with the scheme. That is, after connecting all the parts, we tie them with 2 rows of ch.
video lesson
Openwork napkins
Crocheted openwork napkins always receive special attention, the patterns of which you will find below. Beautiful and elegant, they are able to decorate any interior. Masterfully executed products will not leave anyone indifferent.
For the execution of openwork patterns, certain skills are needed, since thin threads and small hooks are used for knitting. 
The scheme involves the use of a large number of tricks and combinations of loops.
and beginners can independently knit an openwork napkin, which is easy to perform. It consists of air loops, which is within the power of beginners. We make a sliding loop and knit 17 tbsp. b / n inside the loop. We connect a series of connections. sts of the first and last loop.
2 row: ch 3 and in the loop of the base we knit st. b/n. and repeat in a circle, the first and last loops are connected.
3 row: skip the hook under the arch and knit the connection. p., 3 v.p. and knitting Art. b / n through the arch, repeat in a circle. We connect the 1st and last loops.
4 row: we knit through the arch conn. loop and * 4 ch. and draw through the next arch, knitting st. b / n. * The combination (**) is repeated in a circle. We connect the first and last loops.
5 row: In the arch we knit 2 connections. p. and * 5 vp, draw under the arch and knit st. b / n *, (**) repeat to the end, connect the first and last loops.
row: again 2 connections. n and * 6 vp, draw under the arch and knit st. b / n *, (**) repeat, end with the connection of the 1st and last loop.
The size is simple, but at the same time, the size of the openwork napkin can be adjusted independently, adhering to the principle of knitting.
Video tutorials for beginners
Be sure to check out our selection of video tutorials for beginners.
How to read diagrams?
Napkin with stars

Size: 24*24 cm.
For knitting you will need: 40 g of white cotton yarn (265 m / 50 g), hook No. 1.25-1.5.

Description of knitting: for a great motive, tie a chain of 8 air. item and 1 connection. Art. connect it into a ring. Run 3 air. n. instead of 1 tbsp. s / n, 1 tbsp. s / n, then knit in a circle * 2 air. p., 2 tbsp. s / n, from * repeat 6 times, finish 2 air. p., 1 conn. Art. in the 3rd air. n. start. Knit according to the scheme, start each circular row with air. etc., the number of which is indicated in the diagram, and finish the connection. Art. The diagram shows only part of the napkin. Finish the circular rows according to the pattern. After the 11th circular row, the 1st mot is completed. In total, perform 4 such motives, in the last row, each subsequent motive is connected to the connection. Art. with the previous one. For small motives, knit a chain of 8 air.p. and 1 conn. Art. connect it into a ring. Knit according to the pattern. For the middle motif, perform 3 circular rows, in the last row, attach the motif of the connection. Art. to the rest. For 8 external motives, perform 3 rows according to the scheme, in the 3rd row, attach the motives to the rest of the connection. Art. The numbers represent the circles. Stretch the napkin and dry it under a damp towel.
Crocheted napkin "Grapes". Step by step master class
To work, you will need 3 colors of acrylic yarn (white, green and blue) and hook number 3.
Crochet napkin: master class

We take a blue thread for knitting grapes. We attach the thread to the arch and wind 7-10 elongated loops on the hook (the number of elongated loops depends on the thickness of the thread), then we stretch all the loops through the hook and fasten with a half-column. After we knit 1-3 air loops (again, depending on the thickness of the thread) and move on to a new berry.
Similarly, we knit the remaining 9 berries. Cut the thread and fasten.
And on all the fans we knit the first tier of cluster berries.
Let's go to the sheet. First we knit 3 single crochet stitches, then 2 air loops, and again 3 single crochet stitches
We knit 3 air loops to go to the bunch.
And we tie the bunch itself with connecting posts. Between the berries we knit 1-3 connecting columns (depending on the thickness of the thread).
When the row is completely knitted with green thread, we move on to the second tier of berries on each bunch.
Knitting the next row with a green thread, for the leaves we add 2 columns in one loop of the bottom row on each side of the air arches. The green part of the knitting should be wide.
And so we knit until we knit the whole bunch.
We cut off all the ends of the threads, tuck them in and tie the entire napkin in a circle with arches of 6 air loops. We stick the hook into each loop of the previous row.
The work is done.
Filet crochet is knitting in the style of filet lace. With the help of this technique, truly beautiful napkins and tablecloths, as well as summer blouses and openwork scarves, work out. And knitting them is simple and very interesting. Filet knitting is similar to filet embroidery. Double crochets and air loops form a grid and at the same time a pattern is knitted on it. For those who want to make a beautiful thing using fillet knitting technique: the patterns can be seen below:


Fillet knitting of napkins
It is best to start acquaintance with the loin knitting technique with small napkins. A feature of fillet knitting is that a large space is needed for a complex and interesting pattern. Therefore, the larger the canvas, the more room for imagination in the loin knitting technique.
The topic in fillet knitting can be diverse, since you can embody everything you want in this technique. The most famous areas of loin knitting are checkered fabric designs that resemble geometry. Therefore, the pattern embodied in the sirloin technique looks very beautiful. According to the loin crochet technique, the patterns are given below:
How to master this style for beginners
The fillet net, which is the basis of crochet, is simple and unfilled. But there may be a more complex option, with filling in the cells that make up the pattern. However, the possibilities of fillet knitting do not end there.
Ribbons can also be threaded into these cells, and ruffles can be knitted along the contour of these cells. Today loin knitting resembles a kind of imitation of loin-guipure embroidery.
There is nothing difficult in the loin knitting technique, you just need to clearly follow the patterns, as well as check the strength of the threads, and then you will get a beautiful product. Filet knitting can make different things: napkins, tablecloths, clothes. It's always nice to admire things made with your own hands. The main thing is to have a responsible approach to the creation of materials. It is important that they are done flawlessly.
To easily master fillet crochet, beginners need patterns with a complete description of the pattern. You can start with a simple example, the photo is below: 

We will need:
ordinary cotton threads No. 10 or yarn of medium thickness, any neutral color;
hook No. 3-3.5;
But first of all, you need to learn how to read crochet patterns. An example of such a notation can be seen below: 
Work should begin by knitting a chain of air loops. The number of loops should be even, and one more loop at the end to complete the row.
You need to link a sample that may come in handy later. The width of the finished product must be at least 25 cm, that is, about 30 cells or 60 loops plus 1 air loop. The length of the finished product should be 1.5 times greater than the width, about 45-50 cells.
It is important to know that the number of air loops and the number of columns does not match the number of cells, and the number of rows corresponds to the number of cells in height.
Step by step photo tutorial
Cast on 12 stitches 
Next, you need to connect the chain into a ring 
Then connect 2 air loops into the 3rd from the beginning 
Then 5 loops in the same loop 
Next, you need to tie the double crochets into a loop, and the result will be a neat grid 
Now needlewomen are very lucky. After all, a huge number of magazines are sold in which you can find free crochet patterns about filet crochet. There is also a lot of information on the internet. Sections about loin knitting can help you figure it out. There are many good diagrams and drawings in these sections that you can easily learn from. Having studied the technique of fillet knitting, it will be possible to amaze everyone with your wonderful works.
Good afternoon friends!
Often people ask me if I have crochet patterns for round tablecloths, because it's really hard to find clear patterns on the Internet. I couldn't do it either. Now I have already learned how to look for the photos I need and I want to offer you six very beautiful tablecloths for a round table with good large schemes, or rather, I will add five more to one that has long been published on the blog.
I myself really like it when a round table is covered with a burgundy or green linen tablecloth, and a white crocheted openwork tablecloth lies on top. It is so elegant, elegant, graceful, elegant, beautiful, festive and cozy!
As a rule, thin cotton threads such as Iris, Violet, Narcissus, Lily and others are suitable for knitting, and in some cases it is better to knit from bobbin threads for sewing - nulls. Choose a color according to your taste and for your interior.
According to needlewomen, the consumption of threads on a tablecloth can be from 300 to 800 grams, but this will depend on the pattern, the size of the tablecloth, the threads and the density of knitting.
The hook will fit the number 1-1.5, and sometimes it is even better to take the number 0.6.
I picked up only such patterns according to which you can knit the tablecloth as a whole at once, and not from motives. Crocheting round tablecloths is similar to knitting a large doily and many people like it much more.
The finished tablecloth must be starched and spread wet on the floor to dry.
Crochet round tablecloths: patterns
All charts are free to download. They are very large, so they will need to be opened and viewed in a separate tab, then printed and/or saved to your computer. I checked all the diagrams, when viewed on a computer in an enlarged form, they are perfectly readable, you can even see the number of air loops in the arches.
Openwork tablecloth, model 1

Tablecloth with pineapple pattern, model 2
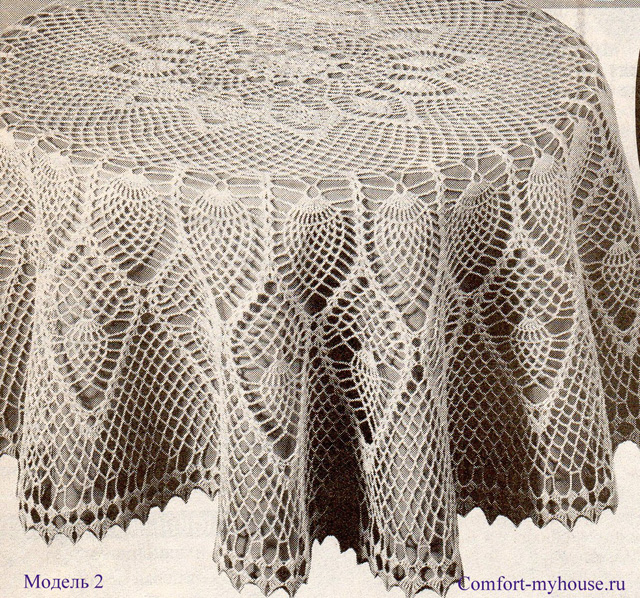
Once in the Vesta magazine, I found diagrams of this front tablecloth, they are very simple and just right for beginners. I leave the diagrams in the text of the article.
Cast on a chain of 8 loops, lock into a ring and knit according to scheme I from the 1st to the 26th rows.

Rows 27-31 are worked as 26.
Knit the next rows according to scheme II.

Such a tablecloth has already been knitted by many people, apparently. My reader Elena generously sent a photo of her beautiful work.
As it turned out, the tablecloth is smaller than in the photo from the magazine.

Large round tablecloth, model 3

Tablecloth for a round table, model 4

Beautiful tablecloth, model 5

Small round tablecloth, model 6

Let crocheting a round tablecloth according to one of the selected patterns give you pleasure.
Crocheted tablecloths can be of various shapes, sizes and colors. Such openwork handmade products will become not only a decoration in any home, but also an excellent gift for the holiday. If you are looking for how to knit a tablecloth on a rectangular table, diagrams and descriptions for them, our article will definitely interest you.
All experienced craftswomen know that crocheting various napkins, coasters, vases and tablecloths can be a great pastime. However, some are firmly convinced that creating such interior details is a rather complicated, time-consuming and thankless job. In fact, there is nothing tricky about this, if you first practice a little and learn a few simple tips:
- Start small, like a small napkin or mini mug coaster. When you master the basic techniques for working with patterns, crochet rectangular tablecloths will be easy and simple.
- Choose a small hook and thin yarn if you want to get an openwork and almost weightless tablecloth. Threads made from coarser materials are more suitable for creating crafts and wardrobe items.
- An experienced needlewoman may not use the scheme at all. The patterns themselves line up in her head, and her hands bring ideas to life. But for beginners, it is still better to clearly follow the proposed scheme.
Of course, the easiest way is to knit a tablecloth for a round table, but in our homes almost all the furniture has a rectangular shape, which we adapt to. Fortunately, today you can buy a lot of auxiliary materials. For example, it will be much easier to crochet a rectangular tablecloth if you take ready-made material as a basis, and then simply tie it in a circle with an openwork border or motifs. Such a tablecloth will also be more functional.
The easiest and fastest way to knit a rectangular tablecloth is from several square motifs connected by columns. The finished product will be original, especially if you use colored threads in your work.

Necessary materials:
- mercerized cotton;
- hook 1 or 2 mm.
Step by step description of the process:

Crochet square motifs: master class
All rectangular tablecloths consist of various square motifs, knitted together in the process of knitting. The only exception, perhaps, are products in which there are inserts and elements from various fabrics. Using all sorts of rectangular, square and triangular motifs, you can create unique and very beautiful patterns on the tablecloth. For example, if you want to get delicate floral motifs, use one of the following schemes.

Due to the many air loops, pico and connecting posts, such patterns are delicate. But keep in mind that such a tablecloth will be very thin, so you need to wash it very carefully. And in order for the finished product to better keep its shape and stretch less, it will need to be starched.
For lovers of classic drawings, such square motifs are suitable. Here the knitting is denser, due to which the tablecloth will turn out to be quite practical and will look beautiful even on a very large table.

Knitting of any square motifs starts from the center of the pattern and continues in a circle in several rows. When the last row is connected, it is necessary to make a smooth transition from one pattern to another in the places indicated on the diagram. If such designations are not indicated in the figure, then the connecting posts are knitted in the corners and in the center of each side of the square.
Having connected the required number of square motifs (calculations are based on the desired length of the tablecloth), the product must be decorated with openwork trim or fringe. A tablecloth decorated with a scalloped edge will look beautiful enough. You can crochet a pattern according to this pattern.

For lovers of original products, the finish in the form of numerous droplets is suitable. Such a border is knitted from a certain number of air loops according to a fairly simple pattern.

You can use simple square motifs not only for knitting tablecloths and napkins, but also when creating original stoles, capes and shawls.
Crocheting is not just a fascinating hobby, but also a practical activity. By creating a variety of patterns, you can create things of indescribable beauty. It looks especially elegant and stylish. The scheme can be both the simplest and more complex.
Knitted tablecloths in the interior
The shape and size of such an object can be any. It depends on the table itself and the desire of the hostess. If a piece of furniture is round, then it is better to knit a tablecloth of the same shape. The color scheme is selected depending on the general style of the room. White product will fit into any interior. The decoration looks (you can’t call it differently) elegant and noble. A clean tablecloth is an indicator of neatness and housekeeping. Of course, if you wish, you can knit a bright contrasting product. Such decor items always look attractive.
Round tablecloth
The most popular shape is oval or square. Round products look perfect on the same table. The pattern is chosen at the discretion of the landlady. We note right away that it will take a lot of time and patience to create a crochet tablecloth. The scheme is selected depending on the skill of the needlewoman. Consider one of the simplest options that looks very attractive and stylish.

The amount of yarn depends on the size of the table. We will knit only the top, and the stripes will be evenly distributed on the sides. They are also crocheted. Its size is selected in accordance with the thickness of the thread. Knitted tablecloths always harmoniously fit into a room or kitchen. With patterns (crocheted more elegant objects are obtained) it is better to determine immediately. Although many people like to improvise.

To create this instance, you need to use the presented schema. As you can see, the pattern is quite simple. Air loops are used and Combining them strictly according to the pattern, you will get a unique piece of furniture. After the main part is ready, you can start knitting the strips. They must be the same length. Here is such a simple crochet pattern for a round tablecloth. But the product is very elegant.
Rectangular decor items
Looks good again is chosen depending on your knitting skills. The simplest option is to use motives. Small ones are made first. After they are all ready, they should be assembled into a single product. Such a product will decorate any table in your apartment or house.

You can knit a regular square using a simple pattern. You can decorate a finished decorative item with original ruffles or flounces. To make such a frame, you can use threads of a different color. Experiment with colors and shapes. Only in this way you will receive the original tablecloth.
Triangle product.
It is not necessary to use a circle or a square to crochet a tablecloth. The scheme can be much simpler if you choose a triangle as the basis. The needlewoman needs to make the right number of figures that are sewn into a single circle. Of course, it is better to spread it on a round table.

If you want to create something unique, then use a colored thread. Combining shades, you get a stylish piece of furniture. Be creative and experiment with patterns and shapes. The larger the hook size, the more voluminous the pattern will be. The thickness of the yarn also matters. It is better to choose "Iris" or "Narcissus" for these purposes.
beautiful stripes

If you use fillet knitting, you can get very beautiful handicrafts. These crochet tablecloths look very stylish. With schemes it is better to be determined immediately. It is important to knit exactly according to the pattern, only in this way the pattern will acquire the desired shape. We propose to create a tablecloth in a sirloin way. For this, strips will be used on which roses with leaves are placed.

We will get a rectangular crochet tablecloth. The schemes will be presented in this article below. Double crochets and air loops will be used. By alternating them, you will get a unique result. It is very important to accurately follow the sequence of dialing all the columns. An error may cause the image to shift.

The number of stripes is set based on the width of the table for which this product is knitted. After everything is ready, you need to connect the components together. Next, the edge of the tablecloth is tied with an openwork rim. Its scheme is also shown in the figure. In this place you can improvise and create your own intricate patterns.
Colored tablecloths
If you have accumulated a lot of small balls, you can knit a multi-colored product. Here is a crochet pattern for a round tablecloth. It is better to use the simplest option.
Dial a chain of three air loops. Now it needs to be closed in a ring. Next, we knit such a pattern: three columns with a crochet in one loop, skip one and knit again 3 Between the triple loops there should be an air loop. Thus, we knit as many rows as required for your piece of furniture.

If desired, you can create a more complex tablecloth. For example, paint a rose flower on a table top. The flower scheme can be used the one used to create the stripes. The fillet method is ideal for knitting colored items. It is important to be careful and follow the sequence of casting loops.
Unusual products
Tablecloths can be not only round or square. There are very original products that will emphasize your individuality. They fit perfectly into unusual interior solutions. For example, long narrow tablecloths will look good on bedside tables and massive chests of drawers. Sometimes they are placed in the middle of the overall table.

This design solution is suitable for any celebration. These red flowers, tied with white thread, look very beautiful. Guests will definitely pay attention to this. And if you pick up napkins to match, all the rules of color combinations will be observed.

Complex patterns also attract attention. But it only at first glance seems that it is difficult to knit such tablecloths. We invite you to experiment with this product. The pattern consists of a set of the most elementary columns and loops. The color can be anything. There are no restrictions on this issue. It is better if the tablecloth is plain.

These items make great gifts for any occasion. Create and decorate your home with openwork decor items. They will never go unnoticed, and you can regularly change the look of furniture, creating new decorations for horizontal surfaces. You can create endlessly.