Hello dear readers!
Today I want to tell you how you can sew such a funny pillow, it can serve as a pillow for the expectant mother, then she will also serve as a pillow for the baby. The pillow is easily deformed and can be bent at your discretion.
It is sewn quite simply, but whoever does not know how will have to puff for an hour or two.
So, to business!
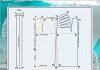
We will need: three types of fabric (it is desirable that they are combined, but not necessary), regular elastic, braid or other lace (horns and tail), threads in the color of the fabric and black threads for decorating faces, filler (synthetic winterizer, or any other)
- From one fabric we cut out: 4 rectangles measuring 15 * 25 cm (this is my size, you can make another one) - this is our back;
2. Cut out from another fabric: 4 rectangles 15 * 25 cm in size - this is also our back; 2 parts of the head, and a rectangle measuring 120 * 25 cm is the stomach;
3. And from the third part of the fabric we cut out 28 details of the paws.
- Getting started: We sew the rectangles together along the side, which is 25 cm, alternating colors. And on the left side, we sew an elastic band on each colored side, when we sew, we must stretch it, but not too much!
 We have a long strip of rectangles.
- Let's prepare the paws: we take two paws and sew them together with the right sides to each other, turn them inside out - this is our one paw is ready, so we will make all the paws and iron them.
- Now we will sew on a foot to each rectangle.

- From the wrong side we sew: the stomach and back on the sides, leaving a small hole, so that later the finished product can be turned on the front side. And we don’t sew from the side of the head either, here we will sew the head.
- And from the back side we sew, while we do not forget to sew a tail from the braid in the middle.

- We cut out the head from two parts, on the part where the face will be, draw eyes, eyebrows, nose and mouth with a pencil or chalk. And on a sewing machine, with a regular line, we sew the contours of the eye, mouth, and nose with black thread several times. Pass the ends of the threads inside out and tie a knot there so that your line does not spread.
 After that, we sew the back of the head, do not forget to put the horns between the parts in the marked places. Horns can be from ordinary braid, tie them in knots at the tip.
- The place on the body where we will sew the head, we sew the elastic band from the wrong side and then sew the head itself to this elastic band. Now we have our pillow completely ready, we turn it on the front side, through the hole that was left. It remains to fill it, I used the filler with balls for pillows, below in the photo, it is sold in sewing stores. When the pillow is stuffed, it remains to carefully sew up the hole through which we stuffed it.
- Fabrics in any color you like. It can be cotton, velvet, velvet - in general, any of these fabrics. Suede or natural / artificial leather (optional) - for the eyelet Holofiber Stick for turning details (from the Tilda set, for example) Scissors Pins Disappearing marker / pencil / crayon Thread and needle PVA glue and brush (optional) Acrylic paint (optional) Time - approximately 5 hours
- head height 9.5 cm torso height 10.5 cm (center) small circle diameter 8.5 cm small circle diameter 12.5 cm
 When we decided what size we want to get the caterpillar, we cut out all the details:
  We select fabrics: after several experiments, I decided for myself that it is best to select fabrics of soothing shades, pastel, and of course, so that they are not from the category of red torso, blue head, yellow circles: And start from what color the head will be - I in the summer I sewed a pink caterpillar, chose beautiful fabrics for the body and circles, everything is super. And of course, everything seemed to fit together well, for the head I took a pink plain fabric. As a result, I got a caterpillar, oooooo very similar to a pig
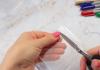
  Here in the photo I have a tool - something similar to a compass, only instead of a pencil it has a blade - a very handy thing when cutting circles from fabric of various diameters. I cut out all the circles with them. But, if you don’t have such a thing, it’s okay, you can get by with ordinary scissors. This is already, as they say, I'm showing off. To cut out the rest of the details, I use ordinary scissors, and not curly scissors. I have curly ones with cloves, everyone says that they are simply necessary when cutting out parts with rounded parts. But I don't use them, I have everything cut out so well. And then no folds after turning the parts are formed.
  We fold the fabrics that we use for the head, body, circles, spout and horns in half and use a disappearing marker to transfer our paper details to the fabric. We chip off with pins and sew on a typewriter, leaving an opening in the lower part of the parts for subsequent eversion and stuffing with holofiber. By the way, I sewed my first caterpillar on my hands, then I didn’t have a sewing machine yet. So if someone does not have a sewing machine, this is not an excuse not to sew a caterpillar When sewing on a machine, I use a stitch length of 1.8 mm.
  Here we got the caterpillar parts. By the way, about the quantity:
 - head - 1 piece torso - 6 pieces large circles - 5 pieces small circles - 3 pieces horns - 2 pieces spout - 1 piece
 We cut out all our details. Be very careful with the horns - the details are quite small and the machine stitches inside the horns are very close to each other - the main thing is not to cut through them with scissors.
  The next item that I have presented here is optional and you can do it, or you can refuse. I smeared with a mixture of PVA glue and water (1: 1 ratio) the edges of the holes through which you need to turn the head, torso, nose and horns. When everted and stuffed with holofiber, the edges of the fabric crumble and shaggy, to a greater or lesser extent. To prevent this from happening, it is better to strengthen these edges. I used to buy a special Plym brand solution for this, but a small tube is quite expensive, and since I already sew a lot and process a lot of edges (especially when sewing dogs), it was already quite an expensive pleasure. So I got out of the situation with PVA glue and water.
 This thing dries for about an hour. You can speed up the process with a hair dryer. I didn't finish the edges of the circles. They only need to be turned out, so their edges do not have time to crumble.
  Now we turn out all the details with a thin stick - I have one left from the Tilda set. Especially this wand is indispensable when turning the horns. They are so small that you can't do without it. When I made the caterpillar for the first time, I didn’t have such a stick yet, and whatever I didn’t use, I suffered terribly, ruined several pieces of horns - they spread along the seam. The main thing is not to rush and try not to pierce the fabric with this stick (I also did this several times).
 We also turn the circles inside out and sew with a hidden seam.
  When the hole is sewn up, without breaking the thread, we begin to gather our circle. We do this with the help of a “forward needle” seam, just then, when we have gone through the whole circle, we gather the fabric and fasten it.
 These are the wrinkled circles we got
  Now we begin to fill parts of the caterpillar with holofiber. I like stuffing toys very tightly. Someone likes toys, on the contrary, to be softer. Here you decide how you want to be. Again, you need to be careful with the horns. Take small pieces of holofiber, and do not push large pieces with difficulty at once - the fabric may spread from the seam area.
  Here are the buns:
  And here they are already sewn up with a hidden seam:
 And here are the details that will then be on the head of the caterpillar. I cut out the eyes from suede in two colors - dark green and beige.
  And again, using a hidden seam, we sew the nose. Above it, with the help of glue, we fix the eyes on the top of the horns. I use Moment glue, gel.
  And here is the muzzle ready:
  Now that we have all the parts of the caterpillar ready, we can "play" with alternating the details of the torso and circles. For the body, I used 2 fabrics, 3 pieces each. In the end, I placed them through one. Also see how best to place circles between them. The only thing I can advise is that it is best to use a small circle between the head and the body, it does not look like a frill. And now that all the details are in place, we take a long needle and thread, for example, floss, and collect our caterpillar like beads. Starting with the priests, we go to the head, and then back to the priest. I usually fix the knots with Moment glue, for reliability.
  And here is our caterpillar:

 Good luck in creativity! _______________________________________________ By sewing such a miracle for a gift, you can also surprise your hero of the occasion.
 This funny pillow toy is suitable for children from three months and will help develop their fine motor skills. Older kids will be interested in getting acquainted with colors, learning to count and compare different objects.
Materials and tools for making rattles

- elastic fabric, for example supplex: 6 pieces 10 × 5 cm; 1 piece 10 × 20 cm; 6 strips 14×1 cm
- sintepuh, holofiber or synthetic winterizer for stuffing
- Kinder Surprise plastic egg
- small beads
- floss threads for embroidery of eyes and mouth
- scissors
- needle
- sewing threads
How to make a do-it-yourself caterpillar rattle
First, lay out the pieces of fabric in the desired sequence.

Then we sew the parts together. If you are sewing on a machine, use a foot and a knitting needle.

Fold the body of the caterpillar in half and sew the side part. For convenience, it can be pre-swept or chipped with pins.


Collect one end on a thread and tighten tightly.


We turn inside out

We stuff with synthetic down, but not too tightly.

We add beads (glass granulate and buttons of different sizes are suitable) so that the baby can develop fine motor skills.

As the torso is filled with stuffing, we tie its parts with pieces of fabric, future paws.

Tie knots at the ends.


We sew the resulting segments, right through the ties. So they won't get loose!

Take the remaining piece of fabric, fold it in half and draw a circle on it.

We sew, not forgetting to leave an open area for eversion.

We cut off all excess.

Turn out to the front side.

We stuff with sintepuh and put an egg with beads, outline the eyes and mouth.

We embroider eyes. To do this, we bring the needle and thread through the unsewn area in the marked place, embroider both eyes, and again bring the thread into the unsewn area. We knit and cut the threads.
Reminder: You can change the look of the face to your liking, but remember that toys for very young children should not have small parts that can be easily torn off. It can be dangerous for their health!
In the same way we embroider the mouth.
The first toys appeared in those distant times, when our ancestors still lived in caves. Initially, these were all kinds of rattles that help mothers soothe crying babies. But the figures of animals and people were originally created as tribal totems, as well as idols and keepers of the hearth, which were worshiped by ancient people. And only much later they began to be made for the entertainment of children. Today in stores you can find an incredible variety of dolls, cars, airplanes, etc. However, nothing will please your child like those toys that he made himself with his mother. If you have some free time, you can, for example, make soft toys with your own hands from fabric.
What you need
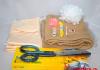
To make toys with your own hands from fabric, you will need:
- needles;
- multi-colored threads;
- yarn;
- ready-made "eyes" or buttons to imitate them;
- scissors;
- sewing machine;
- foam rubber, wool, plastic granules and other stuffing materials.
You will also need scraps of fabric of different types and sizes.
Gingerbread Man
Do you want to make crafts for the entertainment of the baby for the first time? As a fabric toy for beginners, we can recommend a gingerbread man from a well-known fairy tale. She has the simplest pattern, which can be seen below.
For such a craft, any dense woolen fabric, such as a light brown drape, is suitable. Cut out two identical parts according to the pattern. Then on the first one they draw a smile and circles that will depict buttons. Carefully cut out the excess fabric along the applied lines. Using the same pattern, a lining is made of white dense fabric or a layer of synthetic winterizer. A lining is laid out on the wrong side of the part for the back, and a part with a face is placed on top with the front side out. Take a thick white thread. Connect all the details along the edge with a buttonhole seam. Small black circles are glued onto the "whites" of the eyes as pupils. A bow tie is made from a piece of checkered fabric. A double-folded piece of braid is sewn to the top of the gingerbread man so that the toy can be hung on a Christmas tree or over a baby's bed.

Fleece caterpillar: what you need
Do-it-yourself toys made of fabric are made in a variety of ways. For example, you can easily make a green fleece caterpillar.
For this you will also need:
- sintepuh and sintepon;
- white fleece;
- copper wire in a rubber braid;
- green threads;
- 2 beads;
- black floss threads.
How to make a caterpillar from fleece: a master class
To make such a toy with your own hands from fabric, you need:
- fold the fleece in length;


As you can see, fabric toy patterns can be very simple. However, there are also very complex options, consisting of dozens of details.

"Horse": preparation
Today it is not difficult to find any patterns of fabric toys. For example, below is an option for a toy in the form of a horse.
Before proceeding with its manufacture, you need to make a mane and tail. To do this, you need yarn that matches the color of the fabric from which the horse is sewn. Any piece of braid or a thin strip of non-shrinking fabric is also needed.
For the tail, take 10-15 pieces of yarn with a length equal to the length of the part for the leg of the toy, and tie it into a knot at one end. As for the mane, they apply a piece of braid to the pattern of the part of the horse’s head and “circle” the neck almost to the base. Pieces of yarn are sewn to it along the entire length so that a mane is obtained.
We sew a blue "Horse" with a tail and a mane
The pattern of such crafts is increased to the desired size and printed on a printer. Then:
- each detail is applied to the fabric, for example, with a small or special marker, as many times as indicated on the pattern;
- stitch on both parts, from which the torso should be made, places of tucks;
- sew the details of the legs and ears;
- connect the two halves of the body, laying the tail and mane in the right places.
Now it remains to stuff the insides of the toy with synthetic fluff. With your own hands, buttons should also be made from fabric, using a pattern of parts in the form of disks. With their help, as well as using a rope hinge, already stuffed leg parts are attached to the body. Then they draw a rock and stick beady eyes on the horse's head.

Doll
And finally, a very easy-to-make rag doll. From time immemorial, such toys have been made by Russian peasant women for their daughters. In order for your baby to have a rustic-style doll, you should:
- cut a circle from a white or light beige fabric;
- stitch it along the edge and pull it off to make a bag;
- fill it with sintepuh;
- draw a face on the resulting “head”;
- multi-colored patches and pieces of lace are used to sew a dress in the style of a Russian costume with sleeves and gathered at the neck;
- sew on the head;
- cut out a triangle from a bright patch and tie it like a scarf on a doll's head.
Everything, your Marusya or Anyuta is ready! You can make a friend or a smaller daughter doll for her in the same way.
Now you know what simple fabric toys you can easily make yourself using patches cut out of old clothes, and you can please your kids with interesting crafts.
Caterpillar made of fabric, I will show and tell you how to make this interesting and later even funny craft. It will take more attention and imagination. It certainly isn't or where step by step photo instruction is paramount. But also try to understand the method of creating a caterpillar.
The craft is called a cheerful caterpillar.
1. Pieces of fabric of different colors (no preference) cut around. The quantity depends on the intended length of the caterpillar. Each circle needs to be done a little more than the previous one. And also cut out one oblong fabric for the tail.

2. Pull the fabric along the edge and stuff with cotton. As fabric circles, and the tail.


3. Collect the resulting balls on one strong thread, and the “head” ball can be much larger than the body, and make an elongated tail at the end.


4. Collect a thin strip of fabric on the needle and sew on the back (for fluffiness). I took the orange color.

5. Eyes - do as you wish. For elegance, I sewed more pieces of fur around the eyes.

6. Crochet several multi-colored balls for the legs using the "" method. You can also attach unique eyes and a mouth.

7.
Tie thick strong threads between the balls of the body and fasten the balls of the legs to them.
Now your caterpillar will have fun running around in colorful slippers.

Now kids can play with this caterpillar or it can decorate your collection.