Christmas tree - the eternal embodiment of joy and celebration. And not only for children. Adults, too, with poorly hidden trepidation await the coming of the New Year, when all the most cherished dreams come true.
And for this you don't need much - just decorate the tree with cute trinkets. They say that it is this ritual that helps any desire come true. Moreover, if these dIY Christmas toys.
What holiday tree doesn't need decoration? Traditions to decorate new Year's beauty for many hundreds of years. In every family, the decoration of the Christmas tree for the New Year's holiday turns into little holiday, which is remembered for a long time by children. Each of the family members tries to decorate the tree as elegant and original as possible. You can, of course, buy toys for the Christmas tree, but handmade toys add an element of unusualness to the decoration of the Christmas tree. 
Toys can be made from anything, but the most affordable and easy-to-process material is, of course, plain paper. Children with great pleasure will take the most active part in this work and will help you to make Christmas toys. Making Christmas tree decorations out of paper Quite a lot of Christmas tree decorations can be made from paper. Let's dwell on a few.
Balloons
The most common and versatile toys for the New Year are Christmas balls. You can make them yourself from any thick paper: colored cardboard, colorful postcards or old magazine covers. Single-colored balls will add a single style to the room, and multi-colored ones - an atmosphere of fun and fairy-tale magic.

So, before you start making such paper toys, you need to prepare the following:
- thick paper with a pattern you like;
- scissors;
- pVA glue;
- a compass or any object, outlining which, you can reproduce a circle (jars, lids, glasses, etc.).
How to do:
- Draw 21 identical circles on paper and cut them out with scissors.

Prepare the mugs as follows:
- bend the circle twice in half (this is necessary to determine the center);
- unfold the circle and bend one side of it so that the edge of the circle is exactly in the center;
- bend two more sides of the circle to make a triangle with equal sides;
- cut out the resulting triangle, which will play the role of a pattern for the rest of the details;
- overlay the triangle over the remaining circles, trace with a pencil, and bend the edges outward along the lines.
- Glue 10 circles together with two sides so that you get a strip: 5 circles on top, and 5 - below. The strip must be glued into a ring. This will be the base for the balloon.

- Divide the remaining 10 pieces by 5 pieces and glue them in a circle. We got two "caps".

- Glue the top and bottom "caps" to the base in sequence.
- The loop for hanging the ball can be made from a thread passed through the top of the toy with a needle, or from a beautiful ribbon. A ribbon loop is fixed with a knot and passed through the top of the ball cap before gluing it to the base. The knot remains inside the toy, and the loop is outside.
An original paper toy with your own hands is ready for the coming year!
More paper balls for the tree

Volumetric snowflake
Another indispensable attribute new year - snowflakes. They can be the simplest, cut out of a sheet of paper with an arbitrary pattern, or they can be voluminous using the origami technique. We suggest making your own hands the last version of the New Year's snowflake.

To do this, you need to cut out six squares of the same size, fold each one diagonally, and then in half. Parallel cuts are made along the fold. The square unfolds, the inner tongues are wrapped and fastened together.
The outer petals are connected to the same petals of the other squares. You can stick them both with glue and with a regular stapler.
Such voluminous snowflake you can sprinkle with sequins, sequins and decorate like the tree itself, a wall, or collect a whole garland.
Paper ballerinas on a tree


Cubes with a photo
Original and memorable toys for the New Year's holiday will be made from paper cubes with photos of family members or events of the past year.
Moreover, such Christmas tree decorations can be made with your own hands every year, pasting an actual photo at the moment.
Thus, in a few years you will have a whole Christmas tree photo album.

To form such a cube, you need to cut six identical circles from paper or squares. The edges of each element are bent so that a square is formed at the base. Then the folded edges are glued between the rest of the pieces into a box. Favorite photos of the past year are glued to the sides of the toy and a loop is inserted.
Paper lanterns on the tree

Paper angels on the tree

Magic garland
On the eve of the new year, you can make an original magic lamp from a simple LED garland. To do this, you just need to cut out ordinary paper snowflakes with your own hands.

If you do not have the time and desire to do this, then you can purchase lace paper napkins in the store and use them as snowflakes.
All that remains is to thread the garland bulbs through the ready-made snowflakes and hang it on a Christmas tree, wall or window. Flickering colorful lights through intricate patterns will create a truly fabulous New Year atmosphere.
Paper snowflakes on a Christmas tree

Paper flowers on the tree

Paper stars on the tree

Cardboard Santa Claus
Funny paper Christmas tree decorations are made using a small piece of cardboard, glue and a felt-tip pen. You can make any fairy-tale character for the new year, but the most relevant of them is Santa Claus.

(Click to enlarge the picture).
A red square made of cardboard is rolled up and fixed with glue. The top of the toy is bent in the shape of a triangle-cap, the bottom is crumpled in a semicircle in the form of legs. A white triangle-beard is glued to the cap, a face is drawn with a black felt-tip pen. All that remains is to fasten the loop.
New year paper lantern
New Year paper toys "Ice Cream"

You will need:
- corrugated paper
- thick paper, cardboard, or paper bag
1. Cut out circles from thick paper. In this example, the diameter of the circle is 11 cm.
2. Cut each circle into two equal halves and twist them into cones. Secure with glue.
3. Twist a few pieces corrugated paper into lumps and insert them into the cones, securing with glue.
4. If you want to hang these toys on the tree, then you need a needle and thread. Pierce the top of the paper ball, make a loop of string and you're done!
* You can make 2 balls by gluing the second ball of a different color to the first ball.
Do you want to do something unusual for the exhibition in kindergarten? Then this wonderful master class is for you.
Materials:
- Plastic cover;
- Colored cardboard;
- Drawn or printed and cut out bird;
- Double-sided tape;
- Needle with rope;
- Awl.
Work process:
- Cut 4 strips of cardboard with a thickness of 1.5 - 2 centimeters and a length of about 30 - 35 centimeters;
- Exactly in the center in each of them you need to make a hole with an awl;
- Thread the string through the bird and tie a small knot;
- Tie a second knot at a distance of about 4-5 centimeters;
- Pass the string through the holes on the stripes;
- Glue their ends evenly to the lid with double-sided tape;
- Cut a strip of cardboard wider, equal to the diameter of the lid and glue it. Your craft is ready.
If this option is too simple for you, but you liked the idea, you can glue the improvised cage with sparkles, and instead of a simple faceless bird, print a picture of a real one with legs, and glue the bird on them to the lid. So your craft will become even more beautiful and original.
Rainbow ball
If you want to make bright large balls for the Christmas tree, then this particular master class will be of interest to you.
Necessary materials:
- Bright colored paper, preferably 2 or more colors;
- Stencil;
- Scissors;
- Wire;
- Rope.
Work process:
- Such a ball consists of 10 or 12 elements. All you need to do is just cut them out. The stencil outline can be downloaded and printed or drawn;
- Having cut out all the components, we carry out a simple assembly;
- We take the wire, pierce through the ball at the attachment points. We twist one end so that it is firmly fixed, and from the second end we make a small loop, we pass a string into it. Your creative toy is ready.
Step-by-step video tutorial on making a Christmas ball on a Christmas tree
Christmas tree toy "Fairy house"
New Year's houses always looked beautiful on the tree. They created a special mood of wonder and magic. Besides, this is a wonderful craft for a school exhibition. This master class invites you to make just such a toy. For her you will need:
- Thick paper (whatman paper) or cardboard;
- Glue;
- Scissors;
- Stencil paper;
- Acrylic paint and brush;
- Ribbon.
Work process:
- We transfer the pattern to cardboard using a pencil and a ruler, cut it out;
- We make strips from the remnants of cardboard, they will be needed to fasten the house;
- We bend the pattern and assemble the house, glue it with our blanks;
- We glue it over with colored cardboard and paint;
- We make small slots in the roof and insert a ribbon there. Your lovely house is ready.
Paper Christmas trees
To make New Year's toys, many craftsmen use the popular origami technique. This technique is very good at its execution. But you shouldn't forget old traditions. After all, our grandparents used to cut toys and various crafts from paper with scissors. As a result, they made beautiful and delicate products. In order to make such Christmas trees, use our recommendations. 
- So, first of all, print or paint the Christmas tree pattern on a white sheet that you fold and staple.
- Now start carving from the inner patterns, while gradually working towards the edges. Use a metal ruler in your work in order to cut long and straight lines.
- Next, cut out the herringbone according to the counter. Add volume to the bottom of the tree. For this case, twist the base strips using a ruler and scissors. Connect the upper and lower lock.
Beautiful volumetric paper craft
Volumetric toy on New Year do it yourself can look very bright and unusual. And if you have: colored paper, cardboard and glue, then you will be able to make a very original product.

Working process:
- From a sheet of cardboard, you should cut 14 squares that have a side of 2.5 cm.
- Cut out 14 squares from the second sheet, which are 3 cm long.
- Now bend the opposite sides of the squares. Place one end over the other. And the place where the ends touch each other is glued together with glue.
- Then, from any cardboard, you need to cut a circle. Also mark the center of the circle.
Next, apply glue to the circle and glue the blank tubes to it. First glue the larger tubes, and then the small tubes are glued on top of the larger tubes. In this case, the work must be done accurately and accurately. The tubes should be tightly glued to each other. - When you glue the circle with tubes, then glue a few rhinestones to the finished product.
- In the next step, add a beautiful braid to the decoration.
Paper cones for decorating spruce
To create an original bud, prepare:
- cardboard or colored paper;
- pencil and ruler;
- pins or PVA glue;
- scissors and a styrofoam ball;
- braid.

Advice! If there is no foam ball at home, then it is replaced with a ball of crumpled paper.
Working process:
- First, strips are cut out of cardboard or paper, which are 2.5 cm thick.
- Each strip must now be cut across into squares, 2.5 cm wide.
- Fold each square, bending the opposite ends to form an arrow.
- Now we take the ball and begin to glue or attach these blanks with pins. It is recommended to do the work in layers. It is worth starting from the bottom row and moving forward, while creating new rows.
- When they are attached from the blank, it is necessary to attach the braid to the crown of the cone. Even at this stage, you can decorate your craft with additional elements.
Christmas decorations using quilling technique
Know how to work with the technique - quilling, then the next master class is created especially for you. So, to create a Christmas tree toy, prepare:
- old pages of newspapers or magazines;
- pVA glue, baking tins;
- a bead for decoration and a braid to hang the toy.

Working process:
- First, you must cut strips out of paper, which will be 4-5 cm wide.
- Now fold each strip in half lengthwise. Unfold the strip and then fold it again. But this time in each direction. And then fold the entire strip in half.
- Then we take the glue and start twisting the strips into circles. In the work we add glue so that your circles do not creep.
- Now we take another strip of paper and bend it. We prepare a baking dish, put a strip of paper into it. Lay it out neatly inside the mold.
- After that, it is worth expanding the twisted circles inside the mold. And so that the circles are connected to each other, apply glue to them.
- After the glue dries, you need to remove the paper toy from the mold. And to make the workpiece even stronger, add more glue.
- Now you can thread the braid through the toy and decorate it with a bead.
Original paper decoration for walls
The following decorations can perfectly decorate the room for the new year. Indeed, such a Christmas tree will create a truly New Year's atmosphere in the house. To create a decoration, prepare:
- 10 paper plates,
- 20 sheets of green paper,
- stapler and double-sided tape,
- cardboard decoration scissors,
- glue and white tape.

Working process:
- Large squares must be cut out of green paper. Moreover, the square should fit freely inside the plate.
- Now you need to fold a square of paper with an accordion. Then fold it in half.
- Further, with the help of tape we fix the ends of the folded accordion in order to get a semicircle.
- Now, with another paper, you need to repeat the same steps.
- Then we connect the two semicircles with a stapler or double-sided tape. As a result, you have a circle.
- We attach the circle that has turned out with scotch tape to a paper plate. Scotch tape is also glued to the back of the plate. You can use the terminals. This is done in order to fix the plates on the wall.
- In order for the herringbone to form, it is necessary to make 10 such blanks.
- You should decorate the finished unusual Christmas tree with peculiar Christmas decorations, which are very easy to make with your own hands.

As you can see, paper is an excellent material from which everyone can make many interesting Christmas tree decorations. In this article, we have provided just a few craft ideas. Therefore, you can supplement our ideas with your wishes or your imagination.
Friend, did you like the toy in the picture above? Making this bright beauty is not at all difficult! The main thing is 10 minutes of free time and a great desire to create. Such an interesting toy will give your room rays of light and warmth, and, like a beacon, will always remind you of summer.
To make a rainbow toy, or, as it is also called, Yin-Yang, you need:
- colored paper,
- scissors,
- stapler (optional).
To business!
1. Print and cut out the toy part template.
2. To make the toy look exquisite and original, make 10 multi-colored curls. To do this, clip several colored sheets of paper with a stapler, trace the template along the contour and cut out the part.
3. We collect the toy.
- Take two pieces and hook them to each other. Do the same with the other parts, attaching them in turn with the previous two. When you hook each next piece, turn it slightly to the right to connect all the pieces in a circle.
- When all the parts are fastened on one side, you also need to connect them on the other side. Turn the product over and start fastening the parts, clinging them to each other.

Still have questions? A detailed video master class will help you make the toy colorful and very beautiful.
That's all. The rainbow toy is ready to become a highlight of your interior.

Colored cube in modular origami technique

Eat a delicious candy, and make a boat from the wrapper, or tear out a sheet from a school notebook to launch an airplane. Admit it, Friend, was it like that? :) And you know that such an airplane or a boat is not just fun. This is real origami!
Origami is the art of folding beautiful original paper figures invented by the Japanese. Read more about origami history and features.
There are several types of origami: children's, classic, wet. You and I will now master one of the most complex techniques - modular origami, that is, the creation of paper figures from separate particles-modules.
To make a cube using the modular origami technique, you will need six square sheets of colored (on both sides) paper.
Advice for a beginner origamist! One of the basic principles of origami is clear lines. Only in this way the prepared elements will easily fold into a figure and adhere well to each other. Therefore, try to fold the paper neatly so that the lines are nice and even.
To work!
1. Fold a piece of paper in half. While pressing, slide your finger along the fold to form a clear line.

2. Unfold the sheet and fold the edges, guiding them to the place of the first fold.


3. Turn the paper over. Bend one corner towards the center. Do the same with the opposite angle. After that, you will have a parallelogram.


4. Bend the corners to the center again, as shown in the photo. You will get a square.


The paper sheet folded several times is quite thick, so press the folds well so that the finished modules can easily be folded into a cube.
5. Repeat these steps with other sheets of paper - and the modules are ready!

6. We begin to collect the cube. Take one module and hold it so that the folded corners "point" downward. Look carefully: in the middle of the figure there are two "pockets". Insert other modules from them, as shown in the photo.


7. And now, in the same way, connect all the elements - and your colored cube using the modular origami technique is ready!

Flexagon - amazing polyhedron
Agree, Friend: what an amazing and intriguing name - flexagon. Probably, we should get something interesting!
"So what is this?" - you ask. Flexagon is a polyhedron made from strips of paper. Its peculiarity is the ability to rotate: in this case, the outer surface of the toy becomes hidden, and the inner, which was invisible, "comes out" outside. It looks like an endless kaleidoscope.

The first flexagon was made in 1939 by a student at Princeton University in the United States, Arthur Stone. Together with his mathematics teacher and two other students, he took part in the creation of the "Flexagon Committee". They developed the flexagon theory and even patented a newly-invented toy.
I really can't wait to play with her!
What needs to be prepared?
- cardboard (or coated paper);
- scissors;
- ruler;
- pencil;
- colored paper;
- glue;
- narrow tape.
1. On the inside of the cardboard, make the markings as shown in the photo.

2. Prepare three blanks and tape them together.


3. Now you need to "draw" each marked line with scissors and make folds. This is necessary so that the workpiece folds easily into a polyhedron.

4. Glue the loose ends of the blank with adhesive tape to get such a solid figure.

5. Begin to form a polyhedron - bend the first row of triangles inward.

6. Now do the same with the second row.

7. Turn the figure over and repeat the previous two steps.

8. Slightly holding the corners, turn the flexagon inside out and tape the figures together in the right places.


9. Now paste over the toy with colored paper and "laminate" with tape. If you wish, stick transparent pockets on it: you can put different pictures in them every time to make playing with the flexagon even more interesting.


Creative inspiration and great products.
Hello, friends! Well, have you already started the New Year fuss? We finally bought an artificial one yesterday, but the truth is there is nothing special to dress it up with. Therefore, an interesting idea came to me about how to make Christmas tree decorations with my own hands.
I would like to invite you to do such a fascinating business. So put laziness aside, call your kids and start creating New Years!
After all, in any way you have paper, glue, plastic bottles and other materials at hand. Well, there is, right? That's all we need today. From them you can make both the faces of animals and carved ones, as well as the Snow Maiden and Santa Claus and a bunch of other wonderful decorations. So don't hesitate, but rather get down to the fun process.
Moreover, there will be more than enough ideas for such an undertaking. As always, I tried and found the best options for making Christmas tree toys from the Internet. And if you are ready, then we begin. 😉
Do not forget that in any business you need to use your own imagination. This is the only way you can get amazing and exclusive souvenirs.
DIY Christmas tree toys from scrap materials for children
First of all, I want to offer you interesting ideas for creating jewelry from different and almost any materials that are in every home.
Be sure to involve your children in creativity, because they are the ones who are waiting for this magical holiday - the New Year more than anything else. And it will be incredibly pleasant for them to weigh toys on the Christmas tree that they will make themselves.
I suggest you make an interesting decoration in the form of a small Christmas tree from an egg tray.
"Herringbone from the egg tray"

You will need:
- gouache;
- super glue;
- paper packaging for eggs;
- scissors;
- brushes;
- pVA glue;
- thread;
- pencil.

Manufacturing process:
1. Take a paper bag of eggs and cut out 5-7 cells. Cut out the details from them as shown in the photo. Cut one of the cells in half, this will be the top.

2. Glue the pieces together to form a tree. Roll the parts that turned out from the halves with a cone and glue them at the top.

3. Take a green gouache and paint the workpiece.

4. From the remains of the paper packaging, cut out, and if necessary, glue the decorations. Make small balls from a mixture of small pieces of paper and PVA glue.

5. Color the decorations.

6. Dress up the Christmas tree by gluing the entire decor. Do not forget to glue the string by which you will weigh the toy.

7. Cover the product with transparent varnish and dry. Everything is ready!

If you are a lover of expensive wine, then after emptying the bottle, do not rush to melt with its cork. Collect them. And at the right time they will come in handy. For example, use them for the following purpose.
"Souvenir from wine corks"

You will need:
- 6 natural wine bottle corks;
- natural twine;
- super glue;
- scissors;
- confetti, small beads.

Manufacturing process:
1. Carefully cut each plug into 3 equal pieces with a knife.

The knife must be sharp so that the plugs do not crumble.
2. As a result, you should have 18 pieces.

3. Now lay out small triangles from these pieces on a hard surface. One triangle should consist of 6 pieces of cork. There should be 3 triangles in total.

4. Glue each resulting triangle.

5. Cut three strings of 40 cm from the string.

6. Tie each string in the middle, forming a loop.

7. Take the dried up triangle, attach the loop knot to the top, while smearing the place of their contact with glue.

8. Draw the string around the entire triangle and tie the loose ends tightly into a knot.

9. For a tighter fixation, the thread can also be coated with transparent glue.

10. Do the same with the two remaining triangular blanks.


Now try to make beautiful snowmen from iron plugs.
"Snowmen"

You will need:
- tapes;
- bottle caps;
- acrylic paints;
- buttons;
- glue.
Manufacturing process:
1. Get three good, non-deformed bottle caps. Wash and dry them. Then paint with white acrylic paint.

2. After the workpieces are dry, glue the lids onto the tape, leaving a loop on top.


4. Cut a small strip out of the satin ribbon. This will be a scarf. Tie it over the stoppers. And glue the button in the middle. A bright decoration in the form of a snowman is completely ready.

You can also use not only the corks, but the bottles themselves. Only not glass, but plastic. For example, by cutting them into halves, and then gluing the parts of the required length, you get an excellent blank for any toy. Imagine. And then, using paints, revive the plastic blanks.
This is how beautiful and bright you can make a penguin. I think that according to the scheme everything will be clear to you.

Or fill the bottles with any New Year's souvenirs, and decorate the top.

You can also cut strips from plastic and collect a ball.


Here's a simple idea for making small toys out of paper and satin ribbons. Find New Year's pictures on the Internet, print them in the shape of a circle, cut them out. Then glue it onto the cardboard. Weave the ribbons together and paste over the outline with them. Glue the eyelet.

And here's another paper assembly for you. Also a very simple product, just for kids. Print out the diagram, cut it out. Assemble the craft along the fold lines, glue it. Decorate with beads, clay, etc. Glue the loop bow. That's all!

"Crystal ball"

You will need:
- half-beads made of glass and plastic;
- foam balls;
- trimming satin ribbons;
- scissors;
- glue gun.
Manufacturing process:
1. Take a foam ball and begin to glue it in a circle with half beads. At the same time, you can lay out a certain pattern, or make the craft one-color.
Remember to apply the glue in a thin layer or the foam will melt.
2. After you have completely pasted over the entire ball, you just have to embellish it a little more. Simply tie a satin trim bow and glue to the garment. Don't forget the eyelet too.

In the same way, you can make balls from buttons. Only first paint the foam balls with paint, and only then glue the multi-colored buttons.

And disposable plastic cups are generally a godsend for creativity. They just need to be turned upside down and pasted over with paper decorations, sequins, duct tape or painted with paints. And as a result, you can get ringing bells, funny snowmen.


For a change, choose a very simple product - sew or assemble a large Christmas tree bow. Many small bows can be made.

I also came up with the idea to combine the purchased version with homemade art. Buy transparent balls for the Christmas tree, gently unscrew the top and pour glitter into it. Screw on the product. Or apply glue to the surface of the ball in the form of any pattern and sprinkle with sparkles too. Crafts come out very beautiful.

Of course, do not forget about needlework from thick threads and ordinary glue.


Moreover, the use of this technology will make it possible to craft anything.

You can get acquainted with this technique in detail here.

And here is the instruction on how such a miracle can be created.


Interesting products are also obtained from pasta. Usually they are glued together and snowflakes are made in this way.


And a cool idea would be to decorate unnecessary old light bulbs. Usually they are painted with acrylics and decorated with knitted, rag and other attributes.

Also, toys can be molded from salt dough, plasticine or clay.

Or bake real edible souvenirs.

In fact, there are still a lot of festive products that you can make with your own hands from improvised means, just not to list. Therefore, we move on.
Christmas toys, crocheted with patterns
Now a selection for those who are fond of knitting. I found the coolest, in my opinion, crocheted knitted souvenirs. I throw it to you along with the schemes. Knit, to your health!
- "Bell";

- "Herringbone";

- "Angel";

- "Snowflake";

- "Santa Claus";

- "Candy" and "Sock";

- "Snowmen";

- "Dog";

- "Mouse";

- "Piggy".

DIY Christmas tree toys made of felt and fabric (patterns and templates are included)
From crocheting, we move on to sewing from felt and any other fabric. Guys, this time I will not explain to you what and how to sew, I'm sure you already know all this. After all, the main thing is to find patterns. This is where I will help.
I pumped up a wide variety of options. I will kindly provide them to you. Save, cut and start sewing.


Workshop on making a star on top of a Christmas tree from paper and cardboard
Well, now let's start making almost the most important attribute of a green tree - a star.
Of course, you can choose another way of making, but I really liked the next magical transformation.
"Star made of shiny cardboard"

You will need:
- shiny cardboard;
- scissors;
- glue gun.
Manufacturing process:
1. Take cardboard and cut strips of the same width and length from it.

If your cardboard is shiny only on one side, then first glue two sheets of cardboard together so that the two sides are shiny.

3. Now bring the free ends of the strips together and glue them together as shown in the photo.

4. Join the side strips together. You should have such a blank.

5. Repeat steps 1 through 4, that is, glue another exactly the same piece.

6. Connect and glue the two blanks together so that you end up with an eight-pointed star. Your volumetric star on top of the spruce is ready.

I think that such a masterpiece will bring a lot of pleasure, especially when the lights blink on the branches and the star also sparkles with new colors.
Christmas tree toy 2019 in the form of a symbol of the year of the pig
Do you remember what year is coming? That's right, the year of the Pig. So do not forget to appease the Mistress and make souvenirs in the form of funny pigs.
"Colored paper piglet"

You will need:
- double-sided tape on foam;
- semi-cardboard pink and red;
- black marker;
- the pencils;
- felt-tip pens;
- glue;
- scissors.

Manufacturing process:
1. Take a pink half-cardboard and cut out many strips 1 cm wide and 7 cm long.

2. Now use a pencil or scissors to twist each strip.

3. Apply glue to the top of one of the strips and apply another strip on top. Thus, glue the strips in a circle.

4. As a result, you should get such a blank.


6. Now cut a long pink strip 0.5 cm wide.

7. Twist the strip so that you get a curl like a pig's tail.

8. Glue the ponytail to the ball.

9. Cut out two circles of different diameters and ears from the semi-cardboard. Cut two small circles out of red paper - these are the nostrils.

10. On a circle with a smaller diameter, glue a piece of double-sided tape. Attach it to a large circle. Use glue to glue the "nostrils".

11. Draw the eyes with a black marker and draw the contours.

12. Cut out two strips of red paper 2 cm wide and 5 cm long. Draw them with the same black marker. This will be a scarf.

13. Glue the scarf to the back of the pig's head. Then glue the head to the torso (volumetric ball). And don't forget to cut and glue the ribbon loop.

Agree, this is a very easy craft and is available for children's creativity.
Step-by-step instructions on how to make a Christmas toy out of cotton wool
And ahead of us awaits detailed master class on creating another Christmas tree decoration in the form of a bright cockerel. We will make it from ordinary cotton wool.
"Wadded Cockerel"

You will need:
- cardboard (dense, but cutable);
- cotton wool (from a pharmacy, regular in a roll);
- cotton pads;
- the threads are white;
- potato starch;
- half-bead eyes of black color;
- tailor's pin (with a loop at the end);
- paints for painting.
Manufacturing process:
1. Take a piece of cardboard and draw the outline of a cockerel on it. Cut it out.

2. Unwind the cotton wool from the roll and wrap the cut-out outline tightly up to the legs.

3. Now wind the thread over the cotton. Do the same with the leg.


5. From cotton pads cut out the wings (4 pcs.) and parts for the tail (4 pcs.).

6. Cut one comb and two pieces per bar from the cotton pad.

7. Cook a starch paste and coat our cockerel with it. Then wrap our product with thin pieces of dry cotton wool. Grease all irregularities with a paste. Next, saturate all other parts with paste and carefully attach them to the cockerel. Form folds, fluff the ponytail, additionally you can make a thin strip of cotton wool and glue it around the neck. Glue the eyes.

8. Dry the product upside down (hang it on the string we left behind). And then paint it to your liking. Cut the thread and insert a pin, thread an elegant string.

Use this technology to craft other animals, fairy heroes and characters.
Christmas tree toy "Garland" of plastic bottles
Now we are going to make a garland decoration. Moreover, the garland will not be simple, but made of plastic bottles. How do you like this idea? Personally, I am delighted.
"Flower garland"

You will need:
- plastic bottles with lids;
- spray paints;
- scissors;
- electric garland;
Manufacturing process:
1. Cut off the tops of the bottles. Make cuts to make a flower.

2. Round off the petals and paint the blanks in any color.
3. While the flowers are drying, make cross-shaped cuts in the caps of these bottles. Insert light bulbs from an electric garland into the cuts.

4. When the blanks are dry, screw them to the lids, spread the product around the tree and turn on the electric garland. Admire the creation!

Well, a simple manufacturing option garlands of icicles Crafts for a Christmas tree made of polymer clay
I will briefly tell you what figures can be molded from clay. You can take either plasticine as a material.
Here it is important to come up with a hero, mold the details, then put them together, and make a loop.
Here are a couple of schemes for sculpting winter characters.
- Santa Claus;
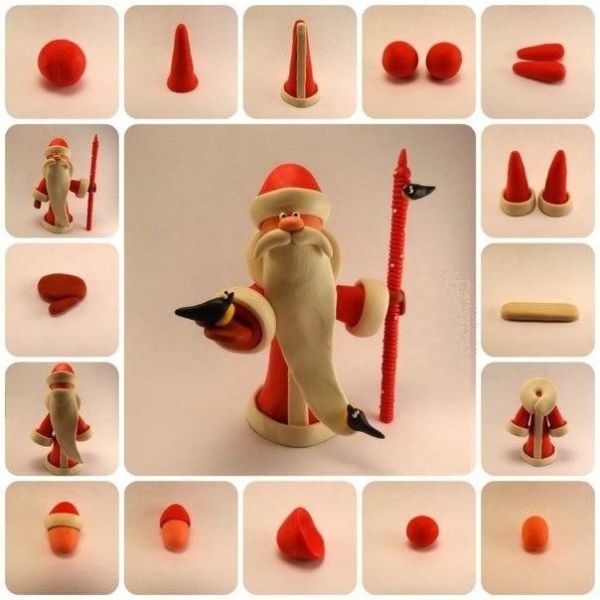

- Monkey;

- Girl;

- Snow Maiden;

- Piggy.

And options for finished works.


Video selection of the best toys for a Christmas tree made of wood
Well, if you are fond of woodworking, then you will be interested in the following story. It contains ideas for creating wooden toys at home. So watch and create. By the way, such souvenirs are perfect for quality.
And this is where I put an end to it. I look forward to your comments! Was I useful and creative? 😀 I think it is undeniable - yes.
I wish you to make what you like and decorate the Christmas tree with homemade toys with the kids. Holiday greetings!
You can make paper toys not only using the origami technique. If you want to try something new, challenging and fun - do papier-mâché, with its help, you can make very complex volumetric toys with your own hands, which will delight not only you, but also your guests, as well as your children, who can participate in the creation of such beauty, and use them in their games.
Materials for work:
- Old newspapers and plain paper (it should be different in color from newspapers);
- PVA glue and plain water;
- Scissors;
- Wicker basket or something similar to it;
- Thick rope (jute twine will work too);
- Twisted rope to decorate the edge of the product;
- Some colored paper;
Toy creation process
The most laborious thing in making this toy out of paper with your own hands is the formation of the base. It should be strong, but not too heavy, so you don't need to do more than 6 layers of papier-mâché, but more on that later.
First, we inflate our balloon to the desired size and fix it on any surface. It is advisable to prepare the workplace so that it is not scary to get dirty.
Next, we take PVA glue and mix it with water in proportions of 1 to 1, respectively. We wet pieces of newspaper with this solution and begin to glue them to our ball from all sides so that the entire surface of the ball, except for the place near the base, is covered with a layer of newspaper.
You need to make an equal number of layers in each area to get a perfectly flat product without grooves. This is very important, because after each layer of newspaper, be sure to use a layer of plain paper, otherwise you will not be able to determine which of the layers is already finished and which has not yet begun.
As mentioned above, it is enough to make 5-6 layers of papier-mâché so that the product keeps its shape after drying. Therefore, we postpone the workpiece until completely dry for a couple of days.

Tip: do not do this in a too hot room, or in a room where the temperature can change dramatically, otherwise the ball inside will simply burst, and you will have to scrape off the remnants of papier-mâché from the walls and surrounding furniture. Not very pleasant and very laborious occupation.
When the base is dry, the ball can be removed without cutting the workpiece. Alas, it will not be possible to reuse it, so you just have to throw it away.
We cover the ball with white acrylic paint in several layers and again leave it alone until it is completely dry for at least one day.
The base is completely ready, it remains only to decorate it properly. First, we decorate the white canvas with colored inserts at our discretion, making them from colored paper, glossy magazines, or old envelopes.

Next, with a neatly twisted thread, we form the edges of the balloon hole. For these purposes, silicone glue together with a glue gun is perfect, because after cooling it becomes transparent and invisible, so even if you overdo it a little with a layer of glue, it will not be conspicuous.
Rainy days, according to our subjective sensations, last much longer than fine ones. It is especially difficult for children who have been forced to p ...
The next step is to fix the selected basket on thinner twisted threads or jute twine. Additionally, the basket can be decorated with small hand-sewn bags that will imitate the load.
Such toys for children with their own hands can be different, it all depends on your imagination and the availability of free time, especially since the materials used in the work are the most accessible and simple.
The finished balloon can be fixed on the ceiling or chandelier plafond to decorate a children's room, or used in your own puppet theater, where the main characters will embark on brave adventures across the open spaces of the apartment for the joy of both children and adults.
0 0 More articles on the topic:
Not everything that is going on in the baby's head, parents can understand quickly and correctly. The following are 6 tests that will help determine the character of the child ...
Many parents find themselves in a situation where their tired child begins to act up, throw things, fight, and is about to go hysterical. That ...


Fast navigation through the article
Making paper crafts with your own hands is a simple, inexpensive and very interesting activity for both children and parents. All you need is paper, scissors, glue and some interesting ideas... In this material you will find 7 step-by-step master classes on needlework from different types of paper and 50 photo ideas for your inspiration.
Idea 1. Volumetric crafts
We offer the smallest needleworkers to make a simple volumetric paper craft in the form of such a cat.

Materials:
- A4 sheet of paper;
- Scissors;
- Glue.
Instructions:
- Download and print the template (see the cat template below) on white or colored paper;
- Cut out the template with scissors, and then make 4 cuts in it along the outlined solid lines;
- Bend your neck along the markings with an accordion and twist the tail;
- Bend the dotted fold lines on the legs and glue them to the cardboard.
For older children, there is a more difficult task, namely a master class on making a volumetric paper craft in the form of a bird.

Instructions:
Step 1. Download and print the layout diagram (see below). Note that the file contains a colorless template so you can print it on colored paper.
Step 2. Cut all the details exactly along the solid lines using a breadboard knife.
Step 3. Fold all the fold lines according to the principle: bold dotted line \u003d fold inward, thin dotted line \u003d fold outward.
Step 4. Glue the parts together by glueing their corners (with the inscription Glue). Stick to the following order:
- First glue the beak to one side of the bird, then to the other.

- Glue the back of the bird starting from the beak, as shown in the photo.

- Glue the wings.

- Now take the part, which is the poultry breast, and at one end, fold and glue the triangle as shown in the photo.


- Assemble the legs, make sure the knees are at a 90 degree angle, then glue the legs to them.

- Well, that's all, it remains only to glue your legs to the body and your voluminous craft made of paper is ready. If you wish, you can make a whole flock of such birds in different colors with your own hands.


Idea 2. Wall panels, paintings and applications
It is known that you can draw not only with paints on paper, but also ... with paper on paper. Such exercises are no less exciting and useful for the development of hand-eye coordination, fine motor skills, perseverance, the ability to plan your work, to combine colors, shapes and materials.
The next selection of photos presents ideas for paintings, panels and paper applications for children of different difficulty levels.


By the way, the applique can be made of parts of the same shape, but different sizes and colors. These can be circles or hearts. The next slider shows examples of such paper crafts and schemes for their manufacture.


And here are some more examples of interesting paper crafts of different types.

Now we offer you to get acquainted with a master class on making an original, but very light paper craft. We have no doubt that such cute figures will help instill an interest in reading books in your child.


Materials:
- 1 sheet of colored A4 paper;
- 1 sheet of A4 white paper;
- Scissors;
- Glue stick;
- Markers, pencils and paints.
Instructions:
Step 1. Bend one half of a white A4 sheet in half and let the child draw on it the cover of his favorite book on his own, also signing the title and name of the author.
Step 2. Cut three long strips from a colored sheet about 2.5 cm wide. You will have 4 parts: 2 stripes for the legs, 1 stripe for two arms and one rectangle for the body of the figure.

Step 3. Take two strips (for the legs), fold them like an accordion, and then glue to the body-rectangle.
Step 4. Divide the remaining long strip into two equal parts, draw fingers at the ends and glue to the body.
Step 5. Bend the top of the figurine to the front side and make bangs with it using scissors as shown in the photo.

Step 6. Cut out circles from the remaining half of the white sheet and glue on the figure as if it were glasses.
Step 7. Draw the details: eyes, mouth, nose and temples with black marker.
Step 8. Now glue the book to the hands of the figurine and finally place it on the table or hang it on the wall, for example, near a bookshelf.

Idea 3. Hats
All children love transformation games and for this they use everything that comes to hand. To provide your child with props, you can make fancy hats with him. By the way, such colored paper crafts can be made for one or several children for a performance, masquerade, thematic Day birthday or any fancy dress party. In the next selection of photos you can see examples of a wide variety of paper "hats" - from pirate cocked hats to wigs.


Today we invite you and your baby to make a hat in the shape of a dinosaur head. This master class is so simple that a child from the age of 3 will need very little help from you.

Materials:
- 3 sheets of colored paper;
- Glue stick or PVA;
- Scotch;
- Scissors.
Instructions:
Step 1. Cut 4 strips about 3 cm wide along the long side of the paper. Two of these strips will turn into a headband, and the other two - into “cap” crossbars, on which the dinosaur spikes will stick.

Step 2. Take two other sheets of paper and cut them into strips about 5 cm wide along the short side of the paper. You can measure and cut strips by eye, but in the end you should get 5 strips from each sheet. We need these blanks to make thorns.

Step 3. Fold each blank for thorns in half and, stepping back about 1.5 cm from the fold, draw a marking in the form of a triangle up to the very edge (see photo). Next, just cut out the future spikes.

Step 4. Glue the two strips, and then glue the spikes on them in a row as shown in the photo below.

Step 5. While the glue is drying, adjust the two pieces of the headband to fit the circumference of the child's head, then tape them together in a circle.
Step 6. Now back to the spikes. Turn the crossbar over so that the spikes are on the table and bend each of them well (see photo). Form the first spike: cover one side with glue and connect it to the other. Use paper clips to secure the spike until the glue dries. Repeat these steps for the rest of the pins.

Step 7. After the glue is dry, remove the staples from the cleats and simply glue the crossbar to the headband at the front and back.

Idea 4. Action figures from toilet paper rolls
Bushings from toilet paper - these are excellent blanks for children's crafts that only need to be embellished a little. For example, you can make such wonderful toys from them.