Experienced craftswomen use everything that comes to hand to create their products. Even those who gather dust in the closet for a long time are used. They can be used to make, for example, original rugs from patches. Let's consider several options that differ from each other in technology.
Varieties of rugs
Before starting work, you need to decide not only on the texture and color of the material, but also on the manufacturing technology. Rugs made from scraps of fabric are completely different, but each of them can be attributed to one of the groups.
- Wicker. This category includes rugs consisting of braids, as well as made according to weaving technology.
- Lush. The volumetric structure is obtained due to the partial fastening of the patches on the base. The risers fill the space and create a 3D effect.
- Knitted. Patch rugs are made using a working tool - a hook. And the threads are replaced with long strips.
- Stitched. Colorful patchwork patterns are created from original compositions in the form of folded fabric squares into triangles.
Below are descriptions of the proposed manufacturing options. It also provides tips for decorating the raw edges of products and some secrets when using technology.

Putting together a rug from fabric braids
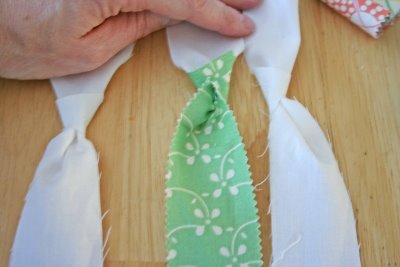
One of the manufacturing options is the braided stock layout. To do this, cut unnecessary items into strips of equal size (approximately 9 x 12 cm). Then fold each of the ribbons in half lengthwise, hiding the raw edge inward. For the convenience of weaving, you will need a dense roller or hard pillow. Fasten the first three ribbons on it and start working. Weave the strips into a braid. At the end that ends, sew a new ribbon with blind stitches. In the same way, build up everything in turn. Patch rugs, woven in the form of braids, can be of various shapes. The easiest way is to get round. Lay the prepared tape in a spiral on the fabric base, twist it tightly. And then fasten the pigtail on the back side. If you want to make a square or rectangular rug, place the blanks in a straight line. After that, carefully process the sections with fabric ribbons and decorate with fringes.

Fluffy patchwork rugs
A very original and simple design is the assembly from small pieces of fabric. This will require pieces of 2 x 8 cm in size. They need to be sewn onto a solid base. For convenience, draw a grid on it with a bright pencil or ballpoint pen. The size of each cell is 2 x 2 cm. Then glue one piece of fabric at each of the cross-shaped intersections of the lines with one or two drops. This is done for the convenience of further manufacturing on a sewing machine. After the blank of the future rug dries up a little, secure the lines with an ordinary seam, directing the free ends of the ribbons to the sides. Do this twice for extra strength. Using this technology, you can create ornaments of various colors, placing the desired piece of a certain tone according to the scheme. Try to use the simplest cross-stitch patterns as a basis. Or just stagger the workpieces.

How to crochet a patchwork rug?
This is another of the simplest ways to make products. Indeed, certain skills and knowledge are not required at all regarding how to crochet a patchwork rug. Everything is very simple to do. Cut the fabric into long strips of equal width (3-3.5 cm) and roll into balls. Knit in single crochet stitches. Decorate the joints of the strips with tight stitches or remove the free ends inward. If the fabric is not too dense, you can move from one strip to another by tying them together. Using the proposed technology, in addition to the traditional variegated knitting in a circle, you can make very elegant rugs with ornaments. Prepare for work several solid balls of different colors. You also need to come up with a color scheme. Then complete the blanks in the form of small squares. Arrange them for an intricate pattern and sew together. So easily you can get a rug in the form of a flower or a fairytale hero.
Securing patches on a mesh backing
The hook may also be needed for another method of making rugs. In this case, the basis is not a dense fabric, but a mesh fabric. On it, the shreds are fixed by tying or using an unusual technology. The photo clearly shows the whole process of work. To do this, you need a special hook with a hole at the opposite end through which the working thread is passed. Thread the tool through five to six holes, then wind several turns of patchwork tape around it. Pull the hook gently and an arc of spirals will form on the working thread. Repeat this step, guiding the needle into the next mesh cells. Try to tightly fasten the resulting spiral-shaped sections on the base, moving along the perimeter (from the edges to the center) or parallel to one of the sides of the workpiece. With this technology, it is possible to use separately cut ribbons without first connecting them to each other.

Products from folded fabric squares
When performing this version of the rug, it is not at all necessary to take care of the same structure and thickness of the fabric. The main thing is to cut out squares of equal size. Roll the blanks twice diagonally before fastening to the base. The result is small, four-layer triangles. Iron them to secure the shape. After that, lay the workpieces in rows on the fabric base, alternately attaching each next one at the same time will cover the untreated sections. You can lay out ornaments in circles, squares and any other geometric shapes. The finished product looks like "scaly" teeth. The described technology of patchwork sewing is one of the varieties of the original type of needlework "patchwork". The combination in one product of several different colors of fabrics allows you to create real masterpieces of art for interior decoration.
Decoration of the edges of products
With many of the above technologies knitted rugs shreds are obtained with open cuts along the entire canvas or part of the perimeter. How to beautifully process and decorate the sides of the products? Choose from several options.
- Fabric ribbon edging. To do this, use strips at least 5-6 cm wide. Hiding the edges inward, process the rug, carefully edging in a circle.
- Forming a fringe from working threads. This option is suitable in the case of making a rug according to the weaving technology, in which two sides do not require additional processing, and the other two consist of "weft" ends. Use them fluffed up for fluff, or decorate with extra lengths.
- Hanging a fringe on the finished edge. In some cases, the rugs are outwardly completely finished and do not require additional decoration (patchwork, braiding, crocheting). However, if you wish, you can add additional fringe using tape pieces of fabric.

Performing the work on the technologies described above, you need to know certain secrets. How to make a rug from scraps beautifully and efficiently? Here are some useful tips to put into practice.
- When making braids from fabrics of various structures, make several "probes". This will determine the most optimal stripe width for each material so that the finished braided blank is uniform in thickness. So, for example, ribbons made of thin fabrics should be much wider than dense woolen ribbons.
- In the event that the edges tend to fray strongly, it is better to remove them inside. Therefore, when cutting into strips, make the required hem allowances.
- Use a double layer of fabric for the base. Then the patchwork rugs will retain their shape better when the pieces are adjusted. The tone of the lower layer, as a rule, matches the color scheme of the upper one. And the use of similar textures of materials will greatly facilitate the work.
Imagine and create unusual items for interior decoration!
When visiting your grandmother, you probably saw her small hand-made rugs. Our ancestors did not throw away old things, they gave them a second life. Having learned how to weave a patchwork rug without a hook, you can create it yourself. It will become not only a decoration for your home, but also a very practical thing to use.
There are fairly large crochet hooks on the market, but such a rug can be made without tools.
Round rug
The simplest version of a scrapped rug is a round one. To make it you will need:
- Old fabric items;
- Scissors;
- Needle;
- Threads.
If you just want to recycle old things by creating a door mat for shoes, feel free to use any fabric. If you have ideas to fit this product into the interior, carefully select the color and texture of the fabric.

First, cut the fabric into long pieces.
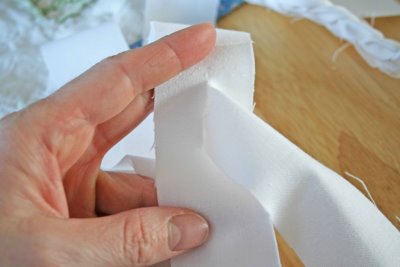
If the fabric is loose, it is best to sew each strip and turn it inside out, leaving a seam inside. This is a rather laborious task, but a product made of processed fabric looks neater and will last longer.
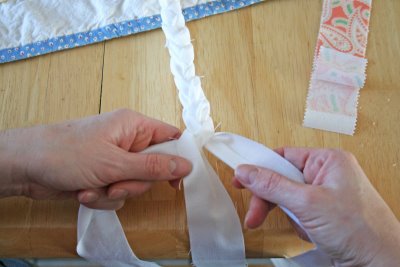
From the obtained pieces of fabric, you need to weave a braid. The tighter it is, the harder the resulting rug will be, respectively, if you want a soft rug, then do not intertwine the braid too much.
Secure the ends of the shreds with a pin.
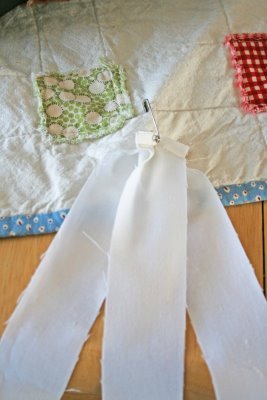
And start weaving.
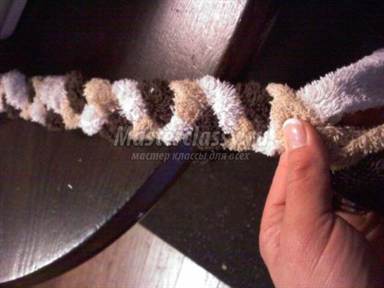
Having reached the end of the ropes, you need to lengthen them. If you tie a knot, it will turn out rough and ugly. There are two options - to carefully sew a new end or make cuts at the ends of the patches and stretch an additional string through the working end and push its tail into the cut. Tighten gently and you have a long string with no knots or stitching. The whole process is clearly visible in the photo:


You need to braid the braid long enough.
Do not process its ends yet, but just grab them with a pin so that they do not bloom. If in the process of making the rug you want it to be larger, just attach new pieces of fabric and braid until you get the desired diameter of the finished rug.


You can intertwine the pigtail with a ribbon instead of thread. To do this, weave it with zigzag stitches either into the side of the carpet, or into a working pigtail thread. Pull up on the tape and it will connect the parts together.
For greater strength, it is better to completely weave or stitch the edge row of the rug with a thread, then the product will definitely not fall apart.

The round rug is ready!

Bathroom decoration
A comfortable and practical bathroom rug you can make yourself. To do this, you will need:
- Old towels;
- Ruler and tailor's chalk;
- Sewing machine;
- Tailor's scissors.
The process of making such a rug differs little from that described above. Start by cutting the towels into long strips 4-5 cm wide.

Connect the first three pieces with a sewing machine. It is also necessary to build up the "working thread" using this sewing tool.

When weaving braids, the raw edges must be folded inward.
During the assembly process, you need to flash the rows on the machine.

The bath mat is ready! It is very soft and pleasant to the touch, absorbs moisture well and can be washed.
Woven models
Patch rugs can be woven using a base. It looks like a small loom. Make a wood frame to match the size of your rug. It can be rectangular or square, it all depends on your idea. On the frame, you need to stuff carnations at a distance of 2-2.5 cm from each other.

For these purposes, you can use a furniture board or an old table. It is not difficult to make a machine, but it will serve you for a long time.
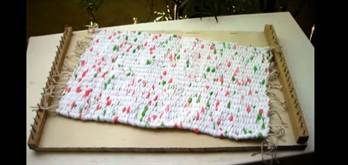
On them, strengthen the warp threads made from pieces of fabric. On the leftmost warp thread, reinforce the working thread. It is best to sew it on. Weave the rug by running the string over one warp and under the other. You can use more complex techniques and weave with two working threads at once. In the process of weaving, the fabric must be constantly pushed up so that it is denser.
Knitted rugs from patches served as a decoration of the house even with our great-grandmothers. In the process of needlework, it is advisable to think about something positive so that bright thoughts are put into the product.
The art of making a rug from different patches was passed from mother to daughter, and each of the craftswomen added their own creative touch to the creation process.
Varieties of weaving rugs from shreds with your own hands
Before starting work, you should decide not only on the size and color of the material, but also on the manufacturing process. Patchwork rugs are different, but each element can belong to one of the groups.
Woven rugs, which consist of braids, are made according to the simplest technology. A lush and voluminous look is obtained by partially attaching the fabric patches to the base, and the free ends fill the space and visually create a 3D effect. Knitted carpets are crocheted with long strips weaving. Motley patches of patterns are combined into an original composition in the form of folded squares of motley fabric.
Weave a rug from patches without using a crochet
For this you will need:
- patchwork fabrics;
- thread with a needle;
- pins.
The weaving of the rug will consist of a spirally twisted braid, woven from three pieces of different colors. Its rigidity will be determined by how tightly the pigtail is woven. The weaker it is, the softer the rug will be.
The tape must be cut to the required width and get to work. Now you need to solve the problem of how to weave correctly if the shred is over and the knots are not imposed. The problem is solved quite simply - at the ends of both ribbons you need to make cuts and cut to match the others, forming a loop. After that, you get a fairly long pigtail.
In the middle, the weave is also simply and neatly laid in a spiral, tied with a thread in 2 parts to the desired diameter. That's it, the rug is ready.
For this you need to take:
- crochet hook No. 10;
- a piece of cloth.

And it is not necessary to buy new fabric, because in the house you can choose from a variety of unnecessary things. For example, cut strips from old t-shirt or jerseys that don't have to be thrown away. It is better to start creating new items and give them a second life.
So, for the manufacture of this piece of furniture, you will need narrow ribbons for knitting. And the thinner the fabric is chosen, the wider the ribbons should be. Cut the ribbons in a spiral pattern to make them look longer.
Stretch the patch in different directions before cutting the fabric. Pay attention to which direction when stretching the fabric to twist, inside out or not. Once the strips are cut, collect them into balls and color them.
Now, directly, knitting. To do this, crochet as many air loops as the width of the strip. Continue with the posts, and check the number of loops regularly. It should remain level in all rows. Connect the ends of the ribbons with stitches.
The rug is knitted to the desired length. Then it needs to be aligned around the perimeter so that it becomes neat and takes on an aesthetic appearance.
Do single crochet stitches with 2-3 light stitches at each corner. This will keep the strips in place for longer and prevent curling.
The rug will turn out to be bright, warm and cozy at home.
Master class on weaving a patchwork rug
To do this, you will need:
- different scraps of matter;
- crochet hooks No. 10.
First, make strips blanks. When doing this, take into account the width and thickness. The ribbons depend on the thickness of the material. The thicker the material, the less frequent the patterns and vice versa.
On average, the stripes will be 4-5 centimeters wide. Cut them in a spiral to make them longer and more rectangular, better round off at the end.
A special approach to work is required. If you are making knitted strips and want a bright rug, it is important that the twist is on the right side when cutting.

To do this, stretch the material vertically, then horizontally. Pay attention to the direction of the knit twist. Roll the cut strips into a ball. How many varieties of scraps - how many balls should be the result.
The rug can be of different shapes. But if this is your first time creating such a piece of furniture, opt for a rectangular carpet. It is the easiest to do.
First, cast on a chain of air loops. It will be equal to the width of the future rug. At the same time, count the number of loops so that they remain the same throughout the entire knitting as at the beginning of work.
A rug will look more effective, where the stripes will differ in color. To bring the ends of the bands together, make a couple of ties to make the rug more neat.
When the size of the rug suits you, start tying the strips together. The strapping is done with a bright ribbon with single crochet posts. When knitting corners, add 3 more air loops. This is to prevent the corners from twisting.
Finally, I crocheted a rug in the hallway of rags. I am not an active knitter. But I wanted so badly to attach things that no one needed now. I'm sorry to throw it away. But I knitted a rug and am happy like a child. Very nice and cozy now in our hallway.
In it, admire!
I will not hide, burdened with other worries, I knitted for a long time. Started in the summer. In my free time at the dacha, I cut strips of unnecessary things and wound them into balls. with no experience. I cut the strips by 2-3 cm, depending on the fabric.

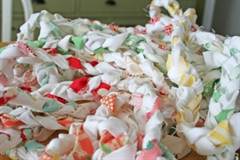
By late autumn, I had a whole basket of balls with strips of fabric for knitting a planned rug from shreds

Trial square for a crocheted rag rug
A trial square for a crocheted rag rug seemed rough to me. I split the strips in half and knit a new square. The result pleased me. The dimensions of the square turned out as standard size block in patchwork - 32x32 cm. It turned out that this size goes well with the floor tiles in our hallway. It all came together and I started knitting squares. Some of the stripes ended earlier than I would like. I had to pick others, similar colors. And in some, she added a thread of yarn of the desired color to fit at least approximately the first sample. And I did it!
In the process of work, I realized that cutting the strips in a circle was not convenient. The seams come loose. It is better to cut the strips from the cut parts back and forth.
For greater importance, I shot a video
Imposed squares. For watching the evening series, it turns out to knit one square.
It turned out that there are several options for connecting them together. Since even mistakes are more visible in the photo, I did just that - I photographed different layouts of squares for the rug.
If you are interested, see the pictures in our group
Crocheted rugs have recently become very popular: square (as in the photo below), rectangular carpet, round, oval, made of thread (made of yarn), twine or leftover rags, on a chair or on the floor in the bathroom. All options are good. The most important thing is that such a magnificent carpet can be crocheted by itself, using the diagram and description, step by step instructions, or, relying on a video tutorial on YouTube or MK (master class: How to crochet a rug diagram and description).
In addition to the fact that you can decorate your home, create a cozy atmosphere in it, this is still a good way for any needlewoman to practice and develop her creative skills... Everyone remembers grandmother's knitwear throughout the house, I would very much like to make the same ones: on the bedside tables, stool, in the hallway, in the kitchen. Lace motifs are very airy and immediately attract a lot of attention.
Crochet rug: patterns and description
As we wrote above, the carpet can be knitted absolutely from any materials, whether it is a model from old things (T-shirts), from plastic bags (from cellophane and garbage) or from ordinary yarn ... Any option will look beautiful on the floor or on a chair in your home. Often, in addition to rugs, beautiful blankets from scraps of fabric, stool covers, multi-colored pillows from knitted squares with knitting needles or crochet, original napkins for furniture or under vases from knitted circles for comfort ... There is a lot of excitement around knitted yarn products - the models are very "home" and unusual.
In order for you to be able to knit a beautiful carpet with your own hands, you can use any material , any knitting (in a semicircle, fillet knitting) and pattern (star, cat, owl, tiger cub, sun, turtle,). You can do it the same way different ways, then decorate as desired. Take a look at the photo selection below and choose an option for yourself and your home.
How to crochet a rug from yarn?
First you need to pick up necessary and correct materials ... If you knit for the first time, then you may need help from experienced needlewomen (such as mom or grandmother). You can knit products, guided by step-by-step instructions for beginners from a master class, for example.
Everybody knows, what are the most beautiful rugs , crocheted - Japanese... The secret here is the correct choice of the color of the future product. It doesn't matter if the carpet is large or small - it should be beautifully knitted and harmoniously combined with the furniture in the room. Same, no need to use light color - beige (avoid milky shades) it will get dirty quickly ... And - thin threadsto make your creation last longer.
So now we will provide detailed diagram and a description of how to crochet a rug with your own hands step by step. Openwork version "sun"
- for him it is better to choose yellow thread
... Do not use acrylic and wool - only cotton
! Also, you may need one hook number 7
, and enough yarn for the entire rug. We recommend knitting with twofold yarn. 


Crochet rugs with patterns and descriptions
How to make crochet rug - the diagram is presented below
... We knit with a popcorn pattern with multi-colored threads. Products of this shape are very popular with young children: it is comfortable and cozy to sit on them,play
. Small child will be delighted with the tactile sensations. Animals will also be happy to have a new "inhabitant" of the house - you can sharpen their claws or sleep on him.
Take a few colors of thread, hook and follow the diagram below: 

Crochet oval rug
It is very easy to make a beautiful oval masterpiece. We knit it with simple loops according to the scheme. Such kids rug fits well into any room.

How to crochet a round rug for beginners: video
There's a lot video lessons about that how to learn how to crochet it for free. This can be done from a thick thread, woven with elongated loops, sewn from several motifs, stripes, make it shaggy, terry and voluminous. Such handicrafts can be sold or donated for a birthday or housewarming.
How to knit square and rectangular rugs?
In order to get beautiful even square - in each row, make increments in 4 corners: 2 S.T., 2 V.P .. 2 S.T. In the following R. Hook is introduced under V.P. This is a more rustic option, but also suitable for the city if you change the knitting style.
The easiest way to crochet a square rug:
- Take yarn from knitwear. Color - optional.
- Chain from V.P. the desired length.
- 1 R .: all S.S.N. Flip the canvas.
- 2 R .: all loops of S. B. N. into the front wall of P. Flip knitting again.
- 3 R .: S.B.N.
- 4P. \u003d 2 R.
- 5 R .: for back wall S.S.N.
- 6R .: all rows. From the sixth knit with a pattern from 2 to 5 R.
- You can see an example of such a product in the video.
The rectangular rug is knitted in the same way.
Do-it-yourself knitted floor rugs
Take a look interesting selection with ideas for inspiration ... There are carpets in a modern style, consisting of roses and flowers, rags, rags, two or more colors - they are all good in the interior.
How to crochet a rug from threads for beginners: video
Crochet rug from old things: step by step instructions
Very often we have a large amount of knitted clothes that we going to throw ... But, what if we tell you that this is optional? You can make beautiful from it knitted yarn and weave many designer unique pieces . Before we start weaving, let's learn how to create the yarn itself. For this you need a rag, a T-shirt and so on. From such material you can make a variety of patterns .
Crochet rugs: master class
We will attach below video for beginners : how to crochet rugs from rags. In the meantime, for more experienced needlewomen, our master class.
To start cut old T-shirts into threads ... It is better to do this in one continuous spiral so that you have to tie fewer knots. After that, you need to take a large and thick hook and start typing on the loops. As if you are typing them with a regular thread. Close V.P. into the chain and sew on the joint for strength. The knitting pattern is attached below. With the help of it and simple yarn, you can knit round rug.
Rug from old T-shirts
Materials: knitted yarn of lilac and violet colors, hook No. 15, scissors, needle and thread.
- Cut of yarnfolded in half tie10 S.S.N. and close the ring.


- 2 S.S.N. in each P. of the previous R.


- From each P. 2 S.S.N.


- S.S.N., 2 V.P., S.S.N. after 1 P. Repeat this pattern until the end of R.


- S.S.N. all over the circle.
- The purple thread should be secured after the previous row. Now we knit purple. We make 1 P. on the hook. S.S.N around the circle.

- S.S.N., 2 V.P., S.S.N through 1 P.

- 1 S.T. in P., 2 S.T. into the hole below, then again into P.
- Change the threads. The entire series of S.S.N.


- Repeat the pattern above with the holes in this row.
- S.S.N. all over the circle.


- Change the color. Openwork holes all over the circle.

- S.S.N.
- Lilac thread: S.T. - 1 R., openwork drawing - 1 R., S.T. - 1 row.


- At the very end there is a "teeth" pattern. From 1 P. 6 S. B. N. \u003d repeat in every 6 P. You're done! The same option can be made from a cord.