Hello everyone who loves to do beauty do it yourself!
Now we will make a decoupage of the bottle on the eggshell. This is a decoupage of the bottle for beginners, a napkin. Following all the steps of the master class, you will definitely learn to make a decoupage.
Decoupage bottles with their own hands is a very interesting and exciting occupation. I will say more, you can even take a sell on it.
What materials do you need:
- Beautiful glass bottle;
- White acrylic paint;
- Eggshell;
- Toothpick or needle;
- PVA glue;
- Soft brush, sponge, rag;
- Decoupage napkin;
- Acrylic lacquer.
Acrylic paint, varnish and plya can be bought in the construction market. Decamental napkins are often sold in supermarkets or shops for needlework.
Let's go to the master class.
Step 1.
Clean the bottle from all labels and stickers. Using a sponge, painting white acrylic paint. If it was not painted at a time, we paint the second time, but after the first layer of paint is dry.

Step 2.
The egg shell is lying on the pieces of 1-1.5 cm. On the bottle we apply glue PVA in small areas.


We apply the shell and press the finger. The shell splits into several parts. Toothpick or needle correlate the shell, evenly distributing on the bottle, which would be between pieces, approximately the same distance.


Thus, we glue the entire bottle.

Step 3.
Shell crumbling into small pieces. The neck of the bottle is lubricating glue and sprinkle with a shallow shell.

Step 4.
When the glue grab a little, it is necessary to fix. We divor the PVA with water 50 to 50 and cover the entire bottle.

Step 5.
PVA dry, now we can give the bottle of acrylic paint by 2 times.


Step 6.
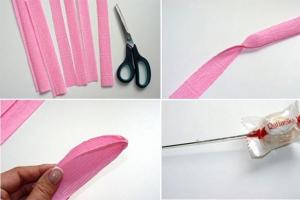
We take a decaptentive napkin and separate 2 layers, leaving the top with the pattern. Hands tearing the necessary fragments.


Why my hands, not scissors? So the tanned edges are obtained, which merge with the background and the edges of the napkin simply will not be visible.
Step 7.
We apply a piece of napkins on a bottle and pva glue diluted with water, glit. Glue from the center to the edges. Soft tassel kicking over the air from under the napkin and leveling wrinkles.


Decoupage on eggshell. Master class with step-by-step photos
Master class with step by step photos "Decoupage on eggshell"
Performed: Lapteva Svetlana Krylianovna, teacher of the state budgetary institution of the Novosibirsk region "Socially-rehabilitation center for minors" Tatarsk
Purpose: Gift, interior decoration.
Purpose: Production of paintings in the technique of decoupage on the eggshell.
Tasks:
- to acquaint with the technology of manufacturing work in the technique of decoupage on the eggshell;
- bring up artistic taste and creative attitude to work, perseverance in achieving the goal, accuracy.
Decoupage is one of the decor techniques in different surfaces. Using this technique you can create exclusive interior items, dishes, vases, porridge, photo frames, decoratively make clothes, independently produce fashion accessories and do much more to how your fantasy allows. Decoupage is an old technique, who has ever been fashionable literally in recent years.
Decoupage on the egg shell gives the surface of the product unusual texture and volume.
There is nothing superpower in the manufacturing technique, but it will take proper patience.
To perform work it is necessary:
- frame without glass;
- acrylic water-based paint;
- eggshell;
- PVA glue;
- a cloth with a pattern;
- scissors;
- brush;
- Toothpick.

Work must begin with the preparation of the shell. My shell of fresh eggs and for 2 hours we leave in water.

We remove the film located on the inside, after which we give the shell to dry well. The shell becomes more fragile and there will be no smell.

We take the shell, we swallow on not very large pieces and with the help of PVA glue, concave side inside, begin to glue on the cardboard from under the frame. Perform work Let's start with the corner.

Sharp shards, like the distance between them, can be large or small at your discretion.

Gradually fill all the space completely. The basis is made, we leave our work to the complete drying of the glue.

The shell turned out different colors. Now we need to make it monophonic. We take the white acrylic and twice cover the resulting paint base with an intermediate drying. When applied, the paint should be paid attention to: if acrylic is thick, then it is necessary to dilute it a little water. When applied paint, it is necessary to monitor the gaps between the shells, the surfaces are not lined up, otherwise the effect of cracks will not be expressed clearly.

We take a simple single-layer napkin. We define what motifs will be used for decoupage.

Cut on the contour two different motifs.

We have them based on trying. If there is a need, we remove or add something. I cut off the bout from the top flower, as it turns out a lining when combining the second motive.

We take the upper motive of our work, we have a place on the we need, in the center we drip PVA glue and glit to the base. We glue from the center to the edges to remove air bubbles or folds.

It is necessary to work very carefully, since the napkin is very thin and can easily break.

We try on the second motive.

Gently glit it.

We leave the job to completely dry the glue and decorated into the frame.


Made a frame of honey, using decoupage technique.

And this work is made similarly, only the egg shell is glued with smaller pieces.

Hope my master class will come in handy!
The decor of the egg shell refers to one of the easiest types of design. With its help, the surfaces acquire a mosaic invoice, and paints will help to portray original drawings. The egg shell decorate bottles, flower pots, candlesticks, banks, vases and even furniture. The material is combined with pasta, croups, salt and fittings. With this type of decoration will cope any novice designer. It does not require any special skill, nor special tools, and the main material for creativity will be found in every home, because waste from eggs usually go immediately to the trash can. We will get acquainted with a pair of master classes and a lot of simple, but original ideas.
How to prepare needlework shell
To start the shell, washed thoroughly in the soap solution. As is known on the surface of eggs, the colonies of dangerous bacteria can flourish, so do not miss this an important stage When working with the material. Soap can be replaced by alcohol or other disinfectant fluid. Some prefer to steer the shell in boiling water for 10-15 minutes. Thermal processing is also perfectly displaced by the surface of each piece. During washing, they can remove the film that could remain. Then the shell is laid out on a piece of pure fabric or a napkin and carefully dried. The finished material is crushed by spending several times with a rolling pin or a glass bottle. There are several ways to attach the shell to the surface form:
- In the first case, a preventive glass, plastic or ceramics are applied with a layer of glue. It "sprinkles" with chopped shells or "collapses" in them. Then the sponge press the resulting mosaic to the surface to fasten better.
- For another method, you will need scotch. Shell is glued on it. A layer of glue is applied to the prepared surface, and the tape is attached from above. Now it is necessary to wait for a complete drying of the fastening substance, after which the adhesive tape is taken with a neat movement.
- The third method is perhaps the most time consuming. The glue is applied to the surface and manually attached the "fragments" of the shell to it. The process will take a lot of time, but the pattern will not be random, but will correspond to the idea of \u200b\u200bthe author.
It is not at all that color will be the shell, in most of the designer "recipes" it later paint.
Decorating flower pot
The decor of the flower pot is performed in two versions:
- Full surface coating shell;
- Partial applying pieces.
For a start, the pot is pre-cleaned from dirt and dried. For a complete coating, the whole surface is deceived by glue. Then they attach the shells. After drying from above, they apply a layer of paint. It is better to use acrylic or to the toilet, as they are better laying onto the surface, they are not afraid of water and burn slowly. You can apply another one through the paint layer another one through the figure stencil or create a drawing yourself. Fix with a layer of varnish. With partial decoration, the pot is pre-stained in the desired color, and the glue is applied only to those areas where they plan to place the shells. Most often of them make horizontal strips of different widths or primitive geometric patterns. The pieces are glued to the surface of the pot, give them to dry, now the original decoration of the window sill is ready.
"Vegetable" drawings are organically looking at the flower pots: blossomed buds, maple leaves, bouquets.
Glass tank decoration options
The technique of applying shells on the surface of cans, vases and bottles does not differ from the design of other ceramic and glass items. Some prefer to give pieces the desired color. For these purposes, they are placed in a container with a dye and give dry. To secure it, the shell already glued to the bottle or the bank is additionally covered with varnish. To this step, they are resorted in cases where the natural color of the material does not harmonize with the overall composition, and it is impossible to apply the paint from above, as the decor becomes the final chord in operation. Vases are additionally placed by volumetric colors from the atlas, boots from pieces of felt, bows, beads and lace. On the surfaces of the "kitchen" jars under the spice, painted pasta of interesting forms, coffee beans in combination with a shell will be appropriate. The decor of the bottles add rows of twine, which turn the container. On the surface you can also glue the real spikelets or blades, which are topped with paint.
Decor of flat objects
In the design of plates and supports under the saucer, the egg shell will act as a background, which is subsequently applied. If you do not own a brush, stencils and napkins for decoupage will come to the rescue. The shell can be glued to the entire surface of the plate, chaotically fill it with its separate sections or make relief only the cut. Also uses the use of combining textures, when one area is filled with a shell, and the other is small beads, bead (buckwheat, rice) or salt. The technique of partial volume visualization is originally: in the picture, some element goes beyond its framework. For example, in a rustic landscape with a cozy house, the fence is made of wood and glued to the surface of the saucer over the image. In "natural" paintings to the surface, real bladeing, branches, cones, leaves or dried flowers are glued.
If the surface of the stand or plates will decorate the city landscape, then the shell, painted in gray, will become an excellent imitation of the stone pavement.
Decorating furniture shell is usually carried out partially. "Solid" embossed background on large surfaces can lose its flavor slightly. However, this material perfectly imitates snake skin. Natural finishing of furnishing objects is a fabulous money, so the shell is an option to create an original scenery, which will be indistinguishable from the original at first glance. The design process can be delayed due to specific processing of the main material. Each piece of shell will have to be processed separately. To do this, you will need tweezers that are manually biled from the edges of the extra millimeters to give them a round-shaped reptile for skin. Print shells will also have long, since in this case the degree of similarity with the original depends on their location. Tones of dyes are selected in accordance with the natural tinge of the skin of the reptile. First apply on the entire surface light tint And give him a completely dry. Then on each "scaly" drip more dark color. An egg shell decorate any surfaces: from traditional wood and to plastic. The racks, facades of cabinets, coffee tables and stands under lamps are originally described.
Decoupage and shell
Both of these techniques are organically combined. Combination methods two:
- On the pre-primed surface gluing a piece of napkins with a picture. For this, the usual PVA glue is best. After drying the image, a layer of the fastening agent is again applied around it, which will hold the shells. For reliability they are pressed with a toothpick or sponge. After the surface will dry it again cover paint.
- First, shells are glued to glass or plastic. After drying, the embossed surface is soaked in a spontaneum twice. It is necessary to walk several times to thoroughly paint all the gaps and gaps. After drying in the technique of decoupage tolerate a picture.


A creative person disappears nothing in vain, even the egg shell. Eggs are in every refrigerator, but most do not even suspect that from their shells you can create a real work of art. For its hardness, many professionals compare it with marble. The surface of the chicken egg is very difficult to scratch. That is why mosaic from the egg shell is so highly appreciated and looks simply amazing. With the help of an egg shell, you can create a magnificent panel and paintings, make a decoupage, create an original mosaic and much more. The egg shell is a wonderful material for creativity, and we will prove it!
Creating picturesque paintings from a bit of a shell is called - Krakle. In the East, such a technique is known since ancient times. Today it can be interesting to transform any subject. At the same time, the effect of a cracked lacquer coating is created.


Decoupage egg shell
We will make decoupage with eggshell on the example of this casket. By this principle, you can make a decoupage of the shell of any surfaces.

To do this, we need items that are difficult to present together with any other circumstances: egg shell, paints, a manicure wand, PVA glue, brush and actually the cardboard box itself.

There was an old cardboard box, and decided to give her new life! To begin with, you need to "grind" the entire box outside and inside with sandpaper, rather large, and then walk again with the "null".

For decoupage we will need: egg shell, brush, PVA glue, manicure wand

First apply glue into a small section of the box (we work with small areas, because PVA will dry enough). Then we take a small piece of the shell, I apply to the surface and gently press the rod on the shell, so that it cracked, as shown in the photo:

The sharp end of the sticks push the shell fragments to the desired distance, thus form a mosaic pattern. Shark fragments, like the distance between them, can be large or small at your discretion. After the shells are pushed to the desired distance, they must be flatched by the end of the finish to the surface.
Read the continuation on the next page
Jim "Like" and only get the best posts in Facebook ↓

Needlework
If you wanted a little decorate an interior, or inhale a new life in old thing, then this master is a class for you. I propose to update the old-pressed ceramic vase for colors using the Decoupage technique using the egg shell.
To work, we will need:
1. Ceramic vase;
2. egg shell;
3. Three-layer napkin with motif;
4. Acrylic paints;
5. Acrylic varnish;
6. Pasta for making;
7. Brushes;
8. Wooden sketch;
9. Emery paper;
10. PVA glue;
11. Alcohol for degreasing;
12. Stationery A4 file;
13. Foam sponge for decoupage.

Before starting work, it is necessary to properly prepare the eggshell. Shell 2-3 eggs Thoroughly, we clean from the films and dried. Now the shell prepared can be used in our work.
We take the usual ceramic flower vase. It is not necessary that he was new, I used the old vase for decoupage, which is 25-30 years old and which is miraculously preserved to the present day. With the help of sandpaper, carefully rub all the irregularities and roughness on the vase.

Degrease the vase with alcohol and cover the working surface with white acrylic paint. 

While the paint dries, prepare the napkin motifs that we will glue on the vase. Gently tear or cut out the fragments of a three-layer napkin, separating two white layers, we leave only one color layer for work.

I splashes a little water to the file, put on it "face down" a color fragment, broken from the napkins, again wet the drawing with water so that it almost floats on the file.

We merge excess water from the file and glue the napkin pattern on the pre-selected place on the vase. Separate the file from the pattern.

After that, a special fan brush is carried out in the figure with a water glue solution with water in a ratio (50 * 50). It is necessary to work as a fan brush to start from the middle of the drawing, gradually moving towards its edges to prevent the formation of air bubbles under the drawing.

After the fragment is glued and smoothed - dried it. This can be done with a hair dryer or leave to be dried to work at night. If nevertheless, unwanted folds were formed during the gluing process in the figure, then they can be carefully lined with sandpaper "zero".

After that we are coated with a vase with one layer of acrylic varnish. Thoroughly dry.
Now we will glue with pieces of eggshell all free space on our vase. The easiest way to do is as follows:
1) we apply a little thick PVA glue to the surface of the vase (we work with small areas of the vase, because glue dries enough),
2) Apply a piece of shell 
3) we press the wooden sap in the middle of a piece, it cracks into several parts, the resulting parts of the same wooden skewer gently push out several millimeters from each other.

When the whole desired surface of the vase is glued with egg mosaic, 
It is necessary to give her to dry well, after which we are covered with white acrylic paint. 
When the paint is driving - vase the vase with acrylic varnish and drifting it. 
And now we will need a pasta to make up the color of Umbra. 
A little paste is applied to the egg mosaic and the fingers are pretty rubbing her. 
The egg crane acquires a characteristic dark shade. 
Napkin patterns are not necessary, they should remain light.
In order to distinguish from the total background the upper side of the vase, we go through dry foam sponge, which caused a slightly acrylic color paint "Metallic".

We also do the same in the bottom of the vase.
Cover the entire Vazan varnish. When the lacquer dries, can be colored acrylic paints Make a presence of some fragments of the napkin pattern.
In conclusion, vanitate 5-6 layers of acrylic varnish, each layer we succeed. 


Well, finally land your favorite indoor plant In our updated von, put it on the most prominent place and ... We enjoy the aesthetic pleasure from the work done. Good luck to you and new creative ideas!

Irina Demchenko
Cheldesenka.ru.