Anna Bliznyakova
For work we need: sheets of white and colored paper for the printer (pink and green, fishing line, thin double-sided cattle and scissors (simple and curly).
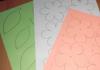
Finding an image on the internet (templates) flowers and leaves. We copy the templates, the value is arbitrary. It is desirable that the leaves have a "leg". We print it.

Cut out leaves and flowers. Leaves can be cut with curly scissors.

Fold all the flowers in half.

Cut off a piece of tape and cut it in half.

Glue the adhesive tape to the bend of the flower, on both sides.

Remove the protective outer tape from the tape.

Add to each side of the flower (glue) one folded flower.

Here's what should happen:

Now we add the last fourth to these three flowers. We also glue adhesive tape on both sides, glue the fourth flower to one side, and do not remove the protective tape on the other side, glue the last place of gluing after we lay the fishing line there.

Here, a ready-made voluminous flower, of eight petals.

We also collect all the other flowers.

On the "legs" of the leaves we glue pieces of adhesive tape.

We take the fishing line, unfasten the protective tape of the adhesive tape from the flower and stretch the fishing line along the flower and fix it. And so at an arbitrary distance, attach four flowers.

Glue leaves between them.


It is more convenient to collect flowers on a fishing line if you fix it on the wall with a carnation.

And in the end, what I have happened:


Children, parents were surprised and delighted! They came to the garden in the morning, and we have - spring on the ceiling. It was nice to see their sparkling eyes and hear words of admiration. And we also blow on them and they spin so cool. And just like that, they constantly turn from air currents. We have a "real" spring has already come!
How to quickly decorate a room and add a festive mood to the interior? Everything is extremely simple, you need to make decorations from tissue paper or ordinary paper napkins.
These are such versatile crafts that even a child can handle, and the pleasure you get from the holiday of March 8 will be the best gift for mom, grandmother or loved one.
Here are some ideas:
How to make paper butterflies
Take a square sheet of paper, fold it in half and cut out the base for the butterfly, as shown in the first picture. Then carefully unfold the paper and fold it like an accordion. Fasten with a thread or thin wire in the middle and unfold the folds - wings.
Everything, the butterfly is ready. If you make a lot of multi-colored butterflies, and collect them in a garland, then you can hang such a decoration on the wall.
How to make paper flowers
Making paper flowers is even easier. You can take square sheets of tissue paper or any paper napkins, the variety of colors of which is simply impressive, and create magnificent elements of spring decor for the holiday from them.
In order to make a flower, you need to fold the napkin with an accordion, tie it in the center with a thread or thin wire, and straighten the edges. Depending on how you cut the folded edges, you get different flowers.
The resulting decorations can be hung on walls, on cornices, attached to the ceiling or decorate a festive table.
Having mastered the technique of creating flowers, you can try to create such a ball -

Cut strips 2x20 cm
Stretch strips on one side
Picking up another section into an accordion, twist the strip, tie it with a thread or wire.
The roses are ready.
How to make a ball:
1) inflate the balloon
2) coat it with glue.
3) we wind the threads around it.
4) wait until the balloon pops up.
5) when the ball is dry, pierce it with something
6) remove the remnants of the ball from the threads.
7) The ball is ready
paper dahlia

Colored paper. Ruler, scissors, pencil. PVA glue or any other reliable glue for paper.
First we need to cut out a circle for the base of our flower. We cut it out of any paper, it will not be visible, and put it aside for a while.
Now we take a new sheet of colored paper and begin to draw it. We need squares 7 by 7 cm. Cut out all the lined squares. You can do it yourselfscissors or a clerical knife, whichever is more convenient for you. For a flower, we need squares from one whole and one half of an A4 sheet.
Now the most time-consuming, but rather interesting work begins. We begin to twist our squares into small envelopes, such as those in which grandmothers used to sell seeds. When all the squares are twisted, we take the circle set aside earlier for the base and begin to collect the dahlia.
We glue the first row of petals and let it dry. Now it's time to glue the second row. Petals of different rows must be glued in a checkerboard pattern. In the same way, we glue the rest of the rows until the entire base is filled with bags - petals.
So, simply, but not very quickly, we got a beautiful dahlia. It can be hung by a rope on the wall, glued to a postcard, inserted into a frame, attached to a leg and put in a vase. In general, there are plenty of options! Such a beautiful paper flower looks like a real dahlia. When your guests see it, they won't believe you made it yourself! Make a lot of these flowers and present to all your friends, they will be delighted!
Decor with fans
If you want to simply and beautifully decorate the wall, you can use the ideas of creating multi-colored fans. And if you approach the process creatively, you can create a whole panel of fans of different sizes and voluminous leaves.
It is better to attach decorations to the wall with pins or masking tape so that after the holiday they can be easily removed and hidden.
Almost every one of us in childhood made fans out of paper, folding it like an accordion. Currently, the creation of decor from paper fans has become a whole trend.
Moreover, it is easy and simple even for a child to make decorations from paper fans on the wall with your own hands.
If you want to quickly decorate a room for the holiday, it is enough to have colored paper, scissors, glue and desire at home. How to make decorations from paper fans with your own hands can be seen in detail in these photos.
As a fastening material, you can use not only glue, but staples fixed with a stapler.
Paper fan decorations can be attached to the wall with buttons or pins. And you can attach bright ribbons to them and hang them.
You can use several colors of plain paper or paper with a pattern to create different types and styles of decorations. The ends of the accordion-folded paper can also be trimmed to your liking. And depending on the trimming scheme, the decorations will have a different look.
Elena Zubareva
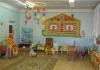
The month of March is in the courtyard and we are all looking forward to the arrival spring. So I want to bask under the rays of a warm spring sunshine,to see the mysterious awakening of nature and feel a surge of inner strength. Spring- the most tender and touching time of the year. Every day brings new experiences and inspires hope. my preschoolers are also looking forward to coming spring. That's why I decided decorate our center wall and create an atmosphere of spring warmth and comfort.

By tradition, I drew an affectionate, smiling Sun(symbol of our groups) with pigtails, glued a wreath of daffodils on her head, decorated her pigtails with flowers.


Then I painted light, airy clouds.


And of course, I drew and attached the first spring snowdrop flowers.


V center our spring composition-girl Spring with a bouquet of the first spring flowers and two little girls who happily meet Spring.


Then I cut out the swallows and attached them to wall.


Swallows - messengers spring and we look forward to their return from warm countries. They will bring us on wings spring. With coming spring all nature awakens, everything around comes to life and we have the wall appeared beautiful fluttering butterflies.
In our group spring mood reigns.


Children enthusiastically appreciated the changes that have taken place in group. Such registration allows them to thoroughly consolidate the characteristic features of each season.

I hope you enjoy spring setting up our group. Thank you for your attention!
Related publications:
Scenario of the holiday "Spring fun" The light music of P. Tchaikovsky "White Nights" sounds. The children stood in two circles. Children: All the blizzards have flown away, The cold has fled, The sun is shining stronger.
Our group is called "The Sun". On the central wall, we constantly flaunt the emblem of our group - the gentle sun. You have already seen how.
I bring to your attention a design option for the central wall for the holiday of March 8. In our kindergarten there is a beautiful, but not very big musical school.
Making walls in a group is always an exciting and responsible task for a teacher. I want it to be original and attractive.
In order for children to enjoy going to kindergarten, both parents and educators need to make some efforts and knowledge about how to decorate a kindergarten with your own hands. And literally everything is subject to decoration. Starting from the hall and vestibules and ending with a playground for children's walks and games, where children spend a considerable part of their time. In the material you can get acquainted with examples, training and play areas, as well as the group as a whole.
How to decorate a kindergarten with your own hands photo
It would be best to break down information thematically on a topic, how to decorate a kindergarten with your own hands, photo-examples and so on for those areas that you have to work on. And we will move logically, like a baby who first enters this new and still completely unknown world. And I want the child to be imbued with love and interest in his new “second home” at first sight, so that he would be comfortable and pleasant to be there. To do this, in all zones without exception, you need to hold, fill the space with fairy-tale characters, toys, and fun entertainment. So that the garden immediately, even among adults, is associated with an interesting pastime.
The first place where the baby gets and where he gets the impression of a new place of residence is the hall and corridors of the room. It would be a big mistake to leave just plain, painted and whitewashed walls, although recommended three hundred times by sanitary standards. After all, it is not only boring, but also scary, reminiscent of either a hospital or a boring institution. It is a completely different matter when from the threshold the baby finds himself in a real fairy tale. You can see examples of this in the photo above, and, you see, they immediately create the right mood for parents, and they will cause real delight in kids. There are practically no restrictions on the choice of colors, since the task is not to calm the children, as in a recreation area, or to make them more focused, as in a classroom for lessons and classes. It is best to choose not so plots from cartoons, because the fashion for them passes quickly enough, but some neutral fairy tales.
For example, in the photo you can see a very interesting design option that resembles a city road with markings, signs, traffic lights. We assure you that even girls will be delighted and will quickly remember the way to their group, let alone the boys. Often, each group is given its own separate name, rather than boring numbers with letters. Such a name in the form of an emblem can also be placed in the design, for example, by making a sticker or drawing on the doors, by placing a corresponding soft toy next to it on a shelf, or something else in the same spirit.

The second zone where mom and dad with a child get when opening the door in a beautiful corridor is the locker room. It is also designed as beautifully as possible, as far as the budget of the entire event allows. But not only beauty is important, but also the convenience of changing clothes, especially when it comes to the older group, where the children are already dressing on their own. In the photographs you can see various options for furniture sets that will be convenient for use by both parents, along with educators and nannies, and for children. Also, do not forget that it is the locker room that is the very place that parents visit most often, since they do not directly enter the group every day. It is here that it is worth placing a stand with useful information for them, making an exhibition, and so on. Of course, all this should be organically integrated into the fabulous design of walls and furniture, not out of the general outline.
How to decorate a kindergarten group with your own hands
The main attention should be paid directly to the room where the kids are, that is, the group. About, how to decorate a kindergarten group with your own hands, a huge number of manuals and recommendations have been written, because there are simply no trifles in this matter. And yet we urge you, in addition to norms and rules, to be guided by common sense and a sense of taste. You can use your favorite examples, because, by and large, the group is such a kind of children's room, only there are much more kids there. And the rest of the tasks before the designer are still the same - to make a beautiful appearance of the room, where it would be possible to combine a study area, a play area and a place to relax (daytime sleep).

You can see examples of how you can transform in the photo above. As you can see, here too you must adhere to the general chosen concept so that the room looks like a fairyland. In fact, doing this is much easier than it seems, because in the modern world there are so many tools that can make anyone feel like an artist. Children need tables and chairs to play. Moreover, unlike school desks, here it is better to make workplaces individual and it will be especially good if you can make furniture that is adjustable depending on the height of the child, and also meets all the requirements for the formation of the correct posture, which is very important at such a young age. very important.

It is better to move the sleep zone as far as possible from the desktops, it should be possible to provide maximum fresh air, both in summer and winter, but it should not be cold or damp. It is better to cover the walls with drawings in the most neutral, light, pastel colors that would not attract the attention of the children at the moment when they are trying to sleep. The same should be said about cribs, bedding, it should be beautiful, in harmony with the surrounding space, but not attract attention and not arouse interest.

Often, teachers arrange several thematic corners. This is indeed a wonderful idea, because all of them are necessary and important, but it would be better if they did not mix up either in space or in the head of the children. The teacher chooses thematic corners himself, but the most common among them are the corner of acquaintance with nature and the outside world, the corner of health, the corner of sports games and achievements, as well as interesting decorative elements that can teach kids in a playful way. For example, these can be posters with the correct sequence of putting on clothes for a walk, a stadiometer, names and pictures of furniture, clothes, utensils, and so on. It is believed that a group for older children is better to arrange with letters and numbers, so they will be remembered faster, they will be deposited in memory literally at a subconscious level. But for kids, it’s better to have more pictures with the study of the world that surrounds them - animals, houses, transport, and so on.

How to decorate a kindergarten playground with your own hands
Let's move on from the interior to landscape design and use all our knowledge on the topic in order to make daily walks in the fresh air not only more interesting and fun, but also those that will help the development of the baby, so that he becomes stronger, more agile, smarter with each afternoon. Therein, how to decorate a kindergarten playground with your own hands, there are no strict recommendations, the main thing is that all the elements with which you fill the space are safe for children, and, at the same time, are useful for them, for their physical and mental development.

The input that is available at almost all sites is a covered veranda where you can walk during adverse weather conditions, during strong sun and so on, as well as a fence or fence that separates the site from the outside world and several swings and sports equipment. All this needs to be decorated and supplemented in order to make such a dull project truly interesting.

The key task number 1 can be called the solution of the problem how to decorate the veranda of a kindergarten with your own hands. This room should not be just a temporary shelter from rain and sun, it should be no less beautiful than the group, and also filled with interesting games. In addition to the beautiful drawing that is done on all surfaces and walls of the veranda, you also need to take care of a sufficient amount of light that should get inside. Either windows or roof construction can provide this. It would be very appropriate to design the floor as a playground, for example, hopscotch or tic-tac-toe. There you can also make shelves where toys are stored, reception, it can be both their permanent storage place and temporary, if there are doubts about their safety inside the veranda.

Very often a fence adjoins the veranda, and just as often it is a boring, dull sight. But this "canvas" and asks for some interesting work. So before you buy expensive swings or conjure grandiose crafts, you should learn how to how to decorate a kindergarten, do-it-yourself plots, referring only to a simple way to ennoble the space.
How to decorate the territory of the kindergarten with your own hands

It is impossible to express in any words how much children love to play, and when buildings or crafts that are installed on the playground help them in this, there is simply no limit to this delight. Below you will see some examples of how to decorate the territory of the kindergarten with your own hands with these crafts. And although they are not very useful, the pleasure of imagining yourself as the captain of a real ship, a truck driver or a real tram, as they say, is priceless.

Another idea that is often overlooked when decorating is having a purpose-built small house or gazebo. In fact, this is one of the favorite entertainments for children, because there you can invite guests, arrange puppet tea parties, in a word, behave like real adults.
How to decorate the kindergarten yard with your own hands

And the last collection of ideas, how to decorate the kindergarten yard with your own hands, which, perhaps, will push you to new achievements on the eve of the start of the new school year. Sandboxes, slides, sports equipment - all this will perfectly fit into the concept of an ideal playground. Just remember to leave enough space for outdoor games, do not overdo it, trying to squeeze everything you like into the limited space of the courtyard.