Another gorgeous paper flowers. I simply admire the creativity of the craftswoman. This beauty was made by a girl under the nickname Astoria. Below you can watch a detailed master class.
What do you need: Paper density 120. Composter 3.7 cm.
1) Poke holes with an awl and cut the petals.
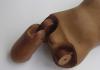
2) Moisten the paper until it becomes soft. The photo on the left side shows a dry part and a wet part for clarity. Fold first in half, then like an accordion.
3) Holding the petals, crumple the paper as if crimping it. Monitor the reverse side so that tucks form there too.
4) Carefully unfold. You can dry the parts first, or you can assemble the flower from the wet ones. I continue with the wet method; wet paper is easier to adjust. Attach a foam ball to the wire. If there is none, cut a strip 1cm wide. and approximately 7cm long. Fold it 4 times, secure it with wire in the middle, drop some glue and twist it between your fingers, cut off the excess. It is better to do this from a moistened strip.
5) I found a convenient way to assemble a flower using a ruler, which I’m sharing. We select the required diameter, insert the wire and pull slowly, but without fanaticism, you can pull out the wire or damage the paper. The first layer can be pushed completely through the ruler. Then press the petals more tightly in the middle of the bud.
6) I have a large flower made of 4 parts. Buds from one and two parts. We add each layer using the holes in the ruler, slightly pulling the wire down, compacting the layers. Attach the last layer through a circle of smaller diameter than the previous one so that the flower looks blooming. Shape and adjust the petals as you wish.
7) Bud. Everything is like in the beginning. It is also more convenient to glue the star through the hole; there is no need to moisten it. All that remains is to dry the flowers. I used a hair dryer. After drying, the flowers will become hard.


Composter 37mm
Paper weight 120.
So, cut the paper, pierce the holes with an awl and cut the petals. Moisten the paper so that it becomes soft. The photo on the left side shows a dry part and a wet part for clarity.
We work only with moistened parts.

Build a base on the wire; I have a foam ball about 1cm in size. (from a children's inflatable toy).
Cover two opposite petals with glue. Wrap the first petal and be sure to let it stick together, otherwise the middle risks being empty!

Glue the petals on top of each other, creating a cone. Press down the resulting corners at the base.
Perhaps this was the most difficult stage.

We glue the petals of the second part in threes, laying them according to the pattern, as shown in the photo on the right.

After gluing the last three petals, turn the edges back a little with a light touch while the paper is damp and soft.

We twist the third part at the edges, the angle is approximately 90*. Glue three at a time like the previous one.

For convenience, you can use the hole in the ruler. This way the petals will stick at the same time.

Tighten the fourth, fifth and sixth parts and press them on a soft mat, as if rolling the tool from the center to the middle of the petals. In this case, the petals themselves are laid in one direction. (I tried using a nail polish cap instead of a special tool - no worse).
The slight wrinkles formed will give the rose a little more naturalness.

It should look like cups. Place the “cups” in the circle of a ruler of a suitable diameter and dry. I used a hair dryer.

Let's continue the assembly, distributing the petals in a checkerboard pattern.

Composter 37mm
Poke a hole in the center with an awl, cut off a little on the sides, making the petals thinner. Make a herringbone cut moisten and twirl each one individually between your fingers until they look “tattered.”

A little about the leaves:

Composter 15mm, strip 2mm.
Moisten the leaves. Positioning the awl almost parallel to the surface, draw lines along the center, edges and again in the center. Glue the leaves to the strip.

The rose is ready, now about the buds - these are the initial 3 stages.
No. 2 - one detail.
No. 3 - two parts (stage 1, 2).
No. 4 - two parts (stage 1, 3).
No. 5 - three parts (stage 1, 2, 3).
I wish you pleasant creativity!
Added later:
Instead of a foam ball, it is better to use Jumping Clay plasticine - very comfortably! Lightweight, after drying it looks like foam plastic, and works well with glue.

They are very popular. They are used to make holiday ones for friends and relatives, albums for newborns, weddings and family, handmade boxes and gift wrapping, for festive interior decor.
Admiring these flowers, it’s hard for me to believe that they are made of paper. Although I try not to repeat in my blog ideas that are on the Russian-language Internet, it is impossible to ignore such beauty. These flowers are created by a master known on the Internet as ASTORIA. ASTORIA makes flowers from office paper, drawing paper, and paper strips. She keeps her diary on Ya.ru and there she shares with readers her secrets for creating paper flowers.

I will give a short master class on making paper roses, which are shown in the third photo. The author has developed patterns of petals, leaves and stars for the flower. Each template element looks like this:


The templates need to be printed and the elements cut out, as shown in the photo below.

Use the embossing method to form petals. To do this, use a dots (ball) and a soft substrate, for example, a mouse pad.


The process of collecting the flower begins. The petals of a small flower stick together to form a bud.

We glue the small bud to three large petals stacked on top of each other.

This is what the finished rose will look like. On the back side you need to glue a green star.

Glue the buds from several petals and glue a green star. Wrap the wire with floral tape. Pierce the bud on the back side with an awl and insert the wire. Bend the top with a hook, drip glue and pull down. Decorate the finished composition with leaves. 
Thank you, ASTORIA, for such beautiful works and the opportunity to learn how to make paper flowers.


Composter 37mm
Paper weight 120.

If you don't have a composter, use the template (template below).See how to use the template
So, cut the paper, pierce the holes with an awl and cut the petals. Moisten the paper so that it becomes soft. The photo on the left side shows a dry part and a wet part for clarity.
We work only with moistened parts.

Build a base on the wire; I have a foam ball about 1cm in size. (from a children's inflatable toy). Can be made from paper to match the flower http://fotki.yandex.ru/users/asti-n/view/352727/
Cover two opposite petals with glue. Wrap the first petal and be sure to let it stick together, otherwise the middle risks being empty!

Glue the petals on top of each other, creating a cone. Press down the resulting corners at the base.
Perhaps this was the most difficult stage.

We glue the petals of the second part in threes, laying them according to the pattern, as shown in the photo on the right.
After gluing the last three petals, turn the edges back a little with a light touch while the paper is damp and soft.

We twist the third part at the edges, the angle is approximately 90*. Glue three at a time like the previous one.
For convenience, you can use the hole in the ruler. This way the petals will stick at the same time.

Tighten the fourth, fifth and sixth parts and press them on a soft mat, as if rolling the tool from the center to the middle of the petals. In this case, the petals themselves are laid in one direction. (I tried using a nail polish cap instead of a special tool - no worse).
The slight wrinkles formed will give the rose a little more naturalness.

It should look like cups. Place the “cups” in the circle of a ruler of a suitable diameter and dry. I used a hair dryer.
Let's continue the assembly, distributing the petals in a checkerboard pattern.
Composter 37mm or SAMPLE
Poke a hole in the center with an awl, cut off a little on the sides, making the petals thinner. Make a herringbone cut moisten and twirl each one individually between your fingers until they look “tattered.”

A little about the leaves:
Composter 15mm, strip 2mm.
Moisten the leaves. Positioning the awl almost parallel to the surface, draw lines along the center, edges and again in the center. Glue the leaves to the strip.

The rose is ready, now about the buds - these are the initial 3 stages.
No. 2 - one detail.
No. 3 - two parts (stage 1, 2).
No. 4 - two parts (stage 1, 3).
No. 5 - three parts (stage 1, 2, 3)

http://ASTI-N.ya.ru/replies.xml?item_no=997
The question of coloring was firmly stuck in my head and did not give me peace. I wanted soft, smooth transitions from dark to light, and most importantly, quickly. I got my hands on ink for an inkjet printer, but more on that later.
Choose thicker paper. Thin ones won’t hold up, thick and loose ones will fall apart. You can use watercolor, but before rolling, squeeze out excess water with a dry cloth.
So let's get down to the wet stuff.
White paper, 137 g. Composter 3.7
Determine the center by making a hole with an awl and cutting the petals.
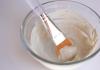
Wet the rag, squeeze it not too hard, but also so that it does not drip. Lay out the parts on one half and cover the other.
Take a wallpaper roller and roll it with pressure. By the way, a very convenient thing.
We will take one part at a time, the rest will remain between layers of fabric so as not to dry out.
We’ll also prepare a damp cloth to wipe your hands and a dry one to remove excess moisture.

I'll start with the ink pads. I have pigment Color Boxes.
A container with a small amount of water, transparent plastic from the packaging, bent in half.
Fold the wet part in half and then like an accordion.

Paint the edge of the part. Dip only the very edge into water.
Clamp into plastic, remove excess water. Distribute the paint using pressure. You can do it without plastic, but your hands will look “smart.”

Repeat coloring the edge to make it brighter.

Fold it a little lengthwise, setting a trajectory for the folds as they roll.
Twist in a figure eight. On the painted side, try to pinch it as close to the edge as possible.

Gently straighten and lay out to dry (as they dry, they will curl even more).

Glue the two dried parts together.
Using a hole of a suitable diameter, you will get a neat hole.
Fold a bunch of stamens (I bought them) in half, threading the wire through. This will make it easier to thread the stamens into the hole.

Cut off the excess and secure with glue.
Printer ink
Distress ink would probably be ideal here, but I don’t have it in my arsenal.
I really liked the result with printer ink, it turns out bright and beautiful.
Why not, they are for printing, should not fade and contain toxic substances. However, I will not say this. It's a pity that there are only 5 colors.
Drip some ink onto a piece of felt (put something underneath).
Paint the wet part yellow in the center, dip it in water and distribute the paint as described above.

The middle is ready, let's paint the edge. Try spreading the ink in different directions, from center to edge and from edge to center.


But I didn’t stop there, I dug up the remaining color after repair.

I was also pleased with the result and there is a wonderful palette on sale.

This is what came out after coloring with color (violet) and printer ink (pink)