In the famous fairy tale, Papa Carlo made Pinocchio from a piece of log with his own hands, without any magic. Even a modern master of applied arts who knows the basics of wood carving can make such a craft. The most impressive look is a doll made of valuable wood (ebony, boxwood, etc.); in foreign souvenir shops, such a craft can have a four-digit price. But if you are just practicing making wooden Pinocchio, blocks made from inexpensive types of wood - aspen or linden - will do.
Execution of workpieces
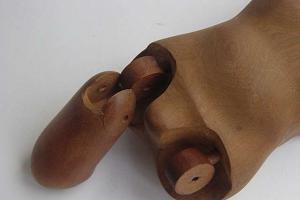
The simplest DIY Pinocchio doll consists of the following blank parts, which are made from solid blocks of wood:
- head - 1 child;
- body - 1 piece;
- hand - 3 children. (shoulder, elbow and hand);
- leg - 3 children. (thigh, calf, foot).
Smaller parts (axis under the neck, key, nose, hair) can be made from the material remaining after cutting out the main elements.
The easiest way to make doll elements is on a turning and milling machine. Then the parts will turn out smooth, streamlined, similar to factory products. However, if the home craftsman does not have access to such equipment, it’s not scary - all the parts can be cut out with your own hands using a wood chisel knife. Fine abrasive sandpaper is used to grind workpieces.
Fastening workpieces
The movable connection of the parts of a wooden toy provides two types of fastening:
- wire;
- articulated.
Connecting toy elements with wire is the easiest thing to do, but its significant drawback is that it is suitable for small-sized toys. If the craft is more than 30 cm high, such a mount looks makeshift. Some craftsmen use dense metal rings, inserting them into the elements that need to be connected. A ring joint looks neater than a wire joint, but the doll's limbs cannot move freely in all directions.

The best option is to make a hinged mount, which has been used by puppeteers for centuries. The components of the hinge are a disk with a hole drilled in the middle and a locking axis that connects the disk to the doll part.
Hinge assembly steps
- inserting the disk into the part of the future toy (a hole is cut out several mm wider than the thickness of the disk)
- securing the disk using an axis machined from a narrow wooden die;
- another axis, smaller in diameter, is inserted into the edge of the disk;
- turning a groove strictly along the diameter of the second axis in the element that needs to be attached to our part;
- the last stage - the axis in the edge of the hinge disk is driven into the groove.
The hinge of this design is suitable for connecting any composition of a wooden toy - shoulder, elbow, knee. To achieve maximum tight fit of the axes to the doll's elements, limiters made of wood chips are used. Using limiters, you can achieve rotation of the limbs only in one direction, if this is not provided for by the design of the toy.
Working on little things: from the nose to the iris
In order for the doll to turn out “alive,” the small elements of the doll require especially careful execution: nose, eyes, fingers, key, hair.

Let's start with the fingers of the hand. To make your hand look natural and not look like one sloppy lump, you need to give volume to the curves of your fingers. It is convenient to perform it using the so-called. Bogorodsk knife, designed specifically for wood carving.

An obligatory element of any wooden Pinocchio, which distinguishes it from the bourgeois Pinocchio, is a golden key. In principle, a metal key from a Soviet-made cabinet will also work as this part, if you have one on the household. But if you want the doll to be made entirely of wood, you will also have to make the key yourself.
The key can be hung either on Pinocchio’s neck, or made so that the doll holds it. In the second case, you need to make a blank not for a brush, but for a clenched fist, which is not much more difficult. The round workpiece is hewn, the contours of the fingers are cut out with a knife and chisel. In this case, the key itself must have 2 elements. The first is an axis with a rectangular thickening at the end, which is inserted into a hole drilled in the workpiece. The second is a shaped key base, which is turned from a separate piece of wood. A hole is drilled at its base where we need to insert our axle. The key is ready.
A separate stage of work is the doll’s nose. Its complexity depends on the form of execution of the element. The easiest way is to turn a triangular cone on a lathe - the future nose of our Pinocchio. It is fastened by drilling a shallow hole in the face blank into which the base of the cone is inserted. To keep the nose firmly, the base is fixed with wood glue.
You can also make the nose as a solid element of our doll’s face (it will look more natural if it is slightly curved upward). In this case, you need to take a block of such thickness that it is enough for both the head and the nose, located in the same plane.

The eyes of the wooden Pinocchio are also made of wood using the inlay method. You can simply draw them on the surface, but the toy will not look as solid. First, in the head blank, a “seat” for the eyes is selected and a shape is given. Next, you need to glue a piece of wood into it that is a lighter shade than the entire doll - this will be the white of the eye. Then, from a darker piece of wood, an iris is cut out and glued in with scissors, in the center of which you can paint a pupil. Our doll has acquired eyes.

Pinocchio's hair can be made from wood chips left over during the work process, which are given a rectangular shape and a bend. Like the nose, the hair is attached to the toy's head blank with wood glue.
The final stage of work is to open the craft with varnish. After it dries, you can dress up the wooden boy in sewn or crocheted clothes.

If you haven’t watched a cartoon or a fairy tale about Pinocchio with your child, or read this interesting work, then it’s time to do it. Although Pinocchio is already an outdated character, today he has been replaced by all kinds of superheroes and transformers, he remains famous and in demand.
Pinocchio is a wooden boy with a very long, and also curious, nose. In this modeling lesson we will mold it from plasticine so that your child will have an incentive to read a fairy tale again or watch an amazing story on the screen.
To sculpt Pinocchio you need to take:
- yellow and orange plasticine;
- red and blue plasticine;
- matches and stack.
1. Roll a small yellow ball. It is this (or orange) color that will help us imitate the surface of wood coated with varnish on top. And this is exactly what the Pinocchio toy was.
2. Stick a long nose on the ball - now the appearance of the character can be traced. Use the head of a match to mark the eyes.

3. Attach the eyes and red eyebrows.

4. From the same orange plasticine, make curls for the tree boy’s long bangs.

5. Place a cap on your head. To make it, fashion a cone out of a red plate and press down the lower part with your fingers. Then stick thin strips of a contrasting color, such as yellow, onto the cone-cap.

6. Attach the ears.

7. Make the torso. Orange plasticine is suitable for this. Draw out a thin cylinder, add a collar and a row of buttons. Add cone sleeves to the sides.

8. Attach thin yellow tubes to the sleeves.

9. Make shorts from two blue cylinders. Continue the shorts with yellow tubes and attach boots to the lower ends. It’s convenient to assemble all the parts using matches, so place them inside first. Matches will also make the figurine stable.

10. Attach the legs to the T-shirt.

11. And attach the head to the upper part of the body - the collar.

In the famous fairy tale, Papa Carlo made Pinocchio from a piece of log with his own hands, without any magic. Even a modern master of applied arts who knows the basics of wood carving can make such a craft. The most impressive look is a doll made of valuable wood (ebony, boxwood, etc.); in foreign souvenir shops, such a craft can have a four-digit price. But if you are just practicing making wooden Pinocchio, blocks made from inexpensive types of wood - aspen or linden - will do.


Execution of workpieces
The simplest DIY Pinocchio doll consists of the following blank parts, which are made from solid blocks of wood:
- head - 1 child;
- body - 1 piece;
- hand - 3 children. (shoulder, elbow and hand);
- leg - 3 children. (thigh, calf, foot).
Smaller parts (axis under the neck, key, nose, hair) can be made from the material remaining after cutting out the main elements.

The easiest way to make doll elements is on a turning and milling machine. Then the parts will turn out smooth, streamlined, similar to factory products. However, if the home craftsman does not have access to such equipment, it’s not scary - all the parts can be cut out with your own hands using a wood chisel knife. Fine abrasive sandpaper is used to grind workpieces.
Fastening workpieces
The movable connection of the parts of a wooden toy provides two types of fastening:
- wire;
- articulated.
Connecting toy elements with wire is the easiest thing to do, but its significant drawback is that it is suitable for small-sized toys. If the craft is more than 30 cm high, such a mount looks makeshift. Some craftsmen use dense metal rings, inserting them into the elements that need to be connected. A ring joint looks neater than a wire joint, but the doll's limbs cannot move freely in all directions.

The best option is to make a hinged mount, which has been used by puppeteers for centuries. The components of the hinge are a disk with a hole drilled in the middle and a locking axis that connects the disk to the doll part.
Hinge assembly steps
- inserting the disk into the part of the future toy (a hole is cut out several mm wider than the thickness of the disk)
- securing the disk using an axis machined from a narrow wooden die;
- another axis, smaller in diameter, is inserted into the edge of the disk;
- turning a groove strictly along the diameter of the second axis in the element that needs to be attached to our part;
- the last stage - the axis in the edge of the hinge disk is driven into the groove.
The hinge of this design is suitable for connecting any composition of a wooden toy - shoulder, elbow, knee. To achieve maximum tight fit of the axes to the doll's elements, limiters made of wood chips are used. Using limiters, you can achieve rotation of the limbs only in one direction, if this is not provided for by the design of the toy.
Working on little things: from the nose to the iris
In order for the doll to turn out “alive,” the small elements of the doll require especially careful execution: nose, eyes, fingers, key, hair.

Let's start with the fingers of the hand. To make your hand look natural and not look like one sloppy lump, you need to give volume to the curves of your fingers. It is convenient to perform it using the so-called. Bogorodsk knife, designed specifically for wood carving.

An obligatory element of any wooden Pinocchio, which distinguishes it from the bourgeois Pinocchio, is a golden key. In principle, a metal key from a Soviet-made cabinet will also work as this part, if you have one on the household. But if you want the doll to be made entirely of wood, you will also have to make the key yourself.
The key can be hung either on Pinocchio’s neck, or made so that the doll holds it. In the second case, you need to make a blank not for a brush, but for a clenched fist, which is not much more difficult. The round workpiece is hewn, the contours of the fingers are cut out with a knife and chisel. In this case, the key itself must have 2 elements. The first is an axis with a rectangular thickening at the end, which is inserted into a hole drilled in the workpiece. The second is a shaped key base, which is turned from a separate piece of wood. A hole is drilled at its base where we need to insert our axle. The key is ready.
A separate stage of work is the doll’s nose. Its complexity depends on the form of execution of the element. The easiest way is to turn a triangular cone on a lathe - the future nose of our Pinocchio. It is fastened by drilling a shallow hole in the face blank into which the base of the cone is inserted. To keep the nose firmly, the base is fixed with wood glue.
You can also make the nose as a solid element of our doll’s face (it will look more natural if it is slightly curved upward). In this case, you need to take a block of such thickness that it is enough for both the head and the nose, located in the same plane.

The eyes of the wooden Pinocchio are also made of wood using the inlay method. You can simply draw them on the surface, but the toy will not look as solid. First, in the head blank, a “seat” for the eyes is selected and a shape is given. Next, you need to glue a piece of wood into it that is a lighter shade than the entire doll - this will be the white of the eye. Then, from a darker piece of wood, an iris is cut out and glued in with scissors, in the center of which you can paint a pupil. Our doll has acquired eyes.

Pinocchio's hair can be made from wood chips left over during the work process, which are given a rectangular shape and a bend. Like the nose, the hair is attached to the toy's head blank with wood glue.
The final stage of work is to open the craft with varnish. After it dries, you can dress up the wooden boy in sewn or crocheted clothes.

Pinocchio is the hero of everyone's favorite fairy tale. Many boys dream of playing this role at a children's party in kindergarten. You can rent a costume for a matinee or carnival, buy it in a store, or simply sew it yourself. Moreover, not only an experienced seamstress, but also an ordinary mother can do the job. So, how to sew a Pinocchio costume?
Materials for sewing a suit
For the Pinocchio costume, it is best to prepare velvet or satin fabric. The costume of a fairy tale hero consists of two elements: trousers or shorts, and a sweater. The jacket can have either long or short sleeves. For the pattern, you can take an ordinary T-shirt or a child’s T-shirt. Sometimes the suit is complemented with a vest, it should be combined with shorts or pants. An excellent addition to the costume would be:
- White knee socks.
- Striped cap.
- Golden Key.
- A long nose.
Sew a cap
It is best to start sewing a suit using small parts, gradually increasing the load.
Materials for work:
- White and red fabrics.
- Threads.
- Scissors.
- Pompon.
 The work should begin by taking measurements. To do this, you need to measure the circumference of the child's head. You need to add 2 cm to the resulting measurement. Then we make a pattern for the cap on paper.
First of all, draw a straight line. It should be equal to the measurement with an addition of 2 cm. Then the straight line should be divided in half. A perpendicular is drawn from a point. It is equal to the height of our product. Then we move it 7 cm down. We connect the edges of the straight line with the vertex of the perpendicular. The result should be a triangle. After which the pattern blank is ready and needs to be cut with scissors.
After the Pinocchio cap is made from paper with your own hands, you need to transfer it to fabric, outline it with chalk, and cut out a part of the costume. Don't forget about 1 cm allowances.
In order to sew a cap with multi-colored stripes, the pattern on paper must be divided into several horizontal parts. After this, the parts are laid out on white and red fabrics and cut out. It is worth considering that the parts are cut out in such a way that the color sequence is maintained.
 When sewing, the workpiece should be folded face inward and sewn along the back seam.
If the cap is striped, then all the parts should first be overlocked, then only sewn together, alternating in color. Finally, the piece is stitched along the back seam.
The finished product can be decorated with a pompom or tassel. The brush can be made from wool threads. If desired, the craftswoman can decorate Pinocchio’s cap using hair curls. In order to make curls, you need to take a strip of colored paper, cut it into thinner strips, twist them into curls, and then glue them with a glue gun to the inside of the cap.
Making the Golden Key
An important detail of the image of the hero of the fairy tale is the golden key, which the cricket talks about in the fairy tale. Don't lose sight of this small part of the image.
In order to make a golden key, you must have:
- Cardboard (preferably thick).
- Spray can with gold paint.
- Pencil and scissors.
You need to draw a key on the cardboard and cut out the part along the contour. If the needlewoman does not know how to draw, then the finished image can be found on the Internet and printed. To make a detail of the image more dense, you can cut out several copies of it and glue them together.
After the glue has dried, the key can be painted with gold paint from a can. When the workpiece is completely dry, you can go to the show. To make the key shine, you can wrap it in gold foil.
Pinocchio's nose
 How to make Pinocchio's nose with your own hands? It is impossible to imagine the image of Pinocchio without a long nose. In order to make the hero’s nose, you need to draw a blank of it on beige cardboard. To do this, you will need to draw a circle, which should be equal to the length of the future nose. After which the workpiece is cut out.
The cardboard must be rolled up to form a cone and glued along the original vertical. The nose must be fixed so that it does not fall during performance. We pierce holes on both sides and insert an elastic band into them. A thin elastic band is ideal. A mask can replace the nose, but it will not look as interesting or realistic.
Making a costume for a fairy tale hero
After all the small details of the future image are ready, you can begin to implement the large elements. The suit, as noted earlier, consists of shorts and a T-shirt. Moreover, the T-shirt should be loose-fitting.
To make a T-shirt you need to take:
- Fabrics of different colors (green, blue and red).
- Threads to match the fabric.
- Pattern on paper.
- Scissors.
When making a pattern, any baby's T-shirt is suitable. The pattern itself consists of three parts:
- Backs.
- Sleeves.
- Front.
 After all the details are made on paper, they can be transferred to fabric. After which the front of the product, back and sleeves are cut out. In order to assemble a T-shirt, you need to connect the front and back pieces facing inward, stitch the shoulders and sides of the product. Then we stitch in the sleeves and trim the neckline. It is worth remembering that space should be left for the fastener. The penultimate stage of working with a T-shirt is hemming the bottom of the T-shirt itself and its sleeves. You need to sew a large white button on the front of the product. The T-shirt for Pinocchio is ready. You can freshen up your T-shirt with a white drawstring collar made of lace.
Sewing shorts for Pinocchio
 Shorts can be made of brown, blue, black or green fabric. Shorts made of corduroy or satin will look beautiful. First you need to prepare a paper base and transfer it to the fabric. After that, the shorts need to be sewn along the instep and side seams.
The top of the product is folded 2-3 cm and stitched. A small section of the top should remain unstitched. Then you need to measure the elastic band, which is equal to the circumference of the baby’s abdomen. It must be inserted into the child's shorts. The last stage of working with shorts will be to hem the bottom of the product by 2 cm. That's all. The suit is ready. You can try it on little Pinocchio.
The finished product can be decorated with rain. The baby can take part in this. You can complement the look with bright blush on the cheeks of a fairy-tale character. Don't be afraid to experiment. Believe me, the baby will remember his performance and the carnival costume made for him for the rest of his life. And memories are expensive in our time, or rather, they are priceless.
Attention, TODAY only!
DIY Pinocchio, wooden doll master class / DIY toys, patterns, video, MKDIY Pinocchio, wooden doll master class / DIY toys, patterns, video, MK
In the famous fairy tale, Papa Carlo made Pinocchio from a piece of log with his own hands, without any magic. Even a modern master of applied arts who knows the basics of wood carving can make such a craft. The most impressive look is a doll made of valuable wood (ebony, boxwood, etc.); in foreign souvenir shops, such a craft can have a four-digit price. But if you are just practicing making wooden Pinocchio, blocks made from inexpensive types of wood - aspen or linden - will do. 


Execution of workpieces
The simplest DIY Pinocchio doll consists of the following blank parts, which are made from solid blocks of wood:
- head - 1 child;
- body - 1 piece;
- hand - 3 children. (shoulder, elbow and hand);
- leg - 3 children. (thigh, calf, foot).
Smaller parts (axis under the neck, key, nose, hair) can be made from the material remaining after cutting out the main elements.  The easiest way to make doll elements is on a turning and milling machine. Then the parts will turn out smooth, streamlined, similar to factory products. However, if the home craftsman does not have access to such equipment, it’s not scary - all the parts can be cut out with your own hands using a wood chisel knife. Fine abrasive sandpaper is used to grind workpieces.
Fastening workpieces
The movable connection of the parts of a wooden toy provides two types of fastening:
- wire;
- articulated.
Connecting toy elements with wire is the easiest thing to do, but its significant drawback is that it is suitable for small-sized toys. If the craft is more than 30 cm high, such a mount looks makeshift. Some craftsmen use dense metal rings, inserting them into the elements that need to be connected. A ring joint looks neater than a wire joint, but the doll's limbs cannot move freely in all directions.  The best option is to make a hinged mount, which has been used by puppeteers for centuries. The components of the hinge are a disk with a hole drilled in the middle and a locking axis that connects the disk to the doll part.
Hinge assembly steps
- inserting the disk into the part of the future toy (a hole is cut out several mm wider than the thickness of the disk)
- securing the disk using an axis machined from a narrow wooden die;
- another axis, smaller in diameter, is inserted into the edge of the disk;
- turning a groove strictly along the diameter of the second axis in the element that needs to be attached to our part;
- the last stage - the axis in the edge of the hinge disk is driven into the groove.
The hinge of this design is suitable for connecting any composition of a wooden toy - shoulder, elbow, knee. To achieve maximum tight fit of the axes to the doll's elements, limiters made of wood chips are used. Using limiters, you can achieve rotation of the limbs only in one direction, if this is not provided for by the design of the toy.
Working on little things: from the nose to the iris
In order for the doll to turn out “alive,” the small elements of the doll require especially careful execution: nose, eyes, fingers, key, hair.  Let's start with the fingers of the hand. To make your hand look natural and not look like one sloppy lump, you need to give volume to the curves of your fingers. It is convenient to perform it using the so-called. Bogorodsk knife, designed specifically for wood carving.
  An obligatory element of any wooden Pinocchio, which distinguishes it from the bourgeois Pinocchio, is a golden key. In principle, a metal key from a Soviet-made cabinet will also work as this part, if you have one on the household. But if you want the doll to be made entirely of wood, you will also have to make the key yourself. The key can be hung either on Pinocchio’s neck, or you can make it so that the doll holds it. In the second case, you need to make a blank not for a brush, but for a clenched fist, which is not much more difficult. The round workpiece is hewn, the contours of the fingers are cut out with a knife and chisel. In this case, the key itself must have 2 elements. The first is an axis with a rectangular thickening at the end, which is inserted into a hole drilled in the workpiece. The second is a shaped key base, which is turned from a separate piece of wood. A hole is drilled at its base where we need to insert our axle. The key is ready. A separate stage of work is the doll’s nose. Its complexity depends on the form of execution of the element. The easiest way is to turn a triangular cone on a lathe - the future nose of our Pinocchio. It is fastened by drilling a shallow hole in the face blank into which the base of the cone is inserted. To keep the nose firmly in place, the base is fixed with wood glue. You can also make the nose as a solid element of our doll’s face (it will look more natural if it is slightly bent upward). In this case, you need to take a block of such thickness that it is enough for both the head and the nose, located in the same plane.
  The eyes of the wooden Pinocchio are also made of wood using the inlay method. You can simply draw them on the surface, but the toy will not look as solid. First, in the head blank, a “seat” for the eyes is selected and a shape is given. Next, you need to glue a piece of wood into it that is a lighter shade than the entire doll - this will be the white of the eye. Then, from a darker piece of wood, an iris is cut out and glued in with scissors, in the center of which you can paint a pupil. Our doll has acquired eyes.
  Pinocchio's hair can be made from wood chips left over during the work process, which are given a rectangular shape and a bend. Like the nose, the hair is attached to the toy’s head blank with wood glue. The final stage of the work is to open the craft with varnish. After it dries, you can dress up the wooden boy in sewn or crocheted clothes.
Comments
Related posts:
DIY doll for a teapot, master class, patterns / DIY toys, patterns, video, MK DIY Pinocchio carnival costume. Master class and video / DIY toys, patterns, video, MK