A craft you create with your own hands will become your child’s favorite toy. This could be an animal-shaped pillow or just some decor to play with.
For the craft you need:
- find a master class of the selected toy on the Internet;
- read the work sequence;
- prepare the material (fabric buttons, thread, needle and scissors);
- print out a template (stencil) for the craft, or you can attach white paper to the computer and trace it with a pencil.

In craft stores you can purchase kits with instructions for making soft toys.

Materials for toys
The following fabrics are suitable for beautiful crafts:
- silk;
- knitwear;
- wool;
- velours;
- velvet;
- felt.

You can also choose your own sizes.

General instructions for making a soft toy
First, find patterns for soft toys to make with your own hands. Easy lessons for beginners:

Mouse
A bright little craft for beginners. An easy-to-use toy for children under 1 year old. It is tactile, wrinkles well and is pleasant to the touch.

Stages of work:
- Choose a bright material, wash, steam if necessary. Better contrasting shades: red/white, blue/white, yellow/green...
- Cut out the parts according to the template.
- Fold the parts on the front side and sew them together, leaving a small space for filling with cotton wool, padding polyester or scraps of fabric.
- Sew on the small ones: paws, nose, tail, ears.
- It’s better to make a couple of details in bright colors, for example, ears and nose.

Turtle
You will need:
- template for a pattern;
- multi-colored pieces of cotton fabric;
- padding polyester;
- beads (buttons) – eyes;
- threads with a needle;
- scissors.

Step-by-step instruction:
- Using the template on the wrong side, we make a pattern for the head, paws, and a small tail. All 2 pieces, and 8 for paws.
- Make the body about 15 cm in radius, the lower part of the shell is slightly smaller.
- In the upper part of the shell you need to make 4 darts to add volume.
- Sew the head and all the legs together, then stuff each piece with stuffing. The tail does not need to be filled.
- Sew the shell together, leaving room for the paws. We stuff the turtle with filler and sew in all the details. Don't forget the ponytail at the back.
- Lastly, sew on beady eyes and embroider a large mouth.
- The turtle is ready!

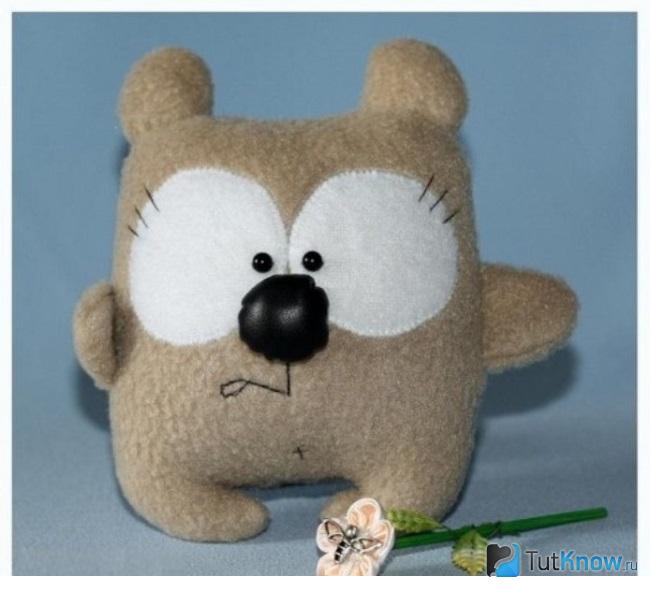
Fleece bear
Prepare for work:
- soft fabric (fleece or plush) 2 colors;
- needle and thread;
- pins;
- a piece of skin for the nose;
- dark beads (buttons) for eyes;
- filler.

Stages of work:
- Prepare a template of the required size, preferably on cardboard. Cut out all the details: 2 torsos, 2 legs, 2 white circles for eyes, black leather nose.
- First you need to secure 2 circles (eyes) with pins and sew them by hand or using a sewing machine to the body. Let's look at the drawing.
- Connect the paws with the front part and sew, turn out.
- The body consists of 2 parts, we connect the front side inward. Immediately on the sides we fasten the paws with pins at the same distance.
- We sew the bear together, leaving 0.5-0.7 cm from the edge. Be sure to leave a hole so that you can freely turn the product inside out.
- We turn the body inside out and fill it with padding polyester. Then we sew the body of the craft with a hidden seam using our hands.
- You need to embroider the mouth with black threads.
- A dark colored leather nose can be made from any material. Go around the circle with a needle and thread, tighten to get a convex nose. We fill it with padding polyester and sew it to the finished body.
- Sew on black beads (buttons) - these are the eyes.
- You can embroider eyelashes, eyebrows, etc.
- Teddy bear is ready!

Using the same simple method, you can create a home animal theater. A selection of patterns for creating an entire home zoo is easy to find on the Internet.

Animal pillows
Designers offer interesting ready-made options, such as a pillow toy. Quadrangles, where 2/3 (upper part) should be plain.

The cat will have a pink top, red-pink bottom and ears. Sew small triangles to the pillow.

A dog with a blue (salad) top and colored bottom. Make semicircular hanging ears 2 times larger than those of a cat

Embroider with funny faces from black and white fabric, mustache, mouth, big eyes.

Children love to fall asleep on such pillows or just lie in a hug. The pillow will become a sweet friend.

We offer a variety of designs for soft toys that are easy to make with your own hands.
It is impossible to remain indifferent at the sight of a charming soft toy, especially if it is sewn with your own hands. For a baby, she will become a wonderful friend whom she will want to hug before bed, and for an adult - just a wonderful individual gift.
Don’t be upset if you don’t have a sewing education; just the desire to create and the ability to use a needle and thread are enough. Plunge into your childhood by making a soft toy, be creative and get a lot of pleasure from the work done!
Simple DIY soft toys for beginners
So, we have already decided that a toy created on our own is much more valuable than a toy purchased. To easily make such a unique little thing, you just need to:
- Get acquainted with a simple algorithm for its production.
- Select the necessary materials.
- Correctly form and cut out the pattern of the future toy.
Internet expanses are filled with patterns of a wide variety of soft toys, but you can find them not only there. It wouldn't hurt to look into handicraft stores , children's creativity departments (here you can purchase huge kits and manuals for making toys yourself), bookstores . If you have old and already worn out soft toys, you can cut them open and trace the parts along the contour - this is a ready-made pattern.

Involve your child in the process of making a toy, this is very important! Such leisure time will introduce the child to work and discipline, and teach him to be careful in his actions. Working with different materials and small accessories contributes to the development of fine motor skills, attention and creativity.
But don't forget - safety comes first! Provide your child with blunt-tipped scissors; do not allow your child to use the sewing machine without adult supervision.
Fabrics used for sewing soft toys
- Knitwear , dignity – it stretches easily.
- Faux fur with piles of different lengths – suitable for creating pillows in the shape of animals.
- Silk - a rather capricious material, but it is indispensable in sewing and decorating dresses for dolls.
- Cotton – differs in a variety of colors.
- Wool - dense, fleecy material.
- Velvet and velor – the presence of a small pile allows you to sew soft toys – animals, imitating their fur.
- Felt – a huge number of crafts can be made using the felting method.
Soft toy manufacturing technology
- Select materials and prepare them for work. The fabric must be washed, ironed, and wrinkled areas steamed.
- Reveal all the necessary details.
- Baste the fabric along the intended outline.
- Sew all parts of the parts according to the basting.
- Stuff the middle of the toy, use cotton wool, synthetic padding, or foam rubber.
- Gather all the pieces of the soft toy and sew them together.
- The final processes in the design of the general appearance of the toy.
It is best to use thick cardboard to make a pattern. Such stencils are easier to trace on fabric; they will last longer for creating many more identical toys. Simply place the template on the wrong side of the fabric, trace, pressing firmly against the fabric.
So you have become familiar with the basics of sewing soft toys with your own hands. To hone your skills, use these simple examples:
DIY patterns and diagrams for soft toys
The patterns of these cute animals are quite simple and do not require additional explanation.
DIY soft toy: photo master class
Soft toy "mouse"
Let's try to sew a wonderful little soft toy. It is perfect for playing with babies up to one year old. The baby will already be able to grasp such a bright and interesting model, and will happily show interest in it. This will help him develop his tactile senses. Having mastered the basics of making such a light toy, you can begin to perform more complex work.
- Use the suggested pattern, it is already ready in the required size.
- Stock up on bright scraps of fabric and contrasting threads, so the finished product will simply attract attention.
- Be original - connect the parts not from the wrong side, but from the front side, using a loop (overlock) seam. It is for this purpose that bright threads were chosen.
- Attach ears, nose and eyes to the body.
- Fill the toy with stuffing and attach the tail.
- Sew the parts of the head and paws together, loosely fill them with foam rubber or synthetic padding, cotton wool will also work if nothing else is at hand. Create the tail in the same way, but you don’t need to fill it.
- Sew round patches to form a shell, leaving holes for stuffing and connecting the paws and head.
- Assemble all the parts into one whole using a hidden seam. Sew on the tail last.
- Add eyes to the toy, and your wonderful pillow turtle is ready. You can not only play with it, but also sleep.
Bouquet of soft toys: manufacturing technology with photos
This kind of gifts appeared relatively recently, and are now at the peak of popularity. Such a bouquet will not wither like fresh flowers, but will delight its owners for a long time. You can buy a bouquet of soft toys, spending a lot of money, or you can create it yourself and save a lot of money.
For work, prepare:
- Small soft bear toys – 3 pcs.
- Corrugated paper, organza.
- Ribbons, sticks, mesh for bouquets, other decorations.
- Glue gun.
Master class on making a bouquet:
- First, prepare the base on which the bears will be attached; they will be placed on sticks. Cut two squares from organza for each stick, form a flower from the scraps and attach with a hot gun to the stick in two layers.
- Do the same from a special mesh for bouquets and secure it over the organza. You should get some kind of flowers, as shown in the photo.
- Next comes the design of the toys. Rid the bears of labels, tags, and other factory identification marks. You can simply glue the bottom of the bears to the newly formed flowers on a stick, or you can sew them on discreetly. The second method will allow, if necessary, to “disassemble” the bouquet without spoiling the toys. Now start collecting the entire bouquet. Tie all the sticks with toys tightly with ribbon; you can also fasten them together with a few drops of glue.
- Take the remaining organza and wrap the bouquet with it, secure it in the place where the sticks themselves are attached. Using the corrugation, form another case for the bouquet; you can hide all your working moments in it. Secure the entire product with a bow. Correct all the irregularities with your hands where necessary - form folds.
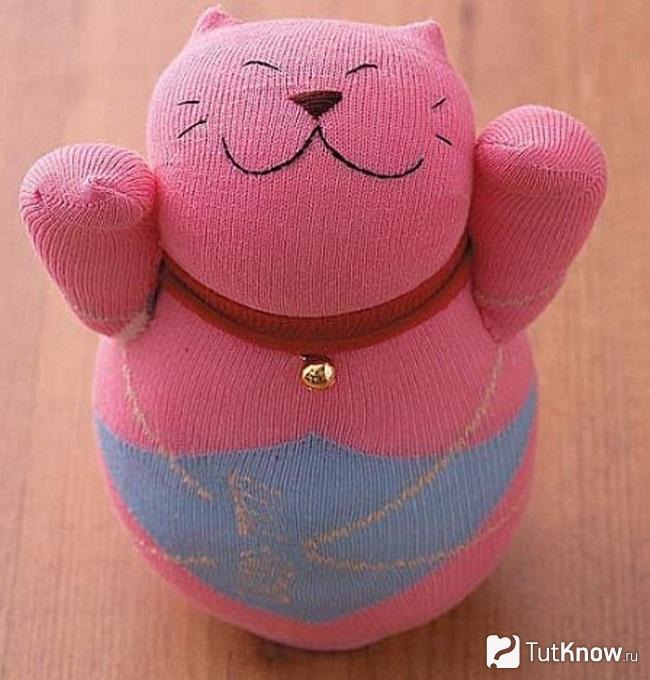
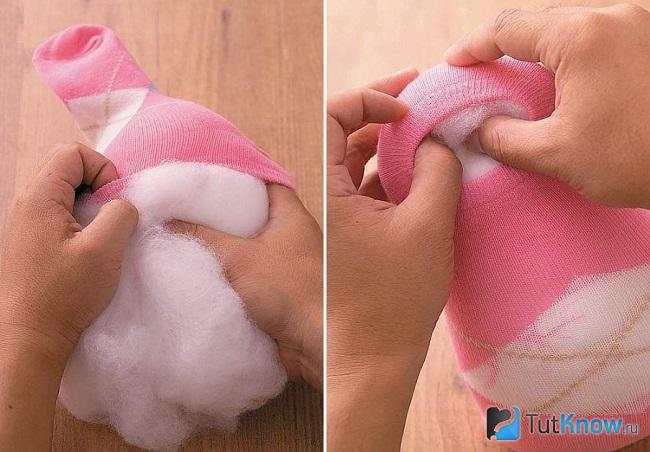
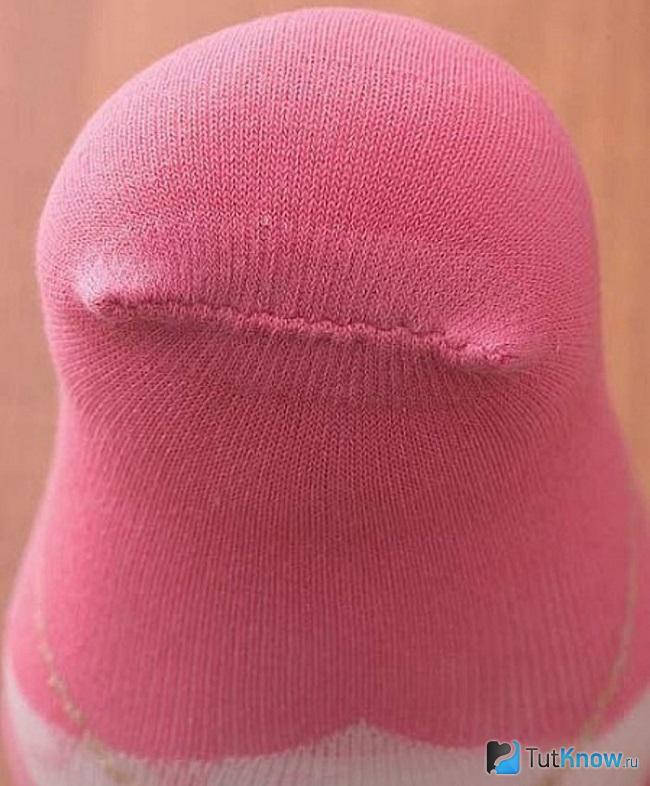
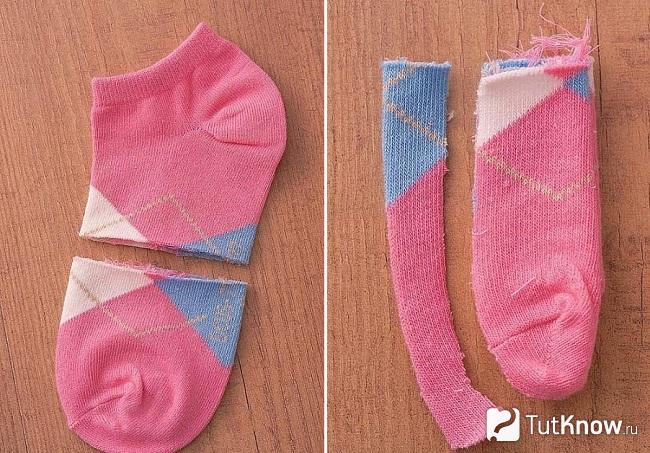
- This toy is easy to use, the basis for it will be the usual sock. Don't use old, worn-out socks: It's a myth that worn-out items make bright, colorful items. But, for sure, there is one attractive sock in the house that has lost its pair, so use it.
- Before starting work, decide what kind of cat you would like to make - thin or fat. Based on this, cut the sock in a certain place. If you want to get a plump toy, cut off the part of the sock that covers the foot, and move the upper part of the elastic to the side.
- Fill the toy with stuffing material, in this case padding polyester. The body should be larger than the head, so fill it tightly. Afterwards, bend the free hole inward and fasten it with needles. Sew up the cut and stretch the edges to form ears.
- Give the product the desired shape with your hands, make the ears sharper. Embroider the pet's face using a contrasting thread according to the previously drawn stencil. Use a needle back stitch.
- Decorate the cat with a bright accessory - a scarf, bow, tie, bow tie.
DIY soft rooster toy
Let's make a small soft toy - a felt pendant, you can decorate the New Year tree with it, or you can simply hang it in a visible place, as a kind of amulet. Let's consider two options.
Cockerel in the shape of a heart.
- Cut out two pieces for the heart from felt, choose white, gray, black, or another muted color as the base. A multi-colored ponytail will stand out better against its background.
- Take a closer look at the picture; all other parts of the cockerel’s body are also cut out in the shape of hearts.
- Attach the wing and eye to one part of the body, and then carefully sew it to the other part of the body, placing the tail, comb and beak in the places indicated for them. Fill the toy a little with padding polyester and secure the loop.
Snow cockerel.
- For this decoration you will need fewer bright colors than for the previous toy, but it will be easier.
- From white felt, cut out a body in the form of a wide figure eight and wings, as in the picture.
- Embroider a joyful image on the face of the toy, use black threads, and also use them to process the edges of the wings.
- Make a red comb and yellow legs with a beak.
- Sew all the parts of the toy, fill with padding polyester and make a loop.
DIY soft toy owl
You can create such a beauty owl with your own hands if you have scraps of fabrics of different colors on hand.
Step-by-step work execution

Making a toy with your own hands is not difficult. This does not require any special knowledge or skills, just your desire and an irresistible craving for creativity. By using your imagination and imagining a little, and using our recommendations, you can create a beautiful and original version of a toy for a child, a pet, or create an unusual element of interior decor.
Stuffed Toys
You can sew an interesting soft toy without spending any money on purchasing consumables, since they can be found in every home. Study the photos of homemade toys, and you will understand that to make them it will be enough to use available materials: fabric, thread, needle, buttons and any printed material.

So what kind of soft toy can you make with your own hands at home? The simplest option is a trinket made from a sock. Surely in any apartment there is a sock of a pleasant color.


With this product you can make a funny caterpillar, a cute dog, and a plump pig. More complex options include toys sewn from pieces of fabric, fur, using patterns, knitted from yarn or made using the felting technique.

Bunny from a sock
Let's look at the instructions on how to make a bunny toy. It is necessary to prepare scissors, a sock, buttons and printed material. The lower part of the sock is carefully cut off. After the sock is turned inside out, an incision is made from the bottom of the product to the “heel”.

Each of the resulting “ears” is stitched with thread. Afterwards, the product is turned inside out and stuffed with padding polyester or any other stuffing material.


The top of the sock, like the bottom, is cut with scissors. The incision is 2 to 3 centimeters. This way we will get bunny legs. They are sewn from the inside, stuffed with padding polyester and completely sewn up. The piece obtained at the very beginning is cut in half, from these parts the “legs” of the bunny are twisted and sewn to the body.


Felt dog
The technique for making this version of a soft toy is a little more complicated. So, how to make this toy at home? You will need:
- felt in three colors (brown, black and white);
- beads or buttons for eyes;
- scissors;
- pattern;
- needle;
- threads;
- hot glue gun.

To begin, find a pattern that is suitable in shape and size, print it out or manually transfer it to paper, and then cut out each part of the toy from fabric. Sew the cut pieces one by one, filling them with padding material. Then connect the resulting parts of the dog’s body together: muzzle, ears, paws, tail, torso.

Cut out two spots from white felt that will decorate the puppy’s face, and from black felt – a nose. Next, using a glue gun or using threads, you need to attach these elements. Then the button eyes are sewn on.


The toy is ready! The dog can be decorated with a ribbon, a beautiful bow or a cord-collar and used as an interior decoration or for playing with children.

Rubber toy
Today on store shelves you can find small thin elastic bands of all colors of the rainbow. By intertwining them with each other using a special technique, you can make interesting small toys that children will certainly like, and can also become a decoration for the New Year tree or be used as a keychain.


In order to fully master this technique, we recommend watching a master class on how to make a toy with your own hands. Having seen the weaving method with your own eyes, you can easily repeat all the necessary steps.

Let's figure out how to make a bouncing ball using rubber bands. You will need:
- a small piece of cotton wool;
- about 100 colored rubber bands.

The sequence of actions is quite simple: the cotton wool is rolled into a circle, and elastic band by elastic band is put on it, step by step, in two turns.

After the ball increases in volume, you can no longer twist the rubber band, but simply pull it from above. The more rubber bands you use, the larger the jumper will be.


Pet toy
Do-it-yourself toys for cats and dogs are very popular. Creating a funny trinket for a pet is not at all difficult, and by making it from scrap materials, you will save a decent amount of money.

An interesting idea would be a toy for a cat made from a wine cork. You can take several corks and decorate them in different ways: tie one with a crochet hook, attach several ribbons to the second, rustling pieces of paper or candy wrappers to the other. Your pet will definitely love this cute little trinket.

Using a needle, you can easily sew a felt toy for your pet. So, for a kitten, a felt fish would be an excellent option, for a small dog - a soft bone. To do this, two identical parts are cut out of fabric, sewn together and filled with padding material. In just half an hour you can make an interesting toy that will keep your pet occupied for a long time.

As you understand, making soft and paper toys for children, funny trinkets for interior decoration, and interesting things for pets is quite simple. The creative process will certainly bring you a lot of pleasure; this interesting activity will not leave either an adult or a child indifferent.

Photos of DIY toys


As the unsurpassed Coco Chanel aptly said, things made with your own hands are luxury. Therefore, handmade soft toys allow even beginners to increase their positivity when decorating the interior, preparing unique gifts for children, souvenirs for family and friends.
For such crafts you will need patterns and diagrams that correspond to the design, available tools and following a simple technology for their manufacture.
For sewing needlework you need to prepare:
- pieces of fabric, ribbons, lace;
- thick paper/cardboard for creating patterns, and for the purpose of transferring them to fabric, also carbon paper and pen/pencil;
- environmentally friendly toy fillers;
- threads of various tones and strengths;
- ruler, scissors, awl, pliers, needles, thimbles;
- small details for the design of the face, fasteners on clothes and decor;
- iron;
- sewing machine (if necessary).
Choosing fabric for toys
Based on the characteristics of a particular toy, the following fabrics can be used:
For novice creators of a soft toy with their own hands, it is important to take these features into account so that when transferring the pattern and design, choose the fabric that matches the image.
Simple and primitive soft toys: patterns for beginners
This group of toys, called “primitives,” can be the first step towards making more complex options. They are cut on double folded fabric and sewn from one piece with a head, legs and torso. Separate sewing of the head, ears, legs, and tail is also allowed here.
Most often these are three-dimensional figurines of various animals, fish, and birds. Their simple creation requires care, but does not require special efforts and skills, or a lot of time. Moreover, using one pattern you can create larger products as decorative pillows. The finished handmade craft is suitable for children to play with, as pendants or keychains. 

One popular option among beginners is a cat toy using ready-made pattern templates.
Using simple patterns, you can create your own favorite wise owl toy from colorful cotton and printed chintz. 

Using the selection with photos, it is easy to understand several steps of completing the work. 
A do-it-yourself soft toy, patterns and diagrams for beginners of these simple products allow you to use any fabric with a minimum of decor. “Primitives” made in light colors can be turned into paintable, fragrant gifts.
To do this, they are impregnated by boiling in strong tea leaves, coffee with the addition of vanilla, cinnamon, and then drying in the sun or in the oven at + 120°C. After this, the fragrant souvenir toy can be painted and dressed up.
What to stuff soft toys with
Previously, cotton wool and small pieces of fabric were used to fill soft toys. However, today these materials are being replaced by lighter and more hygienic synthetic materials (sintepon, holofiber, synthetic padding, foam rubber, etc.).
They do not come true, allowing the products to retain their original shape even after prolonged use and repeated washing. It is quite acceptable to use old sweaters made from light yarn in the form of finely chopped strips.
It is also allowed to stuff toys with undyed, cleaned and combed sheep wool (sliver). At the same time, you need to be sure that future owners of such crafts will not have an allergic reaction. The vulnerability of this material lies in its susceptibility to damage by moths and deformation when moistened.
If it is necessary to make some toys heavier (balls, rattles, etc.), soft fillings can be combined with pre-calcined cereals, seeds, husks, and pebbles.
Personally made pillows in the shape of different animals and birds can be stuffed with medicinal herbs (mint, sage, lavender, fennel, lemon balm, jasmine, etc.). In this case, the individual tolerance of the components contained in them should be taken into account.
Step-by-step instructions: how to sew a fabric doll
When making a soft toy with your own hands, patterns and diagrams for beginners are the first step towards realizing your plan.
Next steps are as follows:
- Selecting the necessary fabrics, washing them, ironing them.
- Transfer the pattern to the fabric and cut out all the parts with allowance for seams and hems (0.5 cm each).

- Basting the resulting parts of the future toy along pre-designated lines (starting with the head, and then the torso, limbs).

- Sewing all the parts according to these outlines (manually or using a sewing machine).

- Filling all elements with environmentally friendly materials.

- Final attachment of each part to each other.

- Decoration of the face, clothes.
How to make a doll's face and hair
For the outer shell of the head, it is necessary to make a bag of the required size from cotton fabric. After filling it with the selected material to mark the neck, you should wrap the lower part 2-3 times with thick threads. Then wrap the head with a piece of flesh-colored knitwear.
To do this, fold it with the front side inward and place the manufactured head on it, mark the lines of the back of the head and neck, then cut out the workpiece and then turn it right side up.
When forming eyes, nose, mouth on the doll’s face, you can use special plastic blanks, buttons, beads, etc.
The second option is sewing/gluing self-made parts from colored fabric or embroidery. Along with this, you can draw the contours of the elements and then color them. The choice of any of the methods depends on what kind of soft toy you should make with your own hands.
Patterns and diagrams for beginners can also tell you which material is best to use for hair, namely:
- wool yarn, which should be sewn to the head, and then create the desired hairstyle;
- special tresses (bonded hair on fabric strips);
- felting yarn;
- felt for making ponytails/bangs, which, after transferring the patterns onto it, are sewn to the head.
In addition, hair is often imitated by painting it with safe paint of a suitable tone.
Tilda and its varieties
The peculiarity of Tilda dolls, created at the end of the twentieth century by Norwegian designer Toni Finnanger, is the simplicity and clarity of the lines of all details, the use of only natural materials. These ruddy-cheeked toys, unlike any other toys with long disproportionate limbs and small eyes, are decorated in soft pastel colors.
During this time, tildomania has gained sympathy in different countries of the world, and has been enriched with different types, in particular:

Textile bear Tilda
Such a stylized toy, using quite accessible materials, has a more complex method of execution than “human” dolls. The simplest option for making a Tilda bear is to cut out 2 elements, sew them together and fill them. The fabric can be of different textures and colors.
Photo and pattern:
Tilde style toy. Hares
Do-it-yourself soft toy: patterns and patterns for beginners for making the Tilda Hare are not at all complicated. 
After cutting and sewing the cut parts on flesh-colored fabrics, you must follow the execution algorithm:
- filling blanks of body parts;
- sewing limbs, ears to the body with the head;
- making/drawing a nose, mouth, eyes;
- dressing the Bunny in pre-prepared pants, a jacket, etc.
Step-by-step instructions: soft toy cat
Just a few simple steps need to be completed to create the charming cat Matroskin:
Making patterns:

DIY toy zoo
Using templates, ready-made patterns, and diagrams of various fauna, you can create your own mini-zoo. These can be homemade bears, monkeys, dogs, seals, giraffes, elephants, deer, hippos and other favorite animals.
Such a nice company will become a bright element of the interior of a child’s room, a source of psychological comfort. The creation of a toy zoo, according to teachers and psychologists, is also an important educational moment.
Fur animal: instructions for beginners
To make such toys, you can use both natural and artificial fur. If it’s easier to work with the latter, then the other option turns out to be truly exclusive. Therefore, it is more advisable for beginners to start with small products made from artificial material. The first step is also to prepare the pattern and cut it to allow for future seams.
It is important to remember this nuance - you need to work with fur not with scissors, but with a sharp stationery knife or a special knife for tailors.
To avoid damage to the fur, short, not deep, sharp movements of the tools are made from the wrong side of the material. The cut out parts are folded right side inward and sewn from the wrong side. In this case, it is necessary to leave small holes for stuffing with filler, which is then closed with a hidden seam.
The last steps are to attach all the elements of the muzzle and add accessories that match the image.
Owl pattern from fabric: how to sew an owl
Beginners can make an owl from just 2 parts of different colors using one of the simplest patterns. 
Further work consists of forming a triangle from the cut out elements, connecting the parts first by basting and then stitching (starting from an acute corner). After this, the future head is fixed by pinning this part and then bending the corner to form the beak. 
The formed body (the lower part after the pin) needs to be filled with the prepared material and sewn at the bottom. Then sew the beak corner to the tummy, and on the face glue cut out white circles-eyes with black pupils made of beads/buttons. Photo of an owl created in half an hour:
Master class felt dog
To prepare a puppy pattern, a beginner will need a template. The toy is made using pieces of white, brown and black felt, thread, needle, scissors, blanks for eyes, and hot glue in a gun.
Algorithm for further actions:
- transfer patterns of parts onto felt;
- cut out all the parts outlined with a ballpoint pen, and then sew them together and leave a small hole for filling;
- fill the blank using the rough end of a pencil/wooden stick;
- fastening all parts and completely closing the hole;
- design of the muzzle, attaching a colorful collar in the form of a ribbon/bow/butterfly, etc.).
To give the toy a more natural look, you can tint the felt with colored pencil lead in several places (inside the ears, on the paws/face/tummy).
How to sew a bunny from felt
Step-by-step felt bunny master class: 

Soft sock toys
The basis for one of the easiest toys to make is 1 sock of an attractive color without scuffs or holes, which has lost its pair. If you want to make a “chubby” toy, you need to shorten it by cutting off the part that covers the foot, and also move the elastic band on top of it. The unworn parts of children's tights that have become small and tight will also come in handy here.
Before starting work, beginners can use a felt-tip pen to mark the location of body parts (head, neck, paws, torso) from the inside out. This will help minimize proportion errors. The technique allows for combining several colors from other socks to designate a “mask” on the animal’s face, tummy, paws, etc.
There are many options for creating “sock” toys with the initial production of patterns and measurements for the location of body parts. Many people make cute toys “quickly” by first filling the products and forming ears from the tied ends of the tops of socks, and then drawing the outlines of faces, waists, and various accessories on this figure.
Master class Sock hare
One of the quick options for making a sock Bunny:
- Fill the sock with cotton wool or cereal (to make the product heavier for stability).
- Measure the distance from the part of the toe sock to the intended neck and tighten this place with an elastic band/thick threads.
- Measure a smaller piece for the head and tie it tightly to prevent the filler from spilling out.
- Divide the remaining edge of the sock into 2 parts, and then cut out the ears from them, giving them a standing/sagging position and sew them along the cut lines with small thick stitches.
- Attach a pompom ponytail to the bottom of the back.
- Decorating the toy: gluing oval/semi-oval circles of a different color to the tummy; attaching eye-beads made from denser fabric of the clove and nose.
- Hare decoration (bow on the head between the ears for girls, and on the neck for boys).
To create many soft toys using the proposed patterns and patterns, beginners do not need to have sewing skills. The important point here is independence, creativity and the desire to create something unique with your own hands. It is advisable to involve not only adult family members in this pleasant activity, but also children, subject to the safety rules for handling sharp objects.
Article format: Vladimir the Great
Video on the topic: DIY soft toy
How to sew a primitive cat:
Soft toys made from socks:
It’s easy to create original toys from socks and leftover fabric. See how to sew a pillow toy, Basik the cat, and make a development board.
Original DIY toys made from socks

Delight your children by making these dolls for them. To do this you will need a little, namely:
- socks;
- threads with a needle;
- scraps of light plain yarn;
- filler;
- narrow braid;
- dark colored beads;
- scissors.
Even those who do not know how to use a sewing machine can make such original toys. Only possession of a needle will be useful.
- Cut the sock in half. One part is the foot. The second is the heel with an elastic band. You only need the first one. Fill it with filler, but not very tightly. Sew with a needle on the right and left to mark the sides. You also need to make legs by stitching at the bottom in the middle. Sew up the top hole through which the body for the baby doll was stuffed.
- Cut a small circle out of light fabric, gather it on a thread, tighten it a little, and stuff it with filler. Then you need to tighten the thread and fix it. Do not cut yet, but sew the resulting head to the body using the same thread.
- Sew beads instead of eyes. You can apply blush on your cheeks to make them brighter. Tie the junction of the head with the body with braid.
- Take the second part of the sock, cut off the heel, it will not be needed. You only need the top part - with an elastic band. Fold it in at the cut and sew along the edge on the arms. Put the cap on the doll’s head, sew it at the top so that you get a “tail” at the end.
To make such an adorable cat, you will need:
- 2 socks;
- threads;
- needle;
- scissors;
- padding polyester;
- Marker is better water soluble.
Sew the hole in a straight line to create two ears.
Using a marker, draw the facial features of the original toy.
If the marker is too bright or not water-soluble, then it is better to use a simple pencil.

Now you need to embroider according to these marks, taking a thread of the appropriate color.

In order for such original cat toys to acquire front paws, you need to make them from a second sock. To do this, first cut it in half crosswise, and then as in the photo.
Now these paws need to be sewn up, stuffed with padding polyester, and sewn to the body of the toy.

This is such a wonderful animal. If you like him, make him a friend.
DIY soft toy cat

This character is very similar to the cartoon character. The pattern clearly shows how such a soft cat toy is made. It will require:
- soft dense fabric of beige and dark brown color;
- filler;
- threads;
- eyes for toys.
- Cut out two parts of the abdomen and stitch them in the center. Two side pieces need to be sewn on the back. You have 2 parts. Sew them together in the area of the paws, tail, and sides.
- Using the appropriate parts, create the kitten's head. Cut out his muzzle from a dark cloth and sew it onto the character’s face. Fill your head with filler through the bottom. Place it around the kitten's neck and sew it with a hidden seam on the arms.
- Each ear consists of two parts - brown and beige fabric. These triangles are sewn in pairs and turned inside out through the as yet unsewn bottom. Then the ears need to be sewn to the head, making a fold on them.
- All that remains is to sew on the eyes, embroider mustaches, eyelashes, mouth and nose with light threads, and the soft toy, which is so interesting to create with your own hands, is ready.

How to sew an original pillow toy?
Kids love these items very much. They first play with these soft toys, then when they get tired, they use them as cozy pillows.

Before sewing a pillow toy, prepare:
- fabric that is pleasant to the touch;
- filler;
- scissors;
- pink fabric for decoration.
- 2 pcs. for the head;
- 4 - for the ear;
- 2 - for the body;
- 2 - for 2 tails;
- 2 - for ear pad.
Stuff the body and tail with stuffing. Sew the tail to the body, where the markings are. Stitch the head, after filling it with a small amount of filler. Attach the pad to the ear with pins, stitch it, tucking the edges. Design the second ear in the same way.
From pink fabric, cut out a nose, a heart, and decorations for the tail. Sew them on too. It turned out to be a wonderful product. If you want to know how to sew a pillow toy so that it looks like a funny teddy bear, then watch another master class.
For this you will need:
- beige and white fabric;
- a piece of black leather;
- filler;
- threads;
- needle;
- scissors.

As you can see, they are oval, straight on the bottom. Sew the pieces in pairs. Sew a light face and a black nose onto the front of the bear. To make it, cut a small circle out of leather, gather it on a thread, and stuff it with filler. Sew toys onto your face.

Now fold the front and back right sides together, placing the sewn tabs between them. Sew along the edge, leaving a gap. Turn the workpiece out through it. Fill it with filler and sew up the hole.
You can make such original toys from leftover fabric. If there is a solid color, you will get the muzzle of a dog and a cat, and if you have a colored one, you will get their bodies.

The following pattern will help you sew a toy pillow in the shape of an owl. It is created from the main fabric, and from colored fabric - a beautiful bird skirt.

If you want your child to like the toy even more, then sew small owls too. Sew a wide strip of fabric onto the owl's belly and stitch it vertically to create pockets. Place the owls in them. To keep them well, cover them with the wings of the mother bird. Button them up.

Pompom toys
They turn out warm and cozy.
To make them you will need:
- cardboard;
- pencil;
- round templates with a diameter of 2.5–7 cm;
- multi-colored yarn;
- sharp scissors;
- felt;
- glue gun

Using the lids, draw circles. Place coins of a smaller diameter in the center and outline them. Cut out the resulting cardboard rings. Make a cutout on the side of each.

Combine two pieces of cardboard of the same size. Wind the yarn tightly around them. Separate the cardboard. Cutting the yarn in the center, insert the thread in the middle, tighten it, and tie it.

For each animal you need to make two pompoms of different sizes. The smaller one will become the head, the larger one will become the body.

Connect these elements by tying them with threads. Cut out ears, eyes, nose for a charming animal, attach them with a glue gun.

The sheep is made from white threads, the eyes are cut out from black fabric, the nose from pink, the ears from white.

Create a chicken using yellow pompoms.

These are the original toys you can make with your own hands.

If you have kids at home, make useful things for them from leftover materials.
Original DIY educational toys

Soft books are an indispensable thing for a baby. It is interesting to make such developmental aids with your own hands, thereby saving a lot of money. To make such educational toys, you will need:
- textile;
- threads;
- scissors;
- sheet filler;
- finishing elements.
If you don't have a sewing machine, hand stitch each sheet using a basting stitch, using long stitches.
Do the same for the rest of the pages. Everyone should teach their child something. You can sew a sneaker onto one and attach a lace to it so that the child can practice tying it.
Let the girl learn how to braid her hair. To do this, sew three ribbons onto the top of the page.
It is useful for a child to become familiar with watches. Cut a circle out of light thick fabric and sew numbers to it. Cut out the clock hands from dark canvas. Secure them in the center of the dial.
To help your child learn geometry from an early age, cut out various shapes from scraps and sew them onto a book. The same pairs need to be created from fabric and Velcro attached to them. The baby will look for paired figures and compare them.
Instead of sewing a book, you can attach geometric shapes to a thick drape and let the child find pairs for them.

If you have cardboard boxes, use them to make a whole car complex for the boy, which will include:
- washing;
- gas station;
- garage;
- riser.

Cars can be made from the same material. You will make them from wood and plywood.

DIY educational board

You won't get bored with this toy! After all, there are so many interesting things here, you can scroll through the telephone dial, learn how to lock and open a real lock. Now you don’t need to click the door chain or the latch, since it will all be on the board. An abacus will help your child learn to count, and scales will help your child learn to weigh objects.
To make such “smart” original toys with your own hands, you will need:
- door lock, latch, chain, handle;
- abacus;
- scales;
- switch;
- buttons;
- textile;
- elastic bands;
- switch;
- glue gun;
- colored cardboard;
- self-tapping screws;
- MDF sheet;
- sneakers, etc.
- Lay out the items on the prepared board. See how to position the lock so that it closes well. The same applies to the latch and door chain.
- Screw one half of the lock to one plank with self-tapping screws, and the other and the door handle to the second. In the same way, attach these boards to the MDF.
- To keep the abacus in working condition, you can rattle it with “knuckles”; attach only the frame to the board.
- Glue scales, key holder, and other items using hot gun silicone rods. Cut out the base of the phone from cardboard, glue it to the board, and secure the dial in the center.
- Cut out a small dress from the fabric, sew buttons and elastic in the form of loops to it. Let your child learn to unbutton and button clothes.
You can use various items that you have at home to decorate your development board.
Original toy - cat Basik
This toy is loved by both children and adults. The cute cat is made from a material that is pleasant to the touch.

If you want to quickly create such an original toy, then use a simple pattern.

At the bottom of the back and tummy you need to make an undercut, then these parts will become more voluminous.
On the Basik pattern, the undercut locations are indicated by triangles. You just need to match the opposite sides of each shape and stitch on the wrong side.
- The muzzle consists of two identical parts, cut in a mirror image. They need to be connected by stitching in the center.
- For each paw you need to cut out 2 pieces. In total, you will need 4 parts for the hind legs and the same number for the front legs.
- Sew the paired pieces on the wrong side, leaving the top unsewn. Turn the paws inside out and fill them with filler. Sew the muzzle to the tummy.
- Here's how to sew Basik further. To assemble this original toy, place the front part on the back part, insert the front and back legs between them, placing them in place. Turn the toy inside out through the hole left at the bottom.
- Stuff the animal with a small amount of stuffing and sew up the hole in the arms.
Here are the paws and toes. Don't forget to sew a tail on the toy. It is given on the pattern.

Sew a fish from a piece of colored fabric and place it in Basik’s paws.

You can dress up the cat at your discretion; clothes for Basik are also not difficult to sew.

If this is a winter option, a hat with earflaps and a scarf will do. You will sew the first one from the remnants of fur, and knit a scarf from yarn.
Here are some original toys you can create with your own hands. Choose the ones you like and start crafting. And to simplify the process of creating new things and get ideas for inspiration, watch the selected videos.