Paper is an excellent material for creativity. Today, with its help, real works of art are created. We'll start small - let's make a paper skull. Such a thing can be useful for interior decoration, at a masquerade, Halloween and as a prop for a performance or photo shoot. The article will tell you how to make a skull out of paper in several ways. Which one you like - choose for yourself. The good thing about paper is that even children can make crafts from it.
Volumetric paper skull mask
Necessary materials:
- Skull template.
- Thick paper (cardboard).
- A simple pencil.
- Eraser.
- Scissors or
- Glue.
- A piece of foam rubber.
- Paints.
- Black felt-tip pen or marker.
How to make a voluminous skull mask using a template
Before you make a skull out of paper, you need to prepare a template. You can make it in several ways: draw it yourself, copy it from a picture, find an image on the Internet. It is better to take a skull with a visible jaw. Next, transfer the drawing you like onto the piece of paper twice. That is, you will need two identical blanks. Don't forget to adjust the picture to the size of your face! The thicker the paper, the more voluminous the mask will be. You can even use a shoebox as material. We cut out the drawings along the contours and glue them together. Now we make holes for the nose and pupils of the eyes.
Now let's move on to the second part. We will learn how to make a skull (upper blank) out of paper. For this template, you need to transfer the same drawing onto a piece of paper, but without the lower jaw. We cut holes for the nose and eye sockets. If the selected drawing had cracks in the skull and other additional elements, now is the time to make them.
Note! Before this, we made holes only for the pupils, now we cut out the eyes completely. It is important. This will make the mask look more voluminous.
We cut out the top blank along the contour and glue it to the first part. While the base dries, let's move on to additional elements. Draw on paper and cut out the upper jaw and nose. We glue the parts to the skull. The result should be a “sandwich”. How to make a paper skull mask, you know it's time to give it color.
Now, using a piece of foam rubber, we paint the mask. Waiting for it to dry. We outline each element with a black marker or felt-tip pen.

How and what to make a mask mount from
If you plan to only apply the mask to your face, you can glue a stick or a long and narrow rectangle of thick cardboard. If you want to use the skull without using your hands, it is better to use another method.
You will need two pieces of ribbon or an elastic band. We glue them to the mask. For better fixation, cut out two small pieces from cardboard or paper. Lubricate them with glue and place them on the ends of an elastic band or ribbon. Place the mask under the press for several hours.
Making a paper mask in the shape of a skull for a child
The easiest way to make a skull out of paper is to print the photo from the article on a color printer, cut it out and glue it along the allowances, as shown in the pictures. But you can do it differently.
From white paper we cut out an oval according to the size of the face. This will be the base of the skull. On black paper we draw two large ovals-eye sockets and a triangle-nose. Don't forget to maintain proportions. Glue the parts to the skull. We make holes for the child's eyes. Now you can make a mount for the mask using the methods described above.

How to make a skull prop out of paper: selecting materials
Before you start, it's a good idea to have an idea of what the skull actually looks like. This is necessary so that the future props look realistic. Just look at as many pictures of real skulls as you can. Now let's take:
- Balloon.
- Vegetable oil or Vaseline.
- Marker.
- Masking tape.
- Paper or newspapers torn into small pieces. Cutting is not recommended. You just need to tear it so that the pieces of paper adhere better to each other and the transition is more invisible.
- Paste or PVA glue, diluted with water in equal proportions.
- Stationery knife or scissors.
- Putty.
- Sandpaper.

How to make a skull out of paper using papier-mâché technique
Inflate the balloon to the desired size. Lubricate it with Vaseline or vegetable oil. Why do this? So that at the end the skull can be easily separated from the ball. We glue the “tail” so that it does not get in the way when working.
Using a marker we outline the eyes, nose and teeth. We will not cover these places with paper; they must remain untouched.
We glue the paper onto the ball. After two or three layers, let it dry. The more paper there is, the stronger the skull will be.
When the base is ready, you can start sculpting the individual parts. Using a marker, we draw the places that should be voluminous. For example, forehead, back of the head, eye sockets, cheekbones, jaw. Only glue pieces of paper onto these areas. After gluing 2-3 layers, let the skull dry. We do this until we achieve the desired result.
Remove the dried skull from the ball, gradually deflating it. We cut off the excess paper that has come out beyond the outline.
Apply putty to the skull. While it is still wet, we form tubercles and cracks, focusing on realistic images of skulls. When the putty has dried, the product must be sanded with sandpaper. As a result, the skull should be smooth. If necessary, we paint the product.
Having figured out how to make a skull out of paper with your own hands, you can surprise everyone at the holiday or diversify your photo shoot.

The holiday of All Saints, which moved to us from overseas lands, or brought with it many new traditions, for example, decorating the house with all sorts of “horror films”: figurines of bats, spiders and paper skulls. Today we will tell you how to make a skull out of paper using the origami technique with your own hands.
Origami skull
For the craft we will need:
- a square sheet of paper - office, colored or special for origami;
- origami skull folding diagram;
- creative mood.
Let's get started:
- Let's print out a diagram according to which we will put together our craft.
- Place a square sheet of paper in front of you on a hard, flat surface. If only rectangular paper is available, then first cut off the excess part from it.
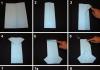
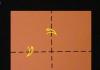
- Let's mark diagonal lines on our paper square, aligning its opposite corners, bending the sheet and ironing the folds with our finger. After this, unfold the sheet again.
- Now we need to make an irregular rhombus from the square. To do this, align the left corner of the sheet with the previously outlined diagonal.
- Let's do the same with the right corner of the sheet. Don't forget to press all the folds with your fingers to secure them.
- We bend the upper corner of the sheet inward so that its top aligns with the two previously folded ones. Now our craft has this shape
- The upper part of the paper skull is ready, now all that remains is to fold its lower part - the jaw and teeth. To do this, fold our craft in half crosswise.
- Bend the bottom of the diamond in the opposite direction so that a fold of about 2 cm is formed.
- Now we turn our work over to the front side and fold its lower part like an accordion. We do this slowly and do not forget to iron each fold so that our craft has a neat appearance.
- As a result, we get something like this.
- Although origami does not involve the use of glue, we will still glue all the folds of our accordion. Thanks to this, the jaw of our paper skull will look neat, and the teeth will not stick out at random.
- It's time for our craft to spruce up. Using a black pencil or marker, draw large eye sockets on it.
- Using the same pencil or marker, we will color the teeth one after another. Our paper origami skull craft is ready!


What can you do with your kids for Halloween? It all depends on how impressionable the child is. Typically, images of evil witches, bloodthirsty vampires or terrible ghosts are used for copying and decoration. But until you find something suitable, you will have to reconsider many daunting options. Another thing is the image of a skull. This paper craft is quite suitable for the theme of the day of evil spirits, but no one will be afraid of it. On the contrary, it is useful for children to know how the human body works and what the skull looks like.
This master class shows in detail how to make an origami skull with your own hands. It is advisable to make it white to show maximum resemblance to a part of the human body.
To make a skull using the origami technique, prepare:
- a square sheet of white paper - a regular office option or square blanks for notes;
- some black paper;
- scissors and glue.
How to model an origami skull with your own hands?
An origami skull can be considered a simple model that will introduce young creators to the technique of paper folding. To create the intended craft, prepare a square of white paper, the side length can be 12 cm, or select your own more suitable parameters. If you are helping a preschool-age child, then you need to prepare 2 identical sheets. An adult should complete the craft step by step, showing an example to the child and explaining each step.

First, bend the square along one diagonal, and use your fingertip to press along the fold. Then straighten the square and make a similar bend, but along the second diagonal. Thus, at this stage 2 lines along the diagonals will be selected.

Returning the square to its original position, bend two adjacent sides, aligning them without gaps along one diagonal.

Lower the upper corner of the resulting sharp-nosed part down, joining 3 corners at one point.

Raise the sharp nose up approximately in the center, making a horizontal bend. Then lower this protrusion down again, but do not completely unfold the paper, but leave a small fold (about 0.5 cm).

Turn the part with the blank side facing you. Here you will again see a ledge going down. Lift it up, leaving a gap of about 0.5 cm.

Lower the protrusion down, joining the horizontal line that separates the rounded model.

Lift the tip up again, drawing a zigzag line.

Move the rest of the tab back down. If you follow the proportions, you will get a perfect zigzag line, there will be no extra protrusion left. The last triangular bend can be coated with glue and pressed down so that the model holds well.

And the New Year holidays are just around the corner, keep a link to an excellent
The origami model itself, very similar to a skull, is already ready. But we were also preparing black paper. It will be needed for additional elements. Cut out black circles for the eyes and nose. Glue them onto the main oval part. Thus, we will show depressions instead of eyes and nose.

The origami skull is ready. This is a suitable craft for Halloween. It guards a treasure and perhaps belongs to some brave pirate explorer.
See also video: how to make an origami talking skull: