DIY web and spiders
A web with spiders is a simple and effective room decoration for Halloween, especially if you are planning a party with guests and you need to create the appropriate atmosphere.
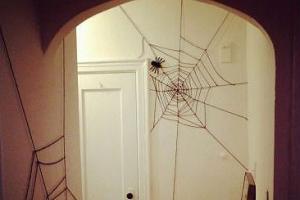
The most obvious option is to wind woolen threads in the form of a web on the wall, securing them with push pins. First you need to secure the warp threads (diagonal), and then wind the thread in a circle.

You can attach a spider web thread to a plastic disposable plate, populate it with a cardboard spider and hang it on a chandelier.

The basis for the web can be the crosshairs of any sticks, for example, thin branches or ice cream sticks.


A web can be cut out of paper or oilcloth using the same principle as a snowflake for the New Year.

You can either buy ready-made spiders for Halloween as a decoration on a web or as an independent decoration, or you can make a craft with your own hands. It could be just a figure cut out of cardboard or a three-dimensional version.
These cute spiders can be made from the same plastic plates. The materials you will need are chenille (fluffy handmade wire) and eyes for toys of different sizes.

But such a not only funny, but also tasty spider can be made from lollipop and chenille:

A more complex design is the glamorous spider made from a decorative mesh shaped like a bubo.

You can make this cute spider with your own hands from two foam balls of different sizes.


And another version of a spider made from a ball, this time wrapped in acrylic thread.

A very simple to create, but impressive looking spider - made from a black ball with paper legs. It may well frighten a guest who enters the room!

Halloween crafts from toilet paper rolls
Rolls (tubes) remaining after using toilet paper are an excellent material for children's creativity. From it you can make figures of any animals and birds, and for Halloween - monsters, mummies and bats.

To create such mummies, you don’t need anything other than toilet paper and eyes. Wrap the roll with paper in any order, glue on the eyes - the mummy is ready!


As for creating monsters, here you can fully express your imagination.


The same applies to making witches, ghosts and bats - no instructions are needed to make them.


Well, if you don’t have any extra rolls lying around at home or there isn’t enough material to fulfill all your fantasies, use empty juice boxes as an alternative.

Candlesticks
An original decoration for your Halloween room will be a craft in the form of a candlestick. Making it is not as difficult as it might seem at first glance.

Take a glass container (jar) and stick thematic figures cut out of paper (witch, bat, pumpkin, spider, cobweb, etc.) on the outside. Place a candle at the bottom of the jar, light it - the lamp will effectively light up.


The design can be applied with a marker, and the container can be painted in any color - then the lamps will sparkle in different shades and will look monstrously magnificent in a dark room. Boooo!


You can wrap the jar in gauze and glue on the eyes - you’ll get a mummy lamp.

Wrap the jars with thread and plant spiders on them - again we return to the theme of the web.

Fairy lights
A holiday craft option that offers unlimited scope for imagination. After all, you can hang anything on a garland!
Paper ghosts.

Skeletons, black cats and bats.


Skulls and ghosts made from felt.


Faces of monsters and witches.

Balls made from threads in the shape of “sugar loaves”.

Paper pumpkins.

Ghosts made of threads.

Or made of fabric.

Halloween wreath
A wreath on a door or wall is a very popular home decoration. Nowadays such wreaths are made for many holidays - and Halloween is no exception. As a blank, you can use a circle made of cardboard, plywood or a foam circle - they are sold in handicraft stores.
You can make such funny monsters if you tie a lot of tulle strips tightly in knots on the workpiece.


As the holiday approaches, here are five different crafts you can do with your little one to decorate your home for Halloween.
Some of the proposed decorations are designed to be made independently, for example, a child can make a ghost made of gauze, a ghost garland or a lamp from a jar independently, under the guidance of parents, but it is better for parents to carve a pumpkin, and let the child choose the template and the final decoration.
Ghost made of gauze
Ghosts are one of the most favorite characters on Halloween; children dress in such costumes and decorate the house with crafts in the form of ghosts on the eve of All Hallows' Day.
How to do it?
- You will need: wire, a plastic bottle, a ball (tennis ball or any other ball) and a spray bottle of starch.
- First you need to make a frame from wire, a bottle and a ball, after which you should cover this structure with gauze.
- When the frame with gauze is ready, apply starch to the gauze using a spray bottle. The ghost is almost ready, all you have to do is wait until the gauze dries - add eyes to the ghost and place it on a shelf, above a false fireplace or on any other horizontal surface.
1
 1
1
Little ghosts
This Halloween interior decor idea is very similar to the previous one, the only difference is that instead of starch you can use glue, and also make more little ghosts from the same amount of gauze.
How to do it?
- You will need: a balloon, two paper or plastic cups, gauze, quick-drying glue, a bowl.
- First, we place one glass on top of another (bottom to bottom) and secure them with tape. Place a balloon inside the top glass. Next, we cut pieces of gauze to the required length and width, soak them with quick-drying glue, place them on a pre-installed structure and wait until the gauze dries.
- Carefully pierce the ball, glue two eyes to the ghost from dark fabric or colored paper.

Now the ghost remains to be hung on a chandelier, door or some hooks.

Original ghost garland
How to do it?
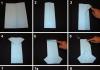
To make such a garland you will need a New Year's garland with small lights, white fabric, scissors and thread.

From a piece of white fabric we cut out squares with which we will “wrap” the garland, and make a hole in the middle to thread the garland through.

We fix the fabric with thread and paint the garland with a black marker.

Such a garland can become an original decoration for windows, doorways, window sills and even bedside tables.

Lamps made from cans
Make your own lamps, use simple jars as candlesticks, they will make original and pretty candlesticks that you can use to decorate the porch, borders and approaches to your house. For example, Jack-o'-lanterns can be made from a glass or jar, wrapped in colored paper.
How to do it?
- You will need: jars, candlesticks, candles, colored paper or paints, glue, marker.
- Make your own jars with colored parchment or simply paint them with gouache and draw various faces, cobwebs, ghosts and spiders on them.
- The child can make such a lamp independently; the parents’ task is simply to monitor the progress of the work.
- Next, you should stick on eyes and a mouth cut out of black paper or any other design, for example a witch on a broom. A lit candle placed inside the jar will create the necessary glow.

 1
1
Flock of bats
A great craft that you can make with your child is a flock of bats. Firstly, this option for home decoration is very easy to implement, and secondly, children simply love to cut out various figures.
How to do it?
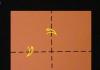
- To complete this task, you should print out a bat template and cut it out, and then fix it on a wall, door or window.
- We have already described step-by-step instructions earlier in the article.


Jack Lantern
One of the obligatory attributes of Halloween celebrations is pumpkins. If you are inviting guests to an Halloween party, use our step-by-step instructions and decorate the interior with these Jack-o'-lanterns. For school-age children, you can arrange a joint Halloween pumpkin carving (making a Jack-o'-lantern) a few days before Halloween; for kids it will be a bright and memorable event.

Small caps like a witch's
Whether you're throwing a Halloween party for friends or hosting a baby shower, these hats are a great option for simple table decorations. Place them on straws in cocktails or spoons in desserts - and a festive mood is guaranteed.
How to do it?
- You will need: black paper, scissors and glue.
- To create two caps, cut out 3 circles: one larger and two small. Cut the large circle in half and roll each half into a cone. Now glue the cones onto the two small circles and you have two hats! In this way, make as many hats as there are expected guests.


Halloween is not an official holiday in our country. However, the catchy outfits and stunning surroundings of this day cannot leave Russians indifferent. On the night of November 1, more and more people take to the streets dressed as monsters or ghosts, and the windows of houses and apartments are decorated with jack-o'-lanterns.
Stores offer a wide range of holiday paraphernalia, but it will be much more interesting (and cheaper) to make Halloween crafts with your own hands. Moreover, many of them do not require special materials or skills.
Decorating the room
For afterlife themed parties, you can create some themed items. DIY Halloween crafts can be created in just a few hours, and then can be used annually until you want to come up with something new.
Garland
A simple decoration in the form of a garland will immediately transform the room. It is enough to stretch a rope or ribbon from wall to wall and decorate it with homemade ghosts, and the atmosphere will immediately become ominous and mystical. To create a restless spirit, you will need a square of any white fabric. As a base for the head, crumple a sheet of paper, giving the lump a spherical shape. Place it in the center of a square of fabric, wrap it in it and tie it with a thread at the “neck”. That's all. All that remains is to draw a pair of eyes or an ominous face. There is an even simpler option - you can cut ghosts from a strip of paper after folding it like an accordion. Other Halloween symbols can also serve as the basis for the garland: pumpkins, bats or spiders.

Ghost
Making separately hanging ghosts is also easy: you only need a small ball, a piece of gauze and PVA. The fabric is soaked in glue and wrung out. After which it is used to cover a ball lying on the neck of a jar or bottle. The structure must be stable. Pretty soon the gauze will dry to the shape you gave it. The jar or bottle is removed, and the finished ghost can be hung on a thin thread (fishing line) in the corner of the room. If there are several such figures, they look even more interesting.

Volumetric paper crafts for Halloween
You can make not only two-dimensional, but also three-dimensional crafts from paper. In particular, the pumpkin - the main symbol of Halloween - has several versions. The easiest way to make it is to glue it from paper. It's quick and even kids can do it.

Therefore, you can create these with children who already know how to use scissors or at least glue ready-made strips.
The pumpkin can be round or flat; for both options you will need orange and green colored paper.

The thickness of the strips, their length, shape and type of leaves - all this is at the discretion of the one who decided to create such crafts for Halloween. You can not only decorate the room with your own hands, but also create souvenirs for party guests - small pumpkin pendants.
Vampire bats
A must-know for those who make Halloween crafts themselves: it will always come in handy when it comes to everything mysterious and sinister. A flock of these bats immediately creates the atmosphere of an abandoned attic of an old house.

The easiest way to make a bat is from black paper or some similar material: cardboard, artificial leather, foamiran. It’s better to place vampires in a room in a group - it’s more believable.
Candles and candlesticks
Halloween-themed crafts can be not only purely decorative, but also functional. Thus, candles, decorated taking into account the peculiarities of the holiday, will become the main source of lighting on the most terrible night of the year. They can be painted with acrylic paints to depict a pumpkin, ghost or monster. And a candlestick can be easily made from a simple glass glass, painted in the same way.
pumpkin head
What would Halloween be without a pumpkin head grinning its unique smile? Anyone can make it from a real vegetable. To do this you will need a pumpkin, a knife and a little dexterity. The middle of the fruit is removed so that the remaining layer is 1.5-2 centimeters. Then the holes for the eyes, nose and mouth are carefully cut. Depending on your mood, your facial expression can be absolutely anything.

All that remains is to insert a light source inside your head, preferably a battery-powered flashlight.
Witch hat
While preparing crafts for Halloween, you can also create costume elements with your own hands. For example, a cap for a witch party or an evil sorceress costume. It consists of a flat ring (a circle with a hole in the middle, suitable for the size of the head) and a cone. Both are easy to cut out of thick cardboard, paint black and glue together. You can also create a witch's vehicle - a broom - from dry branches and a mop stick.
And something else…
What other paper crafts can you come up with for Halloween? Yes, any! Every item you come across can be turned into something Halloween-themed. Computer disks are modified into ghosts, shampoo bottles into vampires, and a trash can into Baba Yaga's mortar. All sorts of monsters are sewn, knitted, and sculpted from plasticine. By doing this seemingly useless task, you can find many new talents in yourself.
And creating crafts for Halloween with children is generally a real pleasure. They so joyfully create nightmare characters that in the process they themselves cease to be afraid of them.
Preparing for a holiday often brings much more positive emotions than the holiday itself. Recently, many have begun to celebrate Halloween, and even create their own family traditions regarding this date. One of these traditions is the making of various themed home decorations and souvenirs. You can make crafts for Halloween with the whole family; it's great fun and brings you together.
Pumpkins, pumpkins, pumpkins
The most famous attribute of the holiday is the pumpkin. As you can see in the photo, not a single party is complete without this vegetable. Pumpkins are also used to make traditional lanterns, and are simply used for indoor or garden decoration. Therefore, when planning to make crafts for Halloween, you can’t do without a “pumpkin” theme.
How to make a traditional lantern out of a pumpkin? This work is quite simple, not only an adult, but also a teenager can handle it. You need to cut off the lid of the vegetable on the side where the stem is located, and then carefully cut out the pulp and seeds. Of course, there is no need to throw away the pumpkin pulp; it can be used to prepare a variety of dishes that will decorate the holiday table. If you plan to make several lanterns, you can freeze the cut out pumpkin flesh and use it later.
After the pumpkin turns into a hollow “pot,” you need to cut a “face” on it. To do this, use a marker to outline the silhouettes of the eyes, mouth, and nose, and then cut them out with a small knife. The expression of the “face” can be anything - angry and ferocious or, on the contrary, cheerful and sweet. All that remains is to insert a candle inside the resulting lantern.
Carving masters know how to carve real masterpieces from pumpkins, however, for those who are taking on the job for the first time, it is better to choose a simple option.


Jack-o'-lanterns are a traditional craft, but they have a short shelf life, so you can't make them in advance. If there are a lot of other concerns on the eve of the holiday, then you can make pumpkin-shaped crafts from other materials in advance. For example, sew a sofa cushion in the shape of a pumpkin, make an image of a vegetable from polymer clay or salt dough, etc. Nowadays, many are fond of weaving from rubber bands; you can use this handicraft technique to make small pumpkins. Such crafts can be used as keychains.

Together with your children, you can make lanterns in the shape of pumpkins out of paper. Work process:
- We roll up a cylinder from thin cardboard, securing the edges of the workpiece with glue, tape or a stapler. Let's paint the cylinder orange;
- Next you need to take a sheet of orange paper, the width of which is greater than the height of the prepared cardboard. Moreover, the greater the difference in size, the larger the flashlight will be;
- fold the sheet in half lengthwise, then on the fold side you need to make parallel cuts not to the end of the sheet. The interval between adjacent cuts is about 1 cm;
- Now you need to unroll the sheet and wrap it around the cylinder, aligning the edges. Since the width of the sheet is larger, you get a three-dimensional flashlight;
- All that remains is to decorate the craft. You can cut out “leaves” and a crossbar for hanging from green paper, and elements of a “face” from black paper.
You can make a lot of these lanterns and assemble them into a garland to decorate your home.
Bats and spiders
Traditional Halloween-themed crafts include not only pumpkins, but also the inhabitants of old crypts and cemeteries - spiders and bats. These representatives of the animal world can be made at home from a variety of materials.
For example, a bat can easily be made from paper and cardboard. To make mice, you will need to make a cylinder out of cardboard; you can use rolls on which toilet paper is wound, and if you want to make a larger one, you can take a roll from a paper towel.
The cylinder needs to be folded so that there is a semicircular recess on top, the ends of which will represent the ears of the mouse. The prepared cylinders should be painted with black paint; the muzzle of the mouse can be painted with white or red paint.
Next, you need to cut out shaped wings from black paper. Fold them on one side like an accordion. Make holes in the cylinder and insert the wings into them. The mouse is ready, all that remains is to hang it on a thread or “plant” it on the curtains or in any other places.


Spiders can be made from different materials. It is convenient to make large spiders from wire and yarn. Small ones can be woven from beads.
Ready-made spiders can be hung on threads under the chandelier, and the chandelier itself can be entangled with white threads depicting a web.
Decorations for windows and doors
Halloween paper crafts can decorate your windows. For the New Year, it is customary to attach snowflakes to windows. But since Halloween is a holiday of evil spirits, you can cut out various scary things to decorate windows - silhouettes of black cats, spiders, witches, etc.


You can put a wreath on the door, like a Christmas wreath. Only in its design you need to use autumn leaves, small souvenir pumpkins, black and orange bows, etc.
Ghosts
Ghosts are frequent “guests” at Halloween. These ethereal creatures can easily be made with your own hands from gauze, tulle or organza.

To make a ghost you will need a balloon, preferably filled with helium. You need to throw a white mesh fabric over the ball and tie it under the ball with a thread. On the fabric covering the ball, you can use felt-tip pens or paints to depict the “face” of the ghost. All that remains is to release the ball so that it floats under the ceiling. If a balloon filled with air is used, the ghost will need to be suspended by a string.

Small ghosts can be easily made from simple paper napkins. You need to roll up a ball of cotton wool and place it in the center of the napkin. Wrap the cotton wool in a napkin and tie it with a thread. We draw a face with a felt-tip pen. If you make many such ghosts, you can make a garland out of them.
Crafts are scary
If there are no kids in the house, then you can make scary crafts. For example, eyeballs can be easily made from small, round-shaped balls. Pour sand or any grain into a ball of any color. Cut off the top part so that we get a spherical blank with a hole. Also cut two more balls, one of them should be white.
We put another ball on the prepared workpiece so that the hole is inside. Now we put a white ball on top. All that remains is to use paint to depict the iris of the eye and the pupil in the place where the one that was put on second looks out from under the white ball. On a white ball, use a thin brush and red paint to paint several blood vessels.

Worms made from jelly look very realistic. To make them you will need wide cocktail tubes and several packages of semi-finished jelly of different colors. The semi-finished jelly needs to be diluted according to the instructions, after cooling, you need to carefully pour the jelly into the tubes. For convenience, the straws should be installed vertically in the glass. Place the glass with straws in the refrigerator overnight. In the morning you will need to remove the worms. To do this, you either need to cut the tubes or put each one in hot water for a couple of seconds and squeeze out the contents. You can simply put these worms on the table in a bowl or decorate ice cream with them.