Origami tulip
The tulip is a spring flower that everyone associates with International Women's Day like no other. Real flowers are amazing, but paper flowers are more durable. In addition, on March 8, it is better for a child to give his mother or grandmother something made with his own hands rather than something bought in a store. In this article we present you the classic origami tulip. Many mothers probably remember how they made such tulips from origami paper at school. Here you will find a detailed diagram of an origami tulip with explanatory comments.
Origami tulip. Origami paper tulip
To make an origami tulip, you will need a square-shaped sheet of paper. It is advisable to use double-sided colored paper for this craft.
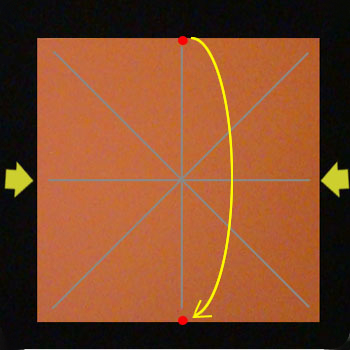
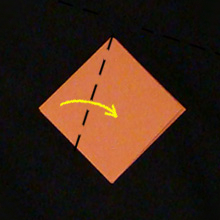
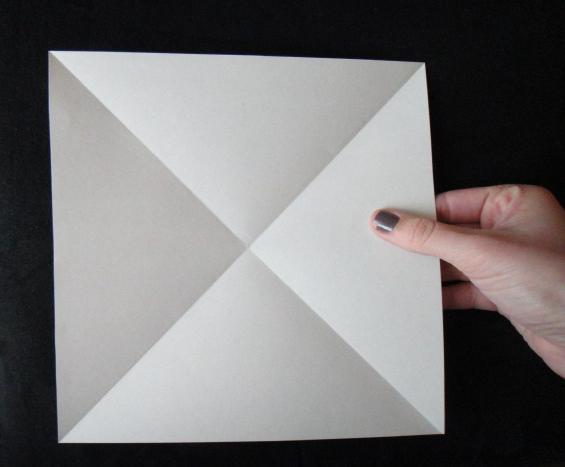
1. Fold a sheet of paper in half horizontally first, then unfold the paper. Now fold the sheet of paper in half again vertically and unfold the sheet. You have outlined the middle lines.

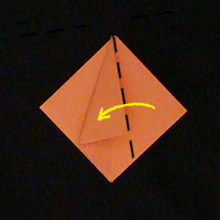
2. Now, in the same way, fold the sheet twice diagonally, also solely to mark the fold lines. To make the origami tulip beautiful, make sure that the corners overlap each other exactly and that the folds are clear and sharp.


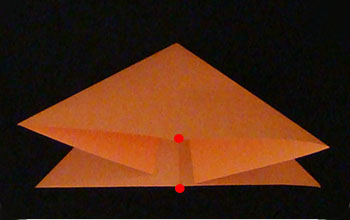
As a result, you should end up with a triangle like this with “pockets” inside.

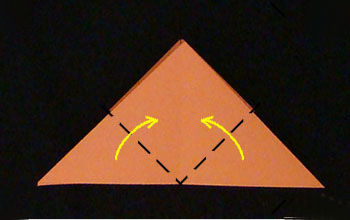
4. We continue to fold the tulip from origami paper. Raise the lower corners of the upper layer of the triangle up to the top of the triangle.
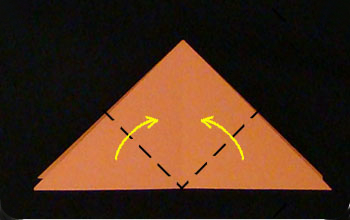
Turn the workpiece over and do the same manipulations on the other side. As a result, you should get a diamond with a “cut” in the middle on one side and the other.

5. We move on to the next stage of making an origami tulip. As if leafing through a book, turn the right side of the diamond over to the left side. Turn the workpiece over and do the same on the other side. As a result, you will again have a rhombus, but with a fold in the middle.


6. Working only with the top layer, you need to bend the left corner of the diamond down first, slightly going beyond the center line. Then the right corner.
7. Now open the right corner and tuck the left one into it.

Turn the origami tulip blank over and do the same on the other side.
Tulips are spring flowers loved by many. But, unfortunately, the flowering time of tulips is quickly ending. And cut flowers soon lose their attractiveness.
But paper tulips will remain in their original form for a long time and will delight you and your loved ones at any time of the year. If you want to make an original gift that will never fade, give a tulip made by yourself. Or make a whole bouquet and decorate your room with it. Today we will look at several techniques for making flowers.
Lesson No. 1: voluminous tulips made from paper triangles 
The first lesson is the most difficult to implement. But this only makes it more interesting! To assemble this flower, you will need a large number of triangular parts (95 for each flower). They are done as follows:
1. Cut a sheet of A4 size into 16 equal squares. 
2. Take one of the squares and fold it in half horizontally. 
3. Fold the square again vertically, then unfold it. 

4. Fold both edges of the rectangle along the center line and carefully smooth both folds. 

5. Turn the shape over and cut off the ends protruding from the bottom. 

6. Fold the bottom edge of the shape up and smooth the fold. 
7. Fold the figure in half towards you. 
8. Repeat all these steps on the remaining squares. 
Having made the required number of parts, you can begin assembling the flower:
1. Form rows 1 and 2, connecting the parts through the slots in the end. 
2. Make a circle with 15 pieces in each row. 
3. Add a third row. 
4. Turn the workpiece over and squeeze it into a bud. 

5. Add rows 4 and 5 with 15 pieces each. 

6. Next, build on the structure on one side so that you get a triangle: 
Row 6 – 4 pieces Row 7 – 3 pieces (on top of Row 6) Row 8 – 2 pieces Row 9 – 1 piece
Repeat the addition on the opposite side of the flower, opposite this triangle. 
All that remains is to make the stem. To do this, take a sheet of thick paper and, rolling it into a hard thin tube, wrap it with green floral ribbon. 
Apply a little glue to the end of the stem and insert it into the tulip. 
Cut and glue 1-2 oblong-shaped leaves to the stem. 
The tulip is ready! 
Master class No. 2: tulips made from tissue paper 
In this lesson you will learn how to make very delicate, airy, thin and graceful tulips. At the same time, they will be quite simple to make; all you need is perseverance and a little skill in working with watercolor paints. They can be an excellent gift not only for the mother from the child, but also for the girl she loves.
Materials:
White, yellow and green tissue paper
Watercolor paints
Several pashotnitsa (stands for boiled eggs)
Drinking straw
Glue
Operating procedure:
1. Cut out identical petals with slightly wavy edges from white tissue paper.
2. Stick two petals on top of each other (one layer of tissue paper is too thin and will be difficult to work with).
3. When the glue has dried, place the petals on a flat surface, such as a tray, and paint with watercolors.
4. Without waiting for the petals to completely dry, carefully lift them from the tray and place them in the tillers to give them a curved shape.
5. Place the tillers near a heat source to dry the paper. 
6. Cut a wide strip of yellow tissue paper, fold it in half lengthwise and make a fine fringe along the double edge.
7. Wrap the strip around the edge of the drinking straw and secure with glue - this is the core of your flower.
8. Remove the dried petals from the tillers and glue them to the tube around the core.
9. Cut a strip of green tissue paper and, securing the edge under the flower, wrap the entire tube. Tape the opposite end of the tape. 
Instruction No. 3: tulips made of thick colored paper 
The easiest way to make flowers. It is perfect for small children.
Materials:
Thick colored paper (about 270 g/sq.m.)
Wooden sticks for stems
Green acrylic paint
Hot melt adhesive
Stationery glue
Green felt-tip pen with soft tip
Flower template that can be downloaded here
Sheet of cardboard
Operating procedure:
1. Print or draw on cardstock and cut out the template for the flowers and leaves.
2. Cut out 4 flowers and 1 leaf for each tulip. 
3. Fold the flower blanks in half along the center line (if the paper is one-sided, the colored side should remain inside). Iron the fold and unfold them to their original position. 
4. Glue two pairs of blanks as shown in the photo. 
5. If the edges of the pieces don't quite match, trim off the excess. 
6. Paint the sticks with green paint and let them dry. 
7. Now glue two pairs of flower blanks, placing the edge of the stem stick between them. While the glue dries, the parts can be pressed together with paper clips. 
8. Cut out leaves from green paper and draw center lines using a green marker.
9. Glue the leaves onto the stems. 

Lesson #4: classic origami tulip with stem 
Not the simplest, but also far from the most difficult option for creating a paper tulip using the origami technique. This lesson can also be brought to life together with your child. For this project you will only need square pieces of paper - green and yellow.
flower head
1. Place the yellow sheet with the colored side up, fold it in half vertically and horizontally, and then return it to its original position.
2. Turn the sheet over and make two diagonal folds, then unfold it again.
3. Fold the square into a triangle so that the two side points meet on the bottom. 
4. Bring the side corners of the top layer of the shape up along the center line. Then turn the shape over and do the same on the other side. 
5. Flip the right side of the diamond to the left, then flip the piece over and do the same on the other side. You will get the same diamond shape, but with a smooth surface. 
6. Bring the edges of the top layer together and nest one inside the other. Smooth the folds along the edges and make sure that sections A and B are equal. 
7. Repeat the same on the other side of the figure.
8. Grasp the resulting cones on both sides, slightly spread them apart and inflate the bud through the hole that has opened at its base.
9. Fold back the edges of the petals at the top of the bud. 
Stem
1. Place the green square on the table, color side down, as shown in the diagram, and make a vertical fold. Then return the square to its original position. 
2. Fold the corners toward the center along the first fold line. 
3. Next, bend the resulting corners again along the same line, and then again. 
4. Turn the figure over and fold it in half lengthwise, raising the bottom corner to the top.
5. Fold the resulting shape in half in width.
6. Bend the top edge of the outside of the shape outward.
7. If you did everything correctly, you will have a stem like this that can be placed on the table: 
Now simply place the tulip head on the vertical rod.
Recalling the super hit of the popular singer “Yellow Tulips,” not everyone will agree that spring primroses are harbingers of separation. Let's leave creative invention to the conscience of songwriters, because in fact, graceful buds symbolize the arrival of warmth, the awakening of blooming nature and the thrill of sensual relationships. But you don’t have to wait for spring to enjoy this beauty, because today we will share with you how to make a paper tulip to decorate your home with bright colors at any time of the year.
For connoisseurs of the basics of origami, a paper tulip will not be particularly difficult with the folding technique, and for those who are beginning to master the oriental art, below are step-by-step instructions that will help you fold the flower the first time, step by step. We will complicate the task a little and invite you to make a tulip from modules - two separately folded parts (bud and stem). In general, any available twig or wire can serve as a flower stem. Thus, apart from colored paper and, possibly, alternative materials for the peduncle, we will not need anything.
Modular origami: Dutch tulip
The Netherlands is rightfully considered the country of tulips. Here they are presented in an unlimited variety of colors and varietal varieties. If you are going to make a tulip out of paper in the image of a classic Dutch flower, make it from colored, or even corrugated, paper of any shade (except green, so that the bud does not merge with the stem). The natural colors of Dutch tulips come in hundreds of variations, so you definitely can’t go wrong with the color.
 Fold the paper bud according to the diagram
- Fold the square sheet inward one at a time, and then along the second diagonal, following diagram 1. Then make another fold line for the sheet - in half. Unfold the workpiece;
- Along the intended folds, fold the sheet into a regular triangle, tucking it inside the plane on both sides (see how to do it in Fig. 1);
- Bend the free corners of the workpiece to the top of the triangle (to a right angle) on both sides. The assembly diagram will help you deal with this without error;
- Soon the paper flower will open in its splendor, but for now, unfold the workpiece into a second plane, closing the folds on both sides. You will get an even square both from below and from the “face”;
- How to finish an origami tulip? Elementary: fold the diagonally opposite corners of the workpiece towards each other, making the base of the flower an acute angle. It is necessary to overlap one corner over the other, and then tuck one bend into the pocket of the other.
You managed to fold a flower and learned the intricacies of how to make a paper tulip with your own hands. But your flower has not yet bloomed. Carefully inflate the bud from the base and bend the petals at random. Now everything is ready, and now you have something to decorate the room, something to give to mothers and grandmothers for the holiday, and something to keep your growing daughter occupied for a long time. By the way, if you liked making paper flowers, then pay attention to ordinary or.
We promised you that this would be a tulip made from modules - more complex than simple paper crafts. Let's plant the prepared buds on a curly peduncle. We can make it from a green leaf of a suitable size:
 Carefully make a stem, connect it to the bud and get a paper tulip from modules!
- Press the square sheet along the diagonals. Bend 2 edges to one of them, bringing them together in the center. One corner of the workpiece will be sharp;
- Now bend the lower sides of the workpiece to the center (arbitrarily, sloppily - the proportions are not particularly important);
- Re-tuck the lower parts of the workpiece inward, turn the package over and fold it in half crosswise;
- Now fold the bundle lengthwise away from you. Turn the top petal of the craft outward and squeeze it, then straighten the flower pedestal and place the bud on the stem with the spectacular petal. A tulip from modules is assembled together - a gift for mom for March 8 is ready. (All that remains is to make a postcard yourself and put it in)

Modular origami: Tien Shan tulip (Fig. 2)
Look at fig. 2, if you want to understand how to make a craft in the likeness of real flowers in the foothills of the Tien Shan. These tulips using the origami technique are no more complicated than the previous ones - they differ only in the way they bend the corner into a pocket (see Fig. 2).

After making these paper tulips on your own, don’t forget to fold the stalks for them. They, as you have already learned, can also be made from green paper. The technique is elementary: if you have mastered the “Dutch” pattern, then fold this flower even faster.
These homemade products look great. Especially from afar, they can easily be confused with real primroses. But don't limit yourself to just one bud! Is it better to put together whole bouquets, where each flower will complement the overall composition? After all, a large armful of tulips is much nicer to give than one bud. And in the interior the bouquet will look completely different. And don’t forget to show the children how to fold a tulip from a square piece of paper for their grandmother for her anniversary or International Women’s Day on March 8th.
The most popular spring flower is the tulip. You can make tulips from crepe paper, from corrugated paper, or make origami - such a craft will be very useful for a women's holiday or birthday. We offer a simple lesson on how to make a tulip out of paper.
Paper tulips: master class
Paper crafts like a tulip can be classified as simple, but quite impressive. To work you will need a sheet of thick paper, scissors and a pencil. Now let's look at step-by-step instructions on how to make paper tulips:
1. For work, prepare a sheet of paper measuring 20x28cm. Choose the color at your discretion, preferably close to the real color of the tulip. There is only one requirement for paper - it must be strong enough.
2. Fold a triangle out of paper. The strip of paper that extends beyond the edges of the triangle should be cut off and set aside. We will use it a little later.
3. Now let's look at how to fold a paper tulip. First you need to unfold the triangle, then fold it again, but in the other direction. The result should be a square with diagonals.

4. To fold a paper tulip bud, fold the folds properly again. Flip the paper over so the center is facing up.

5. Fold the paper in half. We wrap one corner to the fold line. This creates a new triangle. We carry out this procedure with another angle.

6. Tulip and other similar paper crafts require constant contact with the material, the folds must be clearly visible. This is what you should end up with:

7. Connect the sides of the tulip and align them well.
8. Turn the triangle with its base up.

9. The wings of the paper on top must be folded so that they meet at the corners.

10. Turn it over to the other side and do the same.

11. Turn one wing of the paper to the right. On the other hand we duplicate.
12. Carefully insert the end of one wing into the other.

13. On the other side we do the same. We iron everything thoroughly. At this stage, the workpiece is already beginning to resemble the head of a tulip, only slightly flattened.

14. Now let's look at how to make a voluminous paper tulip from this blank. We hold the folded wings with our index finger and press down with our thumb.

15. Now an important point. There is a hole in the center of the paper, you should hit it sharply. Then the structure will be filled with air; you can also use a pencil.
Spring is coming, the time of love and flowers, spring holidays. Yes, and I just want to
please your beloved women with flowers. However, this pleasure is not cheap now. What to do? Ancient origami will help us out. It has more than once helped those who like to be original, and now it will help you make an unusual gift for your loved ones. We invite you to make a bouquet of delicate tulips using the origami technique. After all, as they say, the most unforgettable gift is a gift that is made with your own hands.
Simply and easily
There are many options, from the simplest to the more intricate.
In this article we will tell you one of the easiest ways to make a tulip from paper. A small note: it is better to take thick paper for a tulip so that it can hold its volume well.
Required material
To make a tulip you will need to prepare:
- 1 sheet of paper for a tulip (paper format and color is entirely at your discretion);
- 1 green sheet of paper for the stem;
- PVA glue;
- pencil or pen.
Let's get started
So, the scheme is quite simple.
Take a sheet of paper. If it is rectangular, make a diagonal bend so that the sheet is square. You cut off the excess part, and you won’t need it anymore.

Fold the sheet in a different direction. You will end up with two lines crossing a square piece of paper crosswise.
Fold the sheet in half to form a rectangle.

Fold the triangle, bending both sides of the square inward.
Smooth out the corners of the triangle.

Bend the corners of the triangle towards the apex on both sides.
This results in a four-sided figure.

Both bent triangles must be inserted with their ends facing each other. You have got two unique “little bags”.


And the final stages
At the bottom we make a hole for the stem. Inflate the tulip so that it becomes voluminous.

A few more steps and you will learn how to make a paper tulip. We turn the tulip over and bend four petals from the point side.

Making a stem
Take a green sheet of paper. Screw it tightly onto a pencil or pen. Glue the end of the leaf and twist it. Take out the pencil. We insert the resulting tube into the bud.

We make a leaf for the tulip from the same green paper and glue it to the stem.
Here's a tulip. The scheme, as you can see, is simple. But not everyone succeeds the first time. Try again - and you will succeed.
How to make a paper tulip without getting bored? Of course, together with the children. The child will be happy to surprise his beloved mother with a bouquet of homemade tulips for March 8th. And simply, without any reason.

In conclusion
This craft is perfect for decorating your home and creating a spring mood for your whole family; it will bring a feeling of celebration and freshness to your home. And what’s more, such flowers will last much longer than real ones. And the joy from them is no less.
We wish you success in all your endeavors.