Exquisite knitted pullover in a “marine” style
Knitted pullover, description
Knitted pullover, made in a nautical style, from the Interweave Knits magazine.
Finished product size: S (M-L-XL-XXL), 82 (96, 106, 117, 127) cm chest circumference.
To knit a pullover you will need:
Yarn Spud and Chloe Fine (80% wool, 20% silk; 227 m, 65 g): color No. 7800 popcorn, 4 (4, 5, 6, 6) skeins.
3 mm needles: 80 cm circular needles. The size of the needles is adjustable depending on the desired knitting density.
Stitch markers (M)
Hinge holders (DP)
Tapestry needle
Hook 3mm
10 buttons with a diameter of 0.6 cm
Knitting density: 35 loops and 34 rows = 10 cm 3 knit stitches * 3 purl stitches
Note
Knitting a pullover is done in one piece from top to bottom. Knitting the back begins with the armholes, then a set of loops is made to form the shoulders, followed by knitting the front part to the armholes. Then the back and front parts are connected and the body is knitted in the round. The collar is knitted separately from the body and then sewn on.
Back
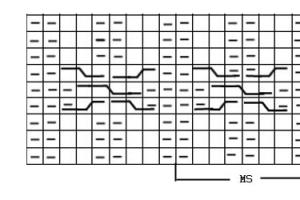
Cast on 135 (153, 171, 183, 201) stitches.  " data-mce-src="images/w502d.jpg" data-mce-style="float: right;" height="400" width="267">
Row 1 (IR): knit 3 p; *3 p.p., 3 p.p. – *repeat to the end.
Row 2 (LR): knit 3 stitches; *3 p.p., 3 p.p. - *repeat until the end of the row.
Row 3, 4: knit in the same pattern as the previous two.
Shoulder Shaping:
Row 1 (IR): Work pattern to last 34 (40, 46, 52, 58) sts, work wrapped stitch, return.
Row 2 (LR): Repeat Row 1.
Row 3: knit the pattern to the wrapped stitch, knit the wrapped stitches together, knit another 4 stitches with the pattern, wrapped the stitch, go back.
Row 4: Repeat Row 3.
Repeat Row 3 and Row 4 5 times.
Row 5 (LR): Work in pattern to end, working remaining wrapped stitch along with wrapped stitches. Work straight in pattern until armhole is 15 (14.5, 16, 15, 16.5) cm from edge of cast-on stitches, finish in IR.
Shoulder Shaping:
Row 6 - increase (LR): 1 l.p., add a stitch from the broach, 2 l.p., place a marker; *P3, k3. p. – knit until the last 6 p., 3 p.p., place a marker, 2 p.p., add a loop from the broach, 1 p.p. – 137 (155, 173, 185, 203) p.
Row 7 (IR): 4 purl stitches, slip the loop unknitted (m), knit in a pattern to the marker, slip the loop unknitted (m), 4 purl stitches.
Row 8 – increase: 1 l.p., add a loop from the broach, knit to the marker, remove the loop not knitted, knit to the last stitch, add a loop from the broach, 1 l.p. – increase by 2 p.
Row 9: p. to the marker, remove the loop not knitted, knit the pattern to the marker, remove the loop not knitted, purl. to the end of the row.
Row 8 and Row 9: repeat 1 (4, 4, 7, 4) times – 141 (165, 183, 201, 219) sts. Remove marker. The armhole size should be approx. 17 (18.5, 19.5, 21, 22) cm.
Cut the thread. Transfer the loops to the holder. Place 2 removed markers on the row of cast-on back stitches, placing each one 39 (45, 51, 57, 63) stitches on each side of the armhole edge.
Front end. Left shelf.
From the front side, cast on and knit 39 (45, 51, 57. 63) stitches along the edge of the cast-on back stitches from the marker to the left edge of the armhole.
Row 1 (IR): P3; *3 l.p., 3 p. p., repeat until the end. Shape the shoulder as follows:
Row 1 (LR): knit 5 stitches in pattern, wrap next stitch, return.
Row 2 (IR): work in pattern to end of row. 
Row 3: Pattern until wrapped, work wrapped stitches together with wrapped stitch, pattern 4 more stitches, next stitch wrapped, return.
Row 3, Row 4 repeat 5 times.
Row 2 (LR): Work in pattern to end of row, work remaining wrapped stitches together with wrapped stitch. Work straight in pattern until armhole measures 4.75 (4.25, 4.75, 4.5, 5)" from row of cast-on stitches along edge of armhole, ending in LR.
Row 3 (IR) - neck formation: knit in pattern until the end, then using the reverse stitch method, cast on 6 stitches - increase 6 stitches.
Row 4 (LR): 3 p.; *P3, p3 repeat until the end.
Row 3, Row 4 repeat 3 (4, 4, 4, 5) times – 63 (75, 81, 87, 99) sts.
Row 5 (IR): P3; *3 l.p., 3 p.p. repeat until the end. Cut the thread. Transfer the loops to the holder.
Front end. Right shelf.
From the front side, cast on and knit 39 (45, 51, 57. 63) stitches along the edge of the cast-on back stitches from the right edge of the armhole to the marker.
Row 1 (IR): P3; *3 l.p., 3 p. p., repeat until the end.
Row 2 (LR): 3 p.; *P3, p3, repeat to end. Shape the shoulder as follows:
Row 1 (IR): knit 5 stitches in pattern, wrap next stitch, return.
Row 2 (LR): work pattern to end of row.
Row 3: Pattern to wrapped stitch, work wrapped stitches together with wrapped stitch, pattern 4 more stitches, next stitch wrapped, return.
Row 4: Work pattern to end of row.
Row 3, Row 4 repeat 5 times.
Row 3 (IR): Work in pattern to end of row, work remaining wrapped stitches together with wrapped stitch. Work straight in pattern until armhole measures 4.75 (4.25, 4.75, 4.5, 5)" from row of cast-on stitches along edge of armhole, ending in LR.
Row 4 (LR) - neck formation: knit in pattern until the end, then using the reverse stitch method, cast on 6 stitches - increase 6 stitches.
Row 5 (IR): P3; *3 l.p., 3 p.p. repeat until the end.
Row 4, Row 5 repeat 3 (4, 4, 4, 5) times – 63 (75, 81, 87, 99) sts.
 Shelf connection:
Row 6 (RS): Knit to the end of the right front, cast on 9 (3, 9, 9, 3) sts, then knit to the end of the left front - 135 (153, 171, 183, 201) sts.
Row 7 (WS): P3; *3 l.p., 3 p.p. repeat until the end. The armhole should measure approximately 15 (14.5, 16, 16, 16.5) cm along the edge of the armhole.
Formation of armholes:
Row 8 (RS): 1 lp, add a loop from the broach, 2 lp, place a marker; * 3 p.p., 3 p.p. – knit until the last 6 stitches, purl 3, place a marker, 2 stitches, add a loop from the broach, 1 stitch. – 137 (155, 173, 185, 203) p.
Row 9 (IR): 4 purl stitches, slip the loop unknitted (m), knit in a pattern to the marker, slip the loop unknitted (m), 4 purl stitches.
Row 10 - increase: 1 l.p., add a loop from the broach, knit to the marker, remove the loop not knitted (m), knit in a pattern to the marker, remove the loop not knitted (m), knit to the last stitch, add a loop from broaches, 1 l.p. – increase by 2 p.
Row 11: purl. to the marker, remove the loop not knitted (m), knit with the pattern to the marker, remove the loop not knitted (m), purl. p. to the end.
Row 10, Row 11 repeat 1 (4, 4, 7, 7) times – 141 (165, 183, 201, 219) sts. Remove marker. The armhole size should be approximately 17 (18.5, 19.5, 21, 22) cm.
Connection between back and front:
Row 12 (LR): Start with 3 p. (3 l.p., 3 l.p., 3 p.p., 3 p.p.), knit elastic bands in the pattern (3 l.p., 3 p.p.) 141 (165, 183, 201, 219) p. front part, finish 3 p. (3 p., 3 p., 3 p., 3 p.), place a marker, then start with 3 p. (3 l.p., 3 l.p., 3 p.p., 3 p.p.), knit elastic bands in the pattern (3 l.p., 3 p.p.) 141 (165, 183, 201, 219) back sts, purl 3 (3 p.p., 3 p.p., 3 p.p., 3 p.p.) – 282 (330, 366, 402, 438). Place a marker and connect in a circle. Knit 7 circles according to the established pattern.
Waist Shaping:
Size S
Row 1 (decreasing stitches): knit in a pattern to the marker, remove a loop not knitted (m), knit 2 stitches together as a purl, knit in a pattern up to 2 stitches before m, knit 2 stitches together as a purl. - decrease by 2 p.
Repeat the last 8 circular rows again - 278 remaining stitches: 141 stitches for the front, 137 stitches for the back.
Row 2 (decreasing stitches): knit in a pattern up to the marker, remove a loop not knitted (m), knit 2 stitches together like a l., knit in a pattern up to 2 stitches before a m, slip one stitch like a k. on the right knitting needle, remove another stitch, like k. on the right knitting needle, thread the left knitting needle into the two removed loops from left to right behind the front walls of these two sts and knit both loops together. behind the back wall (decreasing stitches with a slant to the left) - 276 remaining stitches: 141 stitches for the front, 135 stitches for the back.
Row 3: 3 p.p., *3 p.p., 3 p.p. - repeat in a circle.
Size M (L)
Row 1 (decreasing stitches): knit 2 sts together like k, knit in a pattern up to 2 sts before m, decrease stitches slanting to the left, remove a loop not knitted (m) - repeat again - decrease by 4 sts.
Knit 7 circular rows in the same way.
Repeat the last 8 circular rows again - 322 (358) remaining stitches.
Row 2 (decreasing stitches): knit 2 stitches together as a purl, knit in a pattern up to 2 stitches before m, decrease stitches slanting to the right (slip one like a knitting needle on the right needle, slip one like a knitting needle on the right needle knitting needle, insert the left knitting needle into the two removed ones and remove them, knit both loops together, purlwise behind the back wall), remove the unknitted loop (m) - repeat again - decrease by 4 sts.
Row 3 (decreasing stitches): knit in a pattern up to m, remove a loop not knitted (m), knit 2 stitches together as purl, knit in a pattern up to 2 stitches before m, decrease stitches slanting to the right - decrease 2 stitches for back .
Knit another round row in the same way.
Knit the last 2 circular rows again - 314 (350) remaining sts: 159 (177) sts for the front, 155 (173) sts for the back.
Row 4 (decreasing stitches): knit in a pattern up to m, remove a loop not knitted (m), knit 2 stitches together like k, knit in a pattern up to 2 stitches before m, decrease stitches slanting to the left - 312 (348) remaining p.: 159 (177) p. front, 153 (171) p. back.
Row 5: 3 p.p., *3 p.p., 3 p.p. – repeat the pattern in a circle.
Size XL (XXL)
Row 1 (decreasing stitches): knit 2 stitches together as a purl, knit in a pattern up to 2 stitches before m, decrease stitches slanting to the right, remove a loop not knitted (m) - repeat again - decrease by 4 stitches.
Knit 7 circular rows in the same way.
Repeat the last 8 circular rows again - 394 (430) remaining stitches.
Row 2 (decreasing stitches): knit 2 sts together like k, knit in a pattern up to 2 sts before m, decrease stitches slanting to the left, remove the loop not knitted (m) - repeat again - decrease by 4 sts.
Knit another round row in the same way.
Row 3 (decreasing stitches): knit in a pattern up to m, remove a loop not knitted (m), knit 2 stitches together like k, knit in a pattern up to 2 stitches before m, decrease stitches slanting to the left - decrease 2 stitches in back .
Knit another round row in the same way.
Knit the last 2 circular rows again - 386 (422) remaining sts: 195 (213) sts for the front, 191 (209) sts for the back.
Row 4 (decreasing stitches): knit in a pattern up to m, remove a loop not knitted (m), knit 2 stitches together as purl, knit in a pattern up to 2 stitches before m, decrease stitches slanting to the right - decrease by 2 stitches. backrests
Knit another round row in the same way.
Knit the last 2 circular rows again - 382 (418) remaining sts: 195 (213) sts for the front, 187 (205) sts for the back.
Row 5: 3 p.p., *3 p.p., 3 p.p. – repeat until m, remove the loop not knitted (m), 2 p.p., *3 p.p., 3 p.p. – repeat up to the last 5 sts, 3 l.p., 3 p.p.
All sizes
Knit according to the established pattern until the size of this part is 9 (12.5, 12.5, 15, 15) cm from the armholes.
Size S (M, L)
Row 1 (decrease stitches): *P1, knit 2 stitches together as purl, 3 stitches. – repeat up to 3 sts before m, knit 2 sts together. as purl, 1 purl, remove the loop not knitted (m), knit with the pattern to the end - 252 (285, 318) remaining sts: 117 (132,147) sts. front, 135 (153.171) back.
Row 2: P2, *3 p, p2. – repeat up to m, remove the loop without knitting, 3 r.p., *3 p.p., 3 r.p. – knit to the end.
Size XL (XXL)
Row 1 (decreasing stitches): 3 sts, * purl 1, knit 2 sts together as purl, 3 sts. – repeat until m, remove the loop not knitted (m), knit with the pattern until the end – 350 (383) remaining sts: 163 (178) sts. front, 187 (205) back.
All sizes:
Work in pattern until this piece measures 5 (6.5, 7.5, 7.5, 7.5) cm.
Size S (M, L)
Row 1 (decrease stitches): *knit 2 stitches together, purlwise, 3 stitches. – repeat up to 2 sts before m, knit 2 sts together as a purl, remove the loop not knitted, knit to the end – 228 (258, 288) remaining sts: 93 (105, 117) sts of the front part, 135 (153, 117) back sts.
Row 2: 1 p.p., *3 r.p., 1 p.p. – repeat until m, remove the loop not knitted (m), 3 p.p., *3 p.p., 3 p.p. – repeat until the end of the row.
Size XL (XXL)
Row 1 (decrease stitches): 3 knit stitches, *knit 2 stitches together as purl, 3 knit stitches. – repeat until m, remove the loop not knitted, knit to the end – 318 (348) remaining sts: 131 (141) sts for the front part, 187 (205) sts for the back.
Row 2: 3 p.p., *1 p.p., 3 p.p. – repeat until m, remove the loop not knitted (m), 2 p.p., *3 p.p., 3 p.p. – repeat up to the last 5 sts, 3 l.p., 3 p.p.
All sizes:
Work in this pattern until the piece measures 4 cm.
Belt:
Track. row: p.p. to m, remove the loop not knitted (m), knit with an elastic pattern to the end. Repeat row for part 2.5 cm long.
Size S (M, L)
Track. Row: 1 p.p., *3 p.p., 1 p.p. – repeat until m, remove the loop not knitted (m), 3 p.p., *3 p.p., 3 p.p. – repeat until the end of the row.
Size XL (XXL)
Track. row: 3 p.p., *1 p.p., 3 p.p. – repeat until m, remove the loop not knitted (m), 2 p.p., *3 p.p., 3 p.p. – repeat up to the last 5 sts, 3 l.p., 3 p.p.
Work in this pattern until the piece measures 3 cm.
Size S (M, L)
Row 1 – increase: 1 p.p., *add a loop from the broach, 3 p.p., 1 p.p. – repeat until m, add a loop from the broach, remove the loop not knitted (m) - knit to the end – 252 (285, 318) sts: 117 (132, 147) sts for the front part, 135 (153, 171) sts. backrests
Row 2: P2, *3 p, p2. – repeat until m, remove the loop not knitted (m), 3 p.p., *3 p.p., 3 p.p. – repeat until the end of the row.
Size XL (XXL)
Row 1 – increase: 3 knit stitches, *1 purl stitch, add a loop from the broach, 3 knit stitches, – repeat until m, remove the loop not knitted (m) – knit to the end – 350 (383) p.: 163 (178) p. front, 187 (205) p. back.
Row 2: 3 p.p., *2 p.p., 3 p.p. – repeat until m, remove the loop not knitted (m), 2 p.p., *3 p.p., 3 p.p. – repeat up to the last 5 sts, 3 l.p., 2 p.p.
Work in pattern until this piece measures 4 (4, 5, 6.5, 6.5) cm.
Size S (M, L)
Row 1 – increase: 2 p.p., *add a loop from the broach, 3 p.p., 2 p.p. – repeat until m, add a loop from the broach, remove the loop not knitted (m) - knit to the end – 276 (312, 348) sts: 141 (159, 177) sts for the front part, 135 (153, 171) sts. backrests
Row 2: 3 p.p., *3 p.p., 3 p.p. – repeat until m, remove the loop not knitted (m), 3 p.p., *3 p.p., 3 p.p. – repeat until the end of the row.
Size XL (XXL)
Row 1 – increase: 3 knit stitches, *2 purl stitches, add a loop from the broach, 3 knit stitches, – repeat until m, remove the loop not knitted (m) – knit to the end – 382 (418) p.: 195 (213) p. front, 187 (205) p. back.
Row 2: 3 p.p., *3 p.p., 3 p.p. – repeat until m, remove the loop not knitted (m), 2 p.p., *3 p.p., 3 p.p. – repeat up to the last 5 sts, 3 l.p., 2 p.p.
Work in pattern until this piece measures 6.5 (6.5, 7.5, 7.5, 9) cm.
Collar (performed in two parts):
Dial 28 p.
Row 1: slip stitch unknitted, purlwise, knit to end.
Repeat Row 1 12 times.
Row 2 (decreasing loops) (LR): remove the loop not knitted, decrease the loops with a slant to the left - knit until the last 3 sts, knit 2 sts together like a l., 1 l.p. - decrease by 2 p.
Knit 13 stitches, then repeat Row 2 – 24 remaining stitches.
Knit 47 r., then repeat Row 2 - 22 remaining sts.
Knit a pattern of 13 r.
Row 3 (decreasing loops) (LR): remove the loop not knitted, knit up to the last 3 stitches, knit 2 stitches together, like a knit, 1 knit. – decrease 1 p.
Repeat Row 3 on every 6 rows. 5 times, then every 4 p. 5 times, then on each row 8 times. – 3 remaining sts.
Row 4 (IR).
Close all loops. Do not cut the thread. From persons sides, starting from the last closed loop, crochet around the collar: 1 r. Art. without a crochet.
Knit the second part of the collar in the same way as the previous one, with the exception of crocheting the collar, which must be done on the wrong side. sides.
Pin the collar pieces to the front along a line from the inside edge of the shoulder seam to the middle of the waistband. Sew the collar parts along the shoulder seams.
Sew 5 buttons on each collar. Along the shoulder seam.
Pullover knitting pattern

Dimensions: 32/34.36/38 and 40/42.
Materials: Rowan Handknit Cotton yarn (100% cotton. 85 m/50 g): 350 (50-400) g in Ecru color No. 251. 100 (150-150) g in Burnt color No. 343, 100 g Turkish Plum No. 277 and Sea Foam color No. 352; straight addi knitting needles No. 4 and 4.5, circular addi knitting needles No. 4 40 cm long.
Decorative reductions: Right edge: chrome, knit 2 stitches together. Left edge: knit 2 stitches together. with a slant to the left (* remove 1 stitch as knit, knit the next stitch and pull the removed stitch through it), chrome.
Alternating colors: knit alternately 2 p. Ecru, 2 p. Sea Foam. Knitting density: 21 p. and 28 r. persons Satin stitch with knitting needles No. 4.5 = 10 x 10 cm.
Back: Cast on 93 (101-109) sts using size 4 needles in Burnt color and knit for the placket approx. 1 cm = 4 r. Then switch to needles No. 4.5 and knit faces. satin stitch For side bevels, do every 10 cm = 28 rubles. from the plank on both sides 1x 1 decor, decrease, then repeat them in the 15th and 21st rows. = 87 (95-103) p. At the same time at a height of 12 cm = 34 r. from the bar go to the color Turkish Plum, and after 8.5 cm = 24 p. Turkish Plum change color to Ecru and continue with faces. satin stitch in alternating colors. After 1.5 cm - 4 rubles. alternating colors, perform 1x decor on both sides, decrease = 85 (93-101) p. After 7 cm = 20 r. from the last decrease, add 1 p. for the side bevels lx, then in the next. 19th r. another 1 x 1 p. = 89 (97-105) p. After 22 (21-19.5) cm = 62 (58-54) p. alternating colors, close 1x 3 stitches for armholes on both sides, then perform raglan bevels in the next direction. 4th r. on both sides lx 1 decor, decrease, then repeat them 4x in every 4th row. and then 19 (21-23) x in every 2nd r. At the height of raglan bevels 21.5 (22.5-24) cm = 60 (64-68) r. set aside 35 (39-43) stitches for the back neckline.
Before: First knit the inner pieces for the 2 pockets.
For each piece, cast on 23 stitches using knitting needles No. 4.5 and, starting with knits. r., knit 27 r. persons stitch and set aside. Before starting, like a back. After 9 cm = 26 r. From the placket, tie off the pocket holes. To do this, follow. persons R. knit: knit 6 (7-8), bind off 23 stitches for pocket opening, knit 33 (39-45), bind off 23 stitches, knit 6 (7-8), chrome. Next purl R. knit all the stitches from the inside out, in the places where the stitches close, attach 23 set aside stitches of the inner parts of the pockets and knit them from the inside out. = 93 (101-109) p. Decrease and increase side bevels and alternate colors as on the back = 89 (97-105) p. After 22 (21-19) cm = 62 (58-54) p. alternating colors, close 1x 3 stitches for armholes on both sides, then perform raglan bevels in the next direction. 4th r. on both sides 1x 1 decor, decrease, then repeat them 4 more times in every 4th row. and 15 (17-19) x in every 2nd r. At the same time, at the height of the raglan bevels 14 (15-16.5) cm = 38 (42-46) r. set aside the middle 17 (21-25) stitches for the neckline and finish the left side first. Close from the inner edge for further rounding in every 2nd r. another 6 x 2 sts. Finish the other side symmetrically.
Left sleeve: 39 (39-43) stitches using needles No. 4 in Ecru color for the placket, approx. 1 cm = 4 r.. Then switch to knitting needles No. 4.5 and knit. satin stitch For bevels, add 5 p. 1 p. from the bar on both sides, then in every 6th p. another 9 (ll-ll) x 1 p. and in every 8th p. another 5 x 1 p. = 69 (73-77) p. After 45.5 (44.5-43) cm = 128 (124-120) p. close from the bar for raglan bevels on both sides, 1 x 3 sts. ■ 63 (67-71) sts. Then from the right edge, perform in every 4th r. on both sides 5x 1 decor, decrease, then in every 2nd r. 19 (21-23) x 1 decor each, decrease. At the same time, from the left edge, perform in every 4th row. 5x 1 p. and then in every 2nd p. 15 (17-19) x 1 decor, decrease, then close in every 2nd row. 1x 4 p. and 3x 5 p.
Right sleeve: symmetrically.
Assembly. Sew raglan seams. For the collar, cast on a circle using knitting needles No. 4 in Turkish Plum color from the closed edge of the left sleeve 7 sts, from the rounding of the front neckline 13 sts, knit 17 (21-25) sts of the set aside neckline stitches, from the other rounding cast on 13 sts. , from the closed edge of the right sleeve - 7 stitches, knit. 35 (39-43) sts at back neckline = 92 (100-108) sts and bind them into a circle. Knit 10 rounds. R. garter stitch, then bind off all stitches. Sew on the inner parts of the pockets. Sew side seams.
We are going on vacation to the warm sea for one or two weeks. And the rest of the time - work, home, a heap of everyday responsibilities and problems. Even rare outings into nature with family or friends do not return the state of serene peace that brings the rustling of waves, the breath of salty wind, the eternal union of bright sun and endless blue. Do you want a light breeze of vacation euphoria to appear at the first call? It's time to find out what nautical-style clothing is, where you can go dressed like this, who it will suit, how to put together several sets, items from which will be combined with the rest of your wardrobe.
This wonderful trend has been relevant for several seasons and is not going to lose its fashion position. Read, study photos and try on the image of a charming sailor.

In this article:
How did the nautical style come about?
A sailor's uniform, a children's suit, a spectacular women's outfit - what does this, at first glance, unrelated chain have in common? It was in this sequence that the maritime style of clothing was born.
The legislator was Queen Victoria of England. She was the first, out of a sense of patriotism and in tribute to the services of the British Navy, to dress her little son in a sailor's suit. The example was followed by the nobility, and then by ordinary people.

Fashion queen Coco Chanel continued the legacy. At the beginning of the 20th century, she shocked the French Riviera by appearing on its luxurious beaches in a striped blouse and loose trousers. Soon these items began to be sold in her boutique. This is how a new style appeared in women's clothing - nautical.

Fashion designers enthusiastically picked up the idea, developed new styles, and expanded the color range. Modern, simple and at the same time sophisticated, nautical style is not just leisure wear. A bright, slightly flirty look looks harmonious on city streets and even as an option for office wear.
Recognition and character of the maritime style
The main difference between a spectacular, playful style is color. Basic tones – white, blue, red; additional – gold, brown, black. This is a classic combination, but for romantic girls some color liberties are allowed:
- blue;
- turquoise;
- pink;
- ecru.
After all, the sea can be different, and sails are more often made of unbleached canvas than of scarlet silk.


The second important point is. He can be:
- transverse;
- longitudinal;
- diagonal;
- narrow;
- wide.

No floral or abstract prints, rhinestones, sequins, sparkles.
Marine style clothing is, first of all, comfort, a feeling of lightness and freedom. It is not too tight, but baggyness is not welcome either. The styles are very different, which allows all girls and women, regardless of build, to wear sailor outfits.

Fabrics to choose from: knitwear, cotton, linen, viscose, denim, noble silk, flowy chiffon. Not required, but desirable, is finishing with gold cord and buttons, stripes in the form of yacht club emblems, images of marine themes - anchors, steering wheels, shells.
How to put together a set of clothes in a nautical style
Like any style, marine consists of basic things and additional ones. If you haven't worn this type of clothing before, start with a tank top, T-shirt, tunic, tank top or loose pullover in blue and white stripes.

Such a thing is the calling card of a nautical wardrobe. In addition, it easily matches with blue and dark jeans, which few modern women can do without. And then start choosing a base. This:
- classics of the genre - sailor bell-bottoms;
- loose or tapered trousers;
- for complex women – Bermudas;
- for slender girls - shorts;
- flared, straight, pleated skirts of any length;
- fitted jackets, jackets, oversized sweaters.


For cool weather, purchase a jacket, a short or long coat with a double-breasted fastener, reminiscent of a naval officer's jacket.
As you can see, things are very ordinary. They will gradually fit into a sporty, relaxed classic style. It wouldn’t hurt to add a few strict lines to a romantic look either.
Now let’s put together a set of clothes in a nautical style. It's pretty simple, just don't overdo it. Remember the basic rules:
- striped item - one per set;
- the rest are monochrome;
- no more than three colors are combined;
- Multi-layering is encouraged.

The principle is clear and it’s time to remember the highlight of the modern sailor – the dress. Firstly, it is feminine, elegant, beautiful, and secondly, the most indispensable thing for summer.
Marine style dresses
A striped dress is a basic item in a nautical wardrobe. Moreover, it is so versatile that you can wear it anywhere and all year round. It all depends on the style.

Knitted ones are good for hot summers. For the beach, a knitted version with a large mesh, like a fisherman's mesh, is relevant. Urban casual – these are straight dresses of a simple cut, which can be complemented with a blue or light blue denim jacket. Cocktail models with a full or asymmetrical skirt are suitable for friendly parties and more formal occasions.


Dresses in a nautical style can be combined - a plain top and a striped bottom, or vice versa. Denim inserts, different directions and textures of patterns in one product, and sailor collars look original. In addition to blue and white, red, black, gray, blue stripes and their combinations are popular.

To create a fashionable and harmonious look in a vest dress, you need to remember a simple rule. Narrow transverse and longitudinal stripes make you look slimmer, while wide ones can visually add a few centimeters.
The important role of shoes and accessories
Shoes complete the look. For a marine style, fabric options are best suited:
- flip-flops;
- sandals;
- espadrilles;
- ballet shoes;
- sneakers.


But this is optional. Shoes can be leather, suede, patent leather, the main thing is a marine color palette. Low-speed models are ideal for relaxation and every day. Pay attention to boat shoes and yachting shoes. Can't imagine life without heels? For you, sandals and shoes with wedges and high heels. You can wear classic pumps to the office or to a celebration.

Clothes in this color combination without accessories look quite strict, and sometimes somewhat rustic. You will definitely need:
- a bright fabric bag or an elegant clutch;
- a wide-brimmed hat or a small boater;
- original headdress - white cap;
- colorful scarves that can be tied around the neck and head;
- wide and narrow belts or rope belt;
- bracelets, beads, earrings, rings with marine-themed elements;
- sunglasses in spectacular or calm frames.


The main materials of accessories are plastic, leather, natural shells, pearls. Wearing silver and gold is also not forbidden. Just don’t put on “all the best at once”, be guided by a sense of proportion.
Natural makeup and casual hairstyle
Makeup in marine tones is a tanned or perfectly white skin tone, blue, dark blue, gray shadows. A spectacular accent on the lips - bright red lipstick - looks great. If it doesn't suit you, use a colorless glitter and make your eyes more expressive. Don't strive for flashy makeup with clear lines, let it be slightly blurry.


Hairstyles are the simplest, slight negligence is welcome. Hair worn down or braided should look as if it has just been tousled by a Mediterranean breeze. No complex designs and perfect smoothness. You can do a light styling with a wet effect.


Harmony with appearance and decor
The good thing about this image is that it transforms and makes any appearance irresistible. Fluffy skirts create a flirty look, knitted sundresses emphasize slimness, loose tunics, straight and flared dresses, diagonal stripes, plain side panels mask figure flaws. Just remember about the proportions, do not combine things that are too loose with tight ones.

Where is a sailor outfit appropriate? Yes, anywhere, except exclusively for formal events and work with a strict dress code. For relaxation - the most comfortable models, for everyday wear - simple, cocktail - cheerful, carefree, with a bit of grace. You can choose an outfit for the office - a suit or a formal dress in the appropriate color scheme.

Fashionable looks for inspiration
And now the most interesting part - a ready-made kit designer. See photos of looks from fashion designers, get inspired, adapt them to your appearance and be stylish.