Thinking to sew a new thing for your son, but don't know what exactly? Make elastic trousers for the boy. These pants are perfect for everyday wear, and you can also sew a festive version. You can find patterns in six different styles in this article.
Plain pants
Nothing is easier than a boy with an elastic band. The pattern consists of only two parts. Accordingly, the product will need to be supplemented with wide elastic bands that will support the pants at the waist and be fixed at the ankles. In such trousers, a boy can walk and walk around the house. They do not restrict movement, and the child will feel comfortable in them. But for a festive event, such pants will not work. They are too simple.
The pattern of children's trousers for preschool children is given above. To sew such pants, you need to scale the picture and print it in the desired size. To do this, you need to measure the length of the child's leg, as well as his waist circumference. Based on these dimensions, we scale the pattern. Now you need to cut it into the fabric. There is nothing difficult here. We outline the pattern on the material and cut out the details. We make side seams. A wide elastic band must be sewn into the upper part of the product, as well as into the legs. Patch pockets can be made for trousers.
Long pants
It is good to sew such trousers from and use a synthetic winterizer as a lining. These pants will protect your child from cold wind and slanting rain. And it will not be difficult to sew them. for a boy with an elastic band is presented in the article. It needs to be scaled, printed, and then translated into tracing paper through the window. As a result, there should be two shelves - back and front.

We transfer patterns to fabric. You should have 4 parts. Do not forget that the right and left legs should be cut in mirror image. If you plan to sew trousers on a lining, then you will need to cut out 4 more parts from a padding polyester and from a lining material. Now you need to sew all the details in pairs. First of all, we lay side seams on all legs. If the product is sewn with a lining, then the inner part is first assembled, and only then the outer part is wrapped. The last step is sewing in the elastic. It should be inserted into both the belt and the legs.
Jeans
These pants will be similar to those that appear in the first paragraph of this article, but the difference will be in the middle seam, or rather in its availability. In this model, it is assumed. And why bother making an extra seam if you can do without it? The fact is that clothes, which are made up of a large number of parts and have constructive darts, always fit better. Therefore, you should not take the time to create a product.

The pattern of trousers with an elastic band for the boy is attached above. We will sew such trousers from denim, as guys often fall, and the thin fabric will quickly deteriorate. We cut out 4 parts from the fabric and begin to sew them in pairs. First, we make the trousers, and then we attach them to each other. Sew in an elastic band last. In this model, it will be a decorative element, so it is worth picking it up to match the fabric.
Short trousers
Making such pants will be a rather difficult task. After all, this style is a complete copy of an adult model. The pattern of children's trousers with an elastic band for a boy is not difficult. First, you need to adjust it to the height of the child. When this action is performed, you need to transfer the pattern to paper. Cut it along the dotted lines, that is, separate the front and back pockets. These will require separate patterns.

Now you need to start making fabric parts. When they are ready, you can start sewing trousers. The first step is to assemble the large parts. Then the front and back pockets are sewn to the leg. And only after that the legs are grinded together. Last but not least, the elastic is sewn into the belt. Be sure to process the edges of the legs. You do not need to sew the elastic there, you should tuck them in and stitch them.
Shorts
The ready-made elastic band for the boy is presented below. You can sew both full-length pants and shorts on it. Everything will depend on the size and length that you give to the product. Scale the pattern and then cut it out. Now you need to transfer all the details to the fabric. You need to choose a dense material, even for the summer. Why? Most boys are quite active, so they cannot sit still and run all the time. Pants quickly deteriorate from constant friction.

After all the details have been cut out, you can proceed to sewing. The decorative overlays should be sewn on first. Then you need to sew the trousers. And only after that you can grind the product. You can see the belt on the pattern. You must first sew the fabric to the elastic, and then attach it to the top of the trousers. Optionally, the pants can be decorated with the application of your favorite cartoon character of your son.
Pants for the little ones
A pattern of trousers with an elastic band for a boy who recently turned six months old will look like the one shown in the image below. Sewing such pants on your own is easy, you just need to know exactly the height of your baby. Based on this parameter, the image attached below should be scaled. We transfer the pattern to paper, and then we cut out the details from felt or any other soft fabric.

We proceed to sewing the product. The first step is to sew the legs together. Then you need to attach an overlay to them. We sew it to the bottom of the leg, and in order for it to be easily fastened, buttons or Velcro should be installed on the trousers. Now it remains to assemble the product and attach the elastic. For such trousers, you can sew a jacket in the kit, the pattern for which is shown in the same image.
Sewing children's outerwear is easy enough! The raincoat fabric does not stretch, unlike the "capricious" knitwear, and it costs much less. But if you really need to take courage to sew a jacket, then demi-season pants are a simpler product. It is with him that you can start your trials in sewing outerwear! So, stock up on a little raincoat fabric and fleece - and go!
Materials and tools:
- Membrane raincoat fabric (with a film coating on the wrong side) - 0.7 m,
- Lining fleece (from the front side - fleece, from the inside - knitwear) - 0.7 m,
- Jacket garter (for a belt) - 45 cm,
- Wide elastic for a belt - 40 cm,
- Narrow (underwear) elastic band for cuffs - 40 cm,
- Reflective tape - 1 m,
- Threads to match the fabrics,
- Tailor's pins,
- Fabric scissors,
- Sewing machine.
The number of materials may vary depending on the size of the future garment.

The pattern of children's demi-season pants is taken from a children's fashion magazine (you can download the pattern, model 18). In our case, the template has been slightly changed: instead of the round details in the front of the pants, we supplemented the pants with reflective stripes at the bottom of the legs. But the basic pattern (the outlines of the legs themselves) was used without changes.
Manufacturing:
1. Cut out all the necessary parts of the pants from the fabric. From raincoat fabric - two front parts of the legs, two back and two "belts" for the cuffs of the legs. Fleece lining - two front legs and two back. Well, the jacket garter is a belt for trousers, ready to use.

2. Sewing reflective tape will need to be at the same level on all four parts of the legs, so that this decor element looks neat. Therefore, it is best to fold the legs together, trim them along the bottom line, and in one fell swoop, cut off the lower part in the place where you want to sew the braid.

3. How to sew in reflective tape?
In fact, it's simple. The braid itself is a double-folded (and stitched) ribbon, on one side of which a lace is inserted for rigidity and decorativeness. In the finished product, only the edge of the braid with this lace inside should "look out" on the front part, so it must be turned towards the front part of the product. Lay the top and bottom of the leg folded in front of you, and place reflective tape between them, as in the photo.

4. Sew this "sandwich" on the wrong side, stepping back from the edge of the fabric exactly one foot of the machine. The braid is designed for just such a distance: after turning the fabric onto the front side, you will see that it is the bulk of the braid that "looks out". Sew reflective tape into all four leg pieces, front and back.

5. Fold the sides of the legs: match the front and back pieces in pairs and sew from bottom to top, forming the side seams of the trousers. Sew the reflective tape joints very carefully to make them look beautiful.

6. If the side seams on both halves of the pants are already finished, fold the halves with the wrong side out and sew the folds of the front and back seams.

7. To finish the base part of the trousers, only the crotch seam remains to be sewn. Sew it on the wrong side, starting from the bottom of one leg, through the groin, to the bottom of the other leg.

8. Now you need to sew the cuffs of the legs, inside of which there will then be an elastic band. Take the rectangles of the cuffs, fold them seamy out, and sew the hem to make a donut.

9. Do the same for the second cuff, then turn the cuffs to the right side, fold in half and press.

10. Tie the cuffs to the bottom line of the legs and turn the garment inside out.

11. Make one small hole in the cuffs and insert a narrow elastic band (the length of the elastic depends, for example, on whether you need to put trousers over your shoes). Sew the edges of the elastic, sew the holes.

12. These are the tightened bottoms of the legs:

13. In the same way as for the cuffs, sew the edges of the jacket garter and turn this blank to the right side.

14. Secure this element to the top line of the pants with pins.

15. Tie the belt to the main piece using a typewriter.

16. The "frame" of demi-season pants is ready, so you can start lining! In fact, these are the same pants, cut according to the same pattern as the main parts of the pants, but made of lining fabric. Machine the front and back seams of the lining.

17. Then, machine the side seams of the lining.

18. And sew the crotch seam.

19. Now you need to sew the lining into the pants. To do this, both parts of the trousers - the main part and the lining part - must be turned inside out. Attach the edges of the lining to the allowances of the seam with which you sewed the cuffs to the bottom of the raincoat pants. Secure with pins and sew on a typewriter.

20. If you turn the garment inside out at this point, you will see that the fleece lining is sewn securely and starts just above the elasticated cuff.

21. But to attach the lining at the waist, turn the pants inside out again. Similar to # 19, attach the top of the lining to the waist allowance and type-stitch. It is now possible to unscrew the pants through the hole in the lining (it can be done on purpose, by ripping a few centimeters of the side seam, or leaving the part of the side seam unstitched beforehand). Make a hole in the waistband with a jacket tie and thread a wide elastic into it. Sew the edges of the elastic, sew the hole.

Demi-season fleece pants are ready! The same model can be complicated - make pockets or decorate with a reflective sticker with the image of your baby's favorite hero.


Pattern for ages 3-6 months. Pattern for age 6-12 months.
The details of the legs are cut out with a fold along the outer seam. You need to cut out 2 pieces of each leg - one from the main fabric, one from the lining fabric. You also need to cut out two pieces of the belt with a fold.
If you decide to sew pants from an old pair of jeans or shorts, try to keep as much detail as possible when cutting (bottom, side seams, etc.).
1. Cut all the pieces out of the fabric
2. Pocket: Cut a rectangle out of the base fabric (the size depends on the size of the pocket). Zig-zag all sections. Fold all cuts to the wrong side. If you want to add a button, do it now. Pin the pocket to the leg and sew. 
3. Fold the base fabric and lining fabric right sides together. Sew along the bottom of the leg (see the first photo below, you only need to sew where the pins are pinned).
4. Turn the pant legs to the right side, iron.
5. Topstitch the bottom seam.
6. Sew the legs together. 
7. Sew the button tape to the pants along the inside seams. 
8. Sew the belt pieces into a ring.
This is a very simple and easy-to-use technique. Such it will seem to those who have previously encountered other techniques. And for beginners, to simplify the building process, we offer step-by-step instructions. Step by step, following the instructions, you will easily cope with the task and eventually come to the conclusion that everything is really very simple.
This technique can be used to construct a pattern of trousers for both boys and girls (up to size 42). For older girls, a technique for constructing a pattern of trousers for women is used.
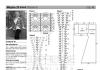
We first take measurements from the child. All measurements are important, this process must be taken seriously. The more accurately the measurements are taken, the more successful the pattern will be. The main parameters, which you cannot do without, are the half-girths of the waist, hips and the length of the trousers. If measurements of the height of the seat and (or) the length to the knee cannot be taken, then these values can be calculated using the formula. Also, you must decide on the width of the trousers along the bottom line. As a guide, you can take old pants (from which the child grew up), measure the bottom of the leg and add a few centimeters. You can do the same when determining the length of the trousers.
To build a drawing of a pattern for children's trousers, you will need the following measurements:
1. Pants length (DB) 88
Measured from the side, vertically from the waistline to the desired length of the trousers. The measure is recorded in full.
2. Length of trousers to the knee (DBK) 50
Measured at the same time as measuring the length of the trousers. From the waistline to the middle of the kneecap. The measure is recorded in full. Also, this value can be determined by calculation (according to the formula)
3. Semi-girth of a waist (St) 30
Measured at the narrowest point of the waist. The measure is recorded at half size.
4. Semi-girth of the hips (Sat) 38
Measured horizontally along the most prominent points of the buttocks, taking into account the bulge of the abdomen. The measure is recorded at half size.
5. Seat height (Sun) 23
Measured from a person sitting on a chair. Sideways from the waistline to the plane of the chair. The measure is recorded in full. Also, this value can be determined by calculation (according to the formula)
6. Width of the bottom of the trousers (Шбн) 18
The width of the pants in the finished form. It is determined independently depending on the style.
FRONT HALF TROUSERS
In the upper left corner of the prepared sheet of paper, draw a right angle with apex at point T.
Length trousers.
From point T downwards we put off the measurement of the length of the trousers (dB), put the point H and draw a horizontal line of arbitrary length to the right.
In our example, the length of the trousers is DB = 88 cm, and you postpone your measurement.
TH = DB = 88 cm.
Step line.
The step line is determined by measuring the height of the seat (Sun). From point T downwards we put off the measurement of the height of the seat and put the point Y.
If there are no measurements of the height of the seat, we use the calculated method for determining the position of the step line: 1/2 measurement of the half-girth of the hips (Sat) plus a value that ranges from 2 to 4 cm and depends on the style of trousers, on the physique and age of the child.
In our example, it will look like this:
TY = 1/2 Sat + (from 2 to 4 cm) = Sat: 2 + 4 cm = 38: 2 + 4 cm = 23 cm.
Choose a convenient way for you to determine the step line, set this value down from point T, put the letter I and draw a horizontal line of arbitrary length from it to the right. 
Hips line.
In this technique, the hip line is not used to draw the pattern, but I would advise you to draw it in order to compare the width of the pattern in this area with the measured half-girth of the hips at the end of the work and, if necessary, correct the pattern.
Divide the TY segment into 3 equal parts, denote the lower division point with the letter B. From point B to the right, draw a horizontal line (line of the hips).
YB = TY: 3 = 23: 3 = 7.7 cm 
Knee line.
The position of the knee line can also be determined in several ways. You can divide the BN distance in half - this will be the approximate position of the knee line. Depending on the style, it can move up or down a few centimeters.
We are currently using the simplest and most accurate:
From point T downwards we lay down the measurement of the length of the trousers to the knee (DBK), put the point K and draw a horizontal line to the right.
In our example, TC = DBq = 50 cm. 
The width of the front half along the waist line.
From point T to the right, set aside 2 cm (for all sizes) and set point T1.
We calculate the width of the front half of the trousers along the waist line: 1/2 of the waist semicircle (St) plus 3cm.
St: 2 + 3 cm = 30: 2 + 3 = 18 cm
From the point T1 to the right, set aside 18 cm and set the point T2, from which we lower the perpendicular down to the intersection with the step line and set the point Y1. 
Bow line. (line of the middle cut of the front half of the trousers)
From the point Y1 upwards, we postpone the value equal to 1/10 of the half-girth of the hips (Sat) and set the point Y2.
Once again, from the same point (L1), we put off to the right the same value (1/10 of the half-girth of the hips) and set the point L3.
In our example, it looks like this:
R1R2 = R1R3 = Sb: 10 = 38: 10 = 3.8 cm.
We draw up the middle line of the front half. See fig. 6. 
Ironing line.
We divide the distance ЯЯ3 in half, put the point Я4. Through this point, draw a vertical line (perpendicular) up and down until it intersects with the waist line and the bottom line. Points of intersection with horizontal lines are denoted by letters T3, Y4, K1, H1, respectively. See fig. 7.
The T3H1 line is called the ironing line. 
Pants bottom width.
The width of the bottom of the trousers depends on the style of the trousers, that is, you determine this value yourself. In our example, the width of the bottom of the pants in the finished form is 18 cm (for small sizes, you can take 14-16 cm). The total width of the trousers between the front and back halves is distributed as follows:
18 - 2 = 16 cm - the width of the front half of the trousers;
18 + 2 = 20 cm - the width of the back half (we need this value when constructing the back half of the trousers).
From the point H1 to the left and to the right, set aside 8 cm (half the width of the front half: 16: 2 = 8 cm) and set points H2 and H3.
H1H2 = H1H3 = 8cm. 
Bottom line of the front half of the trousers.
To finalize the bottom line of the front half of the trousers, we put 0.5-1 cm up from the point H1 and set the point H4. We connect points H2, H4 and H3, we get the bottom line of the front half.
In very tight trousers and in small trousers, the bottom line can be left even. 
Side cut line.
To design the side cut line, we need one more additional point: from the point T down we put 17 cm (for small sizes 15 cm), put the point B.
The upper section of the side cut from point T1, through point B, to point I is drawn with a smooth line, as shown in the drawing.
The configuration of the lower section of the side cut, as well as the step cut, depends on the style and width of the trousers along the knee line. 
The width of the trousers along the knee line. Side and step lines.
The width of the trousers along the knee line can be different and depends on the style (fashion, purpose), but should not be less than the measurement of the knee circumference, plus an increase of 2 cm for a free fit.
Let's look at two examples:
1st example: When constructing a pattern of trousers for small children and (or) older children, but a free cut, drawing out the lines of the side and step cuts, you can connect the points I H2 and I3 H3 with straight lines. 
2nd example:
Let's say the width of the trousers in the knee area should be 20cm.
20 - 2 = 18 cm - the width of the front half of the trousers;
20 + 2 = 22 cm - the width of the back half (we need this value when constructing the back half of the trousers).
From the point K1 to the left and to the right, we postpone 9cm (18: 2 = 9cm), the points will be denoted by the letters K2 and K3.
We connect points I, K2, with a smooth line, then from K2 to H2 with a straight line.
For a step cut line, the same is true: section Y3K3 is a smooth, slightly concave line in the middle, then a straight line to point H3.
Peep at the drawing. 
Darts of the front half of the trousers.
On the front half of the trousers, two darts are marked along the waist line. From point T3 to the right we set aside 1.5 cm, from the middle of this segment we draw down a vertical line 5-7 cm long (depending on the size of the trousers) and draw up the first dart, connecting the points with straight lines.
The second dart: divide the segment T1T3 in half, from this point to the right we set aside 1.5 cm, from the middle of this segment we draw a vertical line 5-7 cm long downward and draw up the second dart.
Instead of darts, folds (tucks) can be laid. 
Clasp, pocket.
The basic construction of the front half of the trousers is complete.
Additionally, if necessary (if provided for by the model), a pocket, a codpiece (a fastener in the middle of the front), etc. are outlined.
We outline the location of the pocket: from the point T1 along the side cut down we set aside 14-16 cm (for small sizes 10-12 cm). From the same point T1 to the right, set aside 4 cm and connect the resulting points with a straight line.
This is the pocket entry line.
To arrange the fastener in the middle of the front, from points T2 and L2 to the right horizontally, set aside 3-4 cm and connect the resulting points with a straight line.
Look at the drawing. Construction lines are marked in red.
If the trousers are with elastic, you do not need to do this. 
The construction of the front half of the trousers is complete.
CONSTRUCTING THE BACK HALF OF THE TROUSERS
Usually, the back half of the trousers is built on the same sheet as the front, and after construction, each half is copied onto separate sheets of paper.
We will build the back half right away on a separate sheet of paper.
To do this, we need to transfer (copy) the main lines and points to a separate sheet of paper:
We draw a vertical line, as well as the lines of the waist (point T), hips (point B), step (point I), knee (point K) and bottom (point H). 
From point T to the right, set aside a value equal to Sat: 2 + 6 cm (for all sizes), in other words: we divide the measurement of the semicircle of the thighs (Sat) by two, plus 6 cm and set the point T1. In our example, it looks like this:
TT1 = Sat: 2 + 6cm = 38: 2 + 6 = 25cm,
and you substitute in the formula the value of your measurement of the half-girth of the hips and determine the result.
From point T1, draw a perpendicular down to the intersection with the bottom line.
The intersection points are denoted by the letters B1, Y1, K1, H1, respectively. See drawing. 
Divide the segment TT1 in half, set the point T2, through which we draw a vertical line down to the intersection with the bottom line, and extend it up by 3 cm beyond the waist line and set the point T3.
We will need this point when constructing the waist line of the back half of the trousers.
At the intersection points, we set the points B2, R2, K2, H2, respectively. 
The waistline of the back half of the trousers.
With a compass from point T3, with a radius equal to half the measurement of the semicircle of the waist (St), we make a mark on the continuation of the line TT1 and put point T4.
T3T4 = St: 2 = 30: 2 = 15cm
We connect points T4 and T3 with a straight line, extending it beyond the point T3 to the left by 5 cm and set the point T5. In order not to get confused, look at the drawing.
We get the waist line of the back half. 
Construction of darts.
Construction of darts (if the pants are with an elastic band, we do not build darts).
We divide the T4T5 waistline into 3 identical segments, from the dividing points we lower the perpendiculars 8-12 cm long (depending on the age and, accordingly, the size of the trousers) and set aside 1 cm from the dividing points to the left and right.
We make out darts.
Here we have omitted the letter designations, in the hope that you will figure it out with the help of the drawing. 
Midline of the back half of the trousers.
Now let's draw the line of the seat (the middle line of the back half).
From the point I to the left on the continuation of the stepping line, set aside a segment equal to half of the segment YaY2 plus 1 cm (for all sizes) and set the point Ya3.
ЯЯ3 = ЯЯ2: 2 + 1cm = 12.5: 2 + 1 = 7.3cm.
Remember to substitute your values in the formula.
We divide the segment ЯЯ3 in half and set aside 1 cm down at a right angle, designate this point with the number 1.
From the point I to the right, set aside 1/10 of the semicircle of the thighs Sat and set the point I4. In our example, this is 3.8cm:
YY4 = Sat: 10 = 38: 10 = 3.8cm
From the obtained point R4, we postpone the same value upward, in our example, 3.8 cm.
We put the point Y5.
Я4Я5 = 3.8 cm 
We draw up the line of the seat: we connect the point T5 and Y5 with a straight line, and then draw a smooth line connecting the points I, point 1 and point Y3, as shown in the drawing. 
Bottom line of the back half of the trousers.
The width of the back half of the trousers is in direct proportion to the width of the front half. In our example, the finished pants bottom width is 18cm.
18 + 2 = 20 cm is the width of the back half along the bottom line.
From the point H2 to the left and to the right, we postpone 10 cm (20: 2) by half of this value and put the points H3 and H4.
From point H2 down at a right angle, set aside 0.5-1 cm (depending on the size), set point H5 and draw up the bottom line of the back half of the trousers. 
As for the width of the back half along the knee line, as in the construction of the front half, we consider two options:
1st example: these are loose-fitting trousers, so we connect the points Y3 and H3 (step cut) and R4 with H4 (side cut) with straight lines, and this is where the construction of the back half ends.
If you have a certain width of the trousers in the knee area, then follow the second example. 
Side and step lines.
2nd example: We calculate the width of the back half along the knee line: 20 + 2 = 22 cm, divide in half, we get 11 cm and set this value to the right and left of the point K2. We put points K3, K4.
It remains to arrange the lines of the side and step cuts in the same way as in the second option, given in the description of the construction of the front half of the trousers. See fig. 18.
Everything depends on you! You are both a designer and a fashion designer! You set goals and act on them.
Pillow is a whole life. Pillows for sleeping, whether they are for relaxation, for the interior, for pregnant women - this is a creative flight of imagination, and creativity is timeless. The answer to the question is - Where to buy a pillow? is resolved very simply. It is enough to look into Online store All Pillows (
If you have already tried sewing baby clothes and complained about "naughty" knitwear, forget about these minor problems! Indeed, today we will sew warm waterproof children's pants from a membrane, and this is a rather difficult experience. Although if you adhere to all the rules and select the right tools, everything will work out the first time! So, we suggest you sew waterproof pants for a boy.
The pattern and calculation are presented for a child aged 2-3 years (height 92 cm). But according to the described master class, you can easily increase or decrease the size and you can calculate the amount of materials required for work. By the way, these trousers are suitable for both a boy and a girl. For a girl, I would like a brighter color, but if you remember that cold weather is not only pure white snow, but often the dirtiest mud, parents often decide that dark gray and black colors are quite suitable for their daughter's warm pants.
In order to sew warm pants for a child, you will need:
raincoat fabric on a membrane basis in dark gray color - 1 m;
orange fleece (for lining) - 1 m;
wide elastic band for the waist - 0.5 m;
adhesive transparent tape for gluing seams - 2 m;
double sided tape;
pattern paper;
tailor's pins;
sewing machine;
synthetic threads.

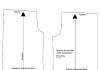
Boy's waterproof warm pants pattern, size 92
This pattern is designed for a baby about 92 cm tall (2-3 years old). To get the pattern in full size, you need to save this photo to your computer (click on it to enlarge), then enlarge it to size so that the waist line (in the photo - the upper horizontal) is 30 cm.After that you can attach the pattern paper to the monitor and trace the contours with a pencil. Cut the pattern along the outline and the pattern is ready!

How to sew warm pants for a child: job description
1. As you probably already noticed, the pattern of these pants is not quite standard: the pants will be two-seam. This means that there will be no outer side seams on the legs: only the seat seams and the crotch seams (inner leg seams). So the pattern shows one whole leg, which needs to be cut out of a raincoat fabric in two mirrored copies.
Cutting from raincoat fabric according to the pattern is difficult, because you cannot attach the template to the canvas with pins: traces will remain from any holes in the membrane. Therefore, it is better to fold the raincoat fabric in half (inside out), attach the pattern to it with double-sided tape and cut out two legs at the same time. Do not forget to make allowances for the seams - on all sides, depart from the contours of the pattern by 7 mm.


2. Fold the two legs together and use tailor pins to secure both sides along the seams of the seat: front and back sections, left and right halves. Here you also need to remember that the extra holes from the pins on the raincoat fabric are useless. Therefore, the pins should be fastened at the very edge of the fabric: in the area that is in the territory of the seam allowances. In addition, the pins should be placed perpendicular to the seam so that they do not interfere with the sewing of the machine needle.

3. Sew the seating lines on the machine using a straight stitch with 3mm stitch spacing.

Useful advice... Sewing a membrane fabric is quite difficult: if your machine has a regular needle and a regular foot, the raincoat fabric on the membrane can stretch or, conversely, slow down (this leads to numerous stitches in place). Try sewing on an unnecessary piece of fabric first. If it doesn't work, use a Teflon foot and a # 75 needle.
Another "trump card" in the seamstress's sleeve is sewing through paper. If the membrane does not obey, place a sheet of tracing paper under and above it: the machine will sew such a "sandwich" perfectly.
4. Sew both back and front seams of the seat. After that, it is imperative to glue the seams: the fabric is waterproof, but water can seep into the holes of the seams. Moreover, if the pants are intended for an active kid who does not like to miss puddles and snowdrifts.

How to glue seams in warm waterproof pants for a child
For gluing, you will need to literally "solder" the adhesive tape into the seam. But even here you will not be able to do without a "sandwich"! Put a wooden block on the ironing board (it is needed in order to raise the seam and prevent the membrane coating from melting from the iron), on it - a product with a seam with the seam upside down, the allowances of which are bent to one side, put the adhesive tape on top with the adhesive side down (so so that it covers both the seam allowance and, of course, the holes in the seam), cover with two layers of gauze and press down with a warm iron. As a result, the tape should stick to the membrane, completely covering both the seam holes and allowances.
Seat seams are fully finished so you can move on to the next seam!
5. This will be a crotch seam: from the bottom of the left leg through the top to the bottom of the right leg. Here, again, you will have to carefully pin the edges of the legs with pins so that they do not go too far on the canvas.

Then - sew this seam on a typewriter and glue it with adhesive tape.

6. The base of waterproof warm pants is ready! Now you need to sew the fleece lining. Use the same pattern for the lining as for the outer layer of the pants. Cut out two mirrored legs from the fleece.

Sew them in the same way as for the outer pants: pin the upper armholes together first.

And then sew the crotch seam.

7. Now the fun begins! The fleece lining should be inserted into the membrane pants.

Sew the bottom edge of the legs with threads. You need to do this on the wrong side: you should not see the raincoat part of the pants, but the membrane one.

Sweep the top of the parts in the same way. In this photo, by the way, you can see the glued seam of the seat.

Having swept away the trousers and the top of the trousers, you should get such a closed "donut".

8. Machine the bottom edge of both legs using the same straight stitch at 3mm intervals. Then sew the top of the pants as well, leaving a small hole (up to 10 cm) for turning the product to the right side.

Turn the pants through this hole and straighten the pants well.

Sew the bottom hem of the pants when turned inside out to complete the look.

Stitch the upper edge of the pants, too, slightly stepping back from the very top. At the same time, you need to retreat so much that a wide elastic band for the belt can fit into the resulting "tunnel".

9.Use a safety pin to thread the elastic into the tunnel and sew the ends together.

Stitch the remaining hole through which you inserted the elastic on a typewriter.

Warm waterproof rain pants for your child are ready! This is a rather difficult job, because here you have not only to sew, but also to adapt to the vagaries of the fabric, to glue the seams ... But the result is undoubtedly worth it: after making pants from a membrane, you can proudly say that you sewed outerwear for a child with your own hands, and the baby will always be warm and reliably protected from adverse weather conditions.


by the way... For the manufacture of water-repellent clothing, they often use just such patterns as in our case - with a minimum number of seams. Excess seams not only increase the chances of fabric leakage, but also add hassle to the craftswomen, because each of them needs to be glued!
Kaho specially for the site