At first glance, it may seem that crocheting a hat is very difficult, but it is not. Of course, knitted hats look much closer to store clothes, but this is their drawback. It may be a little more difficult to crochet a warm hat, but you have more flight for imagination.
Crochet hats can be divided into several parts:
- Choosing the right model
- Crochet and yarn selection
- Taking measurements
- The process of knitting a hat itself
Let's start by selecting a model. Do you need a warm hat for fall / winter or a light one for spring? Do you love pom-pom hats, berets or beanie hats? Based on this data, we are looking for the model we need:
- Hat - beanie crochet
- Crochet knitted beret
- Hat with pompom
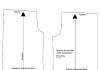
Taking measurements for crocheting a hat

- AB is the depth of the cap, measured from the forehead to the neck (from the eyebrows to the beginning of hair growth).
- CD - Cap Height - Measured from ear to ear through the crown of the head. This size must be halved.
- Head circumference (head circumference) - measured along the line of the forehead and the protruding part of the back of the head. This is your hat size (for adults, from 54-62 cm).
In accordance with the measurements taken, you can start knitting a hat. But, if you have a model at hand, or you knit for yourself, then the easiest way is to make another fitting and not bother with taking measurements.
Now you need to find the right yarn. For a winter hat, we recommend using wool blend yarn or acrylic. A hat usually needs only 1-2 skeins, so don't skimp on yarn. It is better to take imported yarn, because it is softer and does not itch the head. If you are allergic to wool, buy cashmere. 100% cashmere yarn is very expensive, so choose yarn that contains at least 50% cashmere.
If quality yarn in your stores is very expensive, then sew a fleece lining for a winter crocheted hat or from knitwear for an autumn hat.
For a light spring crocheted hat, you can buy yarn with cotton in the composition, at least 50% cotton and 50% acrylic will be enough. And choose the thickness of the yarn depending on the size of the hook.
How to choose the right hook for yarn when crocheting hats
Take the thread and twist it in half slightly. The thickness of the twisted yarn should be equal to the thickness of your crochet hook. It is best to knit a small sample of 10 * 10 cm for a start and see how the yarn behaves, whether the selected pattern is suitable for it. Sometimes it seems that you have found a very nice crocheted hat, but your yarn is not suitable for it at all.
And finally, we want to say that crocheting a hat is easiest according to the scheme, but sometimes it is enough to look at several dozen models to understand what exactly you want and start knitting. We have prepared a selection of our readers' crocheted hats to make it easier for you to decide. Knit for health!
Crochet hats. Works of our readers

Hat size: 54-55 cm. Materials: Yarn: YarnArt, SHETLAND, 45% VIRGINWOOL, 55% ACRYLIC Hook No. 5. Basic knitting: convex and concave posts with 1 crochet (issue s1n, vogn s1n) Legend: Air loop - vp Columns without a crochet - sb Columns with a crochet - c1n Convex column
Read completely

The hat is crocheted from 100g / 200m Vita Unity Light yarn with a crocodile skin pattern. Yarn consumption 130g. Size 54-55 cm. Hook number 4. The pattern has long attracted the attention of needlewomen and does not seem "beaten". The pattern looks especially beautiful when
Read completely

Spring set White cloud, which consists of a cap, snud and mitts. The work of Ksyusha Tikhonenko. I picked up the pattern for a long time, the first 2 options were started and disbanded, the third option pleased me very much, it fits slowly, but the result was wasted time.
Read completely

Warm set for a girl from a hat and snood, knitted from Alize Burcum Nokta + Kartopu Firenze Tiftik. Alize acrylic took almost 3 skeins, Kartopu mohair a little more than one skein. I crocheted 3 mm. Beanie with
Read completely

A set for girls and women, consisting of a hat and an openwork scarf "Snow Queen" is crocheted of "White Leopard" yarn with a very beautiful volumetric pattern "popcorn" crochet No. 3.5. The scarf is knitted with an openwork "fans" pattern. The kit is very
Read completely

Good day everyone! I present to you my work - a set consisting of a winter hat, a scarf, Red Riding Hood mittens. The set took 4 and a half skeins of Olga yarn (50% acrylic, 50% wool, 100 g. 392 m.), Color Carmen,
Read completely

Dear needlewomen, I want to show you a hat that I came up with as a gift for the New Year. Knits pretty quickly because the threads are quite thick at 100g / 100m, I used the hook # 7. At the beginning, tie a ribbon lace along the volume of the head (I
Read completely

A set consisting of a beanie and snood crocheted from Alize Lana Gold Fine yarn 100g / 390m in 2 strands. The composition of the yarn is 49% wool, 51% acrylic. In total, the set took 3 skeins. The lining of the cap is knitted from another
Read completely

Coral kit. Here is a set consisting of a hat and a scarf I knitted for myself. The yarn was used by Gazzal Baby Wool, I really liked the thread, soft and warm, composition 40% merino wool, 40% polyacrylic, 20% cashmere. Crochet hat, description: Hat
Read completely

Cap - an owl knitted of mohair Yarn ANGORA GOLD (10% mohair, 10% wool, 80% acrylic), 550 m, 100 gr. Knitting in two strands, crochet hook 3 mm. Eyes - an incomplete circle of concave and convex columns with
Read completely

I found the scheme of the hat on the Internet. The pattern is very simple and easy to knit, so I knitted everything very quickly. She knitted the scarf herself, without a diagram. I wear it with pleasure. Yarn - 25% wool, 75% acrylic. Knitting pattern for a hat:
Read completely

Set for a girl or a girl "Rainbow"! Autumn is just around the corner. Simple to execute, accessible even for beginners, but incredibly positive and comfortable !!! The shapulya-stocking is knitted with a CCH (one third longer than a regular hat) according to any of the proposed patterns,
Read completely

Hat size: 54-56. Knitted to order crochet No. 2 from half-woolen yarn 340m.x100gr. in two strands. Consumption about 50 gr. If you add a lining to it, then it can be worn in winter. I knit and wear this model already
Read completely

Winter knitted hat for women "Chocolate shells" is knitted from sectionally dyed yarn "Cashmere" 100% wool, 100g / 300m. The knitting is voluminous, twisted columns. It took more than 100 grams. Separately about twisted columns. Broken hook, two days of free time and wasted nerves
Read completely

A cute crochet hat in an hour. Elena's work. Required materials: hook 5 (for elastic), 5.5 (for basic knitting), threads 100% acrylic 100g. DESCRIPTION OF THE HAT: We knit an elastic band: we collect 7 loops and 1 lifting loop, unfold the knitting, we knit a row of st.bn.,
Read completely

Hello! My name is Natalia Samoilova. I want to please you with my new product. The hat and stole are crocheted using the FreeForm technique. Author's work. Threads pehorka Crossbred Brazil 500m в 100g, Pekia PERA 460m в100g and angora footage
Read completely

Crocheted hats - polka dots - the work of Tatiana Belenkaya. Alternating rows: 2 pink, 1 brown. Increases in the 4th and 10th rows. There are 28 rows in total. In the last row, instead of 5 columns with a crochet - 3. Rim - an elastic band is knitted from embossed
Read completely
Scarf, hat and mittens "Winter-winter"

My name is Natalia Samoilova. I present to your attention my little work "Winter-Winter". Freeform technique. The scarf is knitted. Flowers and squiggles are crocheted on a scarf. The mittens are also knitted. Elements are crocheted and sewn on the front.
Read completely

Hats and berets in the Rasta style are the work of Tatiana Sakadina. Tatiana writes that she has simplified knitting to the maximum, so that it is easier to knit and count the loops. All hats are knitted to order - it turns out that the rastaman style is very popular now !! Berets start
Read completely
Crochet hat "Unusual flower"

The knitted hat "Unusual flower" has a classic shape, and the noble brown color makes the knitted hat suitable for ladies of any age, from very young to women of elegant age. I love knitted hats that do not depend on
Read completely

It is known that it is very difficult for women and girls who wear glasses to find a knitted hat. But in the conditions of our harsh Russian winter, a headdress is necessary and we must try to choose the style of a knitted hat that will not only not spoil your
Read completely

The hat with a flower is the work of Olga from Irkutsk. Hat size: 56-57. To knit a hat you will need: 100 g of white yarn (wool 50%, acrylic 50 96, 280 mx 100 g) and 15 g of fuchsia yarn
Read completely
"Poppy hat" crochet

"Poppy hat" work of Glyzina Marina Anatolyevna for the knitting competition "Red Poppy". For knitting a hat Marina Anatolyevna used "Coco" threads of black, red, and green colors. Hook number 2. There is no scheme as such. For the hat I typed 3
Read completely

Winter hat "Pink Miracle" (double, with knitted lining) - author's model of Tatiana Videva (Tani) from Estonia from Tallinn. Knitted cap size: 54/55. Materials: wool 75 gr., Cotton 25 gr., Hook number 2.5. Job description: We knit the top hat. Dial 132 Air
Read completely
Crochet hats. Models from magazines

Cap size: 56-58 cm. You will need: 50 g of Vista yarn and viscose silk; some dark yarn for finishing; hook number 2. Knit 1 circle with a diameter of 15 cm according to the scheme. Then continue knitting without increasing
Read completely

Are you going to make a splash at the resort? Forget wide-brimmed hats. Better tie a pair of trendy berets or hats. They will look good with both dresses and shorts. You will need: VIOLET yarn (100% cotton) -
Read completely

Idea-tronsformer from the CROCHET design studio. This is a little thing from the series "trousers are turning ...", only in our case, but the role of "shorts" is claimed by a hat.
Read completely

The hat, simple in shape, looks original and stylish thanks to the "elongated loops" pattern, which imitate fur. Size 56. You will need: 200 g of lilac wool yarn; hook number 3. The hat is tied with a pattern that imitates fur, the long loops of which are made along the canvas
Read completely

Crochet hats. An original white hat, in which ruffles are tied to the base - a sirloin mesh, creating a wave. Size 56. You will need: 150 g of fine mohair yarn (500 mx 100 g); hook number 2. Tie the cap of the hat (total height
Read completely

The size of the knitted hat: 56- 57. You will need: 150 g of bouclé melange yarn; hook number 5. Work description. Cast on 3 VP (air loops) and in the 2nd loop from the hook tie 3 PRS (single crochet), 3 half crochet and 4
Read completely

Size 56. The model is crocheted and trimmed with fur. You will need: 50 g of thick b / w yarn; fur strips about 1 cm wide; hook number 4; hat elastic 80 cm; fur finishing pom-poms 7 pieces; 2 fur tails; 2 metal
Read completely

An ordinary hat can be easily decorated with bright embroidery. Knitted hat size: 56 cm. You will need: 100 g of wool (420 m / 100 g), hook number 3. Basic pattern: single crochet in circular rows, without lifting loops. Increases: knit 2 columns without
Read completely

It's time to prepare for the coming cold weather. Warm knitted mittens will always come in handy in your wardrobe. Decorate them with colorful embroidery. You will need: 200 g of medium-thick pure wool yarn, hook number 3, colored threads for embroidery and a needle. Work description. Hat. Size 57. Tie
Read completely

Original knitted hat from "Knit & Mode" magazine. Size: one size fits all. To knit a hat, you will need: 150g of blue and 60g of terracotta yarn (95m * 50g), hook number 3 and 2.5, multi-colored beads. Description of work: crochet number 3 with blue yarn to knit a chain of
Read completely
Crochet hat Murano paints
Hat size: for head circumference 54 cm.
You will need:
- Kid Royal Missisipi yarn (62% kid mohair, 38% polyamide, 500 m / 50 g) -100 g section-dyed,
- hook number 1.5,
- clasp for brooches.
Attention! Knit in 2 folds.
Dial a chain of 6 air. etc., close in a ring. Next, knit according to pattern 1 to the desired depth of the cap. Then tie the bottom edge of the cap according to scheme 2. According to schemes 3, 4 and 5, tie 3 flowers, connect them together. Sew a brooch clasp to the flower. Attach the flower to the hat.
Knitting patterns for hats:
Crochet hat video - master classes
Hat - beanie crochet video from Kotova Natalia
The hat is crocheted on an OG of 50-54 cm. For knitting, it took 2 skeins of Lira yarn from Vita Cotton (60% cotton, 40% acrylic, 50 g / 150 m), hook number 2.5 and 1 knitting marker.
Crochet hat Galaxy, video from Elena Kozhukhar
Hat size: 52-54 cm.
Hook number 3. The yarn is thin, cotton.

The video should load here, wait or refresh the page.
Autumn crochet hat, video from Oksana
In this video, Oksana will show how to crochet an autumn hat on a head circumference of 48-50 cm. The yarn "Krokha" from the Pehorsk factory was used in 50 g = 135 m. Nako bambino in 50 g = 130 m. Half a hank was used. Hook number 3.
The video should load here, wait or refresh the page.
Crochet hat with ears, video from Ksenia Kubyshkina
The video should load here, wait or refresh the page.
Autumn has come! The weather pampers us with bright sun less and less. It's time to warm up. Today I propose to knit very beautiful and at the same time simple to perform crochet!
For such mitts, we need:
- Blue yarn;
- Hook;
- Scissors.
Let's start knitting with rubber bands... We will knit her stbn. We form the initial chain as long as the elastic is needed. In this case, it is 15 VP. We make 1 loop on the rise and knit 1 stbn for the back wall of the loops.
At the end, we do 1 VP and turn around. Next, we will knit as many rows as needed for the size. We try on the elastic and see how many more rows it is necessary to complete so that the elastic will come together on the arm.
Photo 1

We connect the two ends of the elastic and sew.
Photo 2

We turn the elastic to the front side.
Now for shell pattern we need to tie in a circle stbn. Their number must be a multiple of 6.
In this case, 36 stb are knitted.
Photo 3

At the beginning of a new row, we need to perform 1 loop on the rise and tie 1 stbn in the same place.
Skip 2 base loops and perform 5 stsn in the 3rd loop.
Skip 2 loops again and knit 1 sc in the 3rd loop.
Photo 4

Again skip 2 loops and knit 5 stsn into a new loop. So we will continue knitting until the very end of this row.
Photo 5

We started the last row with stbn, which means we will start this row with 3 lifting loops and another 2 ssn in the same place.
In the 3rd stsn of the previous row, we knit 1 stbn.
Now in the stbn of the previous row we perform 5 stbn.
So we continue knitting until the end of the row. At the end, we will knit 2 stsn to the same point where lifting loops and 3 stsn were knitted at the beginning of the row. We knit 1 connection. loop in 3 lifting loop.
Photo 6

In the next 2 rows we will be adding to form a place for the thumb.
Since in the previous row we began to knit with 3 lifting loops, then this row starts with 1 lifting loop and 1 stbn to the same point.
Further, in the stb of the bottom row, we will knit not 5 stsn, but 7 stsn. Then, in the 3rd stsn of the bottom row, we perform 1 stbn, as in the previous rows. Then again we knit not 5, but 7 stsn.
This is where the increments ended. Next, we knit in the same way as in the previous rows.
We will repeat this row 1 time.
In the next row we will add again. But now we will knit not 7 stsn in the first 2 shells, but 9 stsn.
We try on a mitten on the hand and determine the approximate number of rows up to the thumb. We knit them with increments of 9 stsn in the first 2 shells.
Photo 7

Now we will form a place for the finger. We start the row as usual. Then we knit 3 stsn in the stb of the previous row.
In 4 stsn of the previous row we knit 1 connection. column. We dial 6 VP.
We skip 1 shell and in the stbn of the previous row we knit 3 stsn.
Photo 8
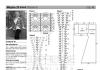
3.
Materials and tools:
1. Threads YarnArt Merino De Luxe 50 (50% merino, 50% acrylic), 280m / 100g about 100g, or other yarn of similar thickness.
2. Circular or toe knitting needles # 2.5 and # 3 (or another size of knitting needles that allows you to achieve the specified density).
3. Marker to mark the beginning of the row.
4. A needle with a wide eye for securing the threads.
Knitting density up to WTOneedles number 3 (1010 cm): 26 loops and 36 rows.
Knitting density after WTOneedles number 3 (1010 cm): 24 loops and 32 rows.
Table 1 - Dimension table.
All calculations are given before the WTO, but the dimension is given taking into account stretching. If the knitting density is the same as that specified (for any yarn), you can refer to the size chart. If it does not match, then you can knit according to the calculations for a size larger or smaller than required.
Cast on needles No. 2.5 108 (108; 120; 132; 132) sts using the Italian method of a set of stitches with an elastic edge. Close the loops in a circle in a convenient way. Place a marker to mark the start of the row. Continue knitting in a circle.
How such a gum fits is very easily shown in the video of Yulia Dolgova:
1 row: the front ones are knitted behind the back wall, the purl ones are removed not tied (thread before work).
2 row: we knit the purl, remove the knitted ones without knitting (thread at work).
3 row: as the first row.
4 row: as the second row.
Next, the elastic band 22 is knitted. To do this, knit the purl, front, then remove the next two loops, change them in places, return them to the left knitting needle and knit the front and purl, then purl, front, remove two loops again, change them in places, return to the left knitting needle and knit the front and back, then the back, front and so on until the end of the row.
5-12 rows: 1 out., * 2 persons., 2 out. * - 26 (26; 29; 32; 32) times, 2 persons., 1 out.
Continue knitting with the main pattern. Pattern repeat 12 stitches and 12 rows.
Closer pattern.


1 row: * 4 persons, 4 out., 4 persons. * - 9 (9; 10; 11; 11) times
2nd row: * 3 persons., 6 out., 3 persons. * - 9 (9; 10; 11; 11) times
3 row: * 2 persons., 8 out., 2 persons. * - 9 (9; 10; 11; 11) times
4 row: * 1 persons., 3 out., 4 persons., 3 out., 1 persons. * - 9 (9; 10; 11; 11) times
5 row: * 1 persons., 2 out., 6 persons., 2 out., 1 persons. * - 9 (9; 10; 11; 11) times
6 row: * 1 persons., 1 out., 8 persons., 1 out., 1 persons. * - 9 (9; 10; 11; 11) times
7 row: * 2 out., 8 persons., 2 out. * - 9 (9; 10; 11; 11) times
8th row: * 3 out., 6 persons., 3 out. * - 9 (9; 10; 11; 11) times
9 row: * 4 out., 4 persons., 4 out. * - 9 (9; 10; 11; 11) times
10 row: * 2 persons., 3 out., 2 persons., 3 out., 2 persons. * - 9 (9; 10; 11; 11) times
11 row: * 3 persons., 2 out., 2 persons., 2 out., 3 persons. * - 9 (9; 10; 11; 11) times
12 row: * 4 persons., 1 out., 2 persons., 1 out., 4 persons. * - 9 (9; 10; 11; 11) times
Repeat the rapport from rows 1 to 12 as many times as indicated in Table 1 for the respective size.
Then make reductions according to the scheme for sizes 49-50, 55-57, 58-60 starting from the 13th row of the scheme. Repeat pattern repeat from sts 1 to 12 to the end of the row.


13 row: * 3 persons., 2 together out. left, 2 persons., 2 together out. to the right, 3 persons. * - 9 (11; 11) times
14 row: * 3 persons., 1 out., 2 persons., 1 out., 3 persons. * - 9 (11; 11) times
15 row: * 2 persons., 2 together out. left, 2 persons., 2 together out. to the right, 2 persons. * - 9 (11; 11) times
16 row: * 2 persons., 1 out., 2 persons., 1 out., 2 persons. * - 9 (11; 11) times
17 row: * 1 persons., 2 together out. left, 2 persons., 2 together out. to the right, 1 person. * - 9 (11; 11) times
18 row: * 1 persons., 1 out., 2 persons., 1 out., 1 persons. * - 9 (11; 11) times
19 row: * 2 together out. left, 2 persons., 2 together out. to the right * - 9 (11; 11) times
20 row: * 1 out., 2 persons., 1 out. * - 9 (11; 11) times
21 row: * 2 persons together. to the right, 2 persons together. to the left * - 9 (11; 11) times
22 row: * 2 persons together. to the right * - 9 (11; 11) times
Cut the thread, thread the tip into the remaining loops, pull off the hole.
For sizes 47-48 and 51-54

This time I decided to make two versions of my master class.
New format: mini master class. Everything in one photo!

It is convenient for memorizing an idea. You just need to save this photo on your phone or computer and then reproduce the entire process of creating a header.
And if you need detailed instructions, you can refer to the classic master class in my blog.
By the way, he is:
Hat crochet ornament "shells"
You will need:
Yarn 100 g 225 m (I have semi-wool)
Hook 4.5
Rubber:
The elastic is knitted across to the desired length of the head circumference.
1 row: 12-14 air loops (depending on how high you want the elastic on the hat) + 1 air lifting loop.
2nd row and subsequent: single crochet for the back half loop + 1 air lifting loop.
Knitting turns all the time and each subsequent row is knitted behind the back half loop, thereby achieving the effect of an elastic band.

Little secret: at the end of each row, knit the last single crochet over both halves of the bottom row (not the back half). This will make the edge of the elastic appear tight and neat.
Having reached the desired length, close the elastic in a circle: fold the first and last rows and knit them with half-columns.


Mathematics:
It is important to correctly calculate the total number of rows in an elastic band, so that in the future ...
it was easy to knit shells in a spiral.
The number of rows in the elastic should be a multiple of 6 minus 3. And correspond to the formula
N × 6 - 3
Where N is the number of shells in the row.
Explaining:
The repetition of the "shell" pattern, with which we will knit the main part of the cap, consists of 6 loops. In one row, there are always N full shells minus half of one shell, that is, 3 loops. This is necessary for a successful transition from one row to the next and knitting a hat in a spiral.
Thus:
In a hat made of 100 g 225 m yarn, there are 14 shells in a circle.
14 × 6-3 = 81 rows in elastic.
As an option:
In a hat made of 100 g 250 m yarn, there were 15 shells in a circle.
15 × 6-3 = 87 ribbed rows.
Main part:
1st row:
Turn the knit across and knit one row with single crochet stitches, knitting one stitch at the end of each row of elastic. This will make the product look neat, and it will be easier for you to start knitting shells.
2nd row:
Shell pattern according to the scheme:

We knit 5 double crochets into the third loop, skipping 2 from the working loop, then 1 single crochet into the third loop, again skipping 2 loops.

We repeat in a circle.

The last shell of this row ends already at the top of the first shell. Thus, the shells of the next row will be located between the shells of the previous row, in a checkerboard pattern.

3 row - 17 row:
We continue the "seashells" pattern. We knit 5 stitches with a crochet in a loop between the shells of the previous row, and we knit a single crochet at the top of the shell of the previous row, skipping two loops, in the third.

Decrease the number of stitches in the row.
Row 18:
We knit 3 double crochets in one loop, skip two, in the third single crochet.

19 row:
We knit 2 double crochets in one loop, skip one, into the second double crochet.
 Head circumference: 50-52 cm.
Size: 28-30.
Age: 3-4 years old.
Yarn: "Stella"(48% wool and 52% acrylic 100g each) and"NakoBaby"(25% wool, 75% acrylic 50 g each)
Yarn consumption: 1 1/3 skein "Stella"On a vest, 1 1/5skein "NakoBaby"On the bottom cap, 1 2/3skein "Stella»On the top cap.
Hook: 4.5mm and 3mm.
Vest
Hook No. 4.5 mm we collect 80 air loops (hereinafter VP, the number of loops is a multiple of 11 + lifting loops) Scheme 17.


Above the last loop of the chain, we knit a half of the shell, that is, 3 CCHs from one loop of the base, do 3 VP lifts, turn the work and go to the 2nd row.
2nd - 4th rows: 3 VP lifting, 3 SSN in the same loop as the lifting loops (3 VP lifting + 3 SSN = 4 SSN), * a shell of 7 SSNs in the middle of a shell of 5 SSNs of the previous row *. Repeat from * to * to the end of the row. Above the last loop of the previous row (namely, above the tip of the half of the shell of the previous row) we knit 4 CCHs, that is, a half of the shell of 7 CCHs, make 3 VP lifts and go to the next row.
5th row: 3 VP lifting, 4 SSN in the same loop as the lifting loops (3 VP lifting + 4 SSN = 5 SSN), * a shell of 9 SSN in the middle of a shell of 7 SSN of the previous row *. Repeat from * to * to the end of the row. Above the last loop of the previous row (namely, above the tip of the half of the shell of the previous row), we knit 5 CCHs, that is, a half of the shell of 9 CCHs, make 3 VP lifts and go to the next row.
6th and 7th rows: 3 VP lifting, 4 SSN in the same loop where the lifting loops (3 VP lifting + 4 SSN = 5 SSN), * a shell of 9 SSN in the middle of a shell of 9 SSN of the previous row *. Repeat from * to * to the end of the row. Above the last loop of the previous row (namely, above the tip of the half of the shell of the previous row), we knit 5 CCHs, that is, a half of the shell of 9 CCHs, make 3 VP lifts and go to the next row.
8th row: 3 VP lifting, 4 SSN in the same loop as the lifting loops (3 VP lifting + 4 SSN = 5 SSN), * a shell of 9 SSN over the next 2 shells of the previous row, we collect 15 VP (for the first armhole) , skip 2 shells of the previous row, knit shells from 9 CCHs over the next 6 shells of the previous row (for the back), dial 15 VP (for the second armhole), skip 2 shells of the previous row, knit shells from 9 CCHs over the next 2 shells of the previous row, and over the last tip we knit half of the shell, that is, 5 CCH.
9th row: 3 VP lifting, 4 SSN in the same loop where the lifting loops (= 5 SSN), shells from 9 SSN over the next 2 shells of the previous row, a shell from 9 SSN in 3 VP of 15- of the dialed loops, skip 4 VPs, knit a shell of 9 CCHs, again skip 4 VPs and knit a shell of 9 CCHs, then knit shells of 9 CCHs over the next 6 shells of the previous row, and then by analogy We knit in a mirror-like manner: a shell in 3 VP of 15 dialed loops, skip 4 VP, knit a shell, skip 4 VP again, knit a seashell, and then knit seashells over 2 seashells of the previous row and a half of a seashell above the last tip. At the end of the row, we do 3 VP lifts, turn the work and go to the next row.
10th - 22nd rows: similar to the 6th row.
Plank. We take a hook No. 3 mm, tie the thread from the inside out at the neck of the left shelf, make 2 VP lifting and then knit the 1st row.
1st row: 1 column without a crochet (hereinafter RLS) along the entire shelf. At the end of the row, we do 2 VP lifts, turn the work and go to the 2nd row.
2nd row: 1 sc over each loop of the previous row. At the end of the row, we do 2 VP lifts, turn the work and go to the next row.
3rd - 6th rows: similar to the 2nd row.
We cut off the thread and tie it from the inside out at the bottom of the vest on the right side, make 2 VP lifts and knit in the same way as the left bar, only in the 4th row there will be loops for buttons.
In order to get a loop, it is necessary to skip 3 loops of the 3rd row, and knit 3 VPs over them (the 5th row is knitted as usual, that is, over the VP and over all RLS we knit 1 SBN each).
Having connected the 6th row of the right shelf, we do not break the thread, but turn the work and start tying the vest “around the entire perimeter” of the RLS, while “at the bends” we knit 2 RLS each.
Thus, they are tied in order: the right strap with loops, the neckline, the left shelf, the bottom of the vest. We break the thread. Similarly, we tie the RLS to the armhole of the vest.
Double beanie
Bottom cap. With a hook No. 3 mm, we collect 4 VP and close it in a circle of SS.
1st row: 2 VP lifting, RLS in the same loop as the lifting loops, 2 RLS in the next loop of the chain and in each loop to the end of the row.
2nd and 3rd rows: similar to the 1st row.
4th - 6th rows: 2 VP lifts, 1 sc in the next loop of the previous row and in each loop to the end of the row.
7th row: 2 VP lifts, * 1 sc in the next loop of the previous row, 2 sc in the next loop of the previous row *. Repeat from * to * to the end of the row.
8th and 9th rows: similar to the 4th row.
10th row: similar to the 7th row.
11th - 13th rows: similar to the 4th row.
14th row: similar to the 7th row.
15th - 43rd rows: similar to the 4th row.
Cut the thread.
Strings. We tie the thread from the inside out over the 15th loop from the connection of the rows (that is, where the VP). In any theory, they write that 1 RLS corresponds to 2 VP of ascent, but in practice we need a rounded smooth transition, so further we will do 1 VP of ascent.
1st row: 1 VP of lifting and we knit 1 RLS each over the next 16 RLS of the lower edge of the cap, 1 VP of lifting, turn the work and go to the 2nd row.
2nd - 8th rows: We begin to decrease the loops at the beginning and at the end of the row, that is, at the beginning of the row we skip 1 loop of the previous row, and at the end of the row we knit 1 RLS out of 2 loops of the base.
9th row: In the 8th row, 3 loops should remain, in the 9th row we knit them together, that is, 1 RLS over 3 loops of the 8th row.
Thus, one loop will remain, we do not break the thread, but do 1 VP, turn the work and dial 75 VP for the tie.
For the second tie, we tie over the 31st loop from the connection of the rows and knit in the same way.
Top cap. With a hook No. 4.5 mm we collect 12 air loops and close them in a circle SS ( Scheme 18).

1st row: 3 VP lifting, 1 CCH in the same loop as the lifting loops, * an arch of 2 VP, 2 CCH in the next loop of the chain *. Repeat from * to * to the end of the row.
We connect the last loop of each row to the upper loop of the SS lifting.
2nd row: 3 VP lifting, 1 SSN to the next SSN of the previous row, * 3 VP over the arch from 2 VPs of the previous row, 1 SSN each over the next 2 SSNs of the previous row. Repeat from * to * to the end of the row.
3rd row: 3 VP lifts, 2 SSNs in the same loop as the lifting loops, a shell of 5 SSNs above each first of the 2 SSNs of the previous row. We knit the last half of the shell, consisting of 2 CCHs, from the same loop as the lifting loops and the first 2 CCHs, that is, we knit a half of the shell at the beginning of the row and a half at the end of the row, and the lifting loops will be in the middle.
4th row: 3 VP lifts, 3 SSNs in the same loop as the lifting loops, a shell of 7 SSNs in the middle of each shell of 5 SSNs of the previous row. The last half of the shell consists of 3 CCHs.
5th row: 3 VP lifts, 4 SSNs in the same loop as the lifting loops, a shell of 9 SSNs in the middle of each shell of 7 SSNs of the previous row. The last half of the shell consists of 4 CCHs.
6th row: 3 VP lifts, 4 SSNs in the same loop as the lifting loops, a shell of 9 SSNs in the middle of each shell of 9 SSNs of the previous row. The last half of the shell consists of 4 CCHs.
7th - 12th rows: similar to the 6th row.
13th and 14th rows: 3 VP lifting, 1 RLS each over the next 4 CCHs of the shell halves of the previous row, 1 RLS each over the next 9 CCHs of the previous row of shells, then 1 shell from 9 CCHs over the middle of the next 2 shells of the previous row, then we knit 1 sc over each loop of 5 shells of the previous row, 1 shell out of 9 CCHs over the middle of the next 2 shells of the previous row, 1 sc over each loop of the previous row to the end of the row.
We connect the top of the lower and the top of the upper SS cap from the front side, and the bottom is connected from the inside of the SS, then we tie the bottom of the upper RLS cap (for this we tie the thread at the junction of the rows, make 2 VP lifts and knit 1 RLS in each loop, reach and tie the first tie, tie in front of the hats, the second tie to the end).
You can decorate the hat with a pompom.