The shawl collar will add sophistication to any of your knits. Every needlewoman who can knit a knitted shawl collar can knit a knitted shawl collar.
Shawl collar types
Distinguish between a sewn and one-piece collar, which can have a variety of shapes, but mainly a rounded, flowing shape is used.
In order to knit a collar on a round neckline, you need:
1) Cast on loops along the entire length of the neckline + additional loops for the ends that will be on top of each other. This is the one-piece collar method. It is knitted in shortened rows.
2) Tie the collar separately and sew it to the garment. To do this, you need to dial all the loops for the shawl collar, and then tie a kind of trapezoid in shortened rows, where the upper short side is the width of the back neckline, the height is equal to the collar height, and the oblique lines are the sides that will be sewn to the front of the neckline.
 For a square cut, you need to knit a rectangular collar separately, where the width is the full length of the "shawl", and the height is the width of the overlapping parts when stitching. Often, such a collar is performed with a 1x1 elastic band.
You can also knit a shawl collar with knitting needles at the v-neck. To do this, you need to cast on loops only on the back, do the work using partial knitting to set loops on the front of the collar, and then subtract the loops on one of the sides (which will be on top) to form the desired cutout.
There is also a double version of the collar in question. It is necessary to separately knit a part with a height = 2x the collar height, fold it in half and carefully sew it to the product.

The shawl is performed as one-piece knitted with a shelf - they are knitted together with the shelves at the same time, in the vertical direction;
so also in the transverse direction - loops are typed along the connected shelves, and separately connected and then quitted to the shelves.
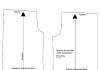
 The neckline has a deep V-neckline, starting almost from the waist, and the fastener bar is wider than usual - up to 8 cm. Tie the collar and fastener horizontally. On the pattern, mark the lines of the neckline and the width of the fastener strap (fig.a). Tie the details of the jacket, sew them and only then proceed to knitting the fastener and collar.
On the front side of the right shelf, on which there will be buttonholes, cast on the buttonholes for the strap, starting from the bottom of the shelf and ending with the middle of the neck of the back:
- For every 2 edge stitches, knit 3 knit stitches. The needles are the same with which the model was made.
- To make the line neat, insert the knitting needle into the edge loops as follows: take one edge loop for both walls, the next one after it once for both walls, the second - only for the front one.
In this rhythm, knit the entire row. Recalculate the stitches on the knitting needle so that you can then cast on the same number of stitches for the left shelf. From the next row, start knitting a 2 × 2 elastic, its height is equal to the width of the fastening strap. Remember to sew buttonholes.
From the shoulder seam to the middle of the back neckline, knit the placket very tightly so that the collar fits better. After tying the placket, close the loops to the beginning of the collar.
Continue to knit only the collar, giving it a shawl shape. To do this, on the front side of the work at the beginning of each row, close 2 loops until the height of the knitted collar is 18-20 cm. After that close all loops. In the same way, tie the strap and the collar for the left shelf, dial the loops on the front side of the work, starting from the middle of the neck of the back. When finished knitting, sew both halves of the collar.
Shawl collar is a one-piece knit collar
can be of various shapes: classic and shaped shawl. There are several options for knitting a collar: the collar and the fastener bar can be knitted simultaneously with the shelf (vertical knitting direction, share) or performed in the transverse (horizontal) direction by typing loops from the edge shelves; can be knitted separately and then sewn on.

For example:
After the shelves and back are tied and sewn along the side and shoulder seams, we collect a number of loops along the front and neckline and knit a bar and a shawl collar as follows: first we knit 2 rows of elastic bands on all loops, then we knit only the collar (from the place the location of the upper button, according to the pattern) using shortened rows, gradually decreasing in each row, i.e. without tying from 2 sides to 2 - 4 loops. Having knitted a collar 7 - 8 cm in this way, we put into operation all the loops and knit together the edge of the collar and both fastener strips 4 - 5 cm wide. On the right shelf, during knitting, do not forget the loops for the fastener.

If the shawl is single, then measure the height of the collar along the back. Knit a sample with this pattern and count how many rows fall on the measured collar height.
The central part of the loops is knit, corresponding to the loops of the neck of the back. The loops of one and the second part, which fall on the neck of the front, are put into operation for the number of calculated rows up to the entire height of the collar, but the number of loops to be picked up on the sides of the loops of the neck of the back and the frequency of their introduction into work. The collar itself is limited by two values - the height (number) of rows, and the number of loops on the rounded part, and the Shape - by the frequency of their introduction into work.
Types of shawls and pattern construction
 The neckline can start almost at the waist. On sweaters with buttons, at the same time, the width of the strap for them is usually wider than the standard one, sometimes reaching 8 cm.The direction of knitting can be vertical (along with the detail of the product) and horizontal (when working loops are drawn along the edge of the knitted fabric and the gate is knitted on them).
You need to start work by building a pattern, determining the desired width of the plank. From the center line of the front, half the width of the plank should be set aside in two directions. If the jacket is supposed to have buttons, then only half of the shelf will be displayed on the pattern. In this case, half the width of the bar is deposited inside the part, the bar itself must be extended by the same distance in the opposite direction.
The beginning of the shawl collar is the location of the top button, which depends on the chosen style. In order to determine the location of the remaining buttons, you need to divide the distance between the top button and the bottom edge of the product into equal parts. Their number depends on how many buttons the jacket provides.
Sew-on shawl collar
 The collar is made separately according to the pattern. Take half the width of the neckline of the back (aB = 6 cm). On the pattern of the shelf, the location of the first button is marked. It depends on how the product will be opened. From point a, lay down 14 cm and mark the location of the first loop (point b). A horizontal line is drawn through point b until it intersects with the side line, the intersection point is denoted by the letter b1. Connect straight points B and b1. This is the sewing line of the collar. It is measured: Vb1 = 24 cm.
Build a rectangle AVGD. Its sides AB and DG are equal: 6 cm + 24 cm = 30 cm.
The sides of BP and VG are equal to the width of the collar - 9 cm (or any other of your choice).
From point A to the right, lay a segment equal to half the width of the neckline of the back (6 cm), put point a.
Points a and D are connected by a straight line and then divide it in half. From the point of division, they are laid along the perpendicular upwards of 1.5 cm.A smooth line connecting points a and D is drawn through the resulting point.
An example of calculating loops.
At 1 cm - 3 loops, at 30 cm there will be: 3 loops * 30 = 90 loops.
For the whole collar: 9;
loops * 2 = 180 loops + 2 outer loops = 182 loops.
To knit a collar, they dial 182 loops and gradually decrease the loops along the pattern on both sides.
Along the line Aa collar loops close all at once. Since decreasing the loops creates an uneven edge of the product, the collar is sewn along the line AavG, the edge of the collar is flat.
Knitting shawls and straps at the same time with the shelf
 On the base pattern for the right shelf, mark the width of the fastener strap and the size of the collar (Fig. 3). Leave the back pattern unchanged. Tie the right shelf at the same time with the placket until the collar begins to expand - point A. Perform the plank in garter stitch. From this point on, start adding loops between the pattern of the shelves and planks in each 4th-6th row (see the "+" signs in Fig. 3). Make new loops with a yarn, throwing it in the purl row, and in the next one knit the front one behind the back wall, then the places of increases are less noticeable. Knit the newly formed loops with a strap pattern, in this case with the front ones.
Having tied to point B, cast air loops on the knitting needle to expand the collar (4-5 cm) and do not make any more additions. Start decreasing: between the patterns of the shelf and collar in each 4th row (on the front side of the work), knit 2 loops together with the wrong one, cutting the loops of the shelf pattern. The number of collar loops must remain unchanged. Make the last decrease at point B and then knit the collar to a height of 6-7 cm using partial knitting: divide the collar loops (mentally) into 3 equal parts and every 3-4 rows do not tie one third from the side that will be sewn to neck of the back. Having knitted the collar, knit a few more rows with an auxiliary thread; without closing the loops of the last row, remove the knitting from the knitting needle and iron. Tie the left shelf in the same way. Sew the model, remove the auxiliary thread, connect the open loops of the collar halves with a loop-to-loop seam and sew it to the neckline of the back with a knitted stitch.

Knitting shawls and planks in the transverse direction
 On the base pattern for the right shelf, mark the width of the placket (6 cm) and the location of the top button (for example, at the waistline, Fig. 4). Connect point A with the width of the neck (point B). Straight AB - new neckline. Leave the back pattern unchanged.
Tie the back and shelves, sew them. Now on the front side of the right shelf, starting from the bottom and ending with the middle of the back, dial the loops from the crochet trim and collar. The spoke number is the same as for the main job. Recalculate the stitches on the knitting needle to cast the same amount for the left shelf. From the next row, start with a double-sided pattern (for example, a 2X2 elastic band) to knit a bar (6 cm). Do not forget to make buttonholes in the middle of the placket. From shoulder to mid-back, knit the bar as tight as possible for a snug fit around your neck. Then close the loops to the place of the top button and continue to knit only the collar, giving it a shawl shape. To do this, at the beginning of each row from the side of the plank, close 2-3 loops each until the collar height is 18-20 cm.At the same time, add loops from the seam side (every 3-4 rows, 1 loop).
Having knitted a collar of the required size, close all the loops in a row. In the same way, tie the strap and the collar of the left shelf (dial the loops along the front side of the shelf, starting from the middle of the back). When finished, connect both halves of the collar with a knitted vertical seam.
When performing solid-knitted collars, it must be borne in mind that on the figure, the main part of the collar (departure) lies on the back and front much below the neckline, therefore the edge of the collar must be knitted more loosely so that it is not pulled together. Otherwise, it will not be possible to create a well-fitted collar - the tightened edge will prevent it from dropping and the collar will not lie nicely. This is the main difficulty when making solid knit collars.
How to attach a shawl collar to a product
 Consider how to knit a shawl collar with knitting needles and how to connect it with a jacket or sweater along the line of the neckline of the shelf and back.
The first thing to say is that the width of the shawl collar along the neckline of the back should be wider than along the neckline of the shelf. In order to do this when knitting, we use shortened rows.
In order to make the correct calculation, it is necessary to outline where the lowest point of the shawl collar on the shelf will be. Now, at an already defined height, it will be necessary to count the same number of loops from the middle of the shelf in both directions and close. In this example, this is a total of 16 loops (i.e. 8 loops from the center of the shelf to each side). And then continue to knit the cutout of the shelf separately.
The loops are reduced along the bevel, knitting two loops in front of the edge loop with one loop so that the decrease in the loops is towards the notch.
Before knitting the shawl collar, the shoulder seams are sewn together and can be slightly steamed through the iron.
How to knit a shawl collar on a product
Along the beveled lines of the neck of the shelf and along the cutout of the back, we collect loops with circular knitting needles an odd number in case of further knitting with an elastic band 1 * 1 on the front side.
In the next out row, knit with an elastic band to the second shoulder seam. Turn the work and remove the 1st loop (like an edging).
 We knit to the first shoulder seam and turn, remove the 1st p.
At the end of each subsequent row, knit several loops (about 1-2 cm) more than was knitted in the previous row.
Repeat the technique until all the loops are in the work.
Then, on all loops, knit straight until the width of the ends of the collar is equal to the length of the bottom edge of the neckline with closed loops. Then close all the loops of the shawl collar.
Now you need to connect the free ends of the collar in the middle of the shelf. To do this, the edges of the shawl collar must be sewn to the lower edge of the neckline: the outer end of the collar is sewn with a mattress knit stitch, and the inner end with an overcasting stitch.
This is how a beautiful shawl collar is created on any sweaters: women, men and children.
Shawl collar from bottom to top - examples
 9 strap loops are knitted together with collar loops. As the edge loops, select the Swiss edge (smooth, without knots)
On the shelves for the V-shaped bevel, 1 loop is subtracted in every 6th row. At the same time, in the same rows, to expand the collar from the inside, add 1 crossed vertex. The looping rhythm should be preserved. At the same time, at the front edge of the collar, add six times in every 2nd row and twice in every 4th row 1 front crossed or 1 purl crossed next to the edge loop. These additions are performed on the front of the collar.
 After securing the shoulder seams on the inside of the back of the collar, loops are still added. The inner edge of the back of the collar is later sewn to the edge of the back neckline. To make the shawl collar wider on the outside than on the inside, shortened rows are made after the last addition of loops. To do this, on the inside of the collar, leave 4 times 7 loops. After each shortened row, 4 full rows are knitted. The loops of the back, tied to the middle of the neckline, are not fixed, but left on a pin.
To connect the back of both halves of the collar, the open loops of each are divided into 2 knitting needles: front loops on one, purl on the other. Both halves of the collar with two needles each are placed opposite each other. First, the front loops on one side, then the front loops on the other, are connected with a knitted seam.
A diagram of the pattern of a jacket shelf with a one-piece shawl collar is attached above.
Double shawl collar
 From the seamy side (shelf, back neck, second shelf), along the entire length, dial the loops for the slats and collar and knit with an elastic band to the desired width of the plank, then stop knitting to the desired height (before the beginning of the collar) (for convenience, these loops can be removed on pins), and continue to knit the collar in shortened rows to the desired width. Then connect all the loops along with the shelves and knit a row with purl loops (this is for a more embossed edge design, a very neat edge is obtained) and then continue to knit the collar, only in the reverse order - where it was shortened - increase by the same number until reached the bar and then finish with the bar together. When you finish knitting the bar, then knit a couple of rows with another thread, then remove everything carefully from the knitting needles and steam off these two rows with an iron, then dissolve these two rows, which were tied with other threads and open the loops. It turns out very neatly. If the jacket has a clasp, then on one of the strips of the shelf you need to knit loops and when folding the strip in half, just sweep them together.
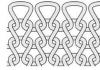
Round shawl
 How to put on such a collar is not important. It is possible separately, it is possible along the edge, as it is more convenient. It's more convenient for me around the edge, so as not to sew later.
The shortened rows are knitted like this: knit a row as usual, but without tying a certain number of loops to the end, stop, make a yarn, turn the knitting and so on. So on both sides, for symmetry. The number of shortened rows is as required by the drawing.
In the first "long" row, that is, when you knit all the loops, the yarns are knitted together with the next loop. If done carefully, then they are not visible at all on the front side, and the edge turns out to be so interestingly rounded, like in the picture.
Then close all the loops together - Just after knitting in shortened rows, then knit a few centimeters long.
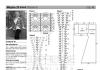
S - M - L - XL - XXL - XXXL
Materials (edit)
DROPS LIMA yarn (65% wool, 35% alpaca, 50 g / 92 m) 11-12-13-14-16-17 skeins of gray, circular knitting needles 4 mm and 5 mm, 2 buttons
Knitting density
19 loops and 25 rows = 10x10 cm in stockings on 5 mm needles
Description of the jacket with knitting needles
Main pattern:
1 row (out.): Persons p.
2nd row: persons. P.
3 row: * 2 sts together persons., Yarn, repeat from * to the end of the row.
4 and 5 rows: persons p.
Knit 7-7-7-8-8-8 cm in stockings and in the next. repeat the main pattern on the seamy row.
Buttonholes perform a trace on the right shelf. way: knit the 3rd and 4th loops from the outer edge together with the front, yarn; for the second button, knit the 3rd and 4th loops from the inner edge of the strap, yarn over.
Location of buttonholes:
Size: S: 28cm
Size M: 29cm
Size L: 30cm
XL: 30cm
XXL size: 31cm
XXXL: 32cm
Decreasing loops: Decrease 1 loop in front of the 1st and 3rd markers: 2 sts together; Decrease 1 loop after the 2nd and 4th markers: remove 1 p. as persons., 1 persons. and stretch it through the shot.
The main detail of the jacket
On 4 mm needles, cast on 204-220-240-256-284-308 sts (including 18-18-20-20-22-22 sts for planks on each side) and knit 7 rows of garter stitch, switch to 5 knitting needles mm and continue with hosiery, knit the loops of the straps with garter stitch. After 8 cm from the typesetting edge, put 4 markers next. way: knit strap loops and trail. 41-45-49-53-59-65 sts, put 1 marker, knit 2 sts, 2 marker, knit 82-90-98-106-118-130 sts, 3 marker, knit 2 sts, 4 marker, 41-45-49-53-59-65 sts and another 18-18-20-20-22-22 sts of the strap.
In the next. in the front row, decrease 1 loop at each marker (4 loops in one row) and then repeat the row of decreases every 5-5-6-6-4-4 cm another 3-3-3-3-5-5 p. = 188-204-224-240-260-284 n viscous. At the same time, make buttonholes and after 31-32-33-33-34-35 cm divide the knitting: transfer the first and last 56-60-66-70-76-82 sts of the front shelves to extra. knitting needle and continue knitting on the back loops = 76-84-92-100-108-120 p.
Back
Continue knitting with the main pattern and at the same time for the sleeves, cast on 30 loops at the end of the trail. 2 rows = 136-144-152-160-168-180 p. 8 loops on each side knit in garter stitch and at the same time at a back height of 54-56-58-60-62-64 cm close the loops for shoulder bevels at the beginning of each row trace. way: 19-19-18-18-17-19 p. 1 time, 10-11-12-13-14-15 p. 4 times and at the same time at a height of 56-58-60-62-64 -66 cm start forming the neckline: close the central 18-18-20-20-22-22 p. After the shoulder bevels are completed, the back height = 58-60-62-64-66-68 cm.
Jacket right shelf
Knit in the same way as the back and after 33-34-35-36-37-38 cm add 1 loop at the extreme loop of the strap, repeat the additions in each 6th row 3 more times = 90-94-100-104-110 -116 p. Shoulder bevel knit as for the back. On the needles, 31-31-34-34-37-37 sts will remain for the shawl collar.
Continue knitting with garter stitch on these loops in shortened rows, starting from the front row: * 2 rows on the first 23-23-26-26-29-29 sts, 2 rows on all loops, repeat from * to the height of the collar 6-6- 7-7-8-8 cm.
Knit the left shelf of the jacket symmetrically to the right shelf.
Assembly
Sew shoulder and sleeve seams. Sew on the shawl collar along the edge of the neckline of the back and sew both details in the center of the back. Sew on buttons.
The shawl collar has one unique property, which is not inherent in many details of the suit - it is able to give any jacket a very feminine sound. Such a stunning effect is achieved due to the smoothness of the lines originating from the shoulder line - the shawl collar not only emphasizes the grace of the neck, but also visually lengthens it. Another indisputable advantage of a shawl collar is that such a collar is quite easy to model and process into a product.
There are two types of shawl collars - one-piece and cut-off collars. We suggest you consider and model the patterns of both types of collars. The one-piece shawl collar is built on the basis of the pattern of the shelf of the product. you can build by yourself and
Rice. 1. Pattern of a one-piece shawl collar
On the pattern of the shelf of the product, mark the position of the upper button. From it, set aside 1.5 cm up and put the point L0. Along the line of the middle of the shelf, add an increase in the half-skid of 3 cm, draw the line of the side. From point L1, draw vertically a segment L1L2 with a length equal to the length of the neck of the back along the pattern.
Draw an arc from point L1 with radius L1L2. In an arc from point L2, set aside the width of the collar departure - L2L3 = 7 cm. Draw segment L3L4 perpendicular to the segment L1L3 10 cm long, of which 3 cm is the height of the one-piece stand and 7 cm is the width of the collar departure.
Plot the outer collar line (points L6 and L7). Cut the top collar one-piece with a hem.
Rice. 2. Cut-off shawl collar pattern
To build a cut-off shawl collar for a jacket or dress, you need to draw a rectangle - the length of the rectangle is equal to the half-girth of the neck according to the measurement + 12 cm: 18 + 12 = 30 cm.
The width of the rectangle is 13 cm (the width of the collar at the back = 8 cm).
IMPORTANT! The length of the collar depends on the depth of the neckline; for a deeper neckline, the increase must be increased. The length of the collar can be measured from the 7th cervical vertebra by wrapping a flexible measuring tape around the neck and lowering it along the front to the desired depth of the neckline.
Shawl collar sewing line. Set aside 5 cm on the upper short side of the rectangle. Draw 2 dotted lines as shown in fig. 2. Divide each in half and set aside 1 cm and 4 cm respectively. Draw the sewing line of the shawl collar and the outside of the collar along the pattern.
A cut-off shawl collar is cut out with two folds.
You will find even more patterns and new ideas on the site of Anastasia Korfiati Sewing School. Subscribe to free lessons of the Sewing School and sew fashionable clothes with us!
S - M - L - XL - XXL - XXXL
Materials (edit)
DROPS LIMA yarn (65% wool, 35% alpaca, 50 g / 92 m) 11-12-13-14-16-17 skeins of gray, circular knitting needles 4 mm and 5 mm, 2 buttons
Knitting density
19 loops and 25 rows = 10x10 cm in stockings on 5 mm needles
Description of the jacket with knitting needles
Main pattern:
1 row (out.): Persons p.
2nd row: persons. P.
3 row: * 2 sts together persons., Yarn, repeat from * to the end of the row.
4 and 5 rows: persons p.
Knit 7-7-7-8-8-8 cm in stockings and in the next. repeat the main pattern on the seamy row.
Buttonholes perform a trace on the right shelf. way: knit the 3rd and 4th loops from the outer edge together with the front, yarn; for the second button, knit the 3rd and 4th loops from the inner edge of the strap, yarn over.
Location of buttonholes:
Size: S: 28cm
Size M: 29cm
Size L: 30cm
XL: 30cm
XXL size: 31cm
XXXL: 32cm
Decreasing loops: Decrease 1 loop in front of the 1st and 3rd markers: 2 sts together; Decrease 1 loop after the 2nd and 4th markers: remove 1 p. as persons., 1 persons. and stretch it through the shot.
The main detail of the jacket
On 4 mm needles, cast on 204-220-240-256-284-308 sts (including 18-18-20-20-22-22 sts for planks on each side) and knit 7 rows of garter stitch, switch to 5 knitting needles mm and continue with hosiery, knit the loops of the straps with garter stitch. After 8 cm from the typesetting edge, put 4 markers next. way: knit strap loops and trail. 41-45-49-53-59-65 sts, put 1 marker, knit 2 sts, 2 marker, knit 82-90-98-106-118-130 sts, 3 marker, knit 2 sts, 4 marker, 41-45-49-53-59-65 sts and another 18-18-20-20-22-22 sts of the strap.
In the next. in the front row, decrease 1 loop at each marker (4 loops in one row) and then repeat the row of decreases every 5-5-6-6-4-4 cm another 3-3-3-3-5-5 p. = 188-204-224-240-260-284 n viscous. At the same time, make buttonholes and after 31-32-33-33-34-35 cm divide the knitting: transfer the first and last 56-60-66-70-76-82 sts of the front shelves to extra. knitting needle and continue knitting on the back loops = 76-84-92-100-108-120 p.
Back
Continue knitting with the main pattern and at the same time for the sleeves, cast on 30 loops at the end of the trail. 2 rows = 136-144-152-160-168-180 p. 8 loops on each side knit in garter stitch and at the same time at a back height of 54-56-58-60-62-64 cm close the loops for shoulder bevels at the beginning of each row trace. way: 19-19-18-18-17-19 p. 1 time, 10-11-12-13-14-15 p. 4 times and at the same time at a height of 56-58-60-62-64 -66 cm start forming the neckline: close the central 18-18-20-20-22-22 p. After the shoulder bevels are completed, the back height = 58-60-62-64-66-68 cm.
Jacket right shelf
Knit in the same way as the back and after 33-34-35-36-37-38 cm add 1 loop at the extreme loop of the strap, repeat the additions in each 6th row 3 more times = 90-94-100-104-110 -116 p. Shoulder bevel knit as for the back. On the needles, 31-31-34-34-37-37 sts will remain for the shawl collar.
Continue knitting with garter stitch on these loops in shortened rows, starting from the front row: * 2 rows on the first 23-23-26-26-29-29 sts, 2 rows on all loops, repeat from * to the height of the collar 6-6- 7-7-8-8 cm.
Knit the left shelf of the jacket symmetrically to the right shelf.
Assembly
Sew shoulder and sleeve seams. Sew on the shawl collar along the edge of the neckline of the back and sew both details in the center of the back. Sew on buttons.