Please! We are glad to be of service.
Good afternoon Olga! I am writing to you with a big request. Could you knit me a panama hat, about like a lilac one around a circumference of 56 cm, but I would like a white one. If you agree, then we will agree on the price and everything else, My phone number 89213167585, Nadezhda.
Wonderful panamas!
Eyes run wide!
Which one to choose for a granddaughter?
Thank you!
Great thank you!
Everything is clear and accessible!
Thank you! Wonderful panamas
Thank you, panamas are just a miracle. I would like to tie everything to the granddaughter.
thanks for the site
I had no idea that a children's panama hat can be so clearly decorated! Prospect and respect!
Thank you very much, great help for us, beginners to knit, very grateful to you.
very beautiful, real summer in hats !!!
Can you see how to decipher the abbreviations on your website? And if not, where is there such information ???
Good afternoon. Panamas are wonderful! But I can't get a panama hat with rounded edges. Even adding after 5 single crochets, the fields are obtained in a wave ((. I knit white with two roses and small round fields.
Good evening, Marina! It all depends on the density of the knit. And it is possible that the finished product will need to be slightly starchy. Success in needlework)
Hello Yulia! Abbreviations are available in any knitting magazine or book. I will try to place them on our website as well. Many thanks to everyone for the pleasant feedback. Pamper your daughters and granddaughters with your needlework more often)
In the 3rd panama hat, in the photo, starting from the 7th row, there are always 4 SNs, and one embossed, and according to the description, in each base SN. should be 2 sn ...
Believe the photo or description ??
Can you please tell me if it is necessary in the last model (summer hat) to make additions in the openwork part? For some reason, it does not work out as according to the scheme ...
Hello Dmitry! The description was compiled by the authors, therefore it is better to stick to it. And of course, look at your work, if possible, try it on, because all distortions and shortcomings will be noticeable. I wish you success)
Hello, Elena! In the description of the last model, there are no allowances in the openwork part. If you adhere to the scheme, then you will have as in the photo in stages. Maybe you started knitting more tightly, tightening, than you started?
How does the embossed column fit? Please tell me.
Hello Olga! A lesson on knitting a relief column can be viewed on YouTube https://www.youtube.com/watch?v=Rc2GQedfeIs
Good afternoon! Today I accidentally went to your site, looking for available descriptions for knitting panama, I'm delighted! everything is clear and easy! will now have something to do in the evenings. My granddaughter is 8 months old, I want to knit a poncho with sleeves by spring (I have beautiful melange yarn - bright, colored), I can't find the same descriptions and schemes, clear and understandable, can you find it?
Thank you so much for such beauty and detailed explanation, available circuits.
A hat with an embossed column ... tell me there it is the front aphid purl?
Please tell me, when knitting a lilac openwork panama hat, how to finish the rows (make the transition from one to another) on the bottom and on the openwork part? Confused.
Thank you very much for the detailed description and diagrams of panamas !!! I have already knitted a couple for my daughter. I wish you success!
Thank you Maria! It's great that our site helped and you succeeded. Health to you and your family!
 Head circumference: 50-52 cm.
Size: 28-30.
Age: 3-4 years old.
Yarn: "Stella"(48% wool and 52% acrylic 100g each) and"NakoBaby"(25% wool, 75% acrylic 50 g each)
Yarn consumption: 1 1/3 skein "Stella"On a vest, 1 1/5skein "NakoBaby"On the bottom cap, 1 2/3skein "Stella"On the top cap.
Hook: 4.5mm and 3mm.
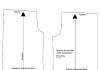
Vest
Hook No. 4.5 mm we collect 80 air loops (hereinafter VP, the number of loops is a multiple of 11 + lifting loops) Scheme 17.


Above the last loop of the chain, we knit a half of the shell, that is, 3 CCHs from one loop of the base, do 3 VP lifts, turn the work and go to the 2nd row.
2nd - 4th rows: 3 VP lifting, 3 SSN in the same loop where the lifting loops (3 VP lifting + 3 SSN = 4 SSN), * a shell of 7 SSN in the middle of a shell of 5 SSN of the previous row *. Repeat from * to * to the end of the row. Above the last loop of the previous row (namely, above the tip of the half of the shell of the previous row) we knit 4 CCHs, that is, a half of the shell of 7 CCHs, make 3 VP lifts and go to the next row.
5th row: 3 VP lifting, 4 SSN in the same loop as the lifting loops (3 VP lifting + 4 SSN = 5 SSN), * a shell of 9 SSN in the middle of a shell of 7 SSN of the previous row *. Repeat from * to * to the end of the row. Above the last loop of the previous row (namely, above the tip of the half of the shell of the previous row), we knit 5 CCHs, that is, a half of the shell of 9 CCHs, make 3 VP lifts and go to the next row.
6th and 7th rows: 3 VP lifting, 4 SSN in the same loop where the lifting loops (3 VP lifting + 4 SSN = 5 SSN), * a shell of 9 SSN in the middle of a shell of 9 SSN of the previous row *. Repeat from * to * to the end of the row. Above the last loop of the previous row (namely, above the tip of the half of the shell of the previous row) we knit 5 CCHs, that is, a half of the shell of 9 CCHs, make 3 VP lifts and go to the next row.
8th row: 3 VP lifting, 4 SSN in the same loop as the lifting loops (3 VP lifting + 4 SSN = 5 SSN), * a shell of 9 SSN over the next 2 shells of the previous row, we collect 15 VP (for the first armhole) , skip 2 shells of the previous row, knit shells from 9 CCHs over the next 6 shells of the previous row (for the back), dial 15 VP (for the second armhole), skip 2 shells of the previous row, knit shells from 9 CCHs over the next 2 shells of the previous row, and over the last tip we knit half of the shell, that is, 5 CCH.
9th row: 3 VP lifting, 4 SSN in the same loop as the lifting loops (= 5 SSN), shells of 9 SSN over the next 2 shells of the previous row, a shell of 9 SSN in 3 VP of 15- of the dialed loops, skip 4 VPs, knit a shell of 9 CCHs, again skip 4 VPs and knit a shell of 9 CCHs, then knit shells of 9 CCHs over the next 6 shells of the previous row, and then by analogy We knit in a mirror: a shell in 3 VPs from 15 dialed loops, skip 4 VPs, knit a shell, skip 4 VP again, knit a seashell, and then knit seashells over 2 seashells of the previous row and a half of a shell above the last tip. At the end of the row, we do 3 VP lifts, turn the work and go to the next row.
10th - 22nd rows: similar to the 6th row.
Plank. We take a hook No. 3 mm, tie the thread from the inside out at the neck of the left shelf, make 2 VP lifting and then knit the 1st row.
1st row: 1 column without a crochet (hereinafter RLS) along the entire shelf. At the end of the row, we do 2 VP lifts, turn the work and go to the 2nd row.
2nd row: 1 sc over each loop of the previous row. At the end of the row, we do 2 VP lifts, turn the work and go to the next row.
3rd - 6th rows: similar to the 2nd row.
We cut off the thread and tie it from the inside at the bottom of the vest on the right side, make 2 VP lifts and knit in the same way as the left bar, only in the 4th row there will be loops for buttons.
In order to get a loop, you need to skip 3 loops of the 3rd row, and knit 3 VPs over them (the 5th row is knitted as usual, that is, over the VP and over all RLS we knit 1 SBN each).
Having connected the 6th row of the right shelf, we do not break the thread, but turn the work and start tying the vest “around the entire perimeter” of the RLS, while “at the bends” we knit 2 RLS each.
Thus, they are tied in order: the right strap with loops, the neckline, the left shelf, the bottom of the vest. We break the thread. Similarly, we tie the RLS to the armhole of the vest.
Double beanie
Bottom cap. With a hook No. 3 mm, we collect 4 VP and close it in a circle of SS.
1st row: 2 VP lifting, RLS in the same loop as the lifting loops, 2 RLS in the next loop of the chain and in each loop to the end of the row.
2nd and 3rd rows: similar to the 1st row.
4th - 6th rows: 2 VP lifts, 1 sc in the next loop of the previous row and in each loop to the end of the row.
7th row: 2 VP lifts, * 1 sc in the next loop of the previous row, 2 sc in the next loop of the previous row *. Repeat from * to * to the end of the row.
8th and 9th rows: similar to the 4th row.
10th row: similar to the 7th row.
11th - 13th rows: similar to the 4th row.
14th row: similar to the 7th row.
15th - 43rd rows: similar to the 4th row.
Cut the thread.
Strings. We tie the thread from the inside out over the 15th loop from the connection of the rows (that is, where the VP). In any theory, they write that 1 RLS corresponds to 2 VP of ascent, but in practice we need a rounded smooth transition, so further we will do 1 VP of ascent.
1st row: 1 VP of lifting and knit 1 RLS each over the next 16 RLS of the lower edge of the cap, 1 VP of lifting, turn the work and go to the 2nd row.
2nd - 8th rows: We begin to decrease the loops at the beginning and at the end of the row, that is, at the beginning of the row we skip 1 loop of the previous row, and at the end of the row we knit 1 RLS out of 2 loops of the base.
9th row: In the 8th row, 3 loops should remain, in the 9th row we knit them together, that is, 1 RLS over 3 loops of the 8th row.
Thus, there will be one loop, we do not break the thread, but do 1 VP, turn the work and dial 75 VP for the tie.
For the second tie, we tie over the 31st loop from the connection of the rows and knit in the same way.
Top cap. With a hook No. 4.5 mm we collect 12 air loops and close them in a circle SS ( Scheme 18).

1st row: 3 VP lifting, 1 CCH in the same loop as the lifting loops, * an arch of 2 VP, 2 CCH in the next loop of the chain *. Repeat from * to * to the end of the row.
We connect the last loop of each row to the upper loop of the SS lifting.
2nd row: 3 VP lifting, 1 SSN to the next SSN of the previous row, * 3 VP over the arch from 2 VPs of the previous row, 1 SSN each over the next 2 SSNs of the previous row. Repeat from * to * to the end of the row.
3rd row: 3 VP lifts, 2 SSNs in the same loop as the lifting loops, a shell of 5 SSNs above each first of the 2 SSNs of the previous row. We knit the last half of the shell, consisting of 2 CCHs, from the same loop as the lifting loops and the first 2 CCHs, that is, we knit a half of the shell at the beginning of the row and a half at the end of the row, and the lifting loops will be in the middle.
4th row: 3 VP lifts, 3 SSNs in the same loop as the lifting loops, a shell of 7 SSNs in the middle of each shell of 5 SSNs of the previous row. The last half of the shell consists of 3 CCHs.
5th row: 3 VP lifts, 4 SSNs in the same loop as the lifting loops, a shell of 9 SSNs in the middle of each shell of 7 SSNs of the previous row. The last half of the shell consists of 4 CCHs.
6th row: 3 VP lifts, 4 SSNs in the same loop as the lifting loops, a shell of 9 SSNs in the middle of each shell of 9 SSNs of the previous row. The last half of the shell consists of 4 CCHs.
7th - 12th rows: similar to the 6th row.
13th and 14th rows: 3 VP lifting, 1 RLS each over the next 4 CCHs of the shell halves of the previous row, 1 RLS each over the next 9 CCHs of the previous row of shells, then 1 shell from 9 CCHs over the middle of the next 2 shells of the previous row, then we knit 1 sc over each loop of 5 shells of the previous row, 1 shell out of 9 CCHs over the middle of the next 2 shells of the previous row, 1 sc over each loop of the previous row to the end of the row.
We connect the top of the lower and the top of the upper SS cap from the front side, and the bottom is connected from the inside of the SS, then we tie the bottom of the upper RLS cap (for this we tie the thread at the junction of the rows, make 2 VP lifts and knit 1 RLS in each loop, reach and tie the first tie, tie in front of the hats, the second tie to the end).
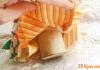
You can decorate the hat with a pompom.
At the numerous requests of girls to knit the same online, I write here my notes and a description of her knitting. If something is wrong, write in the comments, we will fix or add.
The cap is knitted in one piece in circular rows.
Let's collect incarnations in the album:


Materials and tools:
1. Threads YarnArt Merino De Luxe 50 (50% merino, 50% acrylic), 280m / 100g about 100g, or other yarn of similar thickness.
2. Circular or toe knitting needles # 2.5 and # 3 (or another size of knitting needles that allows you to achieve the specified density).
3. Marker to mark the beginning of the row.
4. A needle with a wide eye for securing the threads.
Knitting density up to WTO needles number 3 (1010 cm): 26 loops and 36 rows.
Knitting density after WTO needles number 3 (1010 cm): 24 loops and 32 rows.
Table 1 - Dimension table.
All calculations are given before the WTO, but the dimension is given taking into account stretching. If the knitting density coincides with the specified (for any yarn), you can refer to the size chart. If it does not match, then you can knit according to the calculations for a size larger or smaller than required.
Cast on needles No. 2.5 108 (108; 120; 132; 132) sts using the Italian method of a set of stitches with an elastic edge. Close the loops in a circle in a convenient way. Place a marker to mark the start of the row. Continue knitting in a circle.
How such a gum fits is very easily shown in the video of Yulia Dolgova:
1 row: the front ones are knitted behind the back wall, the purl ones are removed not tied (thread before work).
2 row: we knit the purl, remove the knitted ones without knitting (thread at work).
3 row: as the first row.
4 row: as the second row.
Next, the elastic band 22 is knitted. To do this, knit the purl, front, then remove the next two loops, change them in places, return to the left knitting needle and knit the front and purl, then purl, front, remove two loops again, change them in places, return to the left knitting needle and knit the front and back, then the back, front and so on until the end of the row.
5-12 rows: 1 out., * 2 persons., 2 out. * - 26 (26; 29; 32; 32) times, 2 persons., 1 out.
Continue knitting with the main pattern. Pattern repeat 12 stitches and 12 rows.
Closer pattern.


1 row: * 4 persons, 4 out., 4 persons. * - 9 (9; 10; 11; 11) times
2nd row: * 3 persons., 6 out., 3 persons. * - 9 (9; 10; 11; 11) times
3 row: * 2 persons., 8 out., 2 persons. * - 9 (9; 10; 11; 11) times
4 row: * 1 persons., 3 out., 4 persons., 3 out., 1 persons. * - 9 (9; 10; 11; 11) times
5 row: * 1 persons., 2 out., 6 persons., 2 out., 1 persons. * - 9 (9; 10; 11; 11) times
6 row: * 1 persons., 1 out., 8 persons., 1 out., 1 persons. * - 9 (9; 10; 11; 11) times
7 row: * 2 out., 8 persons., 2 out. * - 9 (9; 10; 11; 11) times
8th row: * 3 out., 6 persons., 3 out. * - 9 (9; 10; 11; 11) times
9 row: * 4 out., 4 persons., 4 out. * - 9 (9; 10; 11; 11) times
10 row: * 2 persons., 3 out., 2 persons., 3 out., 2 persons. * - 9 (9; 10; 11; 11) times
11 row: * 3 persons., 2 out., 2 persons., 2 out., 3 persons. * - 9 (9; 10; 11; 11) times
12 row: * 4 persons., 1 out., 2 persons., 1 out., 4 persons. * - 9 (9; 10; 11; 11) times
Repeat the rapport from rows 1 to 12 as many times as indicated in Table 1 for the respective size.


13 row: * 3 persons., 2 together out. left, 2 persons., 2 together out. to the right, 3 persons. * - 9 (11; 11) times
14 row: * 3 persons., 1 out., 2 persons., 1 out., 3 persons. * - 9 (11; 11) times
15 row: * 2 persons., 2 together out. left, 2 persons., 2 together out. to the right, 2 persons. * - 9 (11; 11) times
16 row: * 2 persons., 1 out., 2 persons., 1 out., 2 persons. * - 9 (11; 11) times
17 row: * 1 persons., 2 together out. left, 2 persons., 2 together out. to the right, 1 person. * - 9 (11; 11) times
18 row: * 1 persons., 1 out., 2 persons., 1 out., 1 persons. * - 9 (11; 11) times
19 row: * 2 together out. left, 2 persons., 2 together out. to the right * - 9 (11; 11) times
20 row: * 1 out., 2 persons., 1 out. * - 9 (11; 11) times
21 row: * 2 persons together. to the right, 2 persons together. to the left * - 9 (11; 11) times
22 row: * 2 persons together. to the right * - 9 (11; 11) times
For sizes 47-48 and 51-54

13 row: * 1 persons., 2 together out. right, 6 persons., 2 together out. left, 1 person. * - 9 (10) times
14 row: * 1 persons., 1 out., 6 persons., 1 out., 1 persons. * - 9 (10) times
15 row: * 1 persons., 2 together out. right, 4 persons., 2 together out. left, 1 person. * - 9 (10) times
16 row: * 1 person., 1 out., 4 persons., 1 out., 1 person. * - 9 (10) times
17 row: * 1 persons., 2 together out. right, 2 persons., 2 together out. left, 1 person. * - 9 (10) times
18 row: * 1 persons., 1 out., 2 persons., 1 out., 1 persons. * - 9 (10) times
19 row: * 1 persons., 2 together out. to the right, 2 together out. to the left * - 9 (10) times
20 row: * 1 person., 2 out., 1 person. * - 9 (10) times
21 row: * 2 persons together. left, 2 persons together. to the right * - 9 (10) times
22 row: * 2 persons together. to the right * - 9 (10) times
Cut the thread, thread the tip into the remaining loops, pull off the hole.
The crown is closer. 
Permission is granted to publish, copy the material or part of it, but only with reference to the source. Girls, let's respect the author's work. Author: Victoria Yakovets (Lvicia). I ask you not to post photos with a child on the network, it is better to give a link to this post.
Enjoy your knitting, even loops, show off your brand new hats!
Autumn has come! The weather pampers us with bright sun less and less. It's time to warm up. Today I propose to knit very beautiful and at the same time simple to perform crochet!
For such mitts, we need:
- Blue yarn;
- Hook;
- Scissors.
Let's start knitting with rubber bands... We will knit her stbn. We form the initial chain as long as the elastic is needed. In this case, it is 15 VP. We make 1 loop on the rise and knit 1 stbn for the back wall of the loops.
At the end, we do 1 VP and turn around. Next, we will knit as many rows as needed for the size. We try on the elastic and see how many more rows it is necessary to complete so that the elastic will come together on the arm.
Photo 1

We connect the two ends of the elastic and sew.
Photo 2

We turn the elastic to the front side.
Now for shell pattern we need to tie in a circle stbn. Their number must be a multiple of 6.
In this case, 36 stb are knitted.
Photo 3

At the beginning of a new row, we need to perform 1 loop on the rise and tie 1 stbn in the same place.
Skip 2 base loops and perform 5 stsn in the 3rd loop.
Skip 2 loops again and knit 1 sc in the 3rd loop.
Photo 4

Again skip 2 loops and knit 5 stsn into a new loop. So we will continue knitting until the very end of this row.
Photo 5

We started the last row with stbn, which means we will start this row with 3 lifting loops and another 2 ssn in the same place.
In the 3rd stsn of the previous row, we knit 1 stbn.
Now in the stbn of the previous row we perform 5 stbn.
So we continue knitting until the end of the row. At the end we will knit 2 stsn to the same point where lifting loops and 3 stsn were knitted at the beginning of the row. We knit 1 connection. loop in 3 lifting loop.
Photo 6

In the next 2 rows we will be adding to form a place for the thumb.
Since in the previous row we began to knit with 3 lifting loops, then this row starts with 1 lifting loop and 1 stbn to the same point.
Further, in the stb of the bottom row, we will knit not 5 stsn, but 7 stsn. Then, in the 3rd stsn of the bottom row, we perform 1 stbn, as in the previous rows. Then again we knit not 5, but 7 stsn.
This is where the increments ended. Next, we knit in the same way as in the previous rows.
We will repeat this row 1 time.
In the next row we will add again. But now we will knit not 7 stsn in the first 2 shells, but 9 stsn.
We try on a mitten on the hand and determine the approximate number of rows up to the thumb. We knit them with increments of 9 stsn in the first 2 shells.
Photo 7

Now we will form a place for the finger. We start the row as usual. Then we knit 3 stsn in the stb of the previous row.
In 4 stsn of the previous row we knit 1 connection. column. We dial 6 VP.
We skip 1 shell and in the stbn of the previous row we knit 3 stsn.
Photo 8

Then we knit as usual.
In the next row we will knit just like the first row of shells. We will knit in a chain from VP in the same way. In the 3rd we carry out 5 stsn. Next, we count 3 loops and knit 1 sc.
All subsequent rows will be the same as the 1st row with shells.
We knit as many rows as needed for the desired length of mitts.
By the same principle, we knit the second mitt.
Crochet mitts with a shell pattern are ready!
Yarn 1 (45% wool, 35% polyamide and 20% alpaca wool; 150 m / 50 g) - 50 g gray-red,
yarn 2 (67% viscose, 33% wool; 310 m / 50 g) - 50 g red; circular needles No. 4.5; hook number 4.5.
Patterns
Front surface
In circular rows, knit face loops constantly.
Crochet start row
Run 2 ch, insert the hook into the 1st ch. and * pull the thread, put the thread on the hook and pull it through the 1st point on the hook, once again throw the thread on the hook and pull it through both loops on the hook, grab the left outer wall of the loop with the hook, from * constantly repeat.
Shell pattern
Knit in circular rows acc. pattern, while knit odd circular rows with gray-red thread, even circular rows with red thread.Start with loops before the rapport, repeat the rapport constantly, end with loops after the rapport.
For the 3rd and 15th rounds. with the help of conn. Art. go back to the beginning of the circle.r., for the 5th circle.r. go forward with the conn. Art.
1 time to perform the 1st to 6th circle.r., Then 2 times to repeat the 3rd to 6th circle.r. and finish the 15-22th circle.

Knitting density
16 p. = 10 cm, knitted with a front satin stitch in 2 red threads;
1 rapport x 8 circular rows = 6.5 x 8.5 cm, connected with the main pattern.
Completing of the work
With a double gray-red thread, crochet the initial row of 70 (80) loops and close it into a ring with 1 connection. Art.After the 22nd circle. R. pull off the remaining 14 (16) p.
Along the initial row, take 80 (88) loops on the knitting needles with a double red thread and tie 5 rounds for the steering wheel. front stitch, then close the loops.
Photo: “Sabrina. Special issue "No. 11/2015