is a fun knitting process that will delight you with a charming winter beauty at the end. You can keep it for yourself or give it to one of your colleagues for the New Year. The snowman's height is 14 cm.
To work you will need:
- Yarn Vita baby Print (100% acrylic; 100g – 400m);
- Yarn Vita baby blue (100% acrylic; 100g – 400m);
- Yarn Pekhorka Children's new white color (100% acrylic; 50g – 200m);
- Hook 2.0 mm and 1.0 mm.
The first part of a video master class on crocheting the head and body of a snowman:
We knit the body and head of a snowman
We knit with white yarn.
- 1st row: in the middle of the loop (ring) we knit six sc, ss;
- 4th row: *inc, 2 sc* (24 sts);
- Row 7: *inc, 5 sc* (42 sts);
- 8-13 row: RLS (42 p);
- Row 14: *decrease, 5 sc* (36 sts);
- Row 15: *decrease, 4 sc* (30 p);
- Row 16: *decrease, 3 sc* (24 sts);
- Row 17: *decrease, 2 sc* (18 p);
- 18 – 19 row: RLS (18 p);
- Row 20: *inc, 2 sc* (24 sts);
- 21 row: * increase, 3СБН* (30 p);
- Row 22: *inc, 4 sc* (36 sts);
- Row 23: *inc, 5 sc* (42 sts);
- Row 24: *inc, 6 sc* (48p);
- 25 - 39 row: RLS (48 sts);
- Row 40: *decrease, 6 sc* (42 p);
- 41 row: *decrease, 5 sc* (36 p);
- Row 42: *decrease, 4 sc* (30 p); Fill the snowman's body with filler and add more padding polyester as you knit.
- 43 row: * decrease, 3СБН* (24 p);
- Row 44: *decrease, 2 sc* (18 p);
- Row 45: *decrease, 1 sc* (12 p);
- Row 46: * decrease * until the hole is closed. Fasten and cut the thread.
The second part of the video master class on crocheting a scarf and a snowman hat:
Knitting a scarf for a snowman
We cast on 60 VP, printed yarn. We knit 2 rows with half double crochets. We tie the entire scarf with sc, using a different color of yarn (blue). We cut the yarn approximately 7-10 cm long and tie the fringe to the edges. We straighten with scissors.
We knit a hat for a snowman
Knitted with printed yarn.
- 1st row: Six sc are knitted into the ring, tighten;
- 2nd row: from one loop we knit 2 sc (12 p);
- 3rd row: *inc, 1 sc* (18 p);
- 4th row: *inc, 2 sc* (24 sts);
- Row 5: *inc, 3 sc* (30 sts);
- Row 6: *inc, 4 sc* (36 sts);
- Row 7: (blue yarn) sc for the back half loop (36 sts);
- 8 – 13 row: (blue yarn) knit in two half loops RLS (36 sts);
- Row 14: (print yarn) * increase, 5 sc * knit in the back half loop (42 sts);
- Row 15: (print yarn) * increase, 6 sc * knit in two half-loops (48 sts);
- Row 16: (print yarn) * increase, 7 sc * (52 sts).
We tie the edge of the cap with blue yarn. Tighten the thread and cut it.
The third part of the video is a master class on crocheting hands in mittens, boots and a carrot nose for a snowman:
Knitting a carrot nose
We knit with orange yarn and a 1 mm crochet hook.
- 1st row: cast on 2 VPs, knit 4 sc into the second loop;
- 2nd row: RLS (4 p);
- 3rd row: *inc, 3 sc* (5 p);
- 4th row: RLS (5 p);
- Row 5: *inc, 4 sc (6 sts).
Knitting boots
We knit with blue yarn.
- 1st row: knit six sc into a ring. Tighten the ring.
- 2nd row: double the loops, knit 2 sc from one loop;
- 3rd row: *RS, inc* (18 sts);
- 4th row: * 2 RLS, inc* (24 sts);
- Row 5: * 3 RLS, inc* (30 sts);
- 6th row: * 3 RLS, decrease * (24 p);
- 7th row: * 2 RLS, decrease * (18 p);
- 8th row: * 1 RLS, decrease * (12 sts). We fill one side of the boot with synthetic padding to stabilize the snowman.
- Row 9: *decrease* until the hole is closed.
Knitting hands in mittens
We knit the mitten with printed yarn.
- 1st row: we knit 1 VP into the ring (it is equal to one sc) and five sc. Tighten the ring.
- 2nd row: knit 2 sc in one loop (12 sts);
- 3 – 4 row: RLS (12 p);
- 5th row: 5 RLS, 1 fluffy stitch (this will be the thumb), 6 RLS;
- 6th row: * 2 RLS, decrease * (9 p);
- Row 7: knit in the front half loop, 2 sc in each. This will be the lapel of the mitten.
Now we knit the hand with white yarn. We still have the back half loops of the 7th row, we start knitting in them.
We knit a sc in each back half loop (9 sts). Next we knit in the round, one sc in each loop, 7 rows in total. Don’t forget to fill the mitten with your hand with padding polyester. And the last row close the loops with decreases.
Now all that remains is to sew on the nose, hands, and buttons. The eyes can be glued or beads sewn on. Sew the boots with the flat side to the bottom of the snowman. Ready!
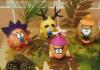
We present a cute and fairly easy to knit toy that can be given as a souvenir for the New Year. This cute crocheted snowman with a hat and mittens will appeal to both adults and children, and will take its place of honor under the Christmas tree! To create such a bright snowman, you will need regular acrylic yarn of different colors and a suitable size hook (2-2.5 mm).
The knitted snowman pattern is based on the Asida pattern. The snowman shown in the photo was knitted by needlewoman Yana Lapa.

Crocheted snowman:
diagram and description of amigurumi toy
Materials:
- Yarn “Children's novelty” 50g/200m, 100% acrylic, hook 2.5 mm
- Some Alize Softy yarn for the edge of the hat
- Safety eyes or beads
- Thick cardboard, tape
- Beads and buttons for decoration
- Scissors
Head
Row 1: 2 ch, into the second loop from the hook 6 sc
Row 2: 2 sc in each loop = 12
Row 3:
Row 4:
Row 5:
Row 6:
Row 7:
Row 8:
Row 9:
Row 10-12: 1 sc each without increase
Row 13:
Row 14: 1 sc in each loop in a circle = 48
Row 15:
Row 16:
Row 17:
Row 18:
Row 19: knit every 3 and 4 stitches together =18
Row 20:
Row 21: decrease in each stitch = 6
Fasten the thread, leaving a tail for sewing.
Insert eyes between rows 12 and 13. Stuff the detail.
Knitted snowman body
Row 1: ch, second from hook 6 sc
Row 2: 2 sc in each loop = 12
Row 3: in every 2nd loop 2sc = 18
Row 4: in every 3rd loop 2 sc = 24
Row 5: in every 4th loop 2 sc = 30
Row 6: in every 5th loop 2 sc = 36
Row 7: in every 6th loop 2 sc = 42
Row 8: in every 7th loop 2 sc = 48
Row 9: in every 8th loop 2 sc = 54
Row 10: in every 9th loop 2 sc = 60
Row 11: in every 10th loop 2 sc = 66
Row 12-16: 1 sc each without increases = 66
Row 17: knit every 10 and 11 stitches together = 60
Row 18: knit every 9 and 10 stitches together = 54
Row 19: knit every 8 and 9 stitches together = 48
Row 20: knit every 7 and 8 stitches together = 42
Row 21: knit every 6 and 7 stitches together = 36
Row 22: knit every 5 and 6 stitches together = 30
Row 23: knit every 4th and 5th stitches together = 24
Stuff it.
Row 24: knit every 3 and 4 stitches together = 18
Row 25: knit every 2 and 3 stitches together = 12
Row 26: decrease in each stitch = 6
Pull the hole, secure the thread and cut.
Mittens
Row 1: 2 ch, in the second loop from the hook we knit 6 sc = 6
Row 2: 2 sc in each loop = 12
Row 3-4: knit 1 sc in a circle = 12
Row 5: we knit 5 sc and knit a fluffy stitch (this will be the finger on the mitten), then we knit another 6 sc = 12
Row 6: knit every 3 and 4 stitches together = 9
Row 7: we knit loops behind the front wall: increase in each loop in a circle. This creates a mitten cuff.
Change the thread to white and begin to knit the handle behind the back walls of the loops of the sixth row = 9
Don’t forget to secure the thread when moving from the mitten to the handle so that the knitting does not unravel later.
Row 8-16: 1 sc in a circle = 9
Row 17: knit every 2 and 3 stitches together
Pull (don’t forget to stuff the handle before doing this) and secure the thread, trim and hide the ends.
Legs
We prepare cardboard for the base of the feet, tape and scissors.
Row 1: cast on a chain of 6 ch, knit 3 sc in the second loop from the hook, then one sc in each loop and 3 sc in the outer loop again, and one sc in the next 3 loops = 12
Row 2: in the next three loops we knit 2 sc, in the next three - one sc, in the next three - again 2 sc, in the last three loops in this circle - one sc, it turns out oval = 18
Row 3: in the next 6 loops, alternating, knit 2 sc, 1 sc (3 times), in the next three loops, knit one sc, in the next six loops, repeat the alternation of 2 sc, 1 sc (3 times); in the next three loops we knit one sc = 24
Row 4: in the next nine loops we knit 1 sc, 2 sc, 1 sc (3 times), the next three loops we knit one sc; in the next nine loops knit 1 sc, 2 sc, 1 sc (3 times); in the next three loops we knit one sc = 30
Row 5: we knit without increments in the round 30 sc for the back walls of the loops = 30
Row 6: again in a circle without increments for both walls of the loops = 30
Row 7: We knit 7 decreases in a row, knit 5 sc one at a time and three decreases on the heel, and knit 5 sc further.
Now we cut out an oval to the size of the sole from cardboard and try it on inside the shoe. If it doesn't fit, we cut it or redo it.
The cardboard needs to be perfect - the right size, otherwise it will stick out or move and the snowman will not be stable. Happened? Great, immediately cut out another piece of cardboard and carefully cover it with tape and put it in the shoe.
Row 8: three decreases and knit one sc to the heel, fasten the thread. Let's stuff it.
Carrot nose
Row 1: 2 ch in second from hook 6 sc
Row 2: one sc at a time = 6
Row 3: in every 3rd loop 2 sc = 9
Row 4-5: one at a time without increments = 9
Row 6: in every 4th loop 2 sc = 11
You can make your nose shorter or longer at your discretion.
Fasten the thread, leave a tail for sewing.
Sew the head and body with holes facing each other. Sew on the arms and legs. Embroider a smile.
Scarf knitted from right to left, each time with a new color. Cast on a chain of chains, secure the thread at the end and cut it. And on the right, a new row with a new color. It turns out beautifully - on one side there are front rows, on the other - purl rows.
cap
Choose the color of the cap and its stripes at your discretion.
Row 1: Cast on a chain of air loops and connect so that you get 56 loops. Try it on the snowman, if necessary, decrease or add 1 loop.
Row 2-8: knit 1 sc in a circle
Row 9: knit every 8th and 9th stitches together
Row 10: knit 1 sc in a circle
Row 11: knit every 7th and 8th stitches together
Row 12: knit 1 sc in a circle
Row 13: knit every 6th and 7th stitches together
Row 14: knit every 5th and 6th stitches together
Row 15: knit every 4th and 5th stitches together
Row 16: knit every 3 and 4 loops together
Row 17: knit every 2 and 3 loops together
Row 18: decrease in each stitch, pull stitches together
Make a pompom and sew it to the hat.
Dress up the knitted snowman and the toy is ready!
If you have any questions about the snowman crochet pattern, write them in the comments to the post! Good luck to everyone in preparing for the New Year!

If you are a beginner needlewoman and are looking for a new way to create designer gifts, pay attention to the crochet technique. To make a three-dimensional souvenir, you only need one tool and multi-colored yarn. Follow the instructions below and you will have a cute knitted snowman. The hook allows you to create original three-dimensional toys quickly and easily. Choose the method you like, remember the principle of operation and create your own exclusive gifts and souvenirs.
Volumetric crochet
If you have already been interested in this needlework technique, then most likely you have seen both diagrams and finished products. Many people are keen on making napkins and clothing items, but voluminous crocheted items are no less impressive. This method can be used to make both flat products with a relief surface and fully three-dimensional objects. Decorations made from voluminous flowers, textured scarves and home decor look original. Soft toys, beads and other accessories and souvenirs look very cute and unusual. A cute winter character - a knitted snowman - will definitely take a worthy place in your home. A hook and a few multi-colored skeins of yarn are all you need to complete it, and, of course, a little free time. Explore several options for making a souvenir and knit your own unique character using the chosen method.
What you need
You need to prepare the following to make a beautiful knitted snowman:
- hook;
- white yarn;
- threads of a different shade, which is necessary to create decorative elements (orange - for the carrot nose, blue - for the scarf and hat, black - for stick pens and eyes);
- filler (sintepon, holofiber, foam rubber, cotton wool);
- a needle with a large eye for sewing elements together.
It is worth considering that the thickness (number) of the working tool must correspond to the yarn. For small products they should be thin. Details of the face - for example, eyes - are easy to embroider, but you can glue ready-made plastic ones. Options with secure mounting on a washer are especially good. They are installed before the toy is filled. A “ring” is attached to the inside of the plastic leg, which cannot be removed. Thus, for example, a baby playing with your product will no longer be able to tear off its eyes or nose.

Manufacturing methods
So, you need a knitted snowman. The hook allows you to create such a character in two ways:
- Whole product.
- Separate elements and their subsequent stitching.

We are talking, of course, about creating the character’s torso itself. By the way, your hero can also look different. The traditional version is made of three balls, going from larger to smaller from bottom to top. A good souvenir can be made from two parts. In addition, snowmen are also made from elongated “sausages”. This part can be used as a head. This option will look unusual and fun.
Execution Sequence
Whatever knitting method you choose, you need to work on making a souvenir toy like this:
- Tie the required number of white balls (individually or as one whole body) to the unfinished top part.
- Fill the parts with padding polyester or other prepared material.
- Decrease stitches and complete your white spheres.
- Embroider or fasten already prepared eyes, nose, buttons.
- Knit additional snowman parts (arms, legs) and decor
- Combine all the elements into a single whole.
The souvenir is ready. If necessary, attach a pendant to the item so it can be used as a keychain or hung on a Christmas tree.

How to crochet a snowman (option 1)
In the first case, we consider a method for making a figurine from two elements into one piece. The sequence of work is as follows:
- Cast on two chain stitches using white yarn.
- Work 6 single crochets into the second chain stitch.
- Make a connecting post.
- In the second row, make six increases, that is, in each loop of the previous row you need to knit two single crochets. As a result, you will have 12 columns.
- The third row is performed according to the principle of the previous one, when two stitches are knitted into each loop. You get 24 columns.
- In the fourth row, make 6 increases, that is, knit 4 stitches, then an increase (two stitches in one loop of the previous row), again 4 stitches and then until the end of the row in the same sequence.
- Knit three rows (30 stitches each) without increments.
- In the next row you need to perform 6 decreases according to the principle of step No. 6, only instead of knitting an additional stitch in one loop you need to skip the loop of the previous row. As a result, you will get 24 columns in a row again.
- Also perform 6 decreases on the next row until 18.
- Fill the resulting element with padding polyester and continue working.
- Add 6 columns (there will be 24).
- Add 6 more columns (up to 30).
- Knit three rows of 30 stitches.
- In each of the following rows, perform 6 decreases.
- Don't forget to fill the ball with padding polyester.
- When there are 6 loops left, simply pull them off and secure the thread.

So, you have learned how to crochet a snowman with a single thread, when subsequent stitching of white balls is not required. If you want to make a souvenir of three parts, simply do not complete the second sphere, but continue working by first increasing several loops in a row, and then, having knitted several rows, decrease loops in the same number and complete the product, not forgetting to first fill it with padding polyester . If you want the balls to be the same, use the same number of loops as in the previous two. If you want to get a small head, accordingly, add fewer loops and make fewer rows.
Knitting a snowman: method 2
Volumetric crochet can be done not from one thread, but by creating individual elements and then stitching them together. In the case of our character, the work scheme will be similar to the previous one, with the only difference being that after step No. 10 (filling with padding polyester), you need to perform not an increase, but a decrease again until the ball is completed. It is easy to knit the second and third balls using the same pattern (all three parts will be the same size), and then sew them into a snowman. Balls of different diameters are knitted in the same way.
Amigurumi
If you want to make miniature crocheted snowmen, the patterns will be slightly different. This requires a thin hook and yarn, and increases and decreases will occur more slowly. And there may be more loops and rows. If you compare it with the diagram above, then when you have 12 stitches in a row, the next increase is made to 18, then to 24, then to 30, 36, 42. Next, make 8 rows of 42 stitches. The decrease follows the same pattern.

How to knit additional parts
When we crochet a snowman, it is worth remembering that we are creating not just a lifeless thing, but a toy, a character that should convey some emotions and create a cheerful mood. This is possible thanks to the decorations and finishing elements used.
Volumetric handles can be knitted according to the following pattern:
- Cast on 2 air loops.
- Make 6 single crochets in the second loop.
- Close with a connecting post.
- In the second row, make two increases (you get 8 loops).
- Knit 7 rows.
If you want to get handles in mittens, start with yarn of a contrasting color, and after completing two rows of 8 loops, change the thread to white and knit another five rows with it. The second handle is knitted similarly. The carrot nose is easy to make using the same pattern, with the only difference being that in step No. 4, not two increases are made, but four.
The scarf is easily knitted from a chain of chain stitches and one row of double crochets. The length is determined at your discretion. The hat can be made with double crochets, starting with a ring of 25 or 30 stitches, knitting the first row and gradually decreasing 4 stitches in each subsequent row.

As you can see, a crocheted snowman for beginners is not such an impossible task. Everything is knitted very simply. It is enough to master the simplest loops and understand the principle of creating a shape by increasing and decreasing. Having studied basic techniques, you can make a beautiful souvenir of any complexity.
Materials: yarn 50% wool, 50% acrylic, thickness 392 m / 100 g, 2 beads for eyes, 2 buttons;
Tools: hook No. 2.5 and knitting needles No. 2, knitting and sewing needle;
Size: toy height about 20 cm.
We present to your attention a snowman crochet pattern. The snowman hurries to the New Year's holiday with a bag of gifts.
Sequence of work
The snowman is knitted from the bottom. The body is connected by a single piece. Hands - separately. Additional elements: a hat, a scarf and a bag with gifts are knitted. All details are single crochet, without lifting loops. Do not stuff the toy parts too tightly with filler. They should have a pleasant elasticity, but not stone. Works well as a filler. In parentheses is the number of columns in the indicated row.

We start knitting from the bottom
1 row : 6 loops in the initial ring (6);
2nd row : * 2 single crochets in 1 loop * - repeat 6 times (12);
3rd row: * 2 single crochets in 1 loop, 1 single crochet * - repeat 6 times (18);
4th row:
5 row:
6th row:
7th row:
8th row:
9th row:
10th row: * 2 single crochets in 1 loop, 8 single crochets * - repeat 6 times (60);
11th row: * 2 single crochets in 1 loop, 7 single crochets * - repeat 6 times (66);
from 12 to 22 row: We knit without increments, in each row there are 66 single crochets.
Row 23: * 9 single crochets, 2 single crochets with one top * - repeat 6 times (60);
Row 24: * 8 single crochets, 2 single crochets with one top * - repeat 6 times (54);
Row 25: * 7 single crochets, 2 single crochets with one top * - repeat 6 times (48);
Row 26: * 6 single crochets, 2 single crochets with one top * - repeat 6 times (42);
Row 27: * 5 single crochets, 2 single crochets with one top * - repeat 6 times (36);
Row 28: * 4 single crochets, 2 single crochets with one top * - repeat 6 times (30);
Middle part of the snowman
We begin to add loops.
Row 29: * 2 single crochets in 1 loop, 4 single crochets * - repeat 6 times (36);
Row 30: * 2 single crochets in 1 loop, 5 single crochets * - repeat 6 times (42);
Row 31: * 2 single crochets in 1 loop, 6 single crochets * - repeat 6 times (48);
Row 32: * 2 single crochets in 1 loop, 7 single crochets * - repeat 6 times (54);
from 33 to 41 row: We knit without increments, in each row there are 54 single crochets.
Fill the bottom of the Snowman with filler.
We begin to decrease the loops.
Row 42: * 7 single crochets, 2 single crochets with one top * (48) - repeat 6 times;
Row 43: * 6 single crochets, 2 single crochets with one top * (42) - repeat 6 times;
Row 44:* 5 single crochets, 2 single crochets with one top * (36) - repeat 6 times;
Row 45: * 4 single crochets, 2 single crochets with one top * (30) - repeat 6 times;
Row 46: * 3 single crochets, 2 single crochets with one top * (24) - repeat 6 times;
Row 47: * 2 single crochets, 2 single crochets with one top * (18) - repeat 6 times;
Top part
Adding loops
Row 48: * 2 single crochets in 1 loop, 2 single crochets * - repeat 6 times (24);
Row 49: * 2 single crochets in 1 loop, 3 single crochets * - repeat 6 times (30);
Row 50: * 2 single crochets in 1 loop, 4 single crochets * - repeat 6 times (36);
Row 51: * 2 single crochets in 1 loop, 5 single crochets * - repeat 6 times (42);
from 52 to 58 row: We knit without increments, in each row there are 42 single crochets.
Fill the middle part of the snowman with filler.
We fill the upper part with filler as we knit.
Decrease loops
Row 59: * 5 single crochets, 2 single crochets with one top * - repeat 6 times (36);
Row 60: *4 single crochets, 2 single crochets with one top* - repeat 6 times (30);
Row 61: * 3 single crochets, 2 single crochets with one top * - repeat 6 times (24);
Row 62: * 2 single crochets, 2 single crochets with one top * - repeat 6 times (18);
Row 63: * 1 single crochet, 2 single crochets with one top * - repeat 6 times (12);
Row 64: * 2 single crochets with one top * - repeat 6 times (6).
We pull the remaining loops onto a thread, fasten and seal the ends.
Hands
We start knitting from the bottom, from the mittens, with red thread.
1st row: 6 single crochets in a sliding loop (6);
2nd row: * 2 single crochets in each loop * - repeat 6 times (12);
3rd row: we knit without increases (12);
4th row: * 5 single crochets, 2 single crochets in one loop * - repeat 2 times (14);
5, 6, 7 row: we knit without increases, in each row there are 14 single crochets (14);
We cut the red thread and attach the white thread.
8, 9, 10 row: each row has 14 single crochets (14);
11th row: * 5 single crochets, 2 single crochets with a common top * - repeat 2 times (12);
12, 13 row: in each row there are 12 single crochets (12);
Row 14: * 4 single crochets, 2 single crochets with a common top * - repeat 2 times (10)
15, 16, 17 row: 10 columns (10)
We cut the thread, leaving an end of about 20 cm for sewing the arms to the body. We stuff our hands in the lower part (mittens) not too tightly. We do not stuff the upper part. Sew up the hole. We make several stitches with red thread, marking the thumb on the mittens. We attach the arms to the body or sew them on.
Nose
We leave the tail of the thread longer (about 20 cm) to sew on the nose. We knit a chain of 6 air loops. We close it with a connecting post. We knit a tube in a spiral with single crochets about 2 cm long. Then we shorten the loops by knitting 2 single crochets with one vertex. Gather the remaining loops onto a thread and tighten. We sew the nose to the head with oblique stitches. No need to stuff your nose.
cap
We knit the hat with knitting needles in the round. We are recruiting 44 loops and knit 1.5 cm in garter stitch (6 rows). Next 2.5 cm (10 rows) - stocking stitch. We decrease 8 loops per row, knitting 2 loops together (4 decreases per row), through the row.When 12 loops remain, tighten the loops and sew on the pompom.
Scarf
We knit the scarf with knitting needles using a 1x1 elastic band. We cast on 8 loops (together with edge stitches). We knit 32 cm. We attach the fringe. The width of the scarf is slightly less than 2 cm.
Gift bag
Knitted in the round at the top. We cast on 46 loops and knit with 3 cm blue yarn (12 rows). Next, according to the pattern, we knit a jacquard pattern. After the pattern, knit 2 cm (10 rows) with blue yarn and connect the sides of the bag with 3 knitting needles or sew. We fill the bag with filler or put a New Year's gift in it.

Sometimes it turns out that there is no opportunity to buy gifts, or, on the contrary, there is an opportunity, but you want to give something special and please your loved ones with your attention. In such a situation, a DIY knitted toy will come to the rescue. In this master class, I propose to look at a knitted snowman using a regular crochet hook, in a selection with a diagram and description. To get started, we need to purchase yarn of different colors and the usual set of tools for a needlewoman; a complete list of everything needed is presented below.
We crochet a snowman step by step: diagram and description of work
Necessary materials:- White yarn;
- Red yarn;
- Orange yarn;
- Any colored yarn for accessories;
- Eyes (can be as prepared or you can use beads or buttons);
- The hook is the right size;
- Scissors;
- Needle;
- White thread;
- Any filler (sintepon, padding polyester, cotton wool, etc.)
Step #1 – Making the body.
We need to knit the ball, for this we will increase the number of intermediate loops between the additions of columns in each row.
1st row: in the second loop from our hook we knit 6 single crochets - number of loops = 6;
2nd row: you need to knit 2 single crochets in each column of the previous row - number of loops = 12;
3rd row: 1 single crochet in each 2nd column of the previous row, between them 2 single crochets - number of loops = 18;
4th row: 1 single crochet in each of the 2 loops of the previous row, alternating with 2 single crochets in the previous row – number of loops = 24;
5th row: 1 single crochet in each of the 3 loops of the previous row, alternating with 2 single crochets in the previous row – number of loops = 30;
6th row: 1 single crochet in each of the 4 loops of the previous row, alternating with 2 single crochets in the previous row – number of loops = 36;
7th row: 1 single crochet in each of the 5 loops of the previous row, alternating with 2 single crochets in the previous row – number of loops = 42;
8 row: 1 single crochet in each of the 6 loops of the previous row, alternating with 2 single crochets in the previous row – number of loops = 48;
9 row: 1 single crochet in each of the 7 loops of the previous row, alternating with 2 single crochets in the previous row – number of loops = 54;
10-14 rows: 1 single crochet in each loop of the previous row – number of loops = 54;
Row 15: 1 single crochet in each of the 7 loops of the previous row, alternating with 1 single crochet in two adjacent stitches of the previous row - number of loops = 48;
16th row: 1 single crochet in each of the 6 loops of the previous row, alternating with 1 single crochet in two adjacent stitches of the previous row - number of loops = 42;
17th row: 1 single crochet in each 5th loop of the previous row, alternating with 1 single crochet in two adjacent stitches of the previous row - number of loops = 36;
18th row: 1 single crochet in each 4 loops of the previous row, alternating with 1 single crochet in two adjacent stitches of the previous row - number of loops = 30;
Row 19: 1 single crochet in each of the 3 loops of the previous row, alternating with 1 single crochet in two adjacent stitches of the previous row - number of loops = 24;
20 row: 1 single crochet in each of 2 loops of the previous row, alternating with 1 single crochet in two adjacent stitches of the previous row - number of loops = 18;
When knitting in the round, it is very important to knit the stitches evenly. Let's start with the fact that we need to close two air loops in a circle.

We start with 6 stitches or 6 single crochets.
We thread the hook into the second loop from our hook and knit 6 single crochets.
Count, 6 loops have formed in front of you, single crochets, belonging to the first row.
If we characterize the technique of knitting rows in circles, it will look like this.
- firstly, such knitting begins and ends the same;
- secondly, we start with lifting loops;
- thirdly, we finish by knitting a half-column from the last column of the row into the first column of the present one, thereby connecting the end and beginning of the row;
- fourthly, we knit a lifting air loop and move on to the next row.
The head is knitted similarly to the body, the only difference is the size of the finished ball, that is, we make fewer rows and loops. When changing the size of the snowman, so that you end up with a beautiful toy, do not forget to proportionally change the number of loops on both the head and body accordingly.
Sew the head to the body.
Step No. 3: knitting handles.As you know, there must be two hands. We make them as simple as possible, namely: we cast on an arbitrary length from air loops, do not miscalculate, otherwise you will end up with disproportionate hands, we knit 5-7 rows with single crochets.
In winter it’s cold outside, so the snowman needs mittens, the number of loops depends on the number of rows you collected when knitting the handles, we knit the rows according to the following pattern:
- 2 single crochets in each column of the previous row;
- 1 single crochet in each stitch of the previous row;
This is how the cuff is knitted
- Repeat as first
- Repeat like the second
5-6. 1 single crochet in the loop of the previous row, 1 single crochet in two adjacent stitches of the previous row, thus alternating the required number of times
After we tighten the loops with the same thread, we sew the mitten to the place that fits on the finger.

By row:
- In the second loop from the hook, knit 6 single crochets, 6 in total
- We tie 2 single crochets to each column of the previous row, already 12
- We alternate 1 single crochet and 2 single crochets to the column of the previous row. - 18.
4-13. 1 single crochet, for each of the loops of the previous row. = 18
We stuff the resulting leg with synthetic fluff, and then finish it like this
- 1 single crochet in the loop of the previous row, and 1 in two adjacent stitches of the previous row. Alternating should make 12.
- 1 single crochet in the loop of the previous row, and 1 in two adjacent stitches of the previous row. Alternating should result in 6.
We finish by tightening the loops and securing the thread.

We sew on eyes - beads, knit and sew on carrots.
The carrot is made like this: we close three air loops into a ring, knit with single crochets in a circle to the required length. The loops were pulled together and the thread was pulled in the other direction.
We make a hat for the snowman - and voila!

This snowman can be an excellent gift and souvenir that will decorate your interior during the Christmas holidays. Well, we’ll finish this wonderful master class with a selection of videos on the topic of knitting similar toys. Give joy made with your own hands!
Video selection on the topic of the article