Happiness is not immediately ready. It happens because of your actions. Dalai Lama Tenzin Gyatso
And you need to act on the basis of understanding your own subconscious, communication with the higher I. But how to hear it? A seemingly unpretentious decoration will help you with this. Shambhala bracelet, which owes its birth to Buddhist monks. What is the Shambhala amulet?
This amulet, which carries a powerful source of energy, begins to influence the fate of a person as soon as it is worn on the wrist. right hand... But in order for it to work correctly, to protect its owner, to give wisdom, it is necessary to learn how to make a bracelet with your own hands.
What he really is
Consists of two or more sturdy cords, woven together. The weaving system resembles the knots of "eternity" of the monks of Tibet. Inside the woven ropes, beads are inserted of the most varied shapes, designs and colors. The finished talisman, if you put it on your hand, can easily be tightened to the required size. To make a classic version of the Shambhala amulet with our own hands, we need:
- Board to weave decoration
- Waxed cords about 3 meters
- PVA glue or Moment
- Lighter
- Scissors
Beads
They can be taken from 10 to 15 pieces, depending on the length of the talisman and the diameter of the beads. It is better to prepare several types of beads, which we will alternate in weaving. Make sure the holes in them fit the diameter of the rope.
Shambhala amulets use different kinds beads. Wooden, metal, precious stones, natural materials... Monochromatic, variegated, painted, with pasted in rhinestones. Their shape speaks volumes.
- Rounded. The symbolism of peace of mind, happiness, good luck with any choice.
- Skull shape. The skull has long been considered a symbol of the energy of life. Shambhala bracelet with skull beads will give strength to its wearer. Protect against fears, dangerous situations.
- Cross beads. Sometimes you can see the original weaving of beads in the form of a cross on the amulets. Such talismans will add worldly wisdom, patience, calmness to the owner. To make a jewelry with cross beads with your own hands is to attract resilience to yourself in all life's vicissitudes.
- Snakes. Beads with the image of snakes bear the symbolism of an ever-changing world, which never ceases to be pleasant and happy for you. It is a symbol of dramatic change with a change for the better.
The classic Tibetan talisman consists of large rounded beads natural stone braided with a waxed black cord.
Cord
Basically, for weaving the amulet, they take a synthetic rope of knitted weaving. You can use nylon, nylon. When choosing, make sure of its strength. It should be about 2 mm in diameter.
- Synthetic. It will come in handy to make a bracelet with rhinestones or precious stones with your own hands.
- Cotton waxed thread. This lace is used to create jewelry with a clearly defined style.
- Leather rope (or imitation leather). Leather threads are rarely used for weaving. They are too stiff and inelastic.
To correctly make a Shambhala bracelet, we need to take about 60 cm of the cord for the base and 150-180 cm for weaving the decorative part. The color of the thread can be selected in accordance with the elements of the signs of the zodiac.
| Zodiac sign | Element | Colour |
|---|---|---|
| Sagittarius, Aries, Leo | Fire | Vibrant shades of reds, crimson, crimson, dazzling orange, magenta, gold, ruby, bronze and black |
| Gemini, Aquarius, Libra | air | The color of the sky in all its manifestations: transparent blue, deep blue, pastel gray, gray-blue, steel color, marengo |
| Capricorn, Taurus, Virgo | Earth | All colors of the natural world. Muted greens, goldens, umber, terracotta, cream, eggplant. Rust, orange and copper color. |
| Scorpio, Pisces, Cancer | water | A gamut of blue and green palettes. Ultramarine, sea wave, delicate pastel colors and deep purple |
First, you can watch a video on how to weave a shambhala bracelet yourself:
Let's start creating
The Shambhala bracelet is an original, unusual designer. You are offered a free flight of imagination when making it yourself.
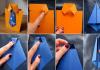
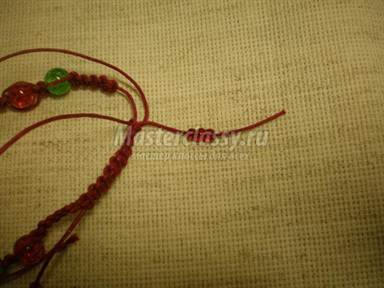
Photo 1. Basis for manufacturing. We take the prepared board. We nail two nails to it, 40-50 cm opposite each other. Tie the end of the main (lazy) rope to one nail. We will string the beads on it in the planned order. We tie the other end of the main thread to another carnation. The rope should be taut.
Photo 2. Fastening knot. We fold the additional cord (decorative) in half, making sure that its ends are the same. And we tie it with a regular knot above the initial bead. The edges of all threads can be set on fire with a lighter.
Photo 3. Basic weaving. We pass the left part of the additional thread under the lazy cord and put it on top of the right one. We pass the right part of the decorative thread over the main one and thread it through the loop of the left part of the additional cord. We are tightening.
Photo 4. Knots of weaving. Then we carry out the same procedure, but we start each new node from the other side. The second knot begins with the introduction of the right side of the decorative thread under the main one, we display it on the left. The left one, in turn, is introduced above the lazy one and we thread the loop of the right side of the additional lace. We tighten and continue so on. We make 20-22 knots and reach the first bead.
Photo 5. Bead. We wrap the beads on both sides with our decorative cords and tie a regular knot. We continue basic weaving farther.
The amulet does not have a strict weaving pattern. But for beginners, you can suggest making the first bracelet with your own hands according to this plan: 22 knots - a small bead - 9 knots - a large bead - 9 knots - a large bead - 9 knots - a large bead - 9 knots - a small bead - 22 knots.
Photo 6. Securing. When we have finished weaving the bracelet with our own hands, remove it from the board. We decorate the tips. Having retreated 5 centimeters from the last main knots, we tie several ordinary knots from an additional lace. Lubricate the places of the knots with superglue, and cut off the excess parts of the decorative threads.
- The main lace cannot be cut!
Photo 7. Clasp. We fold our bracelet in a circle, while the ends of the main ropes should be directed towards each other. We take the rest of the additional thread and weave the ends of the lazy cord with five basic knots. We make them loose so that the main laces can slide there. We string one bead onto the remaining ends of the lazy rope and fasten it with ordinary knots. Lubricate them with glue.
Photo 8. Final. On the seamy side of the bracelet, we tie two strong ordinary knots from decorative threads, fix them with glue. We cut off their remains. The amulet is ready! We were able to make a Shambhala bracelet with our own hands!
Take care of him, protect him from falls. Take off when you take water procedures, go to the sauna, solarium. Wipe the bracelet occasionally with a soft piece of suede. Love your talisman and he will love you!
Today we will tell you how to weave a beautiful bracelet using the Shambhala technique. V modern life the shambhala bracelet came from the monks with the help of the Kornerap brothers, who in 2001 presented a collection of these bracelets with precious stones, of course, that the cost of this jewelry reaches several tens of thousands of euros, so it is better to make the product yourself for beginners. On a trip to Nepal, they studied the culture and brought from there the idea of creating a stylish piece for the general public.
The Shambhala bracelet is now created simply as an adornment with a trademark, without carrying any secret meaning under it, although initially Tibetan monks wove not just a bracelet, but a talisman, amulet or talisman, putting a special sacred purpose in it. The energy of this amulet helped the owner to find himself in this world, harmony and unity of a person with the entire Universe was achieved. It was imperative to make this bracelet with his own hand, weaving stones selected according to the stars or the advice of a fortuneteller into it.
Due to the fact that many, having seen expensive Shambhala jewelry, wanted to have a similar product at home, there was a huge offer of cheap bracelets with simple beads for a wider and unpretentious audience. However, knowing the history of the Shambhala bracelet, it is preferable to make it with your own hands, choosing a color scheme and putting your own energy into it, even if it is semiprecious stones or simple beads.
Selection of stones and flowers for shambhala

The color of the beads can be selected in accordance with the element to which the zodiac sign belongs. For example, fire signs (Aries, Leo, Sagittarius) should be given preference to various red, red-orange and orange shades in beads. For signs (Taurus, Virgo, Capricorn) that are part of the element of the earth, it is better to choose yellow, yellow-brown, brown tones. For Gemini, Libra and Aquarius (element of air), green, light green and blue colors are suitable. The rest of the zodiac signs (Cancer, Scorpio, Pisces) refer to the water element, therefore the colors should be similar to the water environment, i.e. blue, lilac, blue-lilac, from bright and saturated to pale and translucent.
All this knowledge for beginners in weaving a Shambhala bracelet will be useful, because all this will come in handy in the process of work, and the direct weaving process can be seen on the example of a photo lesson.
Photo-lesson on the Shambhala bracelet for beginner masters

A small description for the photo tutorial. You need to prepare:
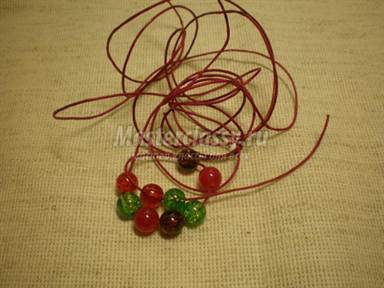
- a waxed wine-colored cord 2.5-3 mm thick, 2.5 meters long (it is better to have a stock that is easy to cut off than to think about how to add the missing material, this is especially important for beginners in weaving);
- glass beads for the main weaving in the amount of 9 pieces, size up to 1 cm in diameter, color: red, green and brown;
- glass beads for decorating the ends of the bracelet from 2 to 6 pcs., 5-7 mm in size;
- scissors;
- PVA glue or transparent nail polish;
- you can come up with a base for weaving, the main thing is that it is even, a piece of foam or planks with a nail / screw, a table and tape for attaching the weaving, a tablet with a clip for papers or a paper clip, etc.
There is practically no scheme for weaving a Shambhala bracelet, work on it is intuitive, i.e. that the color of the materials, that the order of the beads in the weaving is chosen at the request of the master.
An important condition is that before buying beads, it is necessary to check the hole in the beads, it must fit the size of the cord.
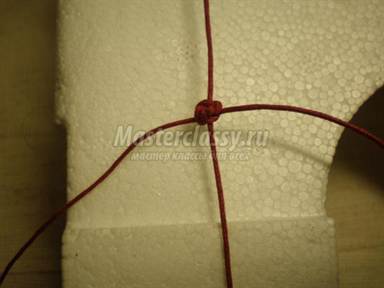
Weaving begins by cutting the cord into pieces. A knotted or "lazy" cord should be about 50 cm, it is attached to the surface. The second long cord is working, the middle of this cord is fastened with a simple knot on a knotted base at a distance of 7-8 cm from the edge of the base, therefore, two long working ends with an approximate length of 1 meter are obtained, located on both sides of the "lazy" cord. The beads can be immediately put on a short cord and fasten the free end of the cord, or they can be put on as needed during work.

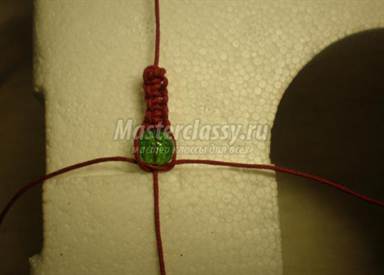
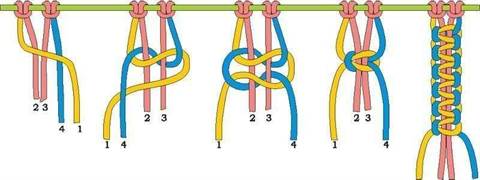
The knot that is weaving is called the double flat knot, it is a simple macrame knot. The weaving pattern will be clear even to weaving debutants.


The knots are woven close to each other so that the weaving looks even and neat, the required initial number of knots is 5 pieces, and then the first bead rises to the weaving, it is braided with the ends of the working cord on both sides and tied with 1 or 1.5 double flat knots.


When work on the main part of the bracelet is completed, it must be detached from the surface and laid in a circle so that the ends of the knotted cord lie together.

Weaving of the fastener begins, inside the same knots there will be not one cord, but two ends of the cord, and the knots must be made not very tight so that the ends slide easily inside the knots of the fastener.

As the clasp is weaving, you need to try on the bracelet to make it suitable size, in the clasp, 9-10 double flat knots should be weaved.
Weaving ends with an ordinary knot, and so that it does not bloom in the sock, it should be fixed with a small drop of glue or varnish on the wrong side. Small beads are put on the sliding ends in the clasp, depending on the desire from 1 to 3 pieces.

The ends of the working cord are cut to the desired length and you can also put on beads on them, securing them with finishing knots.
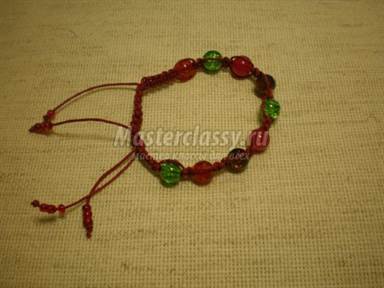
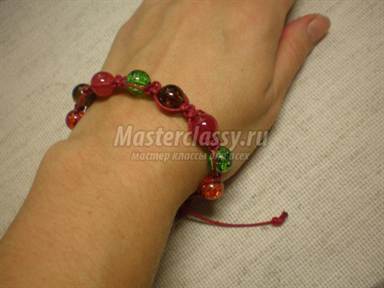
Here is a ready-made shambhala bracelet on the hand of the craftswoman.
An example of double shambhala according to simple schemes
With experience, there is a desire to weave a complicated version of the bracelet, for example, a double shamballa bracelet.
How to weave double shambhala? Description below.
The length of the waxed cord increases to 3.5-4 meters, the number of beads also doubles to 16 pieces with a bead size of 10 mm, depending on the size of the bead, you may need more.
Weaving the beginning of the bracelet can also be done with a double flat knot, only not one knotted cord will be braided, but two. The diagram is presented below.
Having made a certain number of knots (4-8 pcs.), For each knotted cord, i.e. those that pass inside the knot are put on beads, and with working cords, first one, then the other, cords with beads are wrapped in such a way as shown in the photo:


It's no secret that among many modern girls such a decoration as shambhala is popular. Moreover, this bracelet is also worn by famous Hollywood celebrities, for example, Paris Hilton and Demi Moore. It is believed that Shambhala is capable of attracting good luck, prosperity and love to life. Well, let's take a look at how to make such a beautiful and wonderful accessory.
What is needed to create Shambhala?
In general, the creation of this bracelet will require a minimum amount of materials from you. It is enough to stock up on the following:
- synthetic, waxed or leather cord (if there is none, you can use a regular woolen ball);
- needle and thread;
- beads different forms, colors and sizes (you can buy them in almost any supermarket or store);
- glue and a lighter;
- scotch tape, ruler and scissors;
- a loom for weaving (a loom is called an ordinary plank with two nails spaced 25–30 centimeters apart).
Weaving machine - regular plank with two nails
By the way, choosing a thread with beads of the same tone is not at all necessary. It will be very interesting if you play in contrast. This year, purple with orange, beige with blue, pink with brown are considered fashionable color combinations. You can also experiment with metallic options. Bronze shades are popular this season.
Making classic Shambhala
So, let's start creating a classic shambhala. First, you need to cut off a piece of cord about 40 centimeters, tie one end of it onto a nail driven into a weaving machine, string required amount beads, and then repeat the same operation with the other end. Let's call this the "working" (ie, the main) cord.
First you need a piece of cord about 40 centimeters
After that, cut another 1 meter of the cord and tie it to the "worker", so that you end up with equal ends of 50 centimeters.
Cut another 1 meter of the cord and tie it to the "worker"
Well, now is the time to start weaving. In order for this process not to cause you any difficulties, we suggest that you familiarize yourself with the photographs, which show how to tie knots on short lengths of the cord.
Photo review of how to tie knots on short lengths of cord
- Place the right end of the cord under the main one and place it on the left end.
- Put the left end of the cord into the resulting loop on the right, then tighten.
- Now perform the same operation, but in a mirror image (put the left end of the cord under the main one and put it on the right, and put the right end into the loop on the left, tightening it well).
Now it's time to start weaving the bead: move it to the weave and tie a knot, weave several (about 3-4) knots, weave the next bead, and so on.
Weave the same amount at the end of the bracelet as at the beginning.
At the end of the bracelet, you need to weave the same amount as at the beginning.
Cut off excess ends and fasten well so that they do not bloom in the future. To do this, you can use either a lighter or glue.
Cut off excess ends and fix well
Here we are at the home stretch! It remains only to make a lock for the accessory.
- Cut off a 40 cm piece of cord.
- Connect the remaining ends of the shambhala.
- Tie the ends of the bracelet with a knot (this must be done with a cut off 40 cm piece) so that you end up with equal ends.
- Weave the lock, alternating knots.
The result is a lock like this. It works as follows: just pull on the ends - and the accessory will tighten, and fasten the beads on the remaining ends of the bracelet.
As a result, you will get such a lock.
Agree, the finished bracelet looks very nice, neat and stylish!
Video of the process of making a classic Shambhala bracelet
How to make a double version of an accessory
The weaving of a double bracelet is not particularly difficult, while it looks even more interesting than the classic version.
Take two pieces of cord, 35-40 centimeters each, and tape them to the table (or use a weaving machine). Also prepare a 1-1.5 meter cord.
Now tie an ordinary knot at a distance of 4-6 centimeters from the ends of the thread, then take the left end (black and thin in the photo) and put it on top of the vertically lying cords, which are fixed with tape.
We tie a regular knot at a distance of 4-6 centimeters from the ends of the thread
Then take the right tip ( white) and put it on top of the left one and, pushing it under the vertical ones (thick and black), gradually bring it into the loop. So, we tightened it up. As you can see, the white and black threads have changed places. Now take the right one (black and thin) and put a loop on top of the vertical thick ones, and the left one (white) on top of the one you just put and tighten it again with a knot under the two black thick ones. In the photo, the above process looks like this:
We repeat this operation 10-15 times. The result should be as shown in the image:
Now you need to start making the bracelet itself. String the required number of beads onto vertical (35-40 cm) threads. Take the right thread and, as in the image, start winding in a spiral, lowering to the left. Now take the left thread and start repeating the same thing, but in the opposite direction. That's all.
We start making the bracelet itself
Secure with the same knots as at the beginning of the process, make a lock and admire the work done!
There should be such a double Shambhala bracelet
Video of the process of making a double Shambhala bracelet
Workshop on making triple Shambhala
To make a triple bracelet, you will need all the same materials. The 6-meter cord was divided into seven equal parts. Attach all parts to a book or plate on which the work will take place.
Repeat knotting exactly five times. Perform the same procedure with the three rightmost threads. The remaining thread will need to string beads.
We string beads on the remaining thread
Having done all this, proceed to the completion of the weaving. Strengthen the bead on the central thread with a knot, do the same with the very first bead. Be sure to keep track of the number of knots during the manufacture of the bracelet, there should be exactly 5 of them!
Lay the "tails" of the threads one on top of the other. Take a small piece of cord and tie it with a simple knot. Now these "tails" need to be tied with square flat knots in order to secure all the threads of the accessory. As a result, you will get a standard mount, thanks to which it will be possible to adjust the size of the shamballa.
We make a mount, thanks to which it will be possible to adjust the size of the shambhala
Attach the beads on two strands and fix with a knot. Fold the rest of the threads in pairs in a loop and insert their ends into it, tightening with a knot. All unnecessary needs to be cut off. The result is a very beautiful Shambhala bracelet.
It turned out to be a very beautiful shambhala bracelet
Video of the process of making a triple Shambhala bracelet
Thus, it will take a minimum of time and materials to create such a fashionable and stylish jewelry. However, we advise you to be patient, because the first time not everything can go smoothly. Each shambhala presented in our master class looks very impressive, so take the beads, threads and start making, because it can become your new favorite hobby. Good luck!
In the modern world, the Shambhala bracelet is a popular and recognizable piece of jewelry. A spiritual and protective talisman, which was previously considered to be such a bracelet, is currently out of the question.
Since for the most part 90% of products are woven en masse, without observing the rules and regulations that were previously necessary in order to really endow this bracelet with protective and soothing properties. In this you can find out exactly how to make the Shambhala bracelet, woven with your own hands, not only a good decoration, but also have all the positive properties inherent in such a product. This MK is also suitable for beginners.
To make a classic Shambhala bracelet, we need:
- 2m black waxed polyester cord 1mm
- 50cm black waxed polyester cord 0.8mm
- 6 pieces of beads blue Aventurine 10mm
- 1 piece Shambhala bead Midnight blue 10mm
- 2 pieces of 10mm Hematite beads
- 2 pieces of 6mm Hematite beads
- 1 piece of metal bead with rhinestone 7x6mm
- scotch tape, scissors, lighter

How to make a Classic Shambhala bracelet with your own hands Master Class:
So, to begin with, we decided on the total number of beads, you can often use as many beads as you like, but in classic version their roofing felts 9t, roofing felts 7m, as you know it is these numbers that have magical, sacramental power. In this case, it is 8m natural beads blue aventurine and hematite, and a central sparkling Shambhala bead with rhinestones. According to tradition, natural beads should be selected according to the zodiac sign of the person for whom the amulet bracelet is intended.
Previously, only waxed cotton cords were used for weaving, they were both natural and quite abrasion resistant, as well as durable to wear. But now we have a choice, and in truth, from nylon and polyester cords, bracelets look much more presentable, and they last much longer.
Before you start making, you need to tune in to positive thoughts. If the bracelet is woven for yourself, you can think of a good rest, people who cause only good energy, you can dream and imagine that you are in a calm, safe place, for more devout people you can read prayers or even mantras (also prayers, only Buddhist). If the bracelet is made for another person as a gift, it is also recommended to think about this person, remember all his bright qualities, and wish him all the best and happiness during weaving. Sometimes people during manual labor I like to hum funny songs, if there is such a desire, this will also have a beneficial effect both on the whole process and on the positive emotions that will be transmitted to the bracelet.
1. Gathering all the positive thoughts together, we take a 50cm black waxed polyester cord 0.8mm and glue it with a piece of tape to the work surface on which we will weave the bracelet. Sometimes the cord is also secured with a folder and clips, or simply tied to a nail nailed to the board. As you prefer.

The other end of the cord, which remained free, is set on fire with a lighter and fingers, until the cord slightly melted and did not have time to harden again, form a sharp tip with our fingers. We do this carefully so as not to burn ourselves on the hot mass.

One bead Hematite 10mm
Three beads of aventurine
Shambhala bead with rhinestones midnight blue
Three beads of aventurine
One bead Hematite 10mm
After you have strung the beads, the second end of the cord under tension must also be fixed with tape to the working surface; this cord will be stationary throughout the bracelet weaving.

Sometimes the cord does not fit well into the beads, in which case the cord must be cut obliquely and burned, quickly forming a thinner and sharper tip. In addition, when stringing, the beads can be twisted slightly around the cord, sometimes it helps a lot.
note, natural beads often have a small hole diameter, so there may be some difficulties in stringing such beads onto a cord!

2.
Now take the second piece of 1mm black waxed cord. We will require 1.5 meters from the available 2 meters, this piece is enough to weave the main part of the bracelet. We will leave 0.5m for the bracelet lock.
We stretch a 1mm cord through a 0.8mm cord stretched on the working surface.

Straighten the ends and tie a knot. It is necessary that the two ends of the cord with which you will work are the same length, that is, 0.75 cm.
Schematically in the photo, the cords are marked in different colors.
Blue is a stretched cord 0.8mm
Red - left end of the cord 1mm
Light green - right end of the cord 1mm

3. Stretch the left-red end of the cord under fixed with a central blue cord. Then we put it over right-green. We do it as shown in the photo.

4. Now we shave the right-green end of the cord. We put it above fixed with a central blue cord, and stretch it into the resulting loop under left-red cord. As a result, we get a central blue cord 0.8mm, "girded" on both sides with light green and red cords 1mm.

5. Without the schematic dots, it should look like this:

6. We tighten the knot. In fact, such knots are the basis of the macrame technique, they are called square flat knots.

7. This time we do the same thing, only in a mirror image. Stretch out the right tip under the main-center cord and put over left end.

8.
The left tip, in turn, is put above with the main-central cord and pull it into a loop under right cord.

9. We tighten this beauty. Questions may arise as to how tightly the cord should be tightened. If you are working with a nylon cord, it tightens tighter and later on, the knot does not move. In this case, we have a waxed polyester cord, so it is slightly slippery and may seem to come loose a little. Therefore, in order to tie the next knot, the previous one is recommended to be pulled up so that no gaps form between the knots.

10. So, you have learned how to make these simple, but at the same time important knots of Shambhala. In total, you need to make five knots. They are counted by their "cross-sections", in the photo they are marked with red dots.

11. After that we pull the first bead under the knots.

12. Make a square flat knot again. The scheme is the same, only the bead is located immediately after the nodes. A new knot is woven around the bead.


13. We tighten the knot.

14. We do another one. There should be at least one full knot between the beads.


15.
We braid the rest of the beads in the same way. Do not forget to tighten the knots, but do not overdo it, the cords should frame the beads clearly, like a bead in a round frame.

16. The end result should look like this:

17.
At the end, it is necessary, as at the beginning, to make five knots, for symmetry.


18. After five nodes are done, you need to cut off the extra ones. We leave offhand +/- 5mm from the ends, no less. After that, take a lighter and set one end on fire first. It starts to burn and melts as soon as it comes close to the main weave, blow out the light and quickly using back side lighters gently press the molten mass to the weave. You can then quickly form a flat surface with your fingers. It happens that after this, ugly fused threads remain, they can be melted neatly and quickly using the same lighter.

19.
It should turn out "like in a store", without any "burr".

20. The stylish amulet is almost ready. It remains only to make the clasp.

21.
So, fold the two ends of the bracelet parallel to each other.
Attention, they must not overlap!

22.
If you want to insert some kind of additional element, it can be anything, a bead or a special strap, you need to thread the cords into it. Many eminent brands insert their brand name there. The most real Shambhala bracelets, woven by the monks of Bodnath, have a bead in the castle with the image of the smile of Buddha.
As in the previous version, the cords should run parallel and not kink.

23.
For convenience, fix the ends on both sides with tape.

24.
Now we take the remainder of the 1mm, 0.5m black waxed cord. We make a knot where we should have a lock.

25.
And in the old fashioned way we make a square flat macrame knot.


26. We make six such knots, we count along the “cross-sections”. And move the metal bead with rhinestones.

27.
As before, we braided the beads in a bracelet, using knots, we braid the beads in the lock.


28. After the metal bead, you also need to make six knots.

29. Cut off the excess cord.

30. Burn the tips with a lighter again and solder them.

31. Here's a nice lock turned out. Now the bracelet has a vicious circle, a kind of protection ring that cannot be opened.

32.
In order for this to be true, we string 8mm hematite beads on the ends.

33. We make knots at the tips. When pulled, the tips should be about 5cm in length. Therefore, we cut off the excess, leaving 5mm, burn the rest and carefully seal it.

34.
From the back, the bracelet should look like this:

35. Congratulations, the Classic Shambhala bracelet is ready.

36. The following photos show the more popular Shambhala bracelet made entirely of beads with rhinestones.


Shambhala bracelets are very popular, therefore they are even talked about on television, this Video tells in detail about where the Shambhala bracelets come from and how to weave them:
Especially for those who have a reason to be proud of their labor achievements in needlework, we are pleased to announce that we will publish your work on our website, for more details on how to do this, read.
Good luck, and don't forget to drop by our light! ;-)
Advice:
1. You can find everything for creating Shambhala bracelets in the Ethnokot bead store - http://etnokot.com.ua
Although the name of this jewelry sounds very exotic, it appeared not very long ago. The first shambhala bracelets were made in 1994 by two Danish designers. They were inspired by ancient Tibetan teachings, but used the techniques of modern jewelers and costume jewelers.
Now jewelry in this style can be ordered on the official website of the company. But even beginners can make a shambhala bracelet with their own hands. Believe it is not easy beautiful words or advertising (we do not need to advertise anything, because this master class is available to anyone who wants it for free). The work is really simple. Basically, you need to choose the right cord and beads and learn how to weave macrame square knots. And then it’s quite simple.
Beads can also be any, the main thing is that they can be strung on a cord (some have too narrow a hole). At first, the bracelets of the Danish brand only used large round rhinestone beads, such as the one in this picture.
Here is a Shambhala bracelet with one single dZi bead.
Shambhala bracelet weaving
For beginners, the job may seem daunting. In fact, the same action is repeated here: the square macrame knot. This knot forms the base of the bracelet, beads are braided with it, the same knots are needed for the sliding clasp.Let's show how such a knot is made. For the first step, you will need to cut the cord. The entire bracelet takes from one and a half to two meters, the exact figure depends on the girth of the wrist and the number of beads.
Cut off the base of the bracelet (the cord on which the beads will be strung and knots will be tied, it will also be the base of the fastener). The length of this segment is wrist coverage plus 15 centimeters for the ties.
The easiest way to weave a shambhala bracelet with your own hands is on a special site. This could be a tablet, a blackboard, or a piece of plywood. We fix the main cord on this site. It is important that it is well taut. We retreat seven centimeters from its tip and tie the second piece of cord with the usual knot. From it we will knit square macrame knots. The length of this segment is 120-150 cm (that is, 60-75 cm to the right and left of the main cord).
To make it clearer, let's designate the right cord with the letter A. The left one - with the letter B. They need to be tied a little differently. Step-by-step instruction on the picture. We chose contrasting cords for better clarity.
Here is a video about the Shambhala bracelet.
When the last knot is tied, cut the ends of the side (not the main!) Cords. We glue it with varnish or burn it with a lighter if you used polyester.
There should still be room for the fastener on the main cord. We simply tie its ends into knots so that they do not bloom and do not jump out of the fastener. Additionally, small beads can be put on in front of the knots. For beauty and so that the tips certainly do not pop out.
The clasp is knitted with the same macrame square knots. Only they do not need to be tightly tightened, otherwise such a fastener will "jam". Instead of one main cord, there will be two pieces (two ends of the bracelet) folded together. Tie them with a separate piece of cord (40-60 cm long). From three to ten square knots are knitted on the clasp.
You can make a shambhala bracelet in several rows. The weaving technology is the same, only there are more base cords on which the beads are put on.
Sometimes thread shambhala is not made whole, but from two halves. In the middle of such a bracelet there is some interesting connector.
In this case, the main cord is cut into two parts, each of which is bent in half. The loop obtained by folding the cord is passed into the connector ring. Then each half of the bracelet is woven as usual.
Examples for inspiration
We have already said that there are no strict requirements from which to assemble a shamballa bracelet. See what interesting work comes out from authors experimenting with materials.Here they took butterflies destined for Pandora.
They cost just one bead here.
By the way, shambhala beads are great for creating jewelry sets. For example, here are some very simple metal base earrings for stud earrings.