Knitwear is the most optimal fabric option for children's clothing. It is comfortable, soft and even warm if the clothes are made of brushed footer. Warm knitted pants with pockets for boys are suitable for both autumn walks and cool days at home and in the kindergarten. The cuffs on the legs are convenient because they do not allow the wind to pass through and help to carefully put the baby in demi-season boots. Well, what about pockets – where would we be without them? - will delight the little explorer, because they can be used to collect chestnuts, acorns and other street treasures. And most importantly - such You can sew your own pants! Now we'll tell you how to do this. The master class was prepared by Victoria.
Materials and tools:
- Thick, bottle-colored brushed footer – 70 cm
- Elastic rib or black rib – 16 cm
- Thin knitwear for pockets, light green – 20 cm
- Black cord – 1 pc. length 70 cm
- Wide elastic waist – 50 cm
- Tailor pins
- Fabric scissors
- with two feet - a regular one (also called a zigzag foot) and an overlock foot (with a side on the right).
The pattern of knitted pants is taken from the children's fashion magazine Ottobre No. 4-2012 (model 27). There it is presented in sizes from 98 to 128, and our master class shows how to sew pants in size 110.
Manufacturing:
Cut out the necessary details of knitted pants. From brushed footer, these will be two front parts of the legs and two back parts; from rib - two parts of cuffs, from thin knitwear - four parts of pockets. It is better to immediately bend the cuff parts in half with the wrong side inward and iron them.

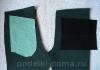
Place one front leg piece in front of you and attach the pocket piece to its side (face to face). Pin both pieces together as shown in the photo.

Sew the pocket pieces to the legs along the side lines. Make sure that the pockets on the front and back of the legs are located at the same level.

Turn the pocket piece to the wrong side of the front leg and secure the fold with a basting stitch.

Machine stitch this line using a regular straight stitch. Do the same with the second front part of the leg: there is no need to attach the folded pocket to the back parts of the legs.

Place the front and back of the pant legs right sides together. Also, place the pant leg pocket pieces together and baste the edges of the pocket.

Sew the edges of the pocket with a knitted stitch, and then change to an overlock foot and finish the edges of the pocket with an overlock stitch.

Sew the side line of the trouser leg (before and after the pocket) with a knitted seam, and then finish the seam allowances with an overlock stitch.

You will get one whole pant leg with a pocket, where the entrance to the pocket on the front of the leg is stitched with a straight seam. Do the same to get the second leg piece.

Sew the front and back seams of the pants (from the top of the garment to the crotch). Do this first with a knitted seam, and then with an overlock stitch. Then turn the pants inside out and pin the crotch seam - a line from the bottom of one pant leg through the groin to the bottom of the other pant leg.

Sew the legs on a machine using a knit stitch and then an overlock stitch.

Prepare the cuffs by folding them along the grooves of the jersey, wrong side out, and stitching the edges together to create a ring of fabric. Then turn the cuffs right side out along the pressed fold.

Attach the cuffs to the bottoms of the legs with pins, placing the edges of the cuffs against the edges of the legs. At the same time, stretch the cuffs a little, because such tightening parts are always slightly narrower than the edges of the legs or sleeves.

Sew the cuffs to the legs using a knit stitch (while sewing, you also need to stretch the cuffs a little so that the main fabric of the pants does not form wrinkles). Then finish the seam allowances with an overlock stitch.

This is what the bottom should look like knitted pants with cuffs.

Finish the top edge of the items with an overlock stitch. If you are sewing pants from a thin jersey, you can skip this step and simply fold the fabric to the wrong side twice to create a tunnel for the waistband. But brushed footer is a rather thick fabric, so if double folded, it will become too rough and will put pressure on the child and create discomfort. So it’s best to finish the top edge of the pants with an overlock stitch.

Now fold the top of the pants to the wrong side once by 2 cm (provided that your elastic is up to 1.5 cm wide) and secure with a basting stitch.

Sew along the folded top of the pants, creating a tunnel for the elastic.

Thread an elastic band inside this tunnel, hand stitch the edges, and sew up the hole through which you threaded the elastic.

In front of the tunnel, at the same distance from the central seam, make two tiny holes (literally large enough for the “beak” of the lace to fit through). Thread a cord through one hole, pull it through the entire belt and out through the other hole. Now you can tie the lace!

Warm knitted pants with pockets for boys ready! Using the same pattern, you can sew thin knitted pants without pockets - ordinary trousers for comfortable indoor games.
Victoria's master class on how to sew a jumper for these pants, watch
More interesting:
See also:
Gift for niece, raincoat for March 8
Another work in the “Handicraft” category about how to sew a raincoat for a girl with your own hands. Master...
Summer suit for girls "Wave", crocheted
I want my child to wear beautiful, bright and original clothes in the summer. Create beautiful models...
Socks with butterfly patterns
Handmade knitted items always warm hearts. And these knitted socks with the “ba” pattern...
Crochet hat and booties for newborns
August is already coming to an end... However, there are places on our planet where it is eternal summer;). Or...
Knitted spring hat - transformable
Another master class on knitting a headdress from Yulia Brazevich. Knitted spring hat...
Children's swimsuit, crocheted
A crocheted swimsuit can be crocheted not only for adults, but also for girls. Master class on knitting here...
We are creating a pattern for children's trousers for children from 3 to 16.
This is a very simple and easy to use technique. This is how it will seem to those who have encountered other methods before. And for beginners, to simplify the construction process, we offer step by step instructions. Step by step, following the instructions, you will easily complete the task and eventually come to the conclusion that everything is really very simple.
This technique can be used to create trouser patterns for both boys and girls (up to size 42). For older girls, the method of constructing trouser patterns for women is used.
To create trouser patterns for children preschool age You can use another technique, which is
We first take measurements from the child. All measurements are important, you need to take this process seriously. The more accurately the measurements are taken, the more successful the pattern will be. The main parameters that you cannot do without are the half-circumferences of the waist, hips and the length of the trousers. If measurements of seat height and (or) knee length cannot be taken, then these values can be calculated using the formula. You should also decide on the width of the trousers along the hemline. As a guide, you can take old trousers (from which the child has outgrown), measure the bottom of the pant leg and add a few centimeters. You can do the same when determining the length of your trousers.
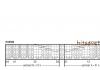
To draw a pattern for children's trousers, you will need the following measurements:
| Name | Designation | Size cm | Options |
| Length trousers | db | 88 | Measure vertically from the side to the desired length of the trousers. The measurement is recorded in full. |
| Pants length to knee |
dbk | 50* | Measure simultaneously with measuring the length of the trousers. From the waistline to the middle of the kneecap. The measurement is recorded in full. |
| Half waist | St | 30 | Measure at the narrowest point of the waist. The measurement is recorded in half size. |
| Half hip circumference |
Sat | 38 | Measure horizontally along the most protruding points of the buttocks, taking into account the convexity of the abdomen. The measurement is recorded in half size. |
| Seat height | Sun | 23* | Measured from a person sitting on a chair. From the side of the waist to the plane of the chair. The measurement is recorded in full. |
| Pants bottom width |
Shbn | 18 | Width of finished trousers. Determined independently depending on the style. |
| *This value can be determined by calculation (using the formula) | |||
The front half of the trousers.
In the upper left corner of the prepared sheet of paper we draw a right angle with the vertex at point T.
Length trousers.
From point T down, set aside the measurement of the length of the trousers (Db), put point H and draw a horizontal line of arbitrary length to the right.
In our example, the length of the trousers is Db = 88 cm, and you set aside your measurements.
TN = db = 88 cm.
Step line.
The step line is determined by measuring the seat height (S). From point T downwards we set aside the measurement of the seat height and set point I.
If there is no measurement of the seat height, we use a calculated method for determining the position of the step line: 1/2 of the half-hip measurement (Hb) plus a value that ranges from 2 to 4 cm and depends on the style of the trousers, the build and age of the child.
In our example it will look like this:
TY = 1/2 Sb + (from 2 to 4 cm) = Sb: 2 + 4 cm = 38: 2 + 4 cm = 23 cm.
Choose a method that is convenient for you to determine the step line, set this value down from point T, put the letter Z and draw a horizontal line of arbitrary length from it to the right.

Hip line.
In this technique, the hip line is not used to create a pattern drawing, but I would advise you to draw it so that, upon completion of the work, compare the width of the pattern in this area with the taken measurement of the semi-girth of the hips and, if necessary, adjust the pattern.
We divide the segment TY into 3 equal parts, lower The division point is designated by the letter B. From point B to the right draw a horizontal line ( hip line).
YB = TY: 3 = 23: 3 = 7.7 cm

Knee line.
The position of the knee line can also be determined in several ways. You can divide the BN distance in half - this will be the approximate position of the knee line. Depending on the style, it can move up or down several centimeters.
We now use the simplest and most accurate:
Lay down from point T measure trouser length to the knee (Dbk), put point K and draw a horizontal line to the right.
In our example, TK = Dbk = 50 cm.
We will consider other methods in the following articles.

The width of the front half along the waistline.
From point T to the right, set aside 2 cm (for all sizes) and place point T1.
We calculate the width of the front half of the trousers along the waist line: 1/2 of the semicircle of the waist (St) plus 3cm.
St: 2 + 3 cm = 30: 2 + 3 = 18 cm
From point T1 to the right we set aside 18 cm and place point T2, from which we lower the perpendicular down to the intersection with the step line and place point Y1.

Bow line.(middle cut line of the front half of the trousers)
From point P1 up, set aside a value equal to 1/10 of the half-circumference of the hips (Sb) and place point P2.
Once again, from the same point (R1), we put the same value to the right (1/10 of the half-circumference of the hips) and place the point R3.
In our example it looks like this:
Y1Y2=Y1Y3 = Sat: 10 = 38: 10 = 3.8 cm.
We draw up the middle line of the front half. See Fig.6.

Ironing line.
We divide the distance RY3 in half, put the point R4. Through this point, draw a vertical line (perpendicular) up and down until it intersects with the waist line and the bottom line. The points of intersection with horizontal lines are designated by the letters T3, Y4 K1, H1, respectively. See Fig.7.
Line T3H1 is called ironing line.

Width of the bottom of the trousers.
The width of the bottom of the trousers depends on the style of the trousers, i.e. you determine this value yourself. In our example, the finished width of the bottom of the trousers is 18 cm (for small sizes you can take 14-16 cm). The total width of the trousers between the front and back halves is distributed as follows:
18 - 2 = 16 cm -
18 + 2 = 20 cm - rear half width
From point H1 to the left and right we set aside 8 cm (half the width of the front half: 16: 2 = 8 cm) and put points H2 and H3.
H1H2 = H1H3 = 8 cm.

Bottom line of the front half of the trousers.
To finalize the bottom line of the front half of the trousers, set aside 0.5-1 cm from point H1 upward and place point H4. We connect points H2, H4 and H3, we get the bottom line of the front half.
In very narrow trousers and in trousers of small sizes, the hemline can be left flat.

Side cut line.
To design the side cut line, we need one more additional point: from point T we put 17 cm down (for small sizes 15 cm), put point B.
The upper section of the side cut from point T1, through point B, to point I is formed by a smooth line, as shown in the drawing.
Configuration lower The area of the side cut, as well as the step cut, depends on the style and width of the trousers along the knee line.

Width of trousers at the knee line. Side and step lines.
The width of the trousers along the knee line can be different and depends on the style (fashion, purpose), but should not be less than the measurement of the knee circumference plus an increase of 2 cm for a loose fit.
Let's look at two examples:
1st example: When creating a pattern of trousers for small children and (or) older children, but with a loose cut, drawing out the lines of the side and step cuts, you can connect the points I H2 and I3 H3 straight lines.

2nd example:
Let's say the width of the trousers at the knees should be 20cm.
20 - 2 = 18 cm - width of the front half of the trousers;
20 + 2 = 22 cm - rear half width(we will need this value when constructing the back half of the trousers).
From point K1 to the left and to the right we set aside 9 cm (18:2 = 9 cm), we denote the points with the letters K2 and K3.
Connect the points I, K2, smooth line, then from K2 to H2 straight line.
For line stepper the cut is similar: section Y3K3 - with a smooth, slightly concave line in the middle, then a straight line to point H3.
Look at the drawing.

Darts on the front half of the trousers.
On the front half of the trousers, two darts are marked along the waistline. From point T3 to the right we set aside 1.5 cm, from middle From this segment, draw a vertical line 5-7 cm long downwards (depending on the size of the trousers) and draw the first dart, connecting the points with straight lines.
Second dart: divide segment T1T3 in half, set aside 1.5 cm from this point to the right, draw a vertical line 5-7 cm long from the middle of this segment down and make a second dart.
Instead of darts, you can put folds(tucks).

Clasp, pocket.
The main construction of the front half of the trousers is completed.
Additionally, if necessary (if provided for by the model), a pocket, codpiece (clasp in the middle of the front), etc.
Let's mark the location of the pocket: from point T1 along the side cut we set aside 14-16cm (for small sizes 10-12cm). From the same point T1 we put 4 cm to the right and connect the resulting points with a straight line.
This pocket entry line.
To decorate the fastener in the middle of the front, from points T2 and R2 to the right, set aside 3-4 cm horizontally and connect the resulting points with a straight line.
Look at the drawing. Construction lines are indicated in red.
If your pants have elastic, you don't need to do this.

Construction front the trouser halves are finished.
Constructing the back half of the trousers
And you will be the first to know about the release of the second part, “Step-by-step construction of the back half of trousers for children from 3 to 16” and will always be in the know.
In the wardrobe of a newborn or infant, in addition to vests, rompers, and caps, there must be a type of clothing such as pants. This product is more practical than. They are very comfortable to wear for walking or sleeping. In addition, this is the simplest item of children's wardrobe that even a novice seamstress can sew. Moreover, things made with love are always the warmest and most comfortable for a baby. In general, let's move from words to action and try to sew pants for a baby using a special pattern.
The provided panties pattern is designed for a child weighing approximately 6 kg. We will use it to sew pants from flannel fabric. Flannel is a soft natural fabric, perfect for babies.

Let's prepare:
How to cut and sew panties:
First of all, we need to prepare materials and tools for cutting and sewing. We will sew children's pants on a regular universal machine (see in more detail how to choose a sewing machine). Flannel fabric should first be treated - washed in hot soapy water (50-60 degrees), rinsed, dried and ironed with a hot iron. It is better to buy an elastic band for pants, not a universal one, but one intended for children's things - they are softer. The same applies to the braid with which we will trim the bottom of the trousers.

Next, you should transfer the pattern onto a sheet of paper. Cut it along the contour. Then you should fold the fabric in half along the grain thread (if any, align the edge with the edge), transfer the contours of the pattern to the material, and cut out the parts. We will have two of them.


We will sew braid to the bottom of the parts of future panties or use bias tape. You can simply hem the bottom of the panties with a hem seam with a closed or open cut.

Then we will process the edges of the side cuts in a convenient way (by hand or with an overlocker) and sew them on a sewing machine.

We bend the top of the panties by 1.5 cm and sew them together so that there is room for the elastic. Insert the rubber band.

The baby's pants are ready. We spent less than one hour on cutting and sewing, which allowed us to save not only the family budget, but also to purchase a new convenient and practical item for the baby.
The simplest item of children's clothing that even a novice seamstress can sew is pants. Judge for yourself: making them is much easier than the same T-shirt, where there is a risk of stretching the fabric at the seams stitched along the sections of the fabric. In addition, to create panties without much hassle, you can choose a “two-seam” pattern. This means that the pants will not have seams on the sides, and the work will go much faster. An example of such a product is warm children's pants with cuffs, which we want to show you now.
Materials and tools:
Pattern of warm fleece pants for boys (size 86)
This pattern shows one leg; to make two legs, simply fold the fleece in half and place this pattern on top. In order for the pattern to fit your size (for a height of 86 cm), increase it on the computer until the waist line (vertical line on the left) is 30 cm. Then attach the pattern paper to the monitor (this is especially convenient to do on a laptop , “turning out” the screen) and cut it along the contours.

How to sew children's pants with cuffs:
1. To get started, cut out all the necessary parts. There will be two main parts - these are two yellow fleece pants.

2. Also cut out animals for appliques (for us these are gray and brown horses) and two cuffs for the legs. The cuffs are two rectangles made of ribana. The length of each rectangle will be equal to ¾ of the length of the lower part of the yellow pant leg (after all, the cuff should tighten the product and fit tightly around the leg). Well, make the height of the cuff at your discretion, depending on the height of the child. If you want your pants to last longer, make the cuffs higher - for example, 10 cm (5 cm when folded). As a result, the size of the rectangles for the cuffs: 10 cm by ¾ of the length of the bottom of the trouser leg.

3. Place both pant legs in front of you so that you can roughly imagine your future pants. To do this, fold the legs vertically and unfold them so that the smaller armholes are facing up (the larger armholes are designed for the more convex back side of the baby). Think about what level you want the appliqués to be placed at and secure them to the legs with pins.

4. Sew the appliqués to the legs. Most often, craftswomen do this on a machine, using a zigzag stitch with a minimum distance between stitches (you get a frame around the applique, reminiscent of satin stitch embroidery). But this time we have an applique with horses, which have rather small details. Therefore, I had to sew the horses on by hand.

5. If the appliqués are already in place, fold the legs together so that the right sides (with the appliques) are hidden inside. Baste two armholes located at the top of the parts: on the left in the photo is the armhole on the back side of the pants, on the right is the front armhole.

6. Machine stitch these armholes. Fleece stretches well, so you can use a knitted seam for it. Don't forget to also finish the edges of the fabric using a zigzag or other suitable stitch.

7. Fold the armhole allowances to one side and baste the crotch seam (from the bottom of the right pant leg through the top to the bottom of the left pant leg). Sew the crotch seam using a machine, then finish the edges of the fabric with an additional seam.

8. Now it’s time for the cuffs. Fold the cuff rectangles in half horizontally and iron them.

9. Unfold the cuffs again, stand vertically and stitch along the edge from the inside out. Turn the cuffs right side out. You should have two cuffs in the form of a double “donut” made of ribana.

10. Place the cuff on the bottom of the pant leg so that the fold of the cuff is turned toward the top of the pants. Turn the cuff seam to the leg seam and secure with a tailor's pin. Using pins and stretching the bottom edge of the rib, distribute the cuff evenly around the entire perimeter of the bottom of the pant leg.

11. Sweep these parts, again, stretching the ribana. Remove the tailor's pins from the fabrics. Do the same with the other pant leg.

12. Machine stitch the cuffs (you should stitch on the wrong side) and finish the seam allowances with a zigzag stitch or similar. The bottom part of the panties with cuffs is ready!

13. All that remains is to decorate the top of the panties and insert the elastic band. Fold the top edge of the pants inward by 2 cm and sew with thread.

14. Sew the same line on the machine, leaving a small hole for later inserting the elastic.

15. Hook a pin onto the end of the elastic, insert it into the top of the pants and sew the ends of the elastic together. Then sew up the hole through which you threaded the elastic into your pants.

Warm children's pants with cuffs are ready! Using the same pattern, you can also sew regular knitted pants for the home. Or you can make your work easier and make pants without cuffs. To do this, extend the pattern by adding about 7 cm to the legs. Good luck in making children's clothing!


Children's fleece pants
Children's fleece pants are light and soft. Fleece is machine washable and dries quickly. Despite the fact that the fleece is based on a knitted fabric, the sections do not need to be overcast, because... Due to the brushed surface, they do not crumble. You can sew fleece with a regular machine stitch - convenient for those who do not have knitted stitches on their machine.
Size: 98 (height 98 cm - 3 years)

Pattern for children's pants.
How to sew children's pants:
Cut:
1. trouser leg 2 parts
When cutting, it is necessary to take into account the fraction. On the pattern, the direction of the lobe is shown by an arrow.
The lobe is located along the edge of the fabric. How to determine the share if there is no edge: because fleece is a knitted fabric with a brushed surface; to determine the grain, you need to try to pull the fabric in different directions - in the direction of the grain, fleece stretches the least (almost no stretch). Fleece may have a pile direction, which also needs to be taken into account when cutting - cut out the pant legs in one direction.
The pattern is given without seam allowances. The pattern shows a hem along the top edge for elastic bands. Allowances for cuts are 0.7 cm, hem allowances are 2.5 cm.
1. Sew the front middle seam.
2. Sew the back middle seam.
3. Stitch the step sections.
4. Turn the hem allowance for the top to the wrong side and stitch at a distance of 1.5 cm from the fold and 3 cm, leaving 1 cm unstitched for threading the elastic.
5. Turn the hem allowance on the bottom to the wrong side and stitch at a distance of 2 cm from the fold, leaving 1 cm unstitched for threading the elastic.
6. Thread the elastic bands.