According to some surveys, 40% of women are embarrassed about their feet and prefer closed summer shoes. And this while men unanimously list thin ankles and feet in the top 10 most attractive female parts body. Maybe you shouldn't deprive the courageous half of humanity of the pleasure of admiring female legs and making a pedicure with gel polish, the photo novelties of 2017 of which we will consider in detail in this article.
The most fashionable colors of 2017 are divided into two camps: natural shades - pink, beige and deep saturated tones - red, blue. Source: Flickr (thepolishdiaries)
Why gel polish?
- This is an easy-to-use material that allows you to correct the shape of the nail and hide all its flaws - roughness, chips, irregularities, ribbing, etc.
- Provides a tight coverage that is not damaged by wearing tight shoes.
- It is noticed that the nail plate coated with gel polish slows down the rate of its natural growth, which means that the next visit to the pedicure for the correction procedure can be postponed for a period of 4 to 6 weeks.
- In some cases, this is the only way to give damaged nails a beautiful natural color.
Note! Gel polish is resistant to sudden changes in temperature. Get a pedicure and go to the sea boldly - hot sand and salt water are not afraid of him.
Pedicure gel polish 2017: fashion trends, photos
Intricate designs are gradually disappearing from the fashion scene, giving way to simple geometric designs. The colors can be completely different, but it is easy to highlight the two most popular accents: playing on contrasts and naturalness. These design directions can be called the opposite, but they are equally fashionable this season.


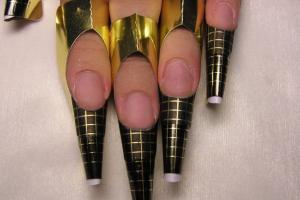
French pedicure 2017 (photo): gel polish and the secrets of its application
French technology is again at its peak. It allows you to give your nails the most natural and well-groomed look, and this is the main trend of the current year. For those looking to experiment, feel free to move away from the classic white + nude theme and create bold two-tone combinations. A blue or pink bed combined with a white smile looks gentle. You can go even further with trendy blue. Glitter, small rhinestones, transfer foil - all this is relevant and makes it possible to beat the usual jacket in a new way.
The main secret of a successful French pedicure is the right smile. The long oval line with high ears looks great on the hands, but looks rough on the toes. Too thick a strip is also not worth drawing, the optimal width is 1-3 mm (depending on the length of the nail).

Important! The nail plate on the feet is usually short, but you can grow it a little under the jacket. In this case, 2 mm is sufficient. Anything longer runs the risk of looking ridiculous.
And yet, it is better not to use transparent gel in a pedicure, which is actual in French manicure - it will only emphasize the shortcomings. On the contrary, matte pink and bright peach on the hands can look unnatural, but for the toes it is a great color scheme.

Multi-colored gel polish on the legs: design, photo 2017
The most fashionable colors of 2017 are divided into two camps: natural shades - pink, beige and deep saturated tones - red, blue. Each of them can be used separately, creating stylish and laconic solutions. Or you can go further and add to base color several contrasting elements. Here are the options for fashionable combinations:
- pink with blue, mint, beige, red;
- blue with white, orange, golden, cherry;
- red with beige, sky blue, gold;
- beige with white, black, gold and ... green!


These color combinations are the most fashionable this year. But you should not restrain your creative impulse within the rigid fashionable framework. Lemon, bleached yellow, purple can also serve as the basis for creating a fashionable pedicure with gel polish in 2017.
The golden rule: the darker the tan, the brighter the gel polish. Summer is the most suitable time for juicy and saturated colors... It is better for girls with pale skin to refrain from such bold experiments and give preference to delicate design based on natural shades.

Pedicure: photo, design 2017 - gel polish "on horseback"!
The main fashionable technique this year is feng shui. Nail art masters already consider it their duty to single out one or two fingers from the general pedicure theme. This can be done not only with gel polish in a contrasting color, but also with the help of various patterns. Trending today:
- Polka dots are small dots of black or white draw most often, but there are others original options... For example, large white and small blue peas on a blue background.
- The stripes are usually vertical, but the horizontal "sailor" is also popular, especially during the summer holidays.
- Mosaic is a complex technique that requires special skill and patience from the master. But the result is worth it: small multi-colored cells, surrounded by a contrasting outline, make the pedicure bright and original.
- Broken glass sounds scary, but small bright glass on the nails looks stylish. You can achieve a similar effect using multi-colored glossy foil.
- Floral ornament that year does not lose its relevance in any design.


Another trend is lunar nail design with gel polish, in the photo and in life it looks amazing. The main thing is not to leave the hole empty, otherwise there is a risk of opening any imperfections of the nail to a prying eye. White, gold or silver crescent is what is fashionable and goes with any base color.

Finally, a few words about rhinestones. They can be glued directly onto the top sticky layer of gel polish - it's very simple and convenient. Such decoration of toes is a hit of 2017. But in this case, shoes are of great importance. Trendy Roman sandals with thick, low-cut straps are not the best pair for such a fancy pedicure. It will look appropriate only with a sophisticated model of sandals with thin high heels.

In a word, there is where to roam fantasy, but the main thing is moderation. Compositions that are too complex have long been considered a sign of bad taste.
Related Videos
The popularity of permanent pedicure among girls today can hardly be overestimated. The beauty of female legs is preserved for 4-6 weeks.
At the same time, you can safely go on vacation, swim in the sea and not worry that the varnish will chip. And all this became possible thanks to the invention of gel polishes.
They combine the properties of an ordinary colored varnish and the gel used for nail extension.
The nails covered with gel polish become shiny, durable, and resistant to damage.
Due to the rich color range, choose beautiful colour will not be difficult, while the masters skillfully create original patterns and drawings.
The advantages of a gel polish pedicure include:
- the result will last at least 4 weeks,
- bright saturated shades that do not fade,
- the ability to implement original design ideas for a pedicure with gel polish.
Pedicure gel polish at home - stages of work
A permanent pedicure can be done easily at home.
The material easily fits on the nail and becomes very durable, polymerizing under an ultraviolet lamp.
Under it, the nails are not damaged and for some time receive protection from external factors.
To work you need the following tools and materials:
- Ultraviolet lamp,
- base and top for gel polish,
- gel polish,
- means for degreasing the nail plate,
- clinser,
- cotton pads,
- pedicure tools.
- Stage 1 - preparation of nails for applying gel polish. The remains of the old coating are removed, the cuticle is trimmed, the heels are processed.
The shape of the nails, if necessary, is corrected with a file, the surface of the nails is treated with a buff. We wipe the marigolds with a napkin dipped in a cleanser.
- Stage 2 - degreasing the nail plate and applying the base product. The nail plates are coated with a primer (air drying - a minute), then a base is applied and polymerized under a lamp for two minutes.
- Stage 3 - application of gel polish in two layers, each drying under UV rays for a couple of minutes.
- Stage 4 - application of the top coat with polymerization in a UV lamp - three minutes.
- Stage 5 - it remains to remove the sticky layer with a special tool and rub oil into the cuticle to soften.
VIDEO ON TOPIC
On average, the procedure takes about an hour and a half. Gradually, the coating grows back with the nail, but on the legs it happens more slowly than on the hands, so correction will be required in a month and a half.
French pedicure, like manicure, is considered a classic and looks appropriate anytime, anywhere.
A classic jacket involves the use of different colors for the nail bed and for the tip of the plate. In this case, the colors should be pale pink or beige and white.
Today, many women successfully combine bright colors and experiment with different tones. At the same time, decorative elements - rhinestones, stickers, sparkles are not prohibited.
But the jacket is not complete without the traditional smile line, which separates the tip of the nail from the nail plate.
In this case, the line can be of a classic rounded shape or with deviations, for example:
- triangular,
- in the shape of a heart,
- beveled corner,
- zigzag,
- wavy.
Special stencils that are sold in specialized stores will help to create a straight smile line.
The stencils are made in the form of stripes, one side has a sticky layer that attaches the stencil to the nail plate.
At home, you can replace them with paper tape. The stencil is fixed on the nail in front of the regrown part of the nail, leaving the edge of the plate free, and a smile line is drawn with gel polish. Masters with a "stuffed" hand draw a smile line with a thin brush.
To create a French pedicure with gel polish you need:
- degreasing agent,
- base and top,
- two gel polishes of different colors,
- stencils or brush
- primer
- adhesive remover
- saw, buff, nippers.
Stages of work:
- Hygienic pedicure - treatment of cuticles, heels, degreasing the nail plate, applying a primer.
- Base coat application and curing under UV lamp.
- Application of gel polish of the main color to the nail and polymerization under UV rays. If necessary, the varnish is applied in two layers.
- Applying a smile line with a stencil or a brush in a different color and drying under a UV lamp, if necessary, the layer is repeated and dried.
- Topcoat application with UV drying.
- Removing the sticky layer.
Some girls like to use additional decor, such as rhinestones.
You need to glue them to the nail plate using special glue and only after the main top coat has been applied with drying and removed stickiness.
Another way is to attach rhinestones to the not yet dried layer of varnish.
The ombre jacket is also popular today, when one color smoothly passes into another. This can be easily done with a sponge or sponge.
- The procedure for applying a French coat is standard - after shaping and degreasing the nails, the base is applied and polymerized on the surface.
- Then on the foil we draw a couple of lines of the main color (the main surface of the nail) and draw a thin strip next to it - a smile line. We combine two colors with dots.
- Then the sponge is dipped in varnish, blotted a couple of times in the free part of the foil and applied to the nail with tapping movements. The layer is dried in a lamp. If the density of the gel polish is insufficient, the process is repeated.
- After that, it remains to apply the top and fix it in the lamp with further removal of the sticky layer.
A jacket with lace looks original. The lace is sold separately and wrapped around the nail.
Then the varnish is “hammered in” through the lace stencil, resulting in a beautiful original drawing.
VIDEO
Nail service specialists know that the peak of popularity of pedicure services falls on the summer period.
It is at this time of the year that the ladies take out open shoes and strive to put their feet in order.
A simple one-color coating has long been boring, so for demanding clients you have to invent original ideas... Consider options for a beautiful summer pedicure with gel varnishes.
- Black color . Despite the fact that in summer you want bright colors, black will remain relevant, because it is easy to combine it with any other tones, for example, with pink, gold, silver, complement with rhinestones and other decor.
- Polka dots. Specks of white or other colors against a background of contrasting shades look bright and unusual. You can decorate them with beads or rhinestones.
- Mosaic. The mosaic pattern requires dexterity and dexterity from the master and turns out to be unusual and bright. Colors can be applied in any order by tracing the cells with a contrasting color.
- Stripes. This is a constant hit, because in the summer many people go on vacation, and the strip is associated with the sea. A drawing in the form of an anchor or a sea animal will complement the "striped" pedicure.
- Flowers. Another classic idea that never goes out of style. The floral ornament can be both small and large, as on each nail, or selectively.
- Exotic patterns... Nails can be decorated with drawings imitating the color of a tiger or a snake, while the classic color scheme can be replaced with calmer or, on the contrary, bright colors.
- Shine. To create a shiny pedicure, sparkling gel polishes with a metallic sheen are also suitable. At the same time, glitter of different sizes can be combined on one nail.
- Bright colors . In summer, mixes of orange, pink, light green, green and other bright shades will always be appropriate. You can use them both for a jacket and for creating geometric ornaments.
- Magnetic pedicure... Varnishes with this effect appeared not so long ago. They contain magnetic particles that, with the help of a magnet, take one shape or another.
- Cracked nails effect... It is created using gels of several contrasting colors.
- Marine theme - drawings in the form of anchors, sails, steering wheels, white and blue stripes are welcome.
The cost of a pedicure with gel polish is determined by the qualifications of the master, the cost of the materials he uses, as well as the complexity of the design.
The most expensive gel polishes are Shellak, Jessica, OPI, Gelish, Harmony. There are also cheaper Chinese counterparts that last worse, so the cost of manicure and pedicure with their use should be lower.
The price is also influenced by the level of the salon in which the master works. Many craftsmen work at home for themselves, so they have the opportunity to offer prices an order of magnitude lower.
Someone, just after completing the courses, starts working for friends and acquaintances for a nominal fee. On average, the cost of the procedure in Russia starts from 800 rubles.
You can also do a pedicure at home. To do this, you will need to purchase a one-time UV lamp, nail files, primer, base and top, as well as buy gel polishes.
The cost of the procedure will be much lower than when contacting a salon, and the cost of purchasing tools and materials will pay off in a few months.
Pedicure - Gel coating is very popular. Gel polish is considered to be a more perfect form of polish that has a gel base. The procedure will require special materials and an ultraviolet lamp. Despite this, applying it at home is a big cost savings. The assembled set of procedures will last for a whole year, even if you do manicure and pedicure. It is estimated that a starter kit for the procedure at home will pay off after the 3rd application of varnish.
Why gel polish?
Many girls choose to last years it is this material due to a number of advantages:
- Durability of the coating. If you follow the recommendations of a specialist and for the first time avoid contact with hot water for 48 hours, then the coating will last 14-21 days. Do not leave the coating for more than three weeks purely from an aesthetic point of view, because the transition from regrown nails will be noticeable.
- Under the influence of a UV lamp, the coating dries quite quickly, unlike ordinary varnish.
- After such a coating, the nails grow back faster and become stronger, but when building it is the opposite.
- Even on short nails gel polish is applied, thus giving the hands a neat look.
- The price for a pedicure with gel polish will also please, which corresponds to the expected effect.

Features of the procedure
In modern conditions everything is possible. Without the help of a salon specialist, you can apply a full-fledged manicure. It is possible to carry out the procedure at home and at the highest level, while purchasing necessary materials, high quality and not so expensive. All of them are presented in specialized stores and pharmacies.
Avoid cheap coatings that can damage your nails. After all, not only beauty is important, but also health. In parallel with the manicure procedure, consider what tools will help to strengthen nails, which will avoid fragility and delamination.
Before proceeding with the procedure for applying gel polish, you must do a hygienic manicure. Remove the cuticle, if it has not grown too much, then simply push it back with an orange stick. Oil can be applied to soften.
Procedure steps:
- In order for the varnish to hold well, the nails must be polished, a buff is used for this. In the salon, a special abrasive material is used for the procedure, but at home you can save money and use a file for polishing. The end result will be the same.
- To maximize adhesion, treat the nail with a degreaser, paying particular attention to the lateral portions of the nail. Apply the product to your nails and let it absorb. All kinds of dirt and dust can be easily removed, for example, Natural Nail Prep from Entity One.
- The base coat cannot be replaced by any means. Among the most popular options is Color Couture Entity One's Base Coat. In addition to being durable, it is endowed with medicinal propertieswhich have a positive effect on the state of the plate. The only thing that can be saved in this case is to apply the material in a thin layer.
- The comfort of applying the varnish itself is guaranteed by a special brush provided in a bottle with the material itself. Before applying, you need to shake the jar with gel polish, or as it is also called, shellac. The list of advantages of this coating will be completed by such qualities as hypoallergenicity, economy and a wide selection of colors. It is recommended to apply a thin layer, because a thick one will simply swell when drying. In this case, do not seal the sides and ends.
- The drying procedure itself should take 1-2 minutes. Then a second layer is applied and dried in the same way. The second layer will give your nails a deeper and richer shade. This material must be stored at room temperature so that it does not simply thicken.
- The final step will be the application of a top coat that dries instantly. But you should not replace it with an ordinary fixative varnish, because at home this option will not allow the coating to last more than two weeks. The coating gives not only a special shine, but also provides strength to the nail plate.
- If you need to remove the sticky layer, then you should use a special lint-free napkin, and with it the funds, a regular cotton pad will not work. For the procedure, you can use ordinary acetone, but such a substitute can deprive the coating of its usual shine.

When applying the base, carefully paint over the ends; due to the use of a special lamp, this layer will dry in a minute.
Opt for a 36 watt lamp to speed up the procedure. Lower lamp wattage can cause matte stains to appear on the coating.
The bulbs must be renewed every 3-6 months, otherwise the coating will chip off faster than after two weeks. A pedicure coated with gel polish will look amazing if you follow all the recommendations and nuances of the procedure.

How to save?
At home, you can significantly save on the procedure if you replace:
- means for softening the cuticles with an ordinary edged manicure;
- professional grinding tool with an ordinary file;
- means for removing the sticky layer with ordinary acetone or alcohol;
- proprietary lamp conventional UV lamp.
Interested in a therapeutic pedicure for nail fungus? Read on. How to do a French manicure at home? See instructions in this article.
The procedure for removing shellac has its own nuances, it can be removed with a single film, if everything is done correctly. As practice shows, many girls create themselves a manicure, pedicure with gel polish at home, because it is simple and economical. Moreover, all the funds necessary for this are freely available.
Well-groomed hands and feet - distinctive feature every girl and woman who looks after herself. Gel polish pedicure is a popular beauty procedure. It allows you to put the legs in order and get a persistent color coating that is worn without chips for several weeks and strengthens the native marigolds. In salons, the procedure is not cheap, but it can also be done at home.
Permanent coating with a special colored layer, which is polymerized in a UV lamp, is highly resistant to external influences.
It does not wear off as a result of contact with shoes, does not peel and does not change its original color even after 10-15 days. The average frequency of corrections is once every three weeks. Gel polish well masks defects of the nail plate such as irregularities, grooves. Plus, there is room for different design ideas and color combinations. There is a huge number of photos of works on the most beautiful pedicure on the Web. The only disadvantage of the procedure is the cost of purchasing a working tool and accessories.
The salons offer their clients manicure and pedicure services with a permanent coating of nails with gel polish or shellac. Not every master can explain the difference between them.

Gel polish lasts for two weeks or more. It contains a soluble plastic gel, drying of the product is carried out strictly in a special lamp.
Smooth coverage, beautiful glossy shine - nails with any design look perfect even after 7-10 days. An ordinary varnish layer, even the highest quality and most durable, does not allow achieving such an effect. In addition, this type of pedicure saves a lot of time that does not need to be spent on updating a regular nail polish.
Let's get back to the question of the difference between gel polishes and shellac - and it is. The first coating of this type was developed by CND. The company named the new product Shellac.
Shellac is an ordinary gel polish, but made by CND. It has a special composition that is different from the products of other companies.
There is no need to apply a primer under Shellac and this coating is easier to remove than others.
Does it have any downsides? Yes, shellac dries the nail plate more strongly than other gel polishes and can cause delamination.
Useful video
Master class on performing a classic pedicure, removing and applying gel polish.
What you need to cover your nails
Gel polish pedicure tools and accessories can be obtained from specialized manicure and pedicure shops.
Lamp
The first thing you need to perform a pedicure with gel polish is a special lamp. Stop on a powerful 36 W model - in it the layer will harden for no more than two minutes. LED lamps are more expensive than ultraviolet lamps, but the drying rate in them is much higher.
Important! Not all types of gels polymerize normally in LED lamps - check with the seller for this information.

Tools and tools
Be sure to buy a nail file or buff with an abrasiveness of 220-240 units. Instead of a professional one, many girls and women use an ordinary soft polishing file.
You cannot do without a degreaser - you can buy it in a specialized store of goods for manicure and pedicure. With this composition, the nails are processed before applying the base for a resistant coating. Popular degreasers SKY Cleaner, Orly, Domix, KODI Professional, Giorgio Capachini. An analogue can be alcohol or nail polish remover (common with acetone).
Bondex is used to ensure high-quality adhesion of the nail to the gel polish. Whether to use it or not is up to you. Many craftsmen apply the base without bondex.
The choice of bases for gel polish on sale is large. There are foods containing vitamins, minerals and ordinary ones. For independent use, they often take universal remedy - base and top in one bottle.
It is most profitable to buy gel polishes in sets. You can choose three colors or more for a pedicure - it all depends on personal preference, favorite nail design options and financial capabilities.

The last product on our list is the top coat. Better to stay with a product without a sticky layer.
You will also need nail scissors or tweezers, a trimmer or cuticle scissors (if you are doing a trim pedicure), an orange stick and a special gel (if the pedicure is unedged), and a heel file.
Stages of a pedicure with gel polish at home
Pedicure with gel polish is carried out in several stages:
- Remove excess nails and shape them to the desired shape.
- Push back the cuticle with an orange stick or remove with a special softener.
- Give the nails the desired shape, polish their surface, and then treat with a degreaser.
- Apply bondex and base. Do everything carefully and do not rush. Note that bondex is sticky and should be applied with a separate brush. When working with the base, make sure that it does not come into contact with the skin. After application, this layer must be dried in a lamp.
- Start applying a colored coating. The number of layers is from one to three. Each of them is dried in a lamp.
- Apply the top and hold the nails under UV rays again.
If the topcoat is sticky, treat the surface of your nails with a degreaser.
That's all - it remains to enjoy the impeccable result of the work done!
Care features
Gel polish nails require some attention. How to keep a new pedicure longer and how to remove it when the nails begin to grow back?
Secrets of durability
To keep the colored coating worn as long as possible, follow the recommendations:
- Do not file or trim your nails.
- Do not pick hard surfaces (get rid of this habit).
- Be careful with knives and razors - they are very easy to ruin the coating, and it will chip off prematurely.
- On the first day after applying the gel polish, it is advisable to avoid active contact with water - postpone visiting the pool or sauna, steam room, taking a hot bath, shower or general cleaning, washing floors at least for a day.

How and how to remove the coating
The coating is removed with a special tool and foil. It is not recommended to use acetone to remove gel polish, as it damages the nail plate. First, the colored coating is lightly cut off with an abrasive file, cotton wool soaked in a liquid for removing shellac is applied to the nails and wrapped in foil.
Plastic tips can be used instead of foil - they are sold in sets.
After 5-10 minutes, the coating is removed with a spatula, the surface of the nails is sanded with a buff.
Summer pedicure ideas gel polish and photo of nail design
What is the perfect summer pedicure? Consider the most interesting nail design options.
- Summer theme - flowers, seashells, stripes, palms and more. This is the perfect design for those traveling to the sea or just yearning for a vacation. Note that you need some skill to create these patterns.
- Glamor - sparkles, rhinestones, and in huge quantities. The Internet is full of photos with design options. Experiment - the summer is never too bright!
- French is classic and colorful. You can choose any colors of the base and "stripes", wear such a design in "pure form" or in a company with patterns, rhinestones.
- Acid shades are bright, even flashy. But keep in mind that these colors look good on tanned skin, and make pale skin even more painful.
- Chrome - winter novelty will be in demand in the summer. The chrome coating can be applied to varnish of any color and admire its unusual tints.

Conclusion
Pedicure with gel polish is not difficult to do. All you need is to study the rules for working with formulations, buy gel polish, base, top and lamp. It is better not to experiment with coating, but you can play with designs. To create drawings, you will need brushes, stickers, stamps and plates for stamping, dots.
Manicure and pedicure with gel polish has become popular now with the fair sex. Making a quality pedicure yourself is not easy, especially with a gel polish coating. But now it is possible thanks to quality equipment and materials. You just need to have everything you need at home and you will not need to go to a specialist and pay extra money for work and do everything yourself. We recommend to study step by step instructions, according to which it is worth performing this procedure.
Gel polish is now quite common, because it has many advantages and lasts about 2-3 weeks. If you use quality materials, you can not worry about appearance your nails.
You can do different types of pedicure, for example, a beach pedicure should be bright and eye-catching. Here it is better to use summer and expressive shades and make original drawings. You can also make a monochromatic style yourself, it is simple and does not take much time, it is better to choose a calm shade.
Manicure and pedicure should be the same color as experts recommend doing so that everything looks organic and complements each other.
Advantages and disadvantages of shellac on toenails
Do not confuse shellac and gel polish, they are completely different things. . Coating Shellak , it can be removed very easily and you do not need to use a primer when using it.
The shellac coated nail plate will be protected for 2 weeks.
If a woman uses this material, she gets many benefits:
- The nail plate becomes stronger;
- The coating lasts long enough, it needs to be updated only because they begin to grow back;
- When done professionally, the coating does not crack or lag;
- It dries instantly after drying in a special lamp and no need to wait for it to dry completely;
- The composition fits well and evenly on the surface of the toes;
- You can independently think over the design of marigolds and apply special decorations.
Among the shortcomings, one can single out the fact that it is necessary to acquire a special set of tools, but they will be enough for a long time.
To learn how to do a pedicure at home, you need to have certain skills and equipment, then you can get many benefits and no longer go to the salon.
Preparing the legs for the procedure
How to do a pedicure with gel polish at home?This question is asked by many modern girls who monitor their appearance, this is especially true in the summer, because the legs should always be ironed flawlessly, because they are always in sight. Now it is possible to independently perform this procedure without visiting salons and masters.
To do this, you need to purchase all the necessary equipment and material and watch video tutorials on applying a glue coating on the Internet, this will be enough to get basic knowledge.
If possible, you can take training in special courses, but this is not necessary if you plan to perform the procedure only for yourself and not professionally do this business.
What is needed for a pedicure with gel polish at home - tools and materials
It is not so difficult to do shellac pedicure at home, you just need to have special equipment, tools and materials with you.
Equipment and materials that are needed to create a pedicure at home
You need to purchase the following types of materials, equipment and tools:
- The first device that simply cannot be dispensed with is an ultraviolet lamp. It is best to buy a powerful 36W lamp, where the coating hardens in a few minutes. Of course, you can use lamps with low power, but there you will need to dry your nails separately, and they will dry for a long time.
- You will also need to purchase a soft nail file or buff. You can buy a regular file for polishing.
- With a special degreaser. At home, nail polish remover or rubbing alcohol is suitable.
- Basic coverage. Now there is a large selection of this tool, but it is better to choose quality materials from well-known manufacturers.
- And, of course, you need the gel polish itself. It is better not to save on it, because the duration and durability of the pedicure, and its appearance, will depend on its quality.
- To complete the work, you will need a top coating.
Step by step instructions for the procedure - pedicure gel polish
To create a pedicure on your feet with gel polish, you need to follow simple instructions.
- Prepare nails for applying gel polish. To do this, you need to push back the cuticle and remove it carefully using nail scissors.
- Next, we clean up the pterygium.
- Give your nail the shape you want. We recommend making a neat rounded shape on your legs. We usually hide our feet in shoes, and create a constant pressure on the nail plate. therefore long nail or a shape with sharp edges may cause discomfort.
- Next, we use a buff, with the help of it, the nail is polished. This is necessary in order to remove irregularities on the nail plate and improve the adhesion of the material to the surface of the nail.
- The next step is to degrease the nail plate, removing any residues of sawdust and other possible contamination on the nail. Gel polish is very moody and can flake off if you do not first degrease the nail.
- Now it's time to use a primer. Apply in a thin layer and air dry.
- Then it is necessary to apply the base, this should be done carefully, without capturing the area around the nail and then dried in a UV lamp;
- Shellac application. At this stage, the design of the nail is thought out and made out, and then it is dried in a UV lamp;
- In conclusion, it is necessary to apply a topcoat, it is necessary to secure all stages of the pedicure, and it must be dried in a UV lamp.
It is necessary to produce a pedicure, relying on all the sequences and stages, without missing a single one, because this is the only way to get a persistent and high-quality pedicure.
The price of a pedicure with shellac in the salon
The price for a pedicure in salons can be different; on average, today the cost can be allocated, ranging from 750 to 3800 rubles. First of all, the price will depend on the status of the salon and the design of the coating. If the coating is monochromatic, then its cost will be less. And if you think over a certain design or decorate with special stones and ornaments, or select original drawings, then the price will be high.
Pedicure ideas gel polish, photo design
Trendy pedicure 2017, takes everything into account fashion trends and brings to light original combinations.