- good mood;
- desire to create;
- unquenchable fantasy;
- a little patience and a little bit of diligence.
With such a set, you can easily get any, even the most intricate patterns of felt products.
Where can I get schemes, templates and patterns for felt crafts?
You can buy various patterns and patterns at fabric and handicraft stores.
But the easiest is just download diagrams and templates of felt crafts from our website. They are presented below. We have collected various patterns for every taste in one place for your convenience.
How to sew a felt product for the new year?
Having a ready-made template to sew a felt craft is not at all difficult. The algorithm of actions will be as follows:
- print the patterns from our website;
- cut out the finished stencils with scissors;
- transfer the picture to felt using a simple pencil;
- cut out the blanks with scissors, very carefully along the resulting lines;
- sew the finished parts by hand, or on a typewriter (leave an unwired place to fill the toy with filler);
- stuff the decoration with cotton or foam rubber for volume;
- sew up the space left for the filler;
- decorate your felt craft with buttons, beads, tinsel, rhinestones, sequins and other decor.

Your crafts will be even more interesting if you play on the contrasts of the colors of the fabric itself and the thread. For example, if your toy white, sew it with red threads. Or add yellow buttons to a blue felt snowman. Such solutions look very impressive on holiday crafts.
To make the toys look even brighter, their size should be about the size of your palm.
Before getting started, review different options performance of your chosen craft. You will find many ideas for your creativity.
Felt can be used not only for making exclusive Christmas tree decorations. This fabric will make wonderful garlands, toppers (decorations for the top of the Christmas tree), wreaths on the door, cards. Such a product can decorate jars with gift tea or a chair for New Year's Eve. It all depends on your desire and imagination.
New Year very close and time is running out! Rather download schemes and create unique dIY felt crafts!
Schemes, patterns and patterns for felt crafts. Click on the picture to enlarge.
Schemes, patterns and patterns for felt crafts. Click on the picture to enlarge.
Schemes, patterns and patterns for felt crafts. Click on the picture to enlarge.
Schemes, patterns and patterns for felt crafts. Click on the picture to enlarge.
Schemes, patterns and patterns for felt crafts. Click on the picture to enlarge.
Schemes, patterns and patterns for felt crafts. Click on the picture to enlarge.
Schemes, patterns and patterns for felt crafts. Click on the picture to enlarge.

Schemes, patterns and patterns for felt crafts. Click on the picture to enlarge.
Schemes, patterns and patterns for felt crafts. Click on the picture to enlarge.
Schemes, patterns and patterns for felt crafts. Click on the picture to enlarge.
Schemes, patterns and patterns for felt crafts. Click on the picture to enlarge.
Schemes, patterns and patterns for felt crafts. Click on the picture to enlarge.
Schemes, patterns and patterns for felt crafts. Click on the picture to enlarge.
Schemes, patterns and patterns for felt crafts. Click on the picture to enlarge.
Schemes, patterns and patterns for felt crafts. Click on the picture to enlarge.
Schemes, patterns and patterns for felt crafts. Click on the picture to enlarge.
Schemes, patterns and patterns for felt crafts. Click on the picture to enlarge.
Schemes, patterns and patterns for felt crafts. Click on the picture to enlarge.

Schemes, patterns and patterns for felt crafts. Click on the picture to enlarge.
Schemes, patterns and patterns for felt crafts. Click on the picture to enlarge.
Schemes, patterns and patterns for felt crafts. Click on the picture to enlarge.
Schemes, patterns and patterns for felt crafts. Click on the picture to enlarge.

Schemes, patterns and patterns for felt crafts. Click on the picture to enlarge.
Schemes, patterns and patterns for felt crafts. Click on the picture to enlarge.
Schemes, patterns and patterns for felt crafts. Click on the picture to enlarge.
Schemes, patterns and patterns for felt crafts. Click on the picture to enlarge.
Schemes, patterns and patterns for felt crafts. Click on the picture to enlarge.
Schemes, patterns and patterns for felt crafts. Click on the picture to enlarge.
Schemes, patterns and patterns for felt crafts. Click on the picture to enlarge.
Schemes, patterns and patterns for felt crafts. Click on the picture to enlarge.
Schemes, patterns and patterns for felt crafts. Click on the picture to enlarge.
Schemes, patterns and patterns for felt crafts. Click on the picture to enlarge.
Schemes, patterns and patterns for felt crafts. Click on the picture to enlarge.
Schemes, patterns and patterns for felt crafts. Click on the picture to enlarge.
Schemes, patterns and patterns for felt crafts. Click on the picture to enlarge.
Click Class
Tell VK
Greetings, my dears! We continue the magic theme of preparing for the New Year. Let me remind you that earlier we made and considered. That's not all, and today we are figuring out what kind of New Year's toys can be made of felt with our own hands. This material is affordable and easy to use, so even a novice child can handle it.
It is not expensive, it has many shades. And what kind of handicrafts just from it will not come up. Last year I wrote and gave different patterns.
Today we will consider Christmas trees, deer, mittens and other attributes of the new year. Of course, let's pay attention to the symbol of 2019 - the piglet.
Let's talk a little about the nuances of working with this felt:
If you decide to sew all the details, then let's look at what types of seams there are.
You can see that the edges of the crafts are beautifully finished. This can be done both on a typewriter and manually. If you prefer the latter option, then here's a stitching stitch for you.

You can also see that the inner parts are finished with a needle-forward stitch.

Or over the edge.

The "Tambour" type of seam looks beautiful.

Of course, someone even sews with satin stitch on their products, but the listed seams are enough for a novice craftswoman to create a very beautiful craft.

So, we considered the types of seams in advance. Practice them a bit, but don't put off your creativity until later. After all, initially the toy can be glued.
What can be made simple and easy by inexperienced craftswomen or children? In my opinion, snowmen, mittens, balls and Christmas trees are the most suitable options.
Here's an idea for where the pieces are glued.

Well, let's continue with the snowmen. First, a few simple ideas for inspiration, and then step-by-step master classes.

Here we will already use the buttonhole seam for joining and processing the edge.


Now consider the master class itself on how to make such a cute snowman face for a Christmas tree.
Master class number 1... Snowman
The minimum is required: three sheets of felt in white, red and orange; scissors; threads; filler; decor.
Cut out 2 parts of the ball from a white sheet (you can use a cotton pad as a template). On the face we draw or make eyes and mouth with knots. Glue the orange felt carrot.

We cut off the hat, we need two parts. It is equal in length to the diameter of the face. We glue 1 side of the hat on a blank with a face, the second part we glue on an empty white round blank.
Now we put a loop of tape or thread between them and sew the edges with a buttonhole seam. We leave a small part not sewn up to fill the toy with filler. Then we sew up the edge and decorate the craft.
Master class number 2.
Another simple step-by-step master class... All steps are shown in the photo instructions.

If you are not yet very confident in your abilities, then choose simple forms - ball, triangle, heart. Many ideas for creativity are already coming out of them - look.


Master class №3. Christmas tree
These holiday trees are also very simple. But let's look at how to do such a craft.
So, we will take, felt, a triangular pattern made of paper, curly scissors, arandash, filler, threads and a needle and decor.
We transfer the template to the fabric. We cut out two parts with curly scissors.
On the front side we make knots for beauty. You can replace them with decor. Then we connect both parts with a seam "forward needle", having previously inserted a loop from a tape or cord inside. We leave its very bottom not sewn up and stretch the filler there. We sew a cut and enjoy the craft.


Let's also watch a video, where the whole process of making the simplest toys is given step by step.
I think that almost every person will be able to repeat the actions of the craftswoman.
Master class on making volumetric crafts "Shara"
Now we will greatly complicate the task so that you do not relax. Take and sew soft voluminous christmas balls for decoration. They can act as pillows and even.

Take: thin felt, threads.
The pattern is attached after the description of the work process. There are two schemes for the ball: large and small.
So, we transfer the selected scheme to the fabric and cut out the details. We must take 6 pieces. Then, from the seamy side, we sew all the blanks with threads, leaving space on one edge.


We turn the part out onto the front side and fill it with holofiber or synthetic winterizer.

Cut out the remaining parts from the pattern from the silver fabric and make a suspension for the ball. We sew all the blanks together and fix them on our volumetric crafts. Take a cord as a suspension.

Patterns for the ball.


That's all. You can repeat this craft from different types of fabric.
New Year's toys "Herringbone" for children, master classes
Christmas trees are also made quite simply. And they have many configurations, decoration ideas.
for example, you can make crafts with eyes, or with handles, legs, with a hat, etc.
Master class №1. Herringbone with eyes
You can make such a beauty using the instructions below.

For naughty crafts, you need to use green and brown felt sheets, filler, scissors, a pattern, and decorations.

So, we cut out two identical parts. We decorate them with thread knots and crosses, asterisks. Sew on the eyes and mark the mouth with a seam "Forward the needle" in one thread. Now we sew the edges with a buttonhole seam or over the edge. We fill the toy through the barrel and close this hole with threads. 
Pattern - A small tree from parts. All branches are marked with numbers so that you do not get confused, you need to cut 2 pieces of each part.
Master class number 2. Simple tree
This is a very easy toy idea. Cut out a four-pointed star and stitch the rays together. Fill the craft and decorate it with decor.

Master class №3. 3D herringbone
And how to make a tree for decoration? Yes, just my dears. It is important to see the entire stage of work only once.
Two identical parts are cut. Then incisions are made. On one side from above exactly to the middle. The other side is exactly up to the middle, but already from the bottom. Blanks are inserted into these cuts and the tree is almost ready.


Decorate twigs and praise yourself for beauty.
Master class number 4.
Another one step-by-step instruction... Shown in great detail.

Master class number 5... Garland
Shown here is how to make a multi-colored felt garland. I think there is no point in explaining here, everything is shown very clearly. So that the cord that connects all the parts is not visible, use the two sides of the tree. Pass the lace through them, and glue the edges. It will turn out very neatly. 
Patterns


Highly unusual craft from different types of felt. The diagram is attached.


Master class number 6.
Another detailed master class. Take: felt, thread, filler, decor and ribbon.

Using this scheme, we will cut out two parts from the fabric.


We decorate both sides of the suspension with knots or decor.
To one we glue a ribbon or cord folded in half.
We cover this side with the second piece and sew the edges. Push the filler through a small hole and sew the edge.
Many variations of toys can be made using this scheme. Look here, there is a machine seam.

And here comes the manual one. 

You can combine colors to create a more unusual craft.

Flat toys also look interesting. You only need to decorate one side of the workpiece.

Buttons look interesting on such homemade trees.


Here is a diagram of a funny Christmas tree made of two types of felt.


You can even make toys on a leg, in the form of a topiary.


Get creative and sew for fun! 

Cones make such a wonderful thing for design and decor.

A few more types of crafts for inspiration.

Not difficult right? I think that it is important to understand the whole process, and only then look at the already implemented details.
How to make a soft angel and Christmas gnomes
At Christmas, it is customary to give angels and, for some reason, gnomes. Well, let's support this idea with our creativity. Different configurations can be made using the patterns below.

Pattern.
Here's how lovely it is.

Of course, this is a difficult option and requires skill and diligence. But there are also simpler ideas.

Now let's move on to the gnomes. We also cut out two pieces of each part. We sew them together and fill with cotton wool. There are only three important elements: hat, legs and body.

See how you can decorate your home with a garland at Christmas. The diagram is attached.

Another template by which you can sew such funny assistants .


Garland idea.
Well, and "gingerbread" people for inspiration. Of course, they are also made of felt.

You can add wings to them and you will also get very cute angels.
Stencils and patterns for Christmas toys in the form of mittens
Not a single winter will do without mittens. We always need these helpers. Therefore, you can make a toy in this unpretentious version.

Scheme for crafts with a snowman.


Flat idea of \u200b\u200bmittens and felt boots.

In general, the scheme of the mitten is very simple, but I will give a couple more. 

Use the one that is more convenient for you.
Simple craft "House"
Of course, fabulous houses where comfort and festive mood reign! This is a great DIY idea too! You can take any templates. The base, of course, is a square and a triangle for the roof.

Houses can be fantasy and fabulous, but we believe in magic and fairy tale.

Yes, contrasting colors harmonize very well with each other.

Use sequins, beads, beads as decoration. 
Here is a template by which you can create a whole composition.

And here the fairy houses with rounded corners look very cute.


I think that such a toy will not leave anyone indifferent. Hands just itch. to sew something already.
Christmas toy from felt "Santa Claus" with patterns and patterns
Without Santa Claus, nowhere. We are waiting for him every year since childhood. We are waiting for gifts and embody his image in crafts.
There is a scheme for such a good man.


And there is a template for that.


such an old man is very easy to do.

European Santa Claus is also familiar to us.

Idea for kids with glued parts.
Three ideas of Frosts at once. They differ in the shape of their hats and beards.
It's not a shame to put them under the tree next to.
Schemes and templates for the New Year felt boots
The idea to put gifts in felt boots, socks and boots came to us from the West. And it got accustomed very much. Moreover, this symbol of the New Year and Christmas is very bright and funny. You will not find him every day on the shelves of shops.
Here is a diagram of a gnome boot with cuffs.


And here is a felt boot with Frost.

Step-by-step scheme for making a boot with a snowman.

According to the same scheme, you can make such a boot, only with a different decor.

In general, she showed the direction of thought. You only have a flight of imagination and its realization.
Patterns of the symbol of the 2019 year of pigs and pigs
I decided to give you a couple of piglet patterns. This is the symbol of 2019. And by themselves they are very cute animals. Especially if they are made of fluffy felt.


I thank all the masters and craftswomen for sharing their work! Thanks to their golden hands, we can create on our own, without having to rack our brains over making templates and stencils.

Who decided that the pig must be pink? And we will make green!

Of course, these are not all ideas, but these are the simplest and cutest of all that I have seen.
Master classes "deer" from felt to school
Got an assignment at school? Make a craft for the New Year. Of course, someone will run into the forest for cones and branches. And we will take the felt and make it. Let's make it with Santa Claus and a deer. Teachers will definitely like this craft.


Well, if you are not afraid to start a real stuffed toy. I suggest such a deer as an idea.

To decorate a class or group in kindergarten make such beauties.


Kids will love the smiling crafts with bright accents.


Another idea from Bambi.

Many small figures make a great garland.


Another detailed pattern with a diagram of the connection of parts.

we will definitely not pass by such a sadness. 
Another idea with a deer.

In general, animals are also a great theme for New Year's decor. 
A lot of perseverance and patience is required of you. After all, if you sew the seams by hand, then you need to observe the distances between the seams, then the craft will turn out to be neat and decent.
Christmas toys made of felt
Why buy toys when you can decorate your Christmas tree with homemade crafts. Believe me, this will not look old-fashioned, but will only highlight your personality. A skillfully made piece of jewelry will cause many questions and admiration.

Different types of bells, stars, and other ideas will noticeably cheer you up.
Here detailed diagram making a bell - a snowman. I like her very much.


And in general, snowmen are an excellent and not at all hackneyed decoration idea. 
Penguins, northern bears, they can also be used for a winter theme.

A few more simple ideas. I will not give the diagrams here, they are all in the article. And they can easily draw with their own hand.


A small master class with a Christmas ball with a fox and a fawn. All parts are glued together.


Winter hearts are also relevant for suspensions.

More options for an idea for creativity.


There are many schemes and templates for New Year's symbols.


A snowflake pattern will decorate any craft.

Buttons and ribbons add personality.

The idea of \u200b\u200ba glass of champagne will not come to everyone's mind either.

Here is a detailed master class for making a variegated ball for a Christmas tree. used felt of two colors.


Of course, we can't do without stars and snowflakes. Make substrates and colored details. Using just one template, you can make an endless variety of crafts.


Flat stars, without filler, can be decorated with beads. It will look very impressive.

You can also play with the shapes of the snowflakes!

Thank you for your attention. My task was to inspire children to create crafts and show how many interesting things you can create and instill a love for felt in children. After all, this is a wonderful and simple material for creativity.
Tweet
Tell VK
Have a wonderful December! Today we look forward to the New Year holidays and decorate our home with felt crafts. More details on this later in the article.
Making a choice
Ahead of us is the New Year and Christmas - a magical time, with joy, gifts and elegant houses. Today I want to show you some very simple home decorating ideas with felt - an affordable and easy-to-use craft material that you can create a variety of things from! From plush toys, pillows, accessories, to wall art and decorations, the options are endless!
I have put together a few New Year's projects for you that you can do yourself. Try your hand at a step-by-step guide that's good for the beginner and advanced master.
Toy "Gingerbread"
These sentimental little Christmas gingerbread felt can create a magical mood. Suitable as a decoration for a gift, or toys for the Christmas tree.
Necessary materials
- felt;
- white thread and needle;
- small buttons;
- thin ribbons;
- hot glue gun;
- pen / pencil and scissors;
- cotton wool or synthetic winterizer for stuffing;
- stencil or cookies.
Step 1
For each Gingerbread, you will need two identical pieces of felt. I used the cookie itself as a stencil, but you can draw a little man on a piece of paper and cut it out by copying the resulting figure onto felt.
Step 2
Cut out your felt, decorate one figure - this will be the top. You can decorate it to your liking, add various decorations, I just sewed it around the edges with white threads, added a red bow and two hot glue buttons.
Step 3
Before assembling the two pieces of my cookie, I applied some hot glue to the wrong side of the top of my head to insert a loop of ribbon for easy use of the finished craft (you can use it to attach it to gifts later or hang it on the Christmas tree).
Step 4
Then I drew glue from the seamy side along the contour: first the head, then the arms, torso and legs. I also added padding gradually: after the glue had dried on my head, I filled it with cotton wool, then added padding to my hands. Always let the glue dry, only then fill a specific area with cotton.
Step 5
When all the small gingerbread was glued together, stuffed with cotton wool, I waited for it to dry, cut off the excess glue.
Step 6
As you already understood, the thread on the craft is decorative - just sew the gingerbread along the contour with the simplest stitch that we were taught at school in the labor lesson. The New Year's cookies are ready!
Christmas garland made of felt
And this wonderful mini-garland can not only decorate a gift, but also act as an independent decoration for walls, doors or a Christmas tree. Either way, this garland of warm, soft, cozy felt never hurts in the New Year's season!
Garland of warm, soft and cozy felt
Although this is a rather painstaking work that involves cutting out all these small details, the result is worth it - your children will be delighted, and the author's view of the obvious manual labor will give your interior a special zest, like everything that is done with your own hands - with love and warmth.
Necessary materials
- sheets of felt (or felt) - I found it on Ali-Express, but it is also available in other online stores;
- round stencil (I cut out three sizes: 3.5 cm, 4 cm and 2.5 cm);
- thin felt-tip pen;
- Nice sharp fabric scissors;
- sewing machine with white threads.
Step by step guide
- Circles: Count about 10-15 rounds of different sizes of the same color, and then cut them out by hand.
- Triangles: Make a quick template to draw triangles, then cut along the top corner, which creates a strip of interlocking triangles, as shown. It's fast!
- Arrange your shapes in order in length as you see them (my garland has about 10 shapes).
- Sew the shapes in one long row so that there is no space in between each shape.
Felt Ornament "New Year's Pudding"
Necessary materials
- sewing needle;
- pin for fixing parts;
- brown, white, dark green and red felt + matching sewing thread;
- tape of your choice (I used a narrow black tape);
- scissors for fabric.
Step by step guide
Step 1
First, cut out a circle according to a single pattern and then make a white icing shape out of this circle as in the picture. The second circle you cut out will be a brown cupcake that is also round. For one decoration, you will need two such forms.
Step 2
Next, cut out a small red circle, about a centimeter in size - this will be the cherry on the pudding. You also need two leaves - you can make them of any shape. Then cut the tape to the desired length. Depending on how the finished decoration will be hung, the ribbon can be long or short, but at least 12 cm in length.
Step 3
Fold the ribbon in a loop and sew securely to one circle of brown pudding. This will be the top of your decoration. It is not necessary to use brown threads to match the felt, as all the seams will be hidden.
Step 4
Then attach the white “frosting” to the front of the ornament (so that the ends of the ribbon are inside), sew it in place with white thread.
Attach the white frosting to the front of the ornament
Step 5
Now you need to place the leaves and berries - put the leaves on the ornament first and move them until you are happy with the position. The leaves should overlap slightly, meet under the ribbon, protrude from the top of the ornament.
Step 6
Once the correct angle is found, place the red berry on one side, sew the leaves using dark green thread. Most of the stitches should be where the leaves will be hidden by the berry, but one long seam will also need to be sewn along each leaf to hold it in place. It is not necessary to make a seam up to the edge of the pudding, it should only peek out slightly from under the berry.
Place leaves and berries
Step 7
Now it remains to sew the second part of the cupcake, add the red berry. You can either sew on the berry first and then sew the front and back of the decoration together, or vice versa, leave the berry last. The latter option will leave a few red stitches on the back of the ornament, but this will make the job a little less awkward.
Step 8
Whichever method you choose, sew on the cherry with a large x-shaped red stitch for a nice decorative touch. Sew the front and back of the pudding together, using white thread around the “frosting” section, gently smooth out the leaves outside the seams.
Make magic with this fancy felt magic wand
This craft can be used as an independent decoration, or an envelope for a gift card. Imagine you are a fairy, create magic with this fancy felt magic wand!
Necessary materials:
- stick 45 cm long;
- brush;
- glue;
- shiny paint with gold;
- cotton wool or synthetic winterizer;
- needle, thread;
- gold sequins, 8 mm;
- three stars cut from a template;
- scissors;
- gift card.
Prepare the necessary materials
Good afternoon - New Year's time is approaching and we all want to decorate this holiday differently than last year. Already tired of glossy Christmas balls - and I want to please the Christmas tree with something new, soft and cozy. Well ... here's to you New idea for a Christmas tree dress. We will decorate the tree with felt toys. In this article you will find large selection ideas and a demonstration master classon New Year's felt.
WHAT exactly - we will be making felt today.
Let me tell you right away what kind of crafts i have collected in this article…
- We will do many STARS - to decorate the Christmas tree.
- Cut out of felt SNOWFLAKES... or embroider them.
- We will tinkering - BALLS from felt (similar to Christmas tree)
- We will sew Santa Claus (different patterns)
- Make a Christmas tree from felt ... and HOUSES.
- Sew small felt SKATES and SLEEVES - to hang on the tree.
- Let's make New Year's OWL and BIRDS also like felt Christmas tree crafts.
- AND AT THE END OF THE ARTICLE…. THERE WILL BE A SURPRISE PRIZE !!!!
That is, there will be many ideas - and I also picked up more ways for each idea ... to wake up your imagination and inspire you to creative New Year's feats.
DELICIOUS FOREWORD… the decorative possibilities of bright felt.
And by the way ... from felt we can make not only New Year's toys ... but use the IDEAS OF THIS ARTICLE to create other New Year's crafts.For example - a felt craft can decorate jars with gift tea... Or a congratulatory New Year postcard ...

Or felt characters can sit on a christmas wreath… Or beautiful craft can serve as decoration for chair back - as part of the general New Year's table setting.

And a bunch of New Year felt characters can become a FINGER THEATER - and on Christmas days your children can stage many theatrical performances in the New Year's theme. And you will help them with the script and the main characters of the play.

Now let's - in order about everything that was promised ...
STARS Christmas made of felt - for decorating the Christmas tree.
And of course there should be stars hanging on the tree ... many beautiful stars made of bright felt. They can be done in a variety of ways.
You can sew a puffy star cut out two parts of the star - front and back - sew them together and stuff cotton wool inside. Decorate the front side of the star with a felt snowflake - it can be sewn with inconspicuous stitches ... passing the thread through the bead ... Then the snowflake is sewn on and the stitches are invisible, because they pass through the beads. This star is in the left photo below.
And you can make a MULTI-LAYER star - from felt different shades (and even of different thickness) cut into stars ... circles ... flowers. And put it all in ONE STOP - (as in the right photo below) ... decorate the middle of the felt multi-layer star with a button
Or do star-shaped blanks FROM PLYWOOD ... or THICK CARDBOARD ... Then cut the same silhouette of a star out of felt and stick them on our rigid blanks. You can decorate the star with a snowflake or felt peas - as in the photo below.

Can the surface of the star decorate with STITCHES - that is, simple embroidery... Just make a seam of colored thick threads, following the contours of the star.
Or try embroidering the outlines of a snowflake in the center of the star and small snowflakes in the corner-rays.

SNOWFLAKES made of felt - flat and voluminous (master class).
And of course I want to do openwork snowflakes... a symbol of nature's tenderness. After all, it is amazing how the wind and water create such beauty - not otherwise as moved precisely by TENDERNESS.
if you have enough DENSE felt - then you can simply cut out the contours of the snowflake - and punch a hole for the ribbon-tie.

You can just snowflake to embroider on a round felt... You can draw a snowflake on felt ... cut with scissors - and also stick as an applique on a circle of felt.
You can also glue the felt applique onto a simple round CARDBOARD. And you can cut two snowflakes of a contrasting color (blue and white) and so that one was a little bigger size - and when we put them on top of each other - the second will spread around the edges from under the first (as in the right photo below).

Can cut FINE RADIANT snowflakes different sizes ... And fold them into a sandwich ... Decorate the center with a button or a bead or brooch. As we can see in the photo below - a snowflake made by hand

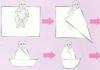
And here is another interesting way to create VOLUME felt snowflakes - petal method.
It looks difficult - but in fact it is even EASIER AND FASTER than cutting out the rays of a snowflake ...

Here's how it's done ...
We will cut out the PETALS (like a flower) ... and then pull the BOTTOMS of these petals (closer to the center of the flower) with a thread ... Thus, the petals at the center of the flower will SHRINK and there will be holes in the center ...
OPTIONAL ... you can decorate the middle of the petals with embroidery ... bugles ... beads ...
And you can then (or immediately) make a FIGURATIVE CUTTING OF PETALS - so that they have teeth or steps ...

And there is also a way to FOLD a snowflake from felt strips... Like in the photo below ...

Felt HOUSES - Christmas tree toys.
If you have THICK felt, you can simply cut out of it SILHOUETTES housein ... make SLIT-windows in them and hang a bell, a lens or a tiny Christmas ball in each slot (such small Christmas balls for mini Christmas trees are sold in the store.
But even if you do not have thick felt, you can get it if glue two layers of regular felt. Layers of felt can be glued with simple PVA glue ... or double non-woven (dublerin) - this is an adhesive fabric, it is placed between the layers of felt and calcined with an iron, the temperature melts the dublerin and the layers of felt are glued together.
Or you can make a chubby house ... sew it from two layers of felt ... and stuff cotton wool inside ...

Or make a voluminous three-dimensional house with four walls and a pyramidal roof.

Christmas tree toys made of felt - in the form of mittens and skates.
Such skates are made very simply ... First, a pattern is cut out - it looks like BOOT SIDES stuck together with each other ...
Then the fold line - this part is pushed under the paper clip .... And in this place - the flaps of the part (the sidewalls of the boot) are folded together and stitched along the sides ... And it turned out that the clip was inside the boot.

Mittens are sewn from two halves - we put cotton wool or synthetic winterizer inside ... We decorate the front detail with buttons (of course, we sew them even before stitching the front and back parts together). We make elegant cuffs from any fabric - we also decorate them with a button. Without cuffs, mittens look like an unfinished craft - and with cuffs they are immediately refined.
Felt cupcakes are like toys for a Christmas tree.
So delicious muffin cake is easy to sew by yourself ... there is no complicated pattern - everything is simply cut out by eye ... The main thing is to do it seams to simulate a ribbed cake surface... decorate the top with a berry or bead ... and make in the middle felt strip - a layer of cream... Candied rhinestones will complement the beauty of this culinary felt masterpiece.

Or you can make voluminous cupcakes out of felt and also hang them on the Christmas tree. ...

How to make a voluminous cake-pie with your own hands.
For this you need to cut a long strip of felt ... in the form of an elongated triangle ... Such elongated parts need 2 pieces - light and darkest color
We put both parts on top of each other and roll them up - like a carpet. We begin to roll up our "two-layer rug" from the wider side ... and to the one that is already. This gives us a cupcake that has a top in the center ...
We fasten the roll with threads (so as not to turn around) ... decorate with a paper cupcake mold ... or lace
Christmas BALLS made of felt - for the New Year tree.
But these are the most simple crafts from felt ... Cut out circles and decorate them with felt strips and rhinestones.

Such felt Christmas balls can have a teardrop shape (as in the photo below)

They can be decorated with flowers and stars cut out of felt. Elegant braid, thin lace and sequins.

Icicle-like oval shapes look good too
Master class on sewing felt Christmas tree toys.
And here is a step-by-step micron in the photo - where the whole process of making such a toy is visible - layer by layer ...

Christmas decorations made of felt WITH APPLIQUE.
And on such a round ball made of felt, you can make a felt applique (or fleece). It is better to use thin felt for application.
For the application of the Christmas tree - it is better to take three shades of green ... so that each tier of the tree stands out beautifully (as in the photo below). And for the applique of a deer - you also need 2 shades of brown - one for the head and the other for the nose and horns.

You can make a snowman or Santa Claus applique.
If there is no white felt for the beard of Santa Claus and for the snowman - you can use a cotton pad. Only a cotton pad needs to be reinforced with PVA glue (soaked in glue, leveled and dried - so that it becomes denser and cemented).
You can make interesting to how would it be STANDING PLOTS on such felt material ... A snowman who rejoices in the snow ... Bunny under the Christmas tree, birds are circling and flowers are blooming in the snow

DEER made of felt - like toy pendants on a Christmas tree.
A deer made of felt is easily sewn ... just a head with ears and horns ... in the middle there is an applique of a nose ... and beads of an eye ...
Or you can whole torso deer cut…. Here's how in the photo below ... and then the ribbons do not need to be sewn to the head - but you can put them like a collar around the deer's neck.

FATHER FROST made of felt - and other characters for Christmas tree decorations.
Santa Claus may have very different pattern... It is very easy to do it yourself. You can simply draw the HEAD of Santa Claus - any shape - in the shape of a circle ... in the shape of a bell ... in the shape of a triangle ...

CAN make Santa Claus - WHOLE ... with the body... Moreover, the body can be completely SCHEMATIC ... just a teardrop shape ... (as if he were in a long fur coat and hid his arms).
Or you can draw out the outlines of the arms and legs on the pattern - make appliqué mittens on the tummy ... and a black belt (as in the right photo below).

You can make Santa Claus with handles and legs in the form of a ropeto (the twine can be replaced with a chain of air loops with a crochet). He will dangle amusingly on the tree.
If you are sewing Santa Claus from THIN felt - then a beard can be made not as a flat applique ... but like a duster of chopped felt strips (as in the right photo below). Such Santa Claus does not have to be hung on a spruce branch - you can simply put it under the tree

And here are also funny New Year characters - a flat penguin and a snowman to decorate the spruce legs.

And you can also make the HEDGEHOG ... and LADYBIRD ... they also turn out bright and will look good like toys on a Christmas tree.
Christmas tree made of felt is a DIY Christmas craft.
If you want your tree to stand out CONTRAST against the background of the spruce, then it is better to make it of bright paired colors - RED + WHITE ... ORANGE + GREEN ...

You can use such a felt Christmas tree decorate with buttons - it is better to use buttons of no more than three colors (to be stylish and not chaotic). christmas tree craft you can also add a small felt Christmas wreath.

You can make several TIERS of a Christmas tree from different colors ... lay them like pancakes on top of each other. You get a volumetric effect.

And you can make on the Christmas tree mini flower applique - oval sequin petals and round sequin center. Or a paper appliqué in the shape of a heart ... and sew an asterisk button on the top.
Owls and other felt birds - how to sew by yourself.
Here are some ideas for what kind of big-eyed owls you can sew from felt - for a Christmas tree.
The silhouette of an owl may look like a heart - narrow towards the bottom ... and at the top diverge to the sides on the ears ...

Or an owl pattern could be like a PEAR OVAL ... or be like a PERFECT BALL ...

You can make your own felt birds to decorate the Christmas tree ... These are such simple ones ... in the shape of a boat-drop.

Or such bird-titmouses with feathers ... with an applique tail.

Birds on the tree are always fortunate ...
May your felt crafts delight you and your loved ones this year - and I am sure that next year too.
It will be so nice to take them out of the box every year and decorate the Christmas tree.
AND THIS IS THE PRIZE ...
Those who have read to the end ... I treat you with TASTY IDEAS ... Christmas pancakes. These are the New Year's surprise breakfasts you can make for your children.)))
The herringbone is a stack of pancakes (folded in a triangle) ... a star is carved from an orange ... berries decorate the tree like balls.
A deer is created from three pancakes - one is the tiniest for the nose. Horns can be made from crispy crispbreads or ruddy sausages. Or you can paint the horns with sour cream on a dark plate ... or jam on a white plate ...
Happy New Year to you !!!
Olga Klishevskaya, specially for the site ""
If you like our site, you can support the enthusiasm of those who work for you.
Happy New Year to the author of this article Olga Klishevskaya.
Celebrating the New Year is not only a night when all wishes come true, the smell of tangerines and falling snow. These are garland lights and bright toys. Firecrackers and sparklers. The joy of the gifts that appear under the Christmas tree after the chimes.
The holiday can be made even more amazing and the anticipation of it more exciting with the help of handmade felt New Year's surprises.
Patterns
The future image of the craft depends not only on the skill of the author, but also on correctly cut details for felt new year products... To create them, you need sheets of cardboard or thick paper. When transferring the form to the material, it should fit snugly and not slip.
For large and basic parts of the craft, it is advisable to prepare separate patterns. The selected design is transferred to a sheet of cardboard and carefully cut out. Ideas for images can be gleaned from master classes on the Internet, specialized magazines, create with your own hands or copy your favorite picture.
If the author endows the felt toy product with an abundance of details for the New Year, then the base can be optimized.
- for the manufacture of the facade of a soft house on the main workpiece, it is advisable to make openings for windows and doors. This will allow you to coordinate the location additional elements on the main part in the markup. And transfer them to the material without creating additional shapes.
For the sake of saving space and convenience when storing the bases of small items for crafts, it is convenient to use factory-made stencils. Or create your own analogs on cardboard sheets. Make holes on an A4 sheet in the form of circles of different diameters, rectangles, squares or triangles of different sizes.
Felt toys for the New 2016
How to make felt toys yourself for the New Year?
Who does not remember the funny bear cub Umka and does not want to see him as a guest? Stuffed Toys make everyone happy. But in families with small children, they occupy a special place. To make a soft toy cute, you need a figure pattern from thick paper or cardboard. On it, you need to outline the detail on felt twice and carefully cut out.
It is more efficient to sew with a seam "over the edge". It looks nice and prevents gaps. The volume of the craft is achieved due to the use of filler - paralon or padding polyester. The muzzle is embroidered with threads. As a decoration, you can put on a teddy bear crocheted, knitting scarf or bow.
Handmade felt "houses"
For single layer cupcakes, you will need to cut any shape. Add vertical seams that accentuate the ribbed surface of the garment. A berry or bead on top will be a worthy decoration. A thin strip depicting a layer of cream and rhinestones - candied fruits will complete the picture.
To make soft, voluminous cupcakes with your own hands, you need:
- cut 2 long felt strips of light and dark colors, in the form of elongated triangles;
- attach them to each other and roll them into a roll. Roll up - from the wide side to the narrow;
- fasten the roll with threads and put on a "skirt" made of paper or lace.
Forms for New Years volumetric snowflakes simple:
- - apply a pattern of flower petals on a dense base;
- - transfer the patterns to the material;
- - pull the cut petals at the bases with threads;
- - sew together the blades of the petals;
- - embroidery, beads, bugles are suitable for decorating the centers of the blades of a snowflake.