It's hard not to notice how braids are gaining popularity. Still would! They are varied, beautiful, match all clothing styles and are suitable for ladies of any age. The most interesting variation is the inverted braid. What is it and is it possible to weave such a braid for yourself?
The ancestor of the inverted braid is the French braid. For a French braid, you need to braid the hair from above, and for an inverted hairstyle, the strands are braided under the bottom and come out.
To create a truly beautiful braid, your hair needs to be prepared. Before braiding, thoroughly wash your curls, dry them and treat them with a spray to make combing easier. Additional volume can be created by curling your hair with a curling iron or flat iron. But keep in mind that curly hair is more difficult to braid, especially the first time.


Let's look at the reverse braiding pattern of three strands. It is similar to French braiding, only all actions are performed up and down.


Separate a section of hair from the top of your head. The thicker it is, the more voluminous the hairstyle will be.
Divide the strand into three equal parts. You can start on the left or right - whichever is more convenient for you. For example, let's start on the left.
Place the left strand under the middle one.
Then, with the same movement, place the right strand under the middle one.
Repeat this action two times.
Secure the base of the braid with your thumb and use your other hand to grab loose hair from the side and add it to the middle strand of the braid.
Place the left strand under the middle one again, take some of the hair on the left and add it to the middle part.
Continue braiding according to this pattern.
Tie the end of your hair with an elastic band.
Iron your hair all the time so that the braid is smooth and even.
If you still don’t understand from the text how to braid a pigtail, watch this video:
On the contrary, a four-strand braid looks much more interesting and attracts more attention. If you decorate your braid with hairpins, hairpins and flowers, you can go to any special event with your hairstyle. How to braid such a non-trivial braid?


Separate a section of hair from the top of your head. You can lightly comb them to add volume.
Divide it into four equal parts.
Let's start on the left. Place the left strand under the next two and pass over the right one.
Now place the right strand under the two adjacent ones and pass over the left one.
Place loose hair under the two left parts and pass over the right.
Repeat with the right section.
Continue braiding the braid in reverse using this pattern until all the hair is gathered.


An even more interesting version of the braid is the other way around. Weaving such a hairstyle will require more time and skill, but the result is worth it.


Take a section of hair from the top of your head and divide it into three sections.
Start weaving a regular inverted braid of three strands (we talked about this above).
For convenience, visually number your hair from left to right.
Take the loose part on the left, place it under the second strand and pass it over the third.
Take a strand from the right side, place it under the fourth and pass it over the third.
Continue weaving according to this pattern.
To give the braid additional volume, straighten its edges a little. You need to pull it out exactly at the edges, and not all the strands, otherwise the braid will unravel.


If an inside-out braid seems boring to you, add a ribbon to the braid. This is not as difficult to do as it seems.


Tie a small knot in the ribbon to prevent it from slipping out.
Using bobby pins, attach the ribbon to the top of your head.
Take a strand from the top of your head and divide it into three equal parts.
Start braiding it like an inverted braid with three strands.
Add a ribbon to the left strand, and bring the right strand under the middle one.
Repeat the action with the other part.
Add hair to the braid on the left and right.
Braid all your hair using this pattern.
Finally, cut the tape.
Unfasten the ribbon from the top of your head, cut it and carefully hide it in a ponytail.
On the contrary, a good ending to such a French braid would be the end of the hair tied with a ribbon.
Fix the braid with hairspray so that it lasts as long as possible and does not fluff up.
Now you have learned only about one way to weave a ribbon into a pigtail. But we have a whole where there are many more of these methods.


The hairstyle goes best with a light dress or business suit. From third-party accessories, you can safely use beads and elegant long earrings.
With such a braid, you can attend any special event, official meeting, or just go for a walk with friends.
The longer the hair, the more interesting the hairstyle looks. An inside-out braid suits girls with any type of face. The presence or absence of bangs does not matter.


At first glance, it seems that braiding such a hairstyle for yourself is an impossible task. However, a couple of workouts, and your hands will automatically begin to braid your hair.


With this hairstyle you will make your image original, feminine and emphasize the uniqueness of your own style.
Braiding is not only a fun, but also a useful activity: such an element can add zest to any hairstyle - from strict to casual. And for this it is not at all necessary to study particularly complex technologies such as weaving with 4 or more strands. Even a classic braid can be presented in an unusual way - for example, done inside out. How to weave such a braid? What tricks will help you make your work clean and perfect even without special skills?
QUICK NAVIGATION THROUGH THE ARTICLE
Reverse braiding master class
The general technology of creation is identical to that characteristic of a classic braid of 3 strands: the alternation of the central and side parts remains unchanged, but their direction of movement changes.
- Divide the entire mass of hair into 3 equal parts, smooth each of them.
- Place the right strand under the middle one, crossing it, and pull them in different directions.
- Mirror the actions: place the left strand under the one that has now become the middle one, and also pull.
- Repeat the process, alternating between the right and left sides, until the very tip. Secure it with an elastic band that matches your hair or dress.
The only thing that can really cause difficulty in weaving the other way around is the unusual position of the hands, but this is only a matter of time. Otherwise, the work is so simple that an inverted braid can be achieved the first time.
But it’s still worth considering some nuances:
- If your hair is very frizzy and you want to get a smooth and neat hairstyle, after moisturizing, treat the strands with a small amount of mousse (a ball the size of a walnut for the length of your shoulder blades). The only point is to choose a product without fixation, otherwise it will stick the hairs together, and after a while it will become impossible to braid.
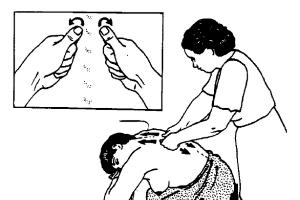
- Can't get a clean back hairstyle? Start working from the side - throw the entire mass of hair over your shoulder and follow the technology described above. Once your hands remember all the steps, you can try to repeat them without looking.
The French version is considered to be strands laid on top of each other with a gradual lateral addition, and those placed under each other with the same lateral “increase” are called Dutch - or dutch braid.
- From the total mass of hair, separate a small wide part in the front zone, moisten it well and divide it into 3 equal parts.
- Bring the right strand under the middle one, crossing them, then do the same on the left side.
- Holding not only the separated strands, but also the place where they meet in the center, with your free fingers, grab a part of the hair on the right that is 1 strand wide, add it to the one that is currently on the right, and bring it under the middle one, crossing them.
- Do the same on the left: grab a strand from the free mass of hair equal to the existing side strand, bring them together under the central one.
- Continue adding loose curls until you run out of them. Then braid your braid in reverse from the resulting wide strands and secure it.

This hairstyle looks especially attractive if the ponytail (from the back of the head) is hidden inside, secured with hairpins and bobby pins. For very long hair (to the waist), you can twist the bun, and so that it does not look too simple, links along the entire length pull to the sides thereby making the weaving more airy and voluminous.
An important nuance: when creating a Danish braid inside out, pick up the strands at the same level: if the part above the ear was taken on the right, on the left it should be located at the same place.

There are no rules for the distribution of free fabric, but professionals recommend first grabbing the outermost curls, and then, when they run out, moving towards the middle line.
Inverted braid on the side: unusual and elegant
In the options mentioned above, the idea of braids is the opposite don't end: they can be moved to either side, wrapped around the head, or added as small elements to other hairstyles. If we talk about a gradual increase in the level of difficulty, of course, Dutch weave will be followed by its lateral variety.
The steps are identical to those described previously, but there are a few important points.
- The hairstyle also begins in the upper front zone, from where the curls are immediately thrown to the chosen side and begin to cross each other.
- It is advisable not to over-tighten the new strands on the side opposite to where the hairstyle is located - they look much more attractive when they lie freely, with slight sagging.

![]()

Learning to weave braids from 3 strands, on the contrary, is no more difficult than their classic variations, and after mastering this technology, you can try turning 4 strands or more outward. However, for inversion it is important to master traditional patterns so that the muscles remember the movements even in sleep.
Since ancient times, long and luxurious braids have been considered the dignity of any woman. At the moment, there are a huge number of ways to weave a wide variety of braids, ranging from classic to complex French ones. Despite the complexity of weaving, the French braid, on the contrary, is widely popular among girls and women of different ages. Thanks to its unusual appearance, the braid fits with any outfit, emphasizing the femininity and sense of style of its owner.
QUICK NAVIGATION THROUGH THE ARTICLE
Weaving methods
It is not difficult to learn how to weave such braids, however, you will need a lot of patience and care, because if you miss one moment, you will have to start the work again.
The methods of weaving French braids are quite diverse and are divided into separate types:
- simple French braid;
- braiding from bottom to top;
- reverse French braid;
- "Waterfall" braid.
Regardless of the type of weaving of such braids, hair decorations remain the same. In order to give your hairstyle originality, you can use combs with stones, hairpins, bobby pins, all kinds of bows and flowers.
Simple French braid
You can weave such a braid as follows: from the side, and starting from the top of the head down. Before starting work, you need to thoroughly comb your hair and apply foam to it for better styling. Then you begin to braid, taking a small strand from each side, as shown in the photo below. The remaining hair must be braided like a regular braid and secured with an elastic band. Next, you should pull the strands out of the braid (see photo). To complete the work, various decorations are added.

You can learn more about installation in the video below.
The next installation scheme is almost the same. The only thing is that weaving starts not from the top of the head, but from the temple. First of all, one strand is separated and divided into three parts. Next, you begin to weave a braid, taking the strands a little at a time on the sides. When weaving such a hairstyle, it is necessary to tighten the strands more tightly, since at the end they will need to be slightly stretched, and in a loose style it does not look so impressive. After braiding the braid to the end, secure it with an elastic band.

Braiding from bottom to top
This type of hairstyle is undoubtedly the most unusual, because in addition to the traditional bun at the back of the head, you can use a bow or curls secured to the side.
In order to get this style, you need to lightly comb your hair and braid, starting from bottom to top:
- tilt your head forward and divide part of your hair into three strands;
- start weaving, gradually taking strands from the side;
- Having reached the crown, pull the resulting braid and the remaining hair into a ponytail.

The weaving technique is described in more detail in the training video.
The final result of such a hairstyle depends on the desires and preferences of its owner. There are several styling options: a bow, a bun or curls secured with a comb on the side.

The French braid, on the contrary, is the most popular among girls, as it is woven quickly and looks amazing with any outfit. This hairstyle can be used both in everyday life and for a celebration.

To begin, comb your hair thoroughly, starting from the top of your head towards the back of your head. Then sprinkle your hair with mousse or foam so that the strands do not get tangled and lie correctly when styling.
The pattern of such installation is simple, but requires care during weaving:
- at the top of the head, separate three strands and begin to braid the braid; for convenience, the strands are numbered from 1 to 3 on the right side;
- strand number 3 must be placed under 2, thus replacing the third strand. The result is a numbering of 1-3-2;
- in order not to get confused, again number the resulting strands from 1 to 3;
- the first strand is placed under the second, ultimately replacing strand number 1;
- then you need to repeat the previous steps to the end.

You can learn more about the technique of creating a hairstyle in the video below.
This hairstyle looks unusual and playful, and at the same time gives its owner femininity and elegance.
The “Waterfall” hairstyle goes well with large romantic curls and suits any image. The weaving pattern is shown below.

To begin, take a section of hair near your forehead and divide it into three parts: top, middle and bottom. Then begin to weave a regular French braid, placing the middle strand on the top strand, and, in turn, the bottom strand on it. Next, the top strand is placed on the middle part, the bottom one is released, and instead of it, a new strand is taken from the top of the hair and woven into the hairstyle. Thus, the process of weaving the “Waterfall” hairstyle takes place.
A new trend in hairstyle fashion is an element called the “inside out braid.” How to weave a braid “inside out” and how to model its various variations? Professional hairdressers share their secrets. Having mastered this original weaving, you can create a wide variety of everyday and formal hairstyles, even for yourself.
Braiding inside out
This weaving is absolutely easy to master. The main condition is to take your time and be extremely careful. Before starting work, prepare your hair: comb thoroughly and lightly moisten. You can braid dry hair, but moisturized hair will be more manageable and the work will be easier. Even if the hair is thin, the volume of the hairstyle will seem luxurious due to the braid inside out. Photos of various options will help you verify the visual effect of such weaving. Such hair, dyed in several colors or shades, looks very extravagant.
Weaving stages
Unlike an ordinary classic braid, inside-out braiding has one characteristic feature: the strands are carefully intertwined during work, laying not on top of the central strand, but strictly under it. This is all the difference, but thanks to this weaving technique, the braid turns out airy and, as it were, raised above the surface of the main hair. Luxurious effect!
How to braid your hair inside out? 
Choose a place to start your weaving. This will depend on the hairstyle. There can be one braid, going from the top of the head down to the neck - start from the crown. If two vertical braids are planned, divide all the hair with a straight parting into two parts and also start working from the crown area. It is more convenient to start an asymmetrical braid above the left ear, 4-5 cm higher. The “crown” is woven from one ear to the other.
The technique of how to braid an inside-out braid is simple: separate a little hair and distribute it into three strands of equal volume.
Now you need to alternate the strands in the same way as in a simple weave, but at the same time bring them only under the central strand. As you weave, you should add a little hair from the main mass to each strand being woven. The braid will become thicker and thicker.
You can direct the scythe in any direction - to do this you need to keep it as close as possible to the desired trajectory.

Having secured the finished one or with pins, it is worth giving it even more volume. To do this, you should very carefully straighten the waves of the braid, evenly pulling them in opposite directions. This must be done moving from the beginning of work towards the end of the braid.
DIY wedding hairstyle with braid
Since braiding a braid “inside out” is not very difficult, you can think about how to use it to create a festive or even wedding hairstyle. If you prepare your hair in advance (twist it from the roots and lightly comb it in the parietal area), then weaving several braids will form the silhouette of a romantic hairstyle for the bride. All that remains is to fix the work with varnish and decorate with flowers or rhinestones. The hairstyle for the most special day in a girl’s life is ready!
Even in ancient Greece, noble women cut off the hair of their slaves to create extensions and braid them into a braid, combining them with their own hair. It was from Greece that the art of braiding and creating beautiful hairstyles came to us.
In Rus', a luxurious, voluminous braid has always been considered a symbol of female beauty, and the longer it was, the more valued it was. The number of braids braided indicated the social status of their owners: one braid - an unmarried girl, two braids - a married woman.


Hairstyles with braids - a fashion trend
Braided hairstyles remain in fashion today. They are so original, beautiful and varied, they so radically change the image of those who wear braids, and they combine so organically with any style of clothing that designers of fashion houses decorate models’ hairstyles with all kinds of braids at the shows of their collections.
The braid is becoming a favorite of the coming season and fashion brands offer a variety of hairstyles with braids: a reverse French braid, unusual braids braided in the form of a basket, a simple braid, small African braids in different weaving options, a fishtail braid and even extravagant braids.


French braid on the contrary - the trend of the coming season
Smoothly styled hair is no longer in fashion, hair-to-hair styling is becoming a thing of the past, and at the peak of popularity is the reverse French braid or inverted braid.
The familiar French braid has undergone some changes. Now it has several names and one of them is the inside-out braid. Changes concern the weaving method: strands of hair are now intertwined with each other from below, rather than from above. The effect is amazing. Even thin hair looks voluminous and luxurious, and its length, in principle, does not matter much to create a beautiful hairstyle.


How to braid your hair backwards
First you need to prepare your hair: wash it, condition it, dry it and comb it thoroughly. Hair should become smooth, straight, shiny and not electrified.
In order to learn the braiding technique, we will braid one braid from the entire mass of hair, which will start from the crown and go down vertically.
1. At the top of the head, separate part of the hair from all the rest. The thicker this main strand is, the thicker the braid will look.
2. Divide the separated strand of hair into three equal parts and mentally number the strands:
strand No. 1 - on the right side,
strand number 2 - in the middle,
strand No. 3 - on the left side.

3. We start braiding with strand No. 1 (right). We transfer this part of the hair under strand No. 2 (middle).

4. Take strand No. 3 (left) and move it under strand No. 1, which is currently in the middle, between strands No. 3 and No. 2.

5. Now on the left we separate a small strand from the main mass of hair and connect it with strand No. 2, which is now on the left.

6. Move a new strand No. 2 under the bottom (old strand No. 2 plus a new strand).

7. Then we attach a new strand on the right side to the central strand.

8. In this way we braid to the end of the braid, each time adding new strands from the main mass of hair, either left or right.

9. We fix the end of the braid depending on the length of the hair and the imagination of the braider.
10. Smooth the hair on both sides of the braid and fix it with hairspray. We remove excess hair under the braid.
11. To give your hair more volume, before fixing it with varnish, you need to pull out the loops of the braid.
12. The hairstyle will look evening if you decorate it with beautiful hairpins and barrettes.
Reverse braid video
Reverse braid with flower
Two outer braids
Having mastered the technique of weaving such a braid, you can create a variety of hairstyles: from classic to retro, from formal to evening.
Reverse French braid looks much more impressive and voluminous than its classic version. The main difference between such a braid is that the braided hide-and-seek is placed not from above, but from below. Thus, when weaving braids, we bring the ponytails down, not up. This is how the effect of a lush braid “glued” to the head is achieved.
How to do a reverse French braid, is well shown in the video at the bottom of this page. Be sure to keep in mind that if you want to give the braid additional volume, you should stretch it gradually during the braiding process, and not after it is secured with an elastic band. This is done as follows. 4 - 5 sections are braided, and then they are stretched and also with the rest of the braid. And upon completion of the braiding, the entire braid is stretched again.
French twist braids- one of the most common elements of evening hairstyles and wedding styling. They are both very impressive and comfortable. Inverted braids look especially beautiful if they are woven asymmetrically across the head or placed next to the face. The result is a modern and romantic look at the same time. In addition, this way you can create a volume effect with virtually no styling products. Similar ideas will be demonstrated in video tutorials later. To begin with, it is important to master the simple reverse french braiding. By the way, depending on who you are, it’s quite easy for me to make the inverted version, but the classic version is much more difficult.
For help in creating the video, we thank the New Style hairdressing salon and personally the hairdresser Yulia Ananyeva.
Photos of hairstyles with an inverted French braid
We bring to your attention interesting ideas for creating hairstyles based on the technique of weaving a reverse French braid. Beautiful braids from our readers:

Playful zigzag braid from Elena Turbina. It will look great on straight long hair.

We conventionally called this braid the “crown”. In order to braid it, you need to gather part of the hair into a ponytail on the top of the head, and then weave an inverted French braid, taking hair alternately from the ponytail and near the face so that the braid covers the parting. It is better to start braiding from the bottom.

Even in ancient Greece, noble women cut off the hair of their slaves to create extensions and braid them into a braid, combining them with their own hair. It was from Greece that the art of braiding and creating beautiful hairstyles came to us.
In Rus', a luxurious, voluminous braid has always been considered a symbol of female beauty, and the longer it was, the more valued it was. The number of braids braided indicated the social status of their owners: one braid - an unmarried girl, two braids - a married woman.


Hairstyles with braids - a fashion trend
Braided hairstyles remain in fashion today. They are so original, beautiful and varied, they so radically change the image of those who wear braids, and they combine so organically with any style of clothing that designers of fashion houses decorate models’ hairstyles with all kinds of braids at the shows of their collections.
The braid is becoming a favorite of the coming season and fashion brands offer a variety of hairstyles with braids: a reverse French braid, unusual braids braided in the form of a basket, a simple braid, small African braids in different weaving options, a fishtail braid and even extravagant braids.


The reverse French braid is a trend for the coming season
Smoothly styled hair is no longer in fashion, hair-to-hair styling is becoming a thing of the past, and at the peak of popularity is the reverse French braid or inverted braid.
The familiar French braid has undergone some changes. Now it has several names and one of them is the inside-out braid. Changes concern the weaving method: strands of hair are now intertwined with each other from below, rather than from above. The effect is amazing. Even thin hair looks voluminous and luxurious, and its length, in principle, does not matter much to create a beautiful hairstyle.


http://vk.com/club22168200
How to braid your hair backwards
First you need to prepare your hair: wash it, condition it, dry it and comb it thoroughly. Hair should become smooth, straight, shiny and not electrified.
In order to learn the braiding technique, we will braid one braid from the entire mass of hair, which will start from the crown and go down vertically.
1. At the top of the head, separate part of the hair from all the rest. The thicker this main strand is, the thicker the braid will look.
2. Divide the separated strand of hair into three equal parts and mentally number the strands:
strand No. 1 - on the right side,
strand number 2 - in the middle,
strand number 3 - on the left side.

3. We start braiding with strand No. 1 (right). We transfer this part of the hair under strand No. 2 (middle).

4. Take strand No. 3 (left) and move it under strand No. 1, which is currently in the middle, between strands No. 3 and No. 2.

5. Now on the left we separate a small strand from the main mass of hair and connect it with strand No. 2, which is now on the left.

6. Move a new strand No. 2 under the bottom (old strand No. 2 plus a new strand).

7. Then we attach a new strand on the right side to the central strand.

8. In this way we braid to the end of the braid, each time adding new strands from the main mass of hair, either left or right.

9. We fix the end of the braid depending on the length of the hair and the imagination of the braider.
10. Smooth the hair on both sides of the braid and fix it with hairspray. We remove excess hair under the braid.
11. To give your hair more volume, before fixing it with varnish, you need to pull out the loops of the braid.
12. The hairstyle will look evening if you decorate it with beautiful hairpins and barrettes.
Reverse braid video
Reverse braid with flower
Two outer braids
Having mastered the technique of weaving such a braid, you can create a variety of hairstyles: from classic to retro, from formal to evening.
Braiding is an ancient way of styling long hair, and although women have been doing it since time immemorial, it is still very relevant today. On many of the world's catwalks you can find models with elaborate braids, and many designers prefer long-haired girls for their shows - thus complementing the created image. But instead of the usual braiding, they come up with new ways, for example, a reverse French braid, many small African braids, or an unusual wreath of beautifully braided hair.
Description of the purl French braid, weaving pattern
How to braid a braid correctly inside out - step by step
Weaving in reverse
- In the area of the crown, a large strand should be separated;
- We divide it into three parts - one lies on the right, another in the middle, and the left part;
- Start weaving from the right side, place it under the middle one;
- Then the left strand should be placed under the right, which should be located in the middle;
- Then from the left side we again select a strand and connect it with 2 curls, which should be located on the left side;
- Move medium hair under the newly created strand;
- We grab the hair in the center of the strand and create a new strand, and place it on the right side;
- Using this technique, braid all your hair, picking up hair from both the right and left each time.
- Secure the remaining hair with a decorative clip or you can tuck it under the braid with bobby pins.
- To give it a casual look, pull out a few strands of hair and coat your hair with some hairspray.
The video shows a reverse braiding diagram for beginners:
And here’s what a side braid wedding hairstyle looks like in the photo and how impressive it will look.
Some tricks for braiding hair in reverse
To make your hairstyle look original and voluminous, before styling, wash your hair, dry it naturally and comb it.
Then:
- On the back of the head, select one strand - and the thicker it is, the more voluminous the hairstyle will be;
- Divide the selected strand into three equal parts;
- Start the procedure with the left strand - take it in your hand and place it between the remaining strands;
- Further weaving will be done using the same technique, just do not forget to pick up strands from the temple areas and lay them from below.
Now the reverse braid is ready. You can diversify it a little by pulling out a little strand - exquisite carelessness will add charm and charm to your hairstyle!
Technique for braiding all hair on the side:
- Part your hair down the middle;
- Divide one of the parts into 3 equal parts again;
- During the braiding process, add small strands located on the sides of the main curl using the reverse braiding technique;
- When finished, connect the braid with the remaining side curls with an elastic band, stretch the strands a little, creating an openwork braid look.
Braid in the form of an openwork headband:

Zigzag weaving
It’s worth mentioning right away that this type of braid is most popular among young girls, and it is based on an ordinary French braid:

These are the main types of braids in reverse, and making a beautiful hairstyle will not be difficult.